Android库Volley的使用介绍
2016-01-12 09:34
369 查看
Android
Volley 是Google开发的一个网络lib,可以让你更加简单并且快速的访问网络数据。Volley库的网络请求都是异步的,你不必担心异步处理问题。
Volley的优点:
请求队列和请求优先级
请求Cache和内存管理
扩展性性强
可以取消请求
##下载和编译volley.jar
需要安装git,ant,android sdk
clone代码:
Volley 是Google开发的一个网络lib,可以让你更加简单并且快速的访问网络数据。Volley库的网络请求都是异步的,你不必担心异步处理问题。
Volley的优点:
请求队列和请求优先级
请求Cache和内存管理
扩展性性强
可以取消请求
##下载和编译volley.jar
需要安装git,ant,android sdk
clone代码:
git clone https://android.googlesource.com/platform/frameworks/volley[/code]
编译jar:android update project -p . ant jar
添加volley.jar到你的项目中
不过已经有人将volley的代码放到github上了:
https://github.com/mcxiaoke/android-volley,你可以使用更加简单的方式来使用volley:
###Maven
format: jar<dependency> <groupId>com.mcxiaoke.volley</groupId> <artifactId>library</artifactId> <version>1.0.6</version> </dependency>
###Gradle
format: jarcompile 'com.mcxiaoke.volley:library:1.0.6'
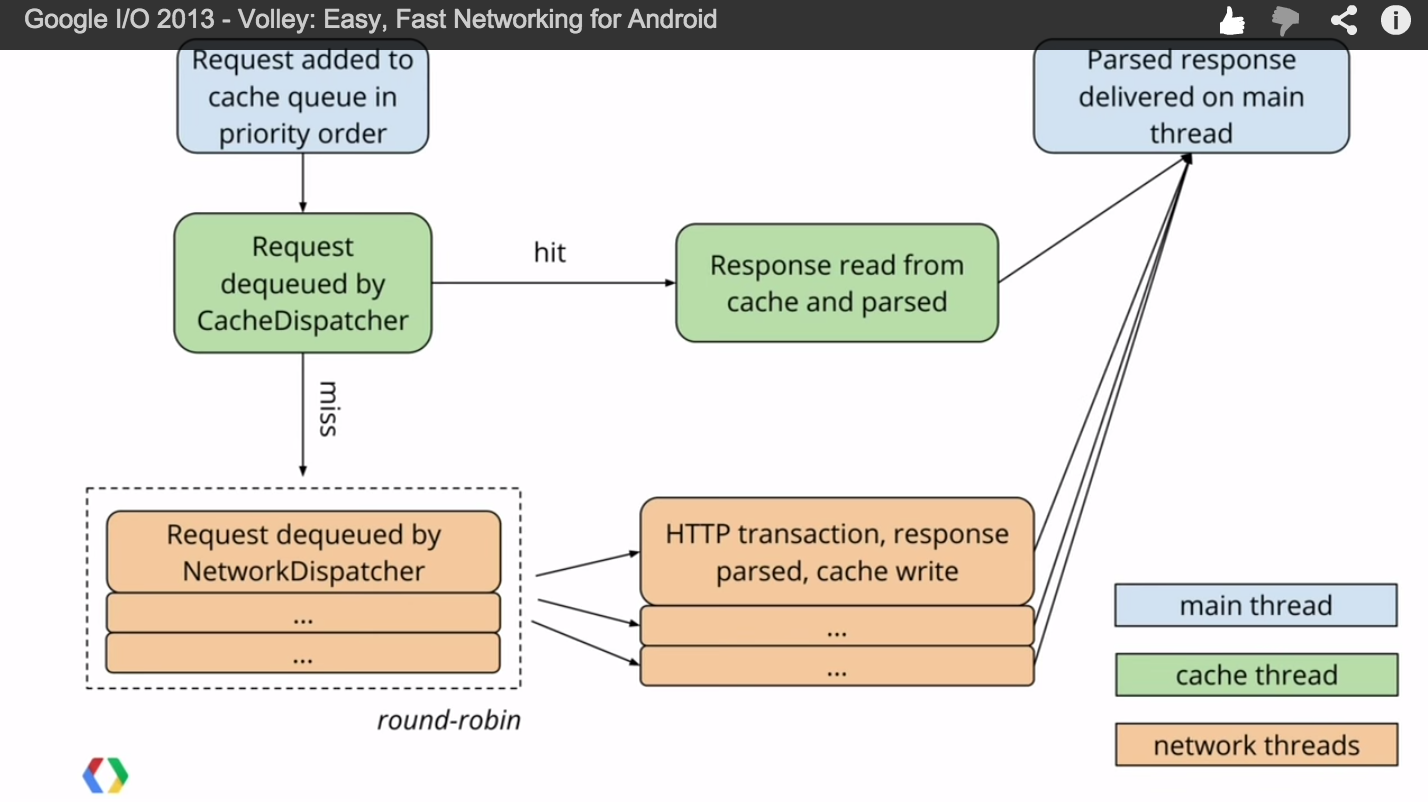
##Volley工作原理图
##创建Volley 单例
使用volley时,必须要创建一个请求队列RequestQueue,使用请求队列的最佳方式就是将它做成一个单例,整个app使用这么一个请求队列。public class AppController extends Application { public static final String TAG = AppController.class .getSimpleName(); private RequestQueue mRequestQueue; private ImageLoader mImageLoader; private static AppController mInstance; @Override public void onCreate() { super.onCreate(); mInstance = this; } public static synchronized AppController getInstance() { return mInstance; } public RequestQueue getRequestQueue() { if (mRequestQueue == null) { mRequestQueue = Volley.newRequestQueue(getApplicationContext()); } return mRequestQueue; } public ImageLoader getImageLoader() { getRequestQueue(); if (mImageLoader == null) { mImageLoader = new ImageLoader(this.mRequestQueue, new LruBitmapCache()); } return this.mImageLoader; } public <T> void addToRequestQueue(Request<T> req, String tag) { // set the default tag if tag is empty req.setTag(TextUtils.isEmpty(tag) ? TAG : tag); getRequestQueue().add(req); } public <T> void addToRequestQueue(Request<T> req) { req.setTag(TAG); getRequestQueue().add(req); } public void cancelPendingRequests(Object tag) { if (mRequestQueue != null) { mRequestQueue.cancelAll(tag); } } }
另外,你还需要一个Cache来存放请求的图片:public class LruBitmapCache extends LruCache<String, Bitmap> implement ImageCache { public static int getDefaultLruCacheSize() { final int maxMemory = (int) (Runtime.getRuntime().maxMemory() / 1024); final int cacheSize = maxMemory / 8; return cacheSize; } public LruBitmapCache() { this(getDefaultLruCacheSize()); } public LruBitmapCache(int sizeInKiloBytes) { super(sizeInKiloBytes); } @Override protected int sizeOf(String key, Bitmap value) { return value.getRowBytes() * value.getHeight() / 1024; } @Override public Bitmap getBitmap(String url) { return get(url); } @Override public void putBitmap(String url, Bitmap bitmap) { put(url, bitmap); } }
别忘记在AndroidManifest.xml文件中添加android.permission.INTERNET权限。
##创建Json请求
volley自带了JsonObjectRequest和JsonArrayRequest分别来处理Json对象请求和Json数据请求(但是voley没有使用gson库写一个GsonRequest,发送一个request,volley直接返回一个java对象,不过我们可以自己写)。
###创建json object请求
发送一个请求只要这么简单,创建一个JsonRequest对象,写好response回调接口,并把这个请求放到请求队列中就可以了。JsonArrayRequest也类似。// Tag used to cancel the request String tag_json_obj = "json_obj_req"; String url = "http://api.androidhive.info/volley/person_object.json"; JsonObjectRequest jsonObjReq = new JsonObjectRequest(Method.GET,url, null, new Response.Listener<JSONObject>() { @Override public void onResponse(JSONObject response) { Log.d(TAG, response.toString()); } }, new Response.ErrorListener() { @Override public void onErrorResponse(VolleyError error) { VolleyLog.d(TAG, "Error: " + error.getMessage()); } }); // Adding request to request queue AppController.getInstance().addToRequestQueue(jsonObjReq, tag_json_obj);
创建String请求StringRequest可以用来请求任何string类型的数据:json,xml,文本等等。// Tag used to cancel the request String tag_string_req = "string_req"; String url = "http://api.androidhive.info/volley/string_response.html"; ProgressDialog pDialog = new ProgressDialog(this); pDialog.setMessage("Loading..."); pDialog.show(); StringRequest strReq = new StringRequest(Method.GET, url, new Response.Listener<String>() { @Override public void onResponse(String response) { Log.d(TAG, response.toString()); pDialog.hide(); } }, new Response.ErrorListener() { @Override public void onErrorResponse(VolleyError error) { VolleyLog.d(TAG, "Error: " + error.getMessage()); pDialog.hide(); } }); // Adding request to request queue AppController.getInstance().addToRequestQueue(strReq, tag_string_req);上面说的都是GET请求,下面来说一下POST请求,与GET请求不同的是,只要在创建请求的时候将请求类型改为POST请求,并且override
创建POST请求Request的getParams方法即可。// Tag used to cancel the request String tag_json_obj = "json_obj_req"; String url = "http://api.androidhive.info/volley/person_object.json"; ProgressDialog pDialog = new ProgressDialog(this); pDialog.setMessage("Loading..."); pDialog.show(); JsonObjectRequest jsonObjReq = new JsonObjectRequest(Method.POST, url, null, new Response.Listener<JSONObject>() { @Override public void onResponse(JSONObject response) { Log.d(TAG, response.toString()); pDialog.hide(); } }, new Response.ErrorListener() { @Override public void onErrorResponse(VolleyError error) { VolleyLog.d(TAG, "Error: " + error.getMessage()); pDialog.hide(); } }) { @Override protected Map<String, String> getParams() { Map<String, String> params = new HashMap<String, String>(); params.put("name", "Androidhive"); params.put("email", "abc@androidhive.info"); params.put("password", "password123"); return params; } }; // Adding request to request queue AppController.getInstance().addToRequestQueue(jsonObjReq, tag_json_obj);
##添加请求头部信息// Tag used to cancel the request String tag_json_obj = "json_obj_req"; String url = "http://api.androidhive.info/volley/person_object.json"; ProgressDialog pDialog = new ProgressDialog(this); pDialog.setMessage("Loading..."); pDialog.show(); JsonObjectRequest jsonObjReq = new JsonObjectRequest(Method.POST,url, null,new Response.Listener<JSONObject>() { @Override public void onResponse(JSONObject response) { Log.d(TAG, response.toString()); pDialog.hide(); } }, new Response.ErrorListener() { @Override public void onErrorResponse(VolleyError error) { VolleyLog.d(TAG, "Error: " + error.getMessage()); pDialog.hide(); } }) { /** * Passing some request headers * */ @Override public Map<String, String> getHeaders() throws AuthFailureError { HashMap<String, String> headers = new HashMap<String, String>(); headers.put("Content-Type", "application/json"); headers.put("apiKey", "xxxxxxxxxxxxxxx"); return headers; } }; // Adding request to request queue AppController.getInstance().addToRequestQueue(jsonObjReq, tag_json_obj);
##创建Image请求
Volley库中自带了NetworkImageView类,这个ImageView可以自动使用volley下载图片
###用NetworkImageView加载图片
首先,说明一下,加载图片的原理:NetworkImageView加载图片需要一个ImageLoader和一个图片URL,这个ImageLoader对象需要一个请求队列对象和ImageCahe对象。调用NetworkImageView的setUrl方法后,首先会判断当前ImageView的URL和新传入的URL是否一致,如果相同,就不用再发送http请求了,如果不同,那么就使用ImageLoader对象来发送http请求获取图片。ImageLoader imageLoader = AppController.getInstance().getImageLoader(); // If you are using NetworkImageView imgNetWorkView.setImageUrl(Const.URL_IMAGE, imageLoader);
加载一个图片只要这么简单~~~
###用ImageView来加载图片
这个过程和NetworkImageView类似ImageLoader imageLoader = AppController.getInstance().getImageLoader(); // If you are using normal ImageView imageLoader.get(Const.URL_IMAGE, new ImageListener() { @Override public void onErrorResponse(VolleyError error) { Log.e(TAG, "Image Load Error: " + error.getMessage()); } @Override public void onResponse(ImageContainer response, boolean arg1) { if (response.getBitmap() != null) { // load image into imageview imageView.setImageBitmap(response.getBitmap()); } } });
可以再简单一点:// Loading image with placeholder and error image imageLoader.get(Const.URL_IMAGE, ImageLoader.getImageListener(imageView, R.drawable.ico_loading, R.drawable.ico_error));ImageLoader.getImageListener方法中已经写了一个默认的ImageListener了
##Volley Cache
volley中自带了强大的cache机制来管理请求cache,这会减少网络请求次数和用户等待时间。
###从请求Cache中加载请求Cache cache = AppController.getInstance().getRequestQueue().getCache(); Entry entry = cache.get(url); if(entry != null){ try { String data = new String(entry.data, "UTF-8"); // handle data, like converting it to xml, json, bitmap etc., } catch (UnsupportedEncodingException e) { e.printStackTrace(); } } }else{ // Cached response doesn't exists. Make network call here }
###使请求缓存失效
失效并不意味这删除,Volley还会继续使用缓存的对象直到从服务器上获取到了新的数据,新的数据会覆盖旧的数据。AppController.getInstance().getRequestQueue().getCache().invalidate(url, true);
###关闭Cache
如果你想将某一个请求的Cache功能关闭,直接调用Request的setShouldCache()方法就可以:// String request StringRequest stringReq = new StringRequest(....); // disable cache stringReq.setShouldCache(false);
###将某一URL的Cache删除
调用Cache的remove方法可以删除这个URL的cache:AppController.getInstance().getRequestQueue().getCache().remove(url);
###删除所有的CacheAppController.getInstance().getRequestQueue().getCache().clear();
##取消请求
在你添加一个请求到请求队列中的时候,你可以发现,addToRequestQueue(request, tag)方法还接受一个tag参数,这个tag就是用来标记某一类请求的,这样就可以取消这个tag的所有请求了:String tag_json_arry = "json_req"; ApplicationController.getInstance().getRequestQueue().cancelAll("feed_request");
##请求优先级
在创建一个request的时候可以OverrideRequest方法的getPriority方法返回一个优先级,优先级分为:Normal,
Low, Immediate, Highprivate Priority priority = Priority.HIGH; StringRequest strReq = new StringRequest(Method.GET, Const.URL_STRING_REQ, new Response.Listener<String>() { @Override public void onResponse(String response) { Log.d(TAG, response.toString()); msgResponse.setText(response.toString()); hideProgressDialog(); } }, new Response.ErrorListener() { @Override public void onErrorResponse(VolleyError error) { VolleyLog.d(TAG, "Error: " + error.getMessage()); hideProgressDialog(); } }) { @Override public Priority getPriority() { return priority; } };
##Missing! 创建xml请求
就像创建Gson请求一样,你可以自定义一个XMLRequest类来请求xml数据

相关文章推荐
- android单元测试
- Android内存泄漏终极解决篇(上)
- Android开发之全屏显示的两种方法
- Android编程实现自动调整TextView字体大小以适应文字长度的方法
- Android 面向协议编程 体会优雅编程之旅
- Android 面向协议编程 体会优雅编程之旅
- Android用ImageView显示本地和网上的图片(转)
- android完美实现 拍照 选择图片 剪裁等代码分享
- 使用HandlerThread实现后台服务轮询执行任务
- Android Activity学习笔记——Activity的启动和创建
- Android studio JNI(NDK) 开发
- 详解Android中实现热更新的原理
- Android资源目录文件夹介绍
- 推荐提升Android性能的建议
- Android简介
- Android编程经典代码集锦(复制,粘贴,浏览器调用,Toast显示,自定义Dialog等)
- Android手机多媒体的应用
- 《Android源码设计模式解析与实战》读书笔记(十九)
- 最优雅退出 Android 应用程序的 6 种方式
- 推荐提升 Android 性能的建议