linux 内核模块编程之LED驱动程序(六)
2016-01-11 19:36
671 查看
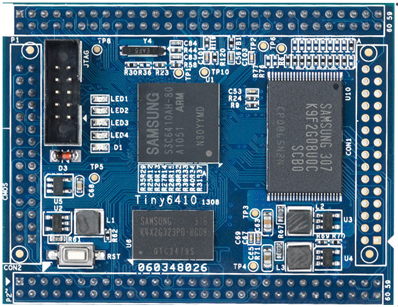
我使用的是tiny6410的核心板,板子如下,淘宝可以买到
为了不与板子上的任何驱动发生IO冲突,我使用CON1那一排没用到的IO口,引脚如下
在板子的手册中,电路如下
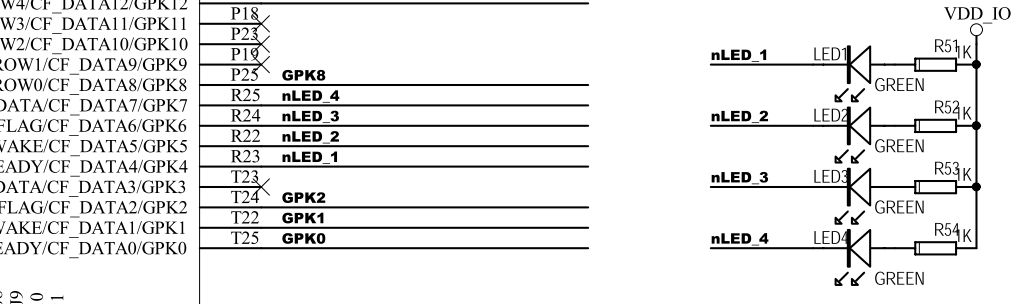
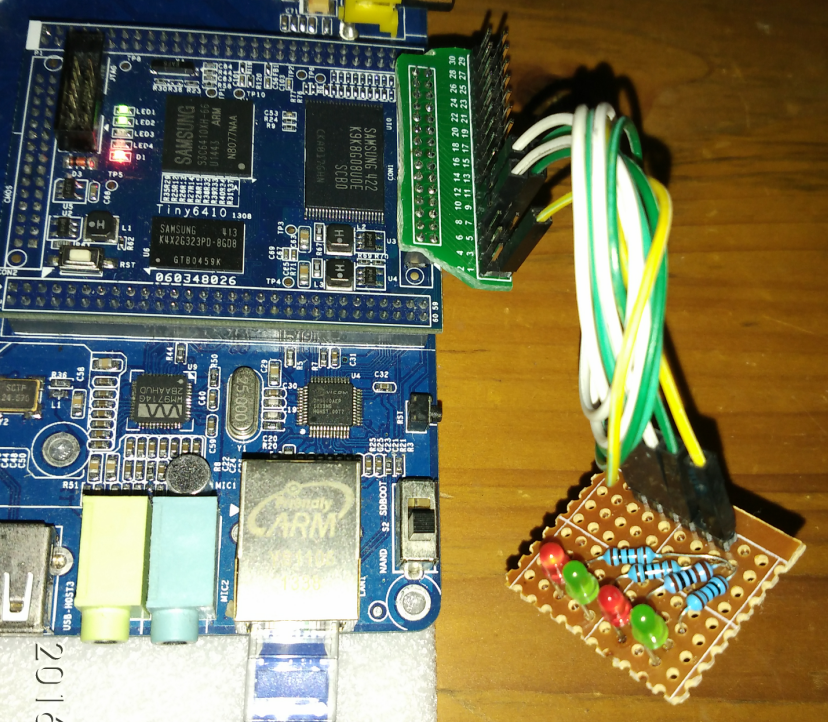
这个是板子上的4个LED的电路图,当然我不可能用这4个led来做实验,但是除了IO口不一样外,电路其实是可以作为参考的,于是我手动焊了个,如下:
由电路图也是可以看出,他是低电平有效的
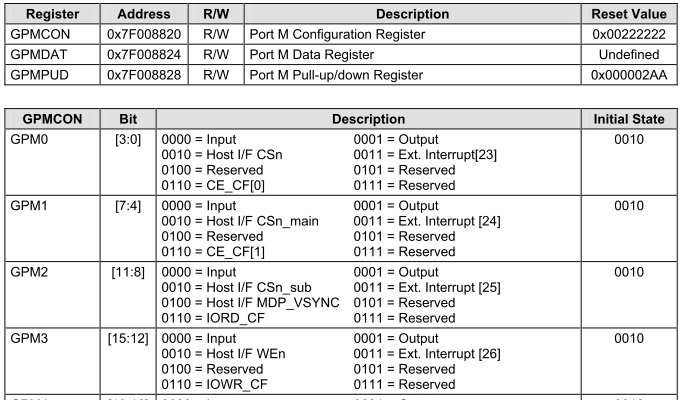
关于s3c6410的的IO说明如下
myled.c文件如下
#include <linux/module.h>
#include <linux/kernel.h>
#include <linux/fs.h>
#include <linux/uaccess.h> /*copy_to_user,copy_from_user*/
#include <linux/io.h> /*inl(),outl()*/
#include <linux/miscdevice.h>
#include <linux/pci.h>
#include <asm/io.h>
#define GPBCON 0x7F008820 //物理地址
#define GPBDAT 0x7F008824 //物理地址
static long S3C64XX_GPMCON;
static long S3C64XX_GPMDAT;
#define LED_MAJOR 240 /*主设备号*/
int led_open(struct inode *inode,struct file *file)
{
unsigned tmp;
S3C64XX_GPMCON = ioremap(GPBCON, 4);//物理地址转为虚拟地址
S3C64XX_GPMDAT = ioremap(GPBDAT, 4);
tmp=inl(S3C64XX_GPMCON);
printk("the pre GPMCON is %x",tmp);
tmp=inl(S3C64XX_GPMDAT);
printk("the pre GPMDAT is %x",tmp);
//这里为什么是0x00111111 ??
outl(0x00111111,S3C64XX_GPMCON); /*向GPMCON命令端口写命令字,设置GPM0-5为output口*/
printk("#############open#############");
return 0;
}
static ssize_t led_read(struct file *file,char __user *buf,size_t count,loff_t * f_pos)
{
unsigned tmp=inl(S3C64XX_GPMDAT);
int num=copy_to_user(buf,&tmp,count);
if(num==0)
printk("copy successfully");
else printk("sorry copy failly");
printk("the GPMDAT is %x.",tmp);
return count;
}
static ssize_t led_write(struct file * file,const char __user * buf,size_t count,loff_t * f_pos) //我是通过write()来控制LED灯的,也可以通过ioctl()来控制
{
char kbuf[10];
printk("###########write###########");
int num=copy_from_user(kbuf,buf,count);
if(num==0)
printk("copy successfully");
else printk("sorry copy failly");
printk("##the kbuf is %c",kbuf[0]);
switch(kbuf[0])
{
case 0://off
//这里为什么是 0xFF ?
outl(0xff,S3C64XX_GPMDAT); /*拉高GPMDAT[0:5]的引脚,使LED灯灭,因为LED是低电平有电流通过*/
break;
case 1://on
//这里为什么是 0x00 ?
outl(0x00,S3C64XX_GPMDAT); /*拉低GPMDAT[0:5]的引脚,使LED灯亮*/
break;
default:
break;
}
return count;
}
int led_release(struct inode *inode,struct file *file)
{
printk("#######release##########");
return 0;
}
struct file_operations led_fops={
.owner = THIS_MODULE,
.open = led_open,
.read = led_read,
.write = led_write,
.release = led_release,
};
int __init led_init(void)
{
int rc;
printk("Test led dev\n");
rc=register_chrdev(LED_MAJOR,"led",&led_fops); //注册字符设备
if(rc<0)
{
printk("register %s char dev error\n","led");
return -1;
}
printk("OK!\n");
return 0;
}
void __exit led_exit(void)
{
unregister_chrdev(LED_MAJOR,"led");
printk("module exit\n");
}
module_init(led_init);
module_exit(led_exit);
makefile文件如下
ifneq ($(KERNELRELEASE),)
obj-m := myled.o
else
KERNELDIR ?= /home/grb/grb/arm/linux-2.6.38/
PWD := $(shell pwd)
all:
$(MAKE) -C $(KERNELDIR) M=$(PWD) modules
clean:
rm -f *.ko *.o *.mod.o *.mod.c *.symvers *~ *.order
endif
测试用的应用程序代码如下
#include <stdio.h>
#include <sys/types.h>
#include <sys/stat.h>
#include <fcntl.h>
int main()
{
printf("hello led device .\n");
int buf[10]={0,1,0,1};
printf("1\n");
int fd=open("/dev/led",2,0777);
printf("2\n");
if(fd<0){
printf("can't open led device\n");
return -1;
}
printf("open the led device successfully.\n");
while(1)
{
int num=write(fd,&buf[0],1);
if(num<0)
printf("we set the led failly.\n");
else
printf("we set the led off\n");
sleep(1);
write(fd,&buf[1],1);
printf("we set the led on\n");
sleep(1);
}
close(fd);
printf("bye led device .\n");
return 0;
}
将上面的文件分别编译成驱动文件:myled.ko和应用程序out文件,然后拷贝到板子上。本人开发板上跑的是linux 2.6.38的内核,这个关系不大,只要你编译时所用的内核和板子的内核版本一致就好。
然后按照下面步骤执行
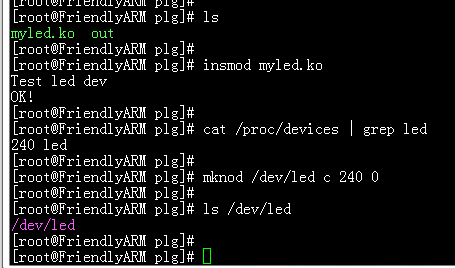
此时我们的驱动就已经安装好了,接下来运行我们的应用程序out就可以了,运行如下

然后就可以看到我们的led在一闪一闪的了。
代码还有很多我也不是很明白,希望大伙多指点指点
参考网址:
http://bbs.csdn.net/topics/391038318 http://blog.csdn.net/wq897387/article/details/7387615
为了不与板子上的任何驱动发生IO冲突,我使用CON1那一排没用到的IO口,引脚如下
| LED1 | LED2 | LED3 | LED4 | |
| 对应GPIO | GPM0 | GPM1 | GPM2 | GPM3 |
这个是板子上的4个LED的电路图,当然我不可能用这4个led来做实验,但是除了IO口不一样外,电路其实是可以作为参考的,于是我手动焊了个,如下:
由电路图也是可以看出,他是低电平有效的
关于s3c6410的的IO说明如下
myled.c文件如下
#include <linux/module.h>
#include <linux/kernel.h>
#include <linux/fs.h>
#include <linux/uaccess.h> /*copy_to_user,copy_from_user*/
#include <linux/io.h> /*inl(),outl()*/
#include <linux/miscdevice.h>
#include <linux/pci.h>
#include <asm/io.h>
#define GPBCON 0x7F008820 //物理地址
#define GPBDAT 0x7F008824 //物理地址
static long S3C64XX_GPMCON;
static long S3C64XX_GPMDAT;
#define LED_MAJOR 240 /*主设备号*/
int led_open(struct inode *inode,struct file *file)
{
unsigned tmp;
S3C64XX_GPMCON = ioremap(GPBCON, 4);//物理地址转为虚拟地址
S3C64XX_GPMDAT = ioremap(GPBDAT, 4);
tmp=inl(S3C64XX_GPMCON);
printk("the pre GPMCON is %x",tmp);
tmp=inl(S3C64XX_GPMDAT);
printk("the pre GPMDAT is %x",tmp);
//这里为什么是0x00111111 ??
outl(0x00111111,S3C64XX_GPMCON); /*向GPMCON命令端口写命令字,设置GPM0-5为output口*/
printk("#############open#############");
return 0;
}
static ssize_t led_read(struct file *file,char __user *buf,size_t count,loff_t * f_pos)
{
unsigned tmp=inl(S3C64XX_GPMDAT);
int num=copy_to_user(buf,&tmp,count);
if(num==0)
printk("copy successfully");
else printk("sorry copy failly");
printk("the GPMDAT is %x.",tmp);
return count;
}
static ssize_t led_write(struct file * file,const char __user * buf,size_t count,loff_t * f_pos) //我是通过write()来控制LED灯的,也可以通过ioctl()来控制
{
char kbuf[10];
printk("###########write###########");
int num=copy_from_user(kbuf,buf,count);
if(num==0)
printk("copy successfully");
else printk("sorry copy failly");
printk("##the kbuf is %c",kbuf[0]);
switch(kbuf[0])
{
case 0://off
//这里为什么是 0xFF ?
outl(0xff,S3C64XX_GPMDAT); /*拉高GPMDAT[0:5]的引脚,使LED灯灭,因为LED是低电平有电流通过*/
break;
case 1://on
//这里为什么是 0x00 ?
outl(0x00,S3C64XX_GPMDAT); /*拉低GPMDAT[0:5]的引脚,使LED灯亮*/
break;
default:
break;
}
return count;
}
int led_release(struct inode *inode,struct file *file)
{
printk("#######release##########");
return 0;
}
struct file_operations led_fops={
.owner = THIS_MODULE,
.open = led_open,
.read = led_read,
.write = led_write,
.release = led_release,
};
int __init led_init(void)
{
int rc;
printk("Test led dev\n");
rc=register_chrdev(LED_MAJOR,"led",&led_fops); //注册字符设备
if(rc<0)
{
printk("register %s char dev error\n","led");
return -1;
}
printk("OK!\n");
return 0;
}
void __exit led_exit(void)
{
unregister_chrdev(LED_MAJOR,"led");
printk("module exit\n");
}
module_init(led_init);
module_exit(led_exit);
makefile文件如下
ifneq ($(KERNELRELEASE),)
obj-m := myled.o
else
KERNELDIR ?= /home/grb/grb/arm/linux-2.6.38/
PWD := $(shell pwd)
all:
$(MAKE) -C $(KERNELDIR) M=$(PWD) modules
clean:
rm -f *.ko *.o *.mod.o *.mod.c *.symvers *~ *.order
endif
测试用的应用程序代码如下
#include <stdio.h>
#include <sys/types.h>
#include <sys/stat.h>
#include <fcntl.h>
int main()
{
printf("hello led device .\n");
int buf[10]={0,1,0,1};
printf("1\n");
int fd=open("/dev/led",2,0777);
printf("2\n");
if(fd<0){
printf("can't open led device\n");
return -1;
}
printf("open the led device successfully.\n");
while(1)
{
int num=write(fd,&buf[0],1);
if(num<0)
printf("we set the led failly.\n");
else
printf("we set the led off\n");
sleep(1);
write(fd,&buf[1],1);
printf("we set the led on\n");
sleep(1);
}
close(fd);
printf("bye led device .\n");
return 0;
}
将上面的文件分别编译成驱动文件:myled.ko和应用程序out文件,然后拷贝到板子上。本人开发板上跑的是linux 2.6.38的内核,这个关系不大,只要你编译时所用的内核和板子的内核版本一致就好。
然后按照下面步骤执行
此时我们的驱动就已经安装好了,接下来运行我们的应用程序out就可以了,运行如下
然后就可以看到我们的led在一闪一闪的了。
代码还有很多我也不是很明白,希望大伙多指点指点
参考网址:
http://bbs.csdn.net/topics/391038318 http://blog.csdn.net/wq897387/article/details/7387615

相关文章推荐
- Linux socket 初步
- Linux Kernel 4.0 RC5 发布!
- linux lsof详解
- linux 文件权限
- Linux 执行数学运算
- 10 篇对初学者和专家都有用的 Linux 命令教程
- Linux 与 Windows 对UNICODE 的处理方式
- Ubuntu12.04下QQ完美走起啊!走起啊!有木有啊!
- 解決Linux下Android开发真机调试设备不被识别问题
- 运维入门
- 运维提升
- Linux 自检和 SystemTap
- Ubuntu Linux使用体验
- c语言实现hashmap(转载)
- Linux 信号signal处理机制
- linux下mysql添加用户
- Scientific Linux 5.5 图形安装教程