FragmentTabHost实现底部导航菜单
2015-12-27 23:32
573 查看
闲话少说直接说正题,最近一直在做底部导航菜单的编写,尝试了各种办法(自定义控件等),实现了底部导航菜单之后与fragment结合的时候又遇到很多问题,还要写方法去showFragment和hideFragment,这个过程虽说不难但是很繁琐,加大了代码量。
底部导航菜单实现的方法 ,介绍实现的三种方法(从最初的到现在最新的方法)
先看实现效果,效果中看到导航两行文字 是因为图片是用的自带文字的icon ,实际使用中根据需求确定
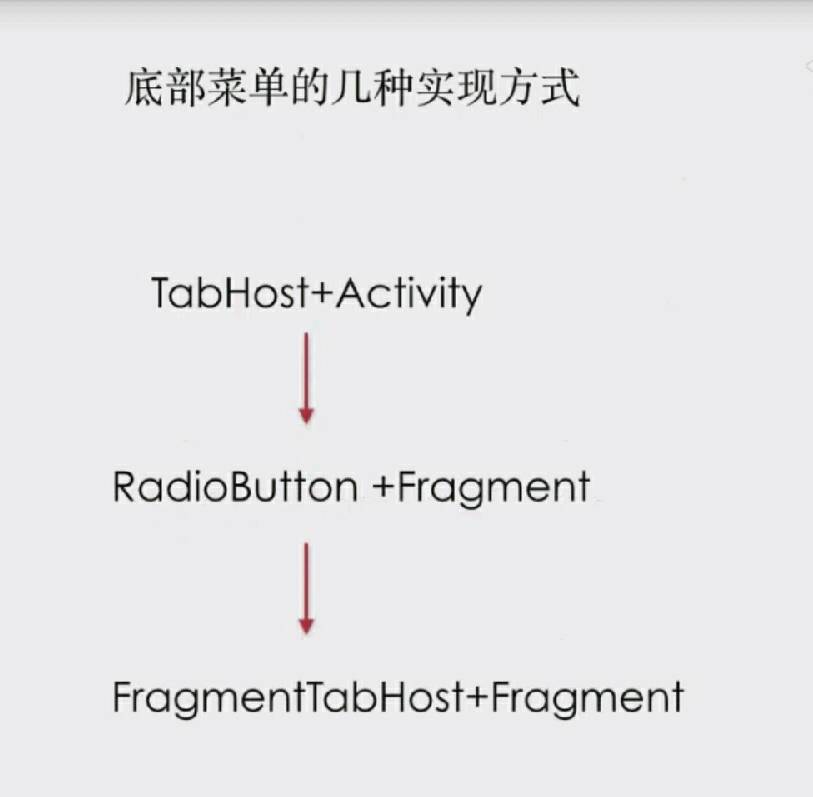
本文主要介绍FragmentTabHost+Fragment的实现方式:分三步实现
findViewById
setup()
addTab
下边给出官方事例
this can also be used inside of a fragment through fragment nesting:
以上是官方给了在activity和fragment的实现方法,但实现中我们对其封装处理。
下边给出我们的使用方法
Tab文件
布局文件
导航字体颜色选择器,选中时候显示
注意:这个文件要建在res资源文件下的color文件里
图片选择器的文件
tab_item布局文件
这样实现后会发现,每次tab间的切换fragment都会重新调用onCreateView方法重绘UI.
解决方法,在fragment onCreateView 里缓存View.
demo源码下载地址
底部导航菜单实现的方法 ,介绍实现的三种方法(从最初的到现在最新的方法)
先看实现效果,效果中看到导航两行文字 是因为图片是用的自带文字的icon ,实际使用中根据需求确定
本文主要介绍FragmentTabHost+Fragment的实现方式:分三步实现
findViewById
setup()
addTab
下边给出官方事例
/**
* This demonstrates how you can implement switching between the tabs of a
* TabHost through fragments, using FragmentTabHost.
*/
public class FragmentTabs extends FragmentActivity {
private FragmentTabHost mTabHost;

@Override
protected void onCreate(Bundle savedInstanceState) {
super.onCreate(savedInstanceState);

setContentView(R.layout.fragment_tabs);
mTabHost = (FragmentTabHost)findViewById(android.R.id.tabhost);
mTabHost.setup(this, getSupportFragmentManager(), R.id.realtabcontent);

mTabHost.addTab(mTabHost.newTabSpec("simple").setIndicator("Simple"),
FragmentStackSupport.CountingFragment.class, null);
mTabHost.addTab(mTabHost.newTabSpec("contacts").setIndicator("Contacts"),
LoaderCursorSupport.CursorLoaderListFragment.class, null);
mTabHost.addTab(mTabHost.newTabSpec("custom").setIndicator("Custom"),
LoaderCustomSupport.AppListFragment.class, null);
mTabHost.addTab(mTabHost.newTabSpec("throttle").setIndicator("Throttle"),
LoaderThrottleSupport.ThrottledLoaderListFragment.class, null);
}
}
this can also be used inside of a fragment through fragment nesting:
import com.example.android.supportv4.R;

import android.os.Bundle;
import android.support.v4.app.Fragment;
import android.support.v4.app.FragmentTabHost;
import android.view.LayoutInflater;
import android.view.View;
import android.view.ViewGroup;

public class FragmentTabsFragmentSupport extends Fragment {
private FragmentTabHost mTabHost;

@Override
public View onCreateView(LayoutInflater inflater, ViewGroup container,
Bundle savedInstanceState) {
mTabHost = new FragmentTabHost(getActivity());
mTabHost.setup(getActivity(), getChildFragmentManager(), R.id.fragment1);

mTabHost.addTab(mTabHost.newTabSpec("simple").setIndicator("Simple"),
FragmentStackSupport.CountingFragment.class, null);
mTabHost.addTab(mTabHost.newTabSpec("contacts").setIndicator("Contacts"),
LoaderCursorSupport.CursorLoaderListFragment.class, null);
mTabHost.addTab(mTabHost.newTabSpec("custom").setIndicator("Custom"),
LoaderCustomSupport.AppListFragment.class, null);
mTabHost.addTab(mTabHost.newTabSpec("throttle").setIndicator("Throttle"),
LoaderThrottleSupport.ThrottledLoaderListFragment.class, null);

return mTabHost;
}

@Override
public void onDestroyView() {
super.onDestroyView();
mTabHost = null;
}
}
以上是官方给了在activity和fragment的实现方法,但实现中我们对其封装处理。
下边给出我们的使用方法
/**
* 初始换tabhost
*/
private void initTab() {
//把需要用到的title    icon    fragment封装到tabbean对象
Tab home = new Tab(R.string.home, R.drawable.home_btn_selector, HomeFragment.class);
Tab find = new Tab(R.string.find, R.drawable.faxian_btn_selector, FindFragment.class);
Tab cart = new Tab(R.string.cart, R.drawable.cart_btn_selector, CartFragment.class);
Tab category = new Tab(R.string.category, R.drawable.category_btn_selector, CategoryFragment.class);
Tab mine = new Tab(R.string.mine, R.drawable.mine_btn_selector, MineFragment.class);
tabs.add(home);
tabs.add(find);
tabs.add(cart);
tabs.add(category);
tabs.add(mine);

mInflater = LayoutInflater.from(this);
//获取FragmentTabHost对象
mTabHost = (FragmentTabHost) findViewById(R.id.tabhost);
//设置setup方法
mTabHost.setup(this, getSupportFragmentManager(), R.id.realtabcontent);
//取消默认的Tab间的竖线显示
mTabHost.getTabWidget().setShowDividers(LinearLayout.SHOW_DIVIDER_NONE);
//设置默认选中第一个
mTabHost.setCurrentTab(0);

//循环把自定义的tab添加上去
for (Tab tab : tabs) {
TabHost.TabSpec tabSpec = mTabHost.newTabSpec(getString(tab.getTitle()));
tabSpec.setIndicator(buildIndicator(tab));
mTabHost.addTab(tabSpec, tab.getFragment(), null);
}

}

/**
* 构建Indicator
* @param tab
* @return
*/
private View buildIndicator(Tab tab) {
View view = mInflater.inflate(R.layout.tab_item, null);
ImageView icon = (ImageView) view.findViewById(R.id.icon_iv);
TextView title = (TextView) view.findViewById(R.id.title_tv);

icon.setBackgroundResource(tab.getIcon());
title.setText(tab.getTitle());

return view;
}
Tab文件
public class Tab {
private int title;
private int icon;
private Class fragment;

public Tab(int title, int icon, Class fragment) {
this.title = title;
this.icon = icon;
this.fragment = fragment;
}
}
布局文件
<?xml version="1.0" encoding="utf-8"?>
<LinearLayout xmlns:android="http://schemas.android.com/apk/res/android"
android:orientation="vertical" android:layout_width="match_parent"
android:layout_height="match_parent">

//这是我们替换fragment的真正布局
<FrameLayout
android:id="@+id/realtabcontent"
android:layout_weight="1"
android:layout_width="match_parent"
android:layout_height="0dp">

</FrameLayout>
<android.support.v4.app.FragmentTabHost
android:id="@+id/tabhost"
android:layout_width="match_parent"
android:layout_height="wrap_content">
//官方建议加一个这个布局文件 虽然用不到(那就按照官方这样写)
<FrameLayout
android:id="@+id/tabcontent"
android:layout_width="0dp"
android:layout_height="0dp">

</FrameLayout>
</android.support.v4.app.FragmentTabHost>
</LinearLayout>
导航字体颜色选择器,选中时候显示
注意:这个文件要建在res资源文件下的color文件里
<?xml version="1.0" encoding="utf-8"?>
<selector xmlns:android="http://schemas.android.com/apk/res/android">

<item android:color="#eb4f38" android:state_selected="true"/>
<item android:color="#eb4f38" android:state_active="true"/>
<item android:color="#a9b7b7" android:state_selected="false"/>
<item android:color="#a9b7b7" android:state_active="false"/>

</selector>
图片选择器的文件
<?xml version="1.0" encoding="utf-8"?>
<selector xmlns:android="http://schemas.android.com/apk/res/android">
<item android:drawable="@mipmap/main_bottom_tab_home_normal" android:state_selected="true" />
<item android:drawable="@mipmap/main_bottom_tab_home_normal" android:state_pressed="true" />
<item android:drawable="@mipmap/main_bottom_tab_home_normal" android:state_checked="true" />
<item android:drawable="@mipmap/main_bottom_tab_home_focus" />
</selector>
tab_item布局文件
<?xml version="1.0" encoding="utf-8"?>
<LinearLayout xmlns:android="http://schemas.android.com/apk/res/android"
android:layout_width="match_parent"
android:layout_height="wrap_content"
android:background="#888888"
android:orientation="vertical"
android:padding="2dp">

<ImageView
android:id="@+id/icon_iv"
android:layout_width="wrap_content"
android:layout_height="wrap_content"
android:layout_gravity="center" />

<TextView
android:id="@+id/title_tv"
android:layout_width="wrap_content"
android:layout_height="wrap_content"
android:layout_gravity="center"
android:visibility="visible"
//调取自定义的字体颜色选择器
android:textColor="@color/selector_tab_text"
android:textSize="10sp" />
</LinearLayout>
这样实现后会发现,每次tab间的切换fragment都会重新调用onCreateView方法重绘UI.
解决方法,在fragment onCreateView 里缓存View.
private View rootView;

@Nullable
@Override
public View onCreateView(LayoutInflater inflater, ViewGroup container, Bundle savedInstanceState) {

if (rootView == null) {
rootView = LayoutInflater.from(getActivity()).inflate(R.layout.fragment_home, container, false);
}
// 缓存的rootView需要判断是否已经被加过parent,如果有parent需要从parent删除,
// 要不然会发生这个rootview已经有parent的错误。
ViewGroup parent = ((ViewGroup) rootView.getParent());
if (parent != null) {
parent.removeView(rootView);
}
return rootView;
}
demo源码下载地址

相关文章推荐
- tabBar点击事件以及返回跟vc的监控方法
- java 遍历map
- java 遍历map
- Servlet forward & include
- iOS蓝牙4.0开发例子
- Unity3D 2D游戏开发 官方教程。(一)
- 参加老男孩培训三个月的心得体会
- 浅析JVM内存结构和6大区域(转)
- JSON解析
- MySql重置密码
- 英语总结系列(十二):一年英语转变之路
- java判断字符串为空的方法
- java判断字符串为空的方法
- 用Swift实现一个弹性动画
- 控制台小游戏之俄罗斯方块
- POCO CMake编译及使用
- 基本包装类
- Linux shell 编程
- 内存查看器
- 安装Python第三方函数库方法