Text
2015-12-20 16:40
302 查看
出现在应用界面上的文本往往以NSString或者NSAttributedString的形式存在,NSAttributedString为NSString添加了文本样式,包括不同的字符样式和段落级别的特点,像对齐(alignment)、行距(line spacing)和边距(margin)
为了让你的NSString或者NSAttributedString出现在界面上,你可以将它绘制到图形上下文(graphics context)或者将它交给界面对象处理。
自我绘制的文本(self-drawing text):NSString和NSAttributedString都拥有将自身绘制到任何图形上下文的方法
绘制文本的界面对象(text-drawing interface object):知道如何绘制NSString和NSAttributedString的界面对象有:UILabel,展示文本,可以包含多行文本,既不能滚动,也不能编辑;UITextField,展示单行的可编辑的文本,可能有一个边框、背景图片,在左端和右端有覆盖视图;UITextView,展示可滚动的多行文本,可编辑的。
在底层,所有的文本绘制都是通过底层的技术来完成的,就是拥有C样式API的Core Text。iOS7之前,某些强大、有用的文本绘制特性只能通过Core Text来实现,但是现在,iOS提供了Text Kit,一个基于Core Text的中间级技术。UITextView很大程度上只是对Text Kit的轻量级包装,Text Kit也可以直接绘制到图形上下文上。
一.字体和字体描述器(Fonts and Font Descriptors)
有两种方式来描述字体:UIFont(用作NSString或者UIKit界面对象)和CTFont(用作Core Text)。iOS7之前,UIFont和CTFont并非toll-free bridged,但是现在它们是toll-free bridged。另一个重要的Core Text类型是CTFontDescriptor,与UIFontDescriptor是toll-free bridged,对执行字体变换是有帮助的。
1.字体(Fonts)
字体(UIFont,与Core Text的CTFont是toll-free bridged)是非常简单的对象,你可以调用UIFont初始化器
通过名称声明字体,你必须要知道字体的名称。每个字体变体(bold、italic等)看作是不同的字体,字体变体被归为族(families)。UIFont提供了类方法来告诉你族的名称,以及族中字体的名称。下面的代码会在控制台中打印已经安装的字体的名称:
当你调用init(name:size:)方法时,你可以通过它的族名或者字体名来声明一个字体,例如,”Avenir”是族名,而这个族中的字体有”Avenir-Book”。这两个都可以作为
系统字体(例如,默认使用在UIButton上的字体)可以通过调用
2.动态类型字体(Dynamic Type fonts)
动态类型字体(iOS7引入)有两个主要特点:
尺寸取决于用户:用户可以在系统的Setting应用中来调整动态类型字体
通过角色(role)来声明:声明动态类型字体,并非通过尺寸,而是它在布局中扮演的角色。调用UIFont的类方法
实际上,动态类型的字体并非动态的,因为只会在用户调用
幸运的是,从iOS8开始,UITableView的cell包含的label会自动监听UIContentSizeCategoryDidChangeNotification通知,并更新字体。所以动态类型在tableview中时动态的。
3.增加字体(Add fonts)
并没有限制只能使用系统已安装的字体,有两种方式来获取额外的字体:
将字体包含在应用的bundle中:包含在应用bundle顶层的字体会在应用启动时被加载,在Info.plist中包含
详细做法请参考:iOS上使用自定义ttf字体
即时下载字体:所有的OS X字体都可以从苹果服务器上下载,你可以在应用运行的时候下载并安装想要的字体。要即时下载字体,你要将字体声明成字体描述器(font descriptor),需要Core Text(import CoreText)的
结果如下:
4.字体描述器(Font Descriptor)
字体描述器(UIFontDescriptor,与Core Text的CTFontDescriptor是toll-free bridged)是声明字体的一种方式,或者不同的字体间描述的转换。比如,给定一个字体描述
如果desc一开始是对
你可以通过字体描述器的初始化方法
这种技术也可以用来获取各种样式的动态类型字体(Dynamic Type fonts),UIFontDescriptor的类方法
你可以通过UIFontDescriptor的fontAttributes方法来探索下字体的特点,该方法返回字体属性和值的字典。
字体描述器的另一个用处就是获取单个字体隐藏的内置排版特点。下面的例子中,会获取Didot字体的变体,将会绘制字体”帽子”(cap):
效果图:
排版特点标识常量,例如
二.带有属性的字符串(Attributed Strings)
1.带有属性的字符串的属性(Attributed String Attributes)
应用到字符串上的属性是描述在字典中的,每个属性都有一个预定义的名称,作为字典中的键。下面是一些最重要的属性(完整的列表,请看 NSAttributedString UIKit Additions Reference)
提示,属性名的形式是:
NSParagraphStyle的重要属性:
如果整个字符串拥有相同的属性的话,你可以调用
为了创建NSParagraphStyle,你需要使用它的可变的子类NSMutableParagraphStyle(因为历史原因,NSParagraphStyle自身的属性全部是只读的)。只需对一个段落的第一个字符应用段落样式就够了,换句话说,一个段落的第一个字符的段落样式就能表明整个段落该如何渲染。
NSAttributedString和NSParagraphStyle都会为所有的属性设置默认值,所以你只需设置你关心的属性即可。
2.创建带有属性的字符串(Attributed String)
下面,将带有属性的字符串绘制在无法交互的UITextView上,它的背景色是白色的,但是父视图的背景色是灰色的,所以你可以看到相对于文本的text view的bounds。
效果如图:

扩展下上一个例子,让整个段落居中对齐,并且进行缩进。为了达到这样的效果,创建一个段落样式,将它应用到第一个字符。注意下段落边距是如何声明的:
效果如下:
下面的例子中,为段落的第一个字符分配更大的字体,稍微增长它的宽度、减少它的字间距:
效果如下:
修改下上面的例子,再次构建了一个段落样式,并将其添加到第一个字符上,这个段落样式展示了左右对齐和连字:
效果:
3.制表符(Tab stops)
制表符是NSTextTab,一个值类,它的初始化器可以让你设置它的位置(location,距离左边缘的距离)和对齐方式(alignment)。一个
效果如图:
上面代码中,一次性设置了段落样式的整个
注意:制表符的对齐方法是对
4.文本附件(Text attachments)
文本附件基本上是一张内联的图片,为了创建该实例,你需要使用图片数据来初始化NSTextAttachment类,最简单的方式是创建UIImage对象,将该对象分配给NSTextAttachment的
文本附件使用NSAttachmentAttributeName这个键来添加到NSAttributedString上,而文本附件作为值。拥有这个属性的字符串必须要是一个特殊的nonprinting字符,它的codepoint(一个完整的Unicode字符叫CodePoint)是NSAttachmentCharacter(0xFFFC)。最简单的方式是调用NSAttributedString的初始化器
效果如图:
5.修改和查询Attributed String
尽管属性被应用到了文本的某个范围内,但实际上属性是属于单独的字符的。因此我们可以调整可变的、带有属性的字符串的某个部分。关键的方法是
如果是替换字符(replace characters)的话,插入的字符串(inserted string)会使用被取代的第一个字符的属性。
如果是插入字符(insert characters)的话,插入的字符串(inserted string)会使用插入部分之前的字符的属性;唯一的例外是如果在最前面插入的话,插入的字符串会使用插入部分后面的字符的属性
你可以查询attributed string中的一个字符的属性,要么查询所有的属性(
下面的例子中,改变大小为10的字体为
没改字体前效果:
修改过字体后效果:
6.自定义属性
你可以将自定义属性应用到文本的扩展中,以attributed string的形式。你的属性不会直接影响字符串的绘制,因为文本引擎不知道如何使用它们。你可以为文本做标记,准备将来使用。
下面的这个例子,UILabel包含一些文本和一个日期。想要用当前的日期取代之前的日期。问题是替换日期的时候,不知道在哪里:既不知道日期的长度,也不知道日期前面文本的颜色。解决方法是使用attributed string,第一次插入日期的时候,使用自定义的属性为日期做标记。下面例子中,自定义的属性名是”Cactus”,为它分配的值是1.
效果如图:
7.绘制和测量attributed string
你可以直接绘制带有属性的字符串,而不用将它放在内置的界面对象上。NSString可以使用
下面,将attributed string的内容绘制到图像上下文(image graphics context)中,然后将图像提取出来。
效果图:

或者,你可以直接在UIView的
这里
调用的时候,只需:
NSSAttributedString提供了方法来测量attributed string,例如:
三.Text Kit
Text Kit刚开始来自OS X,它是由一组负责绘制文本的类组成的,简单地说,它们将NSAttributedString转化为图形。你可以使用Text Kit来调整文本绘制,之前只能通过低级的基于C的Core Text。
UITextView可以直接获取底层的Text Kit引擎,它拥有以下的与Text Kit有关的属性:
当使用自定义的文本容器初始化text view时,你会传递整个Text Kit实例的栈:文本容器(text container)、布局管理器(layout manager)和文本存储(text storage)。在最简单、最常见的例子中,文本存储包含布局管理器,布局管理器包含文本容器,因此构成了”栈”。最简单的例子如下:
下面是三个主要的类的作用:
1.Size:文本容器的左上角是文本布局坐标系统的起始点,文本会在文本容器的矩形中进行排布。
2.Exclusion paths:
3.Subclassing:通过重写
1.文本容器(Text Container)
NSTextContainer有一个尺寸(size),文本会在该尺寸中被绘制。在之前的代码中,text view的文本容器的宽度是text view的宽度,而高度是无限大的。
NSTextContainer也有
当你改变text view的
如果text view的
但是,不能滚动的text view不仅仅是label,因为你可以获取它背后的Text Kit 栈。例如,你可以对文本容器应用exclusion path。如下:
效果如下:
如效果图,文本一开始越来越长,接着越来越短,因为在文本容器的右侧有一个exclusion path。
除了exclusion path外,你也可以子类化
myTextContainer.swift
ViewController.swift
效果图如下:
2.可替换的Text Kit 栈架构
默认的Text Kit 栈是一个文本存储(text storage),包含一个布局管理器(layout manager),而布局管理器包含一个文本容器(text container)。但是,一个文本存储可以包含多个布局管理器,而一个布局管理器可以包含多个文本容器。
如果一个布局管理器有多个文本容器,那么溢出的文本容器会被下一个绘制。下面的例子中,有两个text view,文本填充了第一个text view,然后会流进第二个text view。这是一种获取多列和多页布局的方式。示例代码如下:
运行效果如图:
如果一个文本存包含多个布局管理器,那么每个管理器就会展示相同的文本。下面的例子中,两个text view展示相同的文本。值得提的事情就是当你编辑一个text view时,另一个text view也会发生变化来搭配(那就是Xcode允许你在不同的窗口、标签和面板中编辑相同的代码文件的原因)。代码如下:
效果图:
3.布局管理器(Layout Manager)
了解布局管理器的第一件事情就是它涉及的几何学。为了探索布局管理器的几何学,弄清楚字形(glyphs)和行”碎片”(line fragments)
Glyph:字符的物理表现形式,布局管理器的主要工作是根据字体得到字形,然后绘制它们。
Line fragment:一个矩形,字形(glyphs)会在里面绘制,一个接着一个(它是行碎片,而不仅仅是一行,因为一行可能会被文本容器的exclusion path打断)。
4.不用Text View的Text Kit
UITextView是唯一的内置iOS类,拥有能够让你获取的Text Kit栈,但是并不意味着它是唯一你能够使用Text Kit绘制的地方。你可以在任何地方使用Text Kit绘制,即任何绘制上下文(graphics context)中。当你这样绘制的时候,应该按照顺序调用下面的两个方法:
示例代码:
为简单的例子手动构建整个Text Kit栈似乎是耗费时间的,但是想一下,既然我已经获取了整个Text Kit栈,我还能做其它什么事情呢?可以使用属性(properties),子类化(subclassing)和代理(delegation)。之前,不深入到Core Text是很难实现这些效果的。
为了让你的NSString或者NSAttributedString出现在界面上,你可以将它绘制到图形上下文(graphics context)或者将它交给界面对象处理。
自我绘制的文本(self-drawing text):NSString和NSAttributedString都拥有将自身绘制到任何图形上下文的方法
绘制文本的界面对象(text-drawing interface object):知道如何绘制NSString和NSAttributedString的界面对象有:UILabel,展示文本,可以包含多行文本,既不能滚动,也不能编辑;UITextField,展示单行的可编辑的文本,可能有一个边框、背景图片,在左端和右端有覆盖视图;UITextView,展示可滚动的多行文本,可编辑的。
在底层,所有的文本绘制都是通过底层的技术来完成的,就是拥有C样式API的Core Text。iOS7之前,某些强大、有用的文本绘制特性只能通过Core Text来实现,但是现在,iOS提供了Text Kit,一个基于Core Text的中间级技术。UITextView很大程度上只是对Text Kit的轻量级包装,Text Kit也可以直接绘制到图形上下文上。
一.字体和字体描述器(Fonts and Font Descriptors)
有两种方式来描述字体:UIFont(用作NSString或者UIKit界面对象)和CTFont(用作Core Text)。iOS7之前,UIFont和CTFont并非toll-free bridged,但是现在它们是toll-free bridged。另一个重要的Core Text类型是CTFontDescriptor,与UIFontDescriptor是toll-free bridged,对执行字体变换是有帮助的。
1.字体(Fonts)
字体(UIFont,与Core Text的CTFont是toll-free bridged)是非常简单的对象,你可以调用UIFont初始化器
init(name:size:)来声明一个字体,UIFont提供了一些方法来获取字体的某些量度,如
lineHeight、
capHeight。
通过名称声明字体,你必须要知道字体的名称。每个字体变体(bold、italic等)看作是不同的字体,字体变体被归为族(families)。UIFont提供了类方法来告诉你族的名称,以及族中字体的名称。下面的代码会在控制台中打印已经安装的字体的名称:
func learnFont() -> Void {
UIFont.familyNames().map{ UIFont.fontNamesForFamilyName($0) }.forEach {
(n : [String]) in
n.forEach {
print($0)
}
}
}
当你调用init(name:size:)方法时,你可以通过它的族名或者字体名来声明一个字体,例如,”Avenir”是族名,而这个族中的字体有”Avenir-Book”。这两个都可以作为
name:参数。
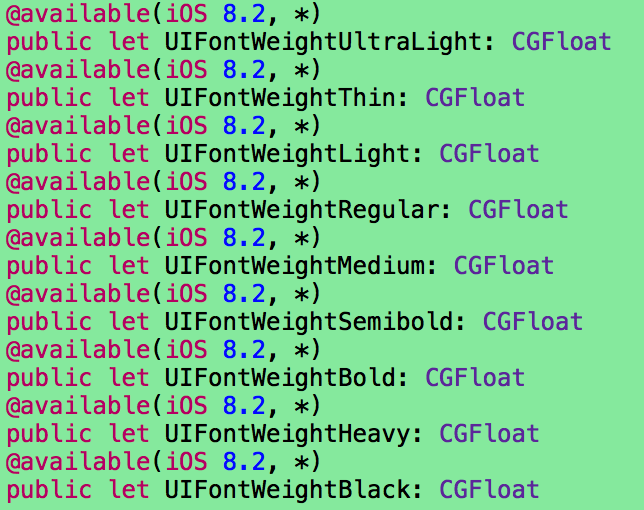
系统字体(例如,默认使用在UIButton上的字体)可以通过调用
systemFontOfSize:weight:方法来获得。weight:参数在iOS8.2中新引入的,可能的权重(weight),可以通过常量名(本质是CGFloat)来表达,按顺序从最轻到最重,如下:
2.动态类型字体(Dynamic Type fonts)
动态类型字体(iOS7引入)有两个主要特点:
尺寸取决于用户:用户可以在系统的Setting应用中来调整动态类型字体
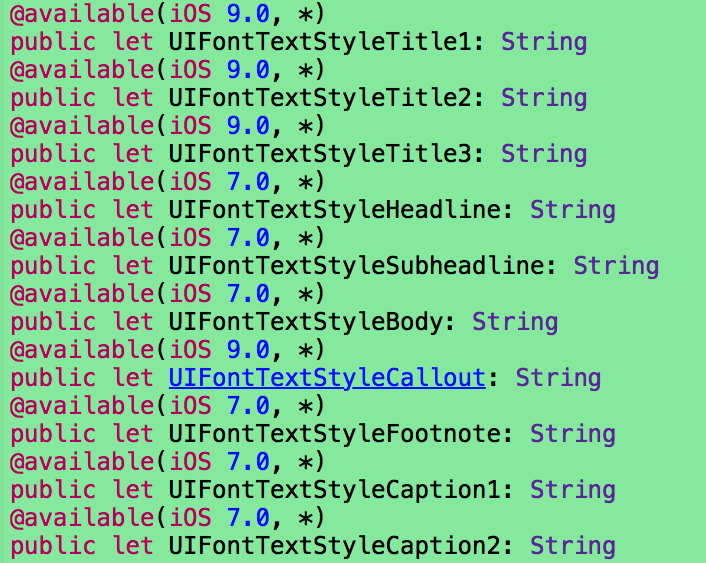
通过角色(role)来声明:声明动态类型字体,并非通过尺寸,而是它在布局中扮演的角色。调用UIFont的类方法
preferredFontForTextStyle:。提供的参数可能是下面的:
实际上,动态类型的字体并非动态的,因为只会在用户调用
preferredFontForTextStyle:时才会会返回用户想要的尺寸大小的字体,如果用户改变了偏好设置,你需要再次调用
preferredFontForTextStyle:方法,为了监听这样的变化,需要注册
UIContentSizeCategoryDidChangeNotification通知。
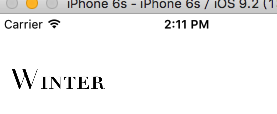
override func viewDidLoad() {
super.viewDidLoad()
self.lab = UILabel(frame: CGRectMake(12,48,120,36));
self.lab.text = "Winter"
let style = self.lab.font.fontDescriptor().objectForKey(UIFontDescriptorTextStyleAttribute) as! String
self.lab.font = UIFont.preferredFontForTextStyle(style)
NSNotificationCenter.defaultCenter().addObserver(self, selector: "DynamicType:", name: UIContentSizeCategoryDidChangeNotification, object: nil)
}

func DynamicType(n:NSNotification) {
let style = self.lab.font.fontDescriptor().objectForKey(UIFontDescriptorTextStyleAttribute) as! String
self.lab.font = UIFont.preferredFontForTextStyle(style)
}
幸运的是,从iOS8开始,UITableView的cell包含的label会自动监听UIContentSizeCategoryDidChangeNotification通知,并更新字体。所以动态类型在tableview中时动态的。
3.增加字体(Add fonts)
并没有限制只能使用系统已安装的字体,有两种方式来获取额外的字体:
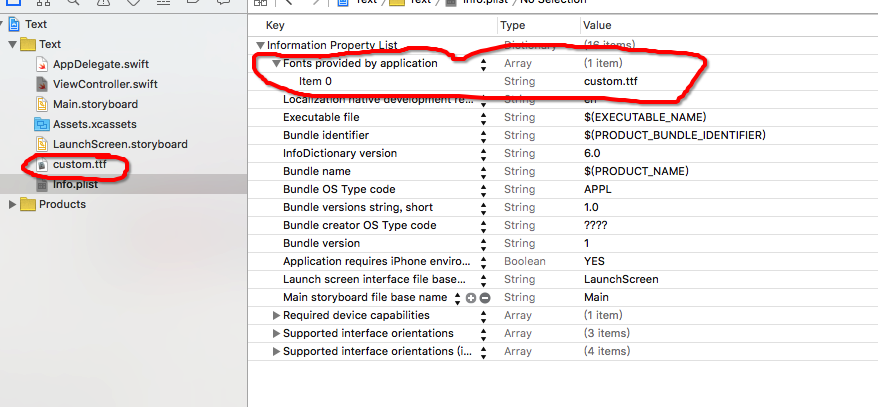
将字体包含在应用的bundle中:包含在应用bundle顶层的字体会在应用启动时被加载,在Info.plist中包含
Fonts provided by application,如图:
详细做法请参考:iOS上使用自定义ttf字体
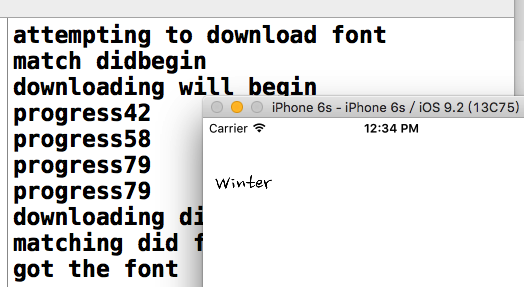
即时下载字体:所有的OS X字体都可以从苹果服务器上下载,你可以在应用运行的时候下载并安装想要的字体。要即时下载字体,你要将字体声明成字体描述器(font descriptor),需要Core Text(import CoreText)的
CTFontDescriptorMatchFontDescriptorWithProgressHandler。它是在后台线程中调研的,因此如果你想要在界面中立即使用下载好的字体,你必须要在主线程中操作。
func downloadFont(fontName: String) {
let name = fontName
let size: CGFloat = 24
let f: UIFont! = UIFont(name: name, size: size)
if f != nil {
self.lab.font = f
print("already installed")
return
}

print("attempting to download font")
let desc = UIFontDescriptor(name: name, size: size)
CTFontDescriptorMatchFontDescriptorsWithProgressHandler([desc], nil) { (state: CTFontDescriptorMatchingState, prog: CFDictionary!) -> Bool in
switch state {
case .DidBegin:
print("match didbegin")
case .WillBeginDownloading:
print("downloading will begin")
case .Downloading:
let d = prog as NSDictionary
let key = kCTFontDescriptorMatchingPercentage
let cur: AnyObject? = d[key as NSString]
if let cur = cur as? NSNumber {
print("progress\(cur)")
}
case .DidFinishDownloading:
print("downloading did finish")
case .DidFailWithError:
print("downloading failed")
case .DidFinish:
print("matching did finish")
dispatch_async(dispatch_get_main_queue(), { () -> Void in
let f: UIFont! = UIFont(name: name, size: size)
if f != nil {
print("got the font")
self.lab.font = f
}
})
default:
break
}
return true
}
}
结果如下:
4.字体描述器(Font Descriptor)
字体描述器(UIFontDescriptor,与Core Text的CTFontDescriptor是toll-free bridged)是声明字体的一种方式,或者不同的字体间描述的转换。比如,给定一个字体描述
desc,你可以要求更换对应的
italic字体描述器。
let desc2 = desc.fontDescriptorWithSymbolicTraits(.TraitItalic)
如果desc一开始是对
Avenir-Book 15的描述器,desc2现在是对
Avenir-BookOblique 15的描述器。但是,它的字体并不是
Avenir-BookOblique 15,因为字体描述器并非字体。
你可以通过字体描述器的初始化方法
init(name:size:)来获取字体描述器;或者:调用字体的fontDescriptor
方法将字体转化为字体描述器,调用字体的初始化方法init(descriptor:size:)`将字体描述器转化为字体,为size参数提供值0保证字体尺寸不会发生改变。
let f = UIFont(name: "Avenir",size:15)
let desc = f.fontDescriptor()
let desc2 = desc.fontDescriptorWithSymbolicTraits(.TraitItalic)
let f2 = UIFont(descriptor:desc2,size:0)
这种技术也可以用来获取各种样式的动态类型字体(Dynamic Type fonts),UIFontDescriptor的类方法
preferredFontDescriptorWithTextStyle:让你避免直接从UIFont开始。下面例子中,字体是UIFontTextStyleBody。
func setTextStyle() {
let body = UIFontDescriptor.preferredFontDescriptorWithTextStyle(UIFontTextStyleBody)
let fbody = UIFont(descriptor: body, size: 0)
self.lab.font = fbody
}
你可以通过UIFontDescriptor的fontAttributes方法来探索下字体的特点,该方法返回字体属性和值的字典。
字体描述器的另一个用处就是获取单个字体隐藏的内置排版特点。下面的例子中,会获取Didot字体的变体,将会绘制字体”帽子”(cap):
func obtainAttributes() {
let desc = UIFontDescriptor(name: "Didot", size: 18)
let d = [
UIFontFeatureTypeIdentifierKey:kLetterCaseType,
UIFontFeatureSelectorIdentifierKey:kSmallCapsSelector
]
let desc2 = desc.fontDescriptorByAddingAttributes([UIFontDescriptorFeatureSettingsAttribute:[d]])
let f = UIFont(descriptor: desc2, size: 0)
self.lab.font = f
}
效果图:
排版特点标识常量,例如
kSmallCapsSelector列在Core Text的头文件
SFNTLayoutTypes.h中。
二.带有属性的字符串(Attributed Strings)
1.带有属性的字符串的属性(Attributed String Attributes)
应用到字符串上的属性是描述在字典中的,每个属性都有一个预定义的名称,作为字典中的键。下面是一些最重要的属性(完整的列表,请看 NSAttributedString UIKit Additions Reference)
提示,属性名的形式是:
NS~AttributeName(~表明属性)
NSFontAttributeName:UIFont,默认值是Helvetica 12
NSForegroundColorAttributeName:UIColor,文本颜色
NSBackgroundColorAttributeName:UIColor,背景色,例如,你可以使用这个来强调一个单词
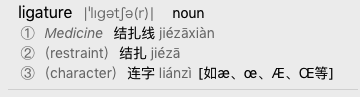
NSLigatureAttributeName:NSNumber,包装的值为0或1,表示是否使用连字(ligature),一些字体,例如Didot,默认是使用连字的。
NSKernAttributeName:NSNumber,包装浮点值,代表字距(kerning)。负值会让字形离相邻的字形更加靠近,一个正值会在字形间添加间距。
NSStrikethroughStyleAttributeName
NSUnderlineStyleAttributeName:NSNumber,包装了下面的其中一个值(NSUnderlineStyle),描述了下划线的权重:
.StyleNone、
.StyleSingle、
.StyleDouble、
.StyleThick。
NSStrikethroughColorAttributeName
NSUnderlineColorAttributeName:UIColor,如果没定义的话,会使用前景色
NSStrokeWidthAttributeName;NSNumber,包装了Float值,如果值为正数的话,文本的字形就会被描边,但是不会填充;如果描边颜色没被定义的话,就使用前景色;如果值为负数的话,那么它的绝对值就是描边的宽度,字形会被会被填充(使用前景色)和描边(使用描边的颜色)
NSStrokeColorAttributeName:UIColor,描边的颜色
NSShadowAttributeName:NSShadow对象,NSShadow只是一个值类,包含shadowOffset、shadowColor和shadowBlurRadius。、
NSTextEffectAttributeName:如果被定义的话,唯一可能的值就是
NSTextEffectLetterpressStyle
NSAttachmentAttributeName:NSTextAttachment对象,本质是内联的图片
NSLinkAttributeName:NSURL,在不可编辑、可选择的UITextView中,链接可以点击去往指定的URL的(取决于UITextViewDelegate方法
textView:shouldInteractWithURL:inRange:的实现),默认地,在UITextView中的链接时蓝色字体,不带有下划线;但是在UILabel中,链接时蓝色的,并且有下划线,但是不可点击的。
NSBaselineOffsetAttributeName
NSObliquenessAttributeName
NSExpansionAttributeName:NSNumber,包装Float
NSParagraphStyleAttributeName:NSParagraphStyle对象,这只是简单的值类,会将特点应用到整个段落中,不仅仅是字符,甚至你的字符串只包含一个单独的段落。
NSParagraphStyle的重要属性:
alignment(NSTextAlignment):
.Left、
.Center、
.Right、
.Justified、
.Natural(左对齐或者右对齐,取决于书写的方向)
lineBreakMode(NSLineBreakMode):
.ByWordWrapping、
.ByCharWrapping、
.ByClipping、
.ByTruncatingHead、
ByTruncatingTrail、
.ByTruncatingMiddle
firstLineHeadIndent, headIndent (left margin), tailIndent (right margin)
lineHeightMultiple,maximumLineHeight,minimumLineHeight
lineSpacing
paragraphSpacing,paragraphSpacingBefore
hyphenationFactor (0 or 1)
defaultTabInterval, tabStops
allowsDefaultTighteningForTruncation:iOS9引入的,如果设为true的话,允许对子距设置负值。
如果整个字符串拥有相同的属性的话,你可以调用
init(string:attributes:)方法来创建
NSAttributedString;否则的话,你要使用
NSMutableAttributedString,它让你对特定范围的字符串设置属性。
为了创建NSParagraphStyle,你需要使用它的可变的子类NSMutableParagraphStyle(因为历史原因,NSParagraphStyle自身的属性全部是只读的)。只需对一个段落的第一个字符应用段落样式就够了,换句话说,一个段落的第一个字符的段落样式就能表明整个段落该如何渲染。
NSAttributedString和NSParagraphStyle都会为所有的属性设置默认值,所以你只需设置你关心的属性即可。
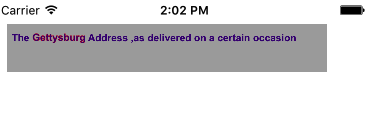
2.创建带有属性的字符串(Attributed String)
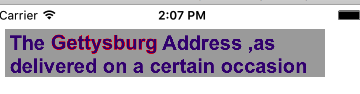
下面,将带有属性的字符串绘制在无法交互的UITextView上,它的背景色是白色的,但是父视图的背景色是灰色的,所以你可以看到相对于文本的text view的bounds。
func makeAttributedString() {
let s1 = "The Gettysburg Address ,as delivered on a certain occasion"
let content = NSMutableAttributedString(string: s1, attributes: [NSFontAttributeName: UIFont(name: "Arial-BoldMT", size: 15)!,NSForegroundColorAttributeName: UIColor(red: 0.251, green: 0.000, blue: 0.502, alpha: 1)])
let r = (s1 as NSString).rangeOfString("Gettysburg")
content.addAttributes([NSStrokeColorAttributeName: UIColor.redColor(),NSStrokeWidthAttributeName: -2.0],range: r)
self.tv.attributedText = content
}
效果如图:
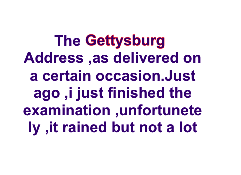
扩展下上一个例子,让整个段落居中对齐,并且进行缩进。为了达到这样的效果,创建一个段落样式,将它应用到第一个字符。注意下段落边距是如何声明的:
tailIndent是负值,将右边距往左移动;
firstLineHeadIndent必须单独设置,因为
headIndent并不会自动应用到第一行。代码如下:
func makeParagraphStyle() {
let s = "The Gettysburg Address ,as delivered on a certain occasion.Just ago ,i just finished the examination ,unfortunetely ,it rained but not a lot"
let content = NSMutableAttributedString(string: s, attributes: [NSFontAttributeName: UIFont(name: "Arial-BoldMT", size: 15)!,NSForegroundColorAttributeName: UIColor(red: 0.251, green: 0.000, blue: 0.502, alpha: 1)])
let r = (s as NSString).rangeOfString("Gettysburg")
content.addAttributes([NSStrokeColorAttributeName: UIColor.redColor(),NSStrokeWidthAttributeName: -2.0],range: r)
let para = NSMutableParagraphStyle()
para.headIndent = 10
para.firstLineHeadIndent = 4
para.tailIndent = -10
para.lineBreakMode = .ByWordWrapping
para.alignment = .Center
para.paragraphSpacing = 15
content.addAttribute(NSParagraphStyleAttributeName, value: para, range: NSMakeRange(0,1))
self.tv.attributedText = content
}
效果如下:
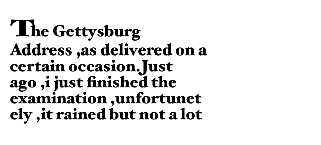
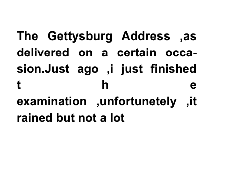
下面的例子中,为段落的第一个字符分配更大的字体,稍微增长它的宽度、减少它的字间距:
func makeLargerCharacter() {
let s = "The Gettysburg Address ,as delivered on a certain occasion.Just ago ,i just finished the examination ,unfortunetely ,it rained but not a lot"
let content = NSMutableAttributedString
1667b
(string: s, attributes: [NSFontAttributeName:UIFont(name: "HoeflerText-Black", size: 16)!])
content.addAttributes([NSFontAttributeName: UIFont(name: "HoeflerText-Black", size: 24)!,NSExpansionAttributeName: 0.3,NSKernAttributeName: -4], range: NSMakeRange(0, 1))
self.tv.attributedText = content
}
效果如下:
修改下上面的例子,再次构建了一个段落样式,并将其添加到第一个字符上,这个段落样式展示了左右对齐和连字:
func makeFullAlignment() {
let s = "The Gettysburg Address ,as delivered on a certain occasion.Just ago ,i just finished the examination ,unfortunetely ,it rained but not a lot"
let content = NSMutableAttributedString(string: s, attributes: [NSFontAttributeName:UIFont(name: "Arial-BoldMT", size: 12)!])
let para = NSMutableParagraphStyle()
para.headIndent = 10
para.firstLineHeadIndent = 10
para.tailIndent = -10
para.lineBreakMode = .ByWordWrapping
para.alignment = .Justified
para.lineHeightMultiple = 1.2
para.hyphenationFactor = 1.0
content.addAttribute(NSParagraphStyleAttributeName, value: para, range: NSMakeRange(0, 1))
self.tv.attributedText = content
}
效果:
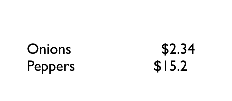
3.制表符(Tab stops)
制表符是NSTextTab,一个值类,它的初始化器可以让你设置它的位置(location,距离左边缘的距离)和对齐方式(alignment)。一个
options字典允许你设置制表符的列终结符。一个常见的用法是创建一个小数制表符(decimal tab stop),以小数点对齐货币值,键是NSTabColumnTerminatorsAttributeName,你可以调用NSTextTab的类方法
columnTerminatorsForLocale:获取值。
func makeTabStop() {
let s = "Onions\t$2.34\nPeppers\t$15.2\n"
let para = NSMutableParagraphStyle()
let terms = NSTextTab.columnTerminatorsForLocale(NSLocale.currentLocale())
let tab = NSTextTab(textAlignment: .Right, location: 170, options: [NSTabColumnTerminatorsAttributeName: terms])
para.tabStops = [tab]
para.firstLineHeadIndent = 20
let mas = NSMutableAttributedString(string: s, attributes: [NSFontAttributeName: UIFont(name: "GillSans", size: 15)!,NSParagraphStyleAttributeName: para])
self.tv.attributedText = mas
}
效果如图:
上面代码中,一次性设置了段落样式的整个
tabStops数组。从iOS9开始,
tabStops数组可以通过
addTabStop:或者
removeTabStop:动态调整。
注意:制表符的对齐方法是对
/t后面的文本来说的,而location也是对
/t后面的文本来说的,是以控件的左边缘为基准的,但是location是根据实际情况会动态调整。
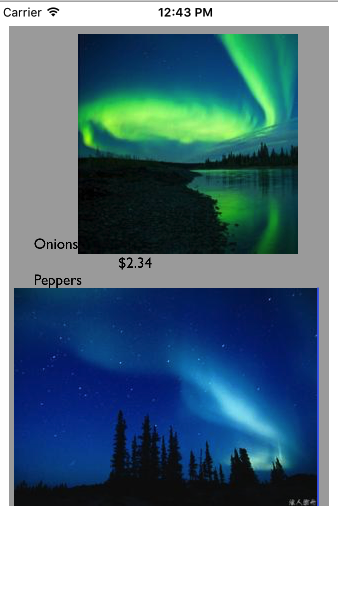
4.文本附件(Text attachments)
文本附件基本上是一张内联的图片,为了创建该实例,你需要使用图片数据来初始化NSTextAttachment类,最简单的方式是创建UIImage对象,将该对象分配给NSTextAttachment的
image属性。你必须要赋予NSTextAttachment一个非零的bounds,图片会自动调整到你提供的bounds的大小,零起始点会将图片放到文本基准线上(text baseline)。
文本附件使用NSAttachmentAttributeName这个键来添加到NSAttributedString上,而文本附件作为值。拥有这个属性的字符串必须要是一个特殊的nonprinting字符,它的codepoint(一个完整的Unicode字符叫CodePoint)是NSAttachmentCharacter(0xFFFC)。最简单的方式是调用NSAttributedString的初始化器
init(attachment:),将NSTextAttachment传递给它,它会给你返回一个带有属性的字符串。然后你可以将这个带有属性的字符串在指定的位置插入到自己的属性字符串中。
func MakeAttachment() {
let s = "Onions\t$2.34\nPeppers\t$15.2443\n"
let para = NSMutableParagraphStyle()
let terms = NSTextTab.columnTerminatorsForLocale(NSLocale.currentLocale())
let tab = NSTextTab(textAlignment: .Right, location: 120, options: [NSTabColumnTerminatorsAttributeName: terms])
para.tabStops = [tab]
para.firstLineHeadIndent = 20
let mas = NSMutableAttributedString(string: s, attributes: [NSFontAttributeName: UIFont(name: "GillSans", size: 15)!,NSParagraphStyleAttributeName: para])

let one = UIImage(named: "one.jpg")!
let two = UIImage(named: "two.jpg")!

let oneAttach = NSTextAttachment()
oneAttach.image = one
oneAttach.bounds = CGRectMake(0, -5, one.size.width, one.size.height)
let oneString = NSAttributedString(attachment: oneAttach)

let twoAttach = NSTextAttachment()
twoAttach.image = two
twoAttach.bounds = CGRectMake(0, -1, two.size.width, two.size.height)
let twoString = NSAttributedString(attachment: twoAttach)

let r1 = (mas.string as NSString).rangeOfString("Onions")
mas.insertAttributedString(oneString, atIndex: (r1.location + r1.length))

let r2 = (mas.string as NSString).rangeOfString("Peppers")
mas.insertAttributedString(twoString, atIndex: (r2.location + r2.length))

self.tv.attributedText = mas

}
效果如图:
5.修改和查询Attributed String
尽管属性被应用到了文本的某个范围内,但实际上属性是属于单独的字符的。因此我们可以调整可变的、带有属性的字符串的某个部分。关键的方法是
replaceCharactersInRange:withString:,该方法可以用来替换字符、插入字符。问题是对于插入的字符,该应用什么样的属性。规则如下:
如果是替换字符(replace characters)的话,插入的字符串(inserted string)会使用被取代的第一个字符的属性。
如果是插入字符(insert characters)的话,插入的字符串(inserted string)会使用插入部分之前的字符的属性;唯一的例外是如果在最前面插入的话,插入的字符串会使用插入部分后面的字符的属性
你可以查询attributed string中的一个字符的属性,要么查询所有的属性(
attributesAtIndex:effectiveRange:),要么通过名称查询特定的属性(
attribute:atIndex:effectiveRange:)。在方法中,
effectiveRange参数是指向NSRange变量的指针。
var range: NSRange = NSMakeRange(0,0)
let d = content.attributesAtIndex(content.length-1,effectiveRange:&rang)
下面的例子中,改变大小为10的字体为
Arial Bold 20,不在意是否传入了最长的有效范围,只需要循环就行:
func makeEnumerate() {
let s = "The Gettysburg Address ,as delivered on a certain occasion"
let content = NSMutableAttributedString(string: s, attributes: [NSFontAttributeName: UIFont(name: "Arial-BoldMT", size: 10)!,NSForegroundColorAttributeName: UIColor(red: 0.251, green: 0.000, blue: 0.502, alpha: 1)])
let r = (s as NSString).rangeOfString("Gettysburg")
content.addAttributes([NSStrokeColorAttributeName: UIColor.redColor(),NSStrokeWidthAttributeName: -2.0],range: r)

let opts : NSAttributedStringEnumerationOptions = .LongestEffectiveRangeNotRequired
content.enumerateAttribute(NSFontAttributeName, inRange: NSMakeRange(0, content.length), options: opts) { (value, range, stop) -> Void in
let font = value as! UIFont
if font.pointSize == 10 {
content.addAttribute(NSFontAttributeName, value: UIFont(name: "Arial-BoldMT", size: 20)!, range: range)
}
}
self.tv.attributedText = content
}
没改字体前效果:
修改过字体后效果:
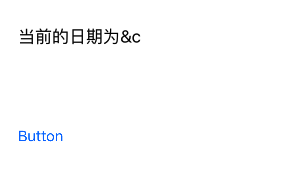
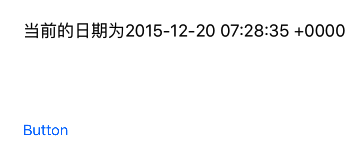
6.自定义属性
你可以将自定义属性应用到文本的扩展中,以attributed string的形式。你的属性不会直接影响字符串的绘制,因为文本引擎不知道如何使用它们。你可以为文本做标记,准备将来使用。
下面的这个例子,UILabel包含一些文本和一个日期。想要用当前的日期取代之前的日期。问题是替换日期的时候,不知道在哪里:既不知道日期的长度,也不知道日期前面文本的颜色。解决方法是使用attributed string,第一次插入日期的时候,使用自定义的属性为日期做标记。下面例子中,自定义的属性名是”Cactus”,为它分配的值是1.
@IBOutlet weak var dateLab: UILabel!

@IBAction func MakeCustomAttributes(sender: AnyObject) {
let mas = self.dateLab.attributedText!.mutableCopy() as! NSMutableAttributedString
let r = (mas.string as NSString).rangeOfString("&c")
if r.length > 0 {
mas.addAttribute("Cactus", value: 1, range: r)
mas.replaceCharactersInRange(r, withString: NSDate().description)
} else {
mas.enumerateAttribute("Cactus", inRange: r, options: []){ (value, r, stop) -> Void in
if let value = value as? Int where value == 1 {
mas.replaceCharactersInRange(r, withString: NSDate().description)
stop.memory = true
}
}
}
self.dateLab.attributedText = mas

}
效果如图:
7.绘制和测量attributed string
你可以直接绘制带有属性的字符串,而不用将它放在内置的界面对象上。NSString可以使用
drawInRect:withAttributes:或者其它方法绘制到矩形中。NSAttributedString可以使用
drawAtPoint:,
drawInRect:,
drawWithRect:options:context:方法绘制。
下面,将attributed string的内容绘制到图像上下文(image graphics context)中,然后将图像提取出来。
@IBOutlet weak var imageView: UIImageView!

func makeImageFromAttributedString() {
let rect = CGRectMake(0, 0, 120, 100)
UIGraphicsBeginImageContextWithOptions(rect.size, true, 0)
UIColor.whiteColor().setFill()
CGContextFillRect(UIGraphicsGetCurrentContext()!, rect)
self.getAttributedString().drawInRect(rect)
let im = UIGraphicsGetImageFromCurrentImageContext()
UIGraphicsEndImageContext()
self.imageView.image = im
}

func getAttributedString() -> NSAttributedString {
let s = "The Great Wall is one of the greatest wonders in china"
let content = NSAttributedString(string: s, attributes: [NSFontAttributeName: UIFont(name: "Arial-BoldMT", size: 15)!,NSForegroundColorAttributeName: UIColor.orangeColor()])
return content
}
效果图:
或者,你可以直接在UIView的
drawRect:中绘制attributed string。
import UIKit

class DrawView: UIView {

@NSCopying var attributedText: NSAttributedString! {
didSet {
self.setNeedsDisplay()
}
}

override func drawRect(rect: CGRect) {
let r = rect.offsetBy(dx: 0, dy: 2)
let options: NSStringDrawingOptions = .UsesLineFragmentOrigin
self.attributedText.drawWithRect(r, options: options, context: nil)
}

}
这里
.UsesLineFragmentOrigin(整个文本将以每行组成的矩形为单位计算整个文本的尺寸)使用是非常重要的,没有它,字符串就会使用基线绘制。
drawRect:默认是使用
.UsesLineFragmentOrigin,但是对于
drawWithRect:options:context:,你需要显式声明。
调用的时候,只需:
self.drawView.attributedText = content
NSSAttributedString提供了方法来测量attributed string,例如:
boundingRectWithSize:options:context:。再次强调下,
.UsesLineFragmentOrigin是重要的,没有它的话,测量的文本没有全包含,返回的高度会非常小。
三.Text Kit
Text Kit刚开始来自OS X,它是由一组负责绘制文本的类组成的,简单地说,它们将NSAttributedString转化为图形。你可以使用Text Kit来调整文本绘制,之前只能通过低级的基于C的Core Text。
UITextView可以直接获取底层的Text Kit引擎,它拥有以下的与Text Kit有关的属性:
textContainer:text view的文本容器(NSTextContainer实例)。UITextView的指定构造器是
init(frame:textContainer:),textContainer:可以为nil来获取默认的文本容器,或者你可以提供自定义的文本容器。
textContainerInset:文本容器的外边距(margin),在大小为contentSize的矩形中分配区域,文本作为一个整体被绘制。改变这个值就会立即改变外边距,引起文本重新布局。
layoutManager:text view的布局管理器(NSLayoutManager实例)
textStorage:text view的文本存储(NSTextStorage实例)
当使用自定义的文本容器初始化text view时,你会传递整个Text Kit实例的栈:文本容器(text container)、布局管理器(layout manager)和文本存储(text storage)。在最简单、最常见的例子中,文本存储包含布局管理器,布局管理器包含文本容器,因此构成了”栈”。最简单的例子如下:
let r = //text view的frame
let lm = NSLayoutManager()
let ts = NSTextStorage()
ts.addLayoutManager(lm)
let tc = NSTextContainer(size:CGSizeMake(r.width,CGFloat.max))
lm.addTextContainer(tc)
let tv = UITextView(frame:f,textContainer:tc)
下面是三个主要的类的作用:
NSTextStorage:NSMutableAttributedString的子类,它容纳底层的文本。它拥有一个或多个布局管理器,当文本改变的时候通知它们。通过子类化和代理(NSTextStorageDelegate),它的行为可以被调整,从而可以以自定义的方式来应用到属性上。
NSTextContainer:它被布局管理器持有,通过定义文本被绘制的区域来帮助布局管理器。它通过三种方式来实现功能:
1.Size:文本容器的左上角是文本布局坐标系统的起始点,文本会在文本容器的矩形中进行排布。
2.Exclusion paths:
exclusionPaths属性包含UIBe’zi’er对象,在该路径中不会绘制文本
3.Subclassing:通过重写
lineFragmentRectForProposeRect:atIndex:writingDirection:remainingRect:,你可以将每个文本块放在任何地方(除了在exclusion path)
NSLayoutManager:这是主要的文本绘制类,它拥有一个或多个文本容器,该类通过文本存储持有。它(text layout manager)将文本存储(text storage)中的文本绘制到由文本容器(text container)定义的边界中。布局管理器可以拥有代理(NSLayoutManagerDelegate),并且可以被子类化。
1.文本容器(Text Container)
NSTextContainer有一个尺寸(size),文本会在该尺寸中被绘制。在之前的代码中,text view的文本容器的宽度是text view的宽度,而高度是无限大的。
NSTextContainer也有
heightTracksTextView和
widthTracksTextView属性,让文本容器调整大小来适配text view尺寸的变化,比如:因为界面旋转,text view调整了尺寸。就像你想的那样,默认地,
widthTracksTextView是true,而
heightTracksTextView是false:文本填充text view的宽度,如果text view的宽度变化的话,会立即重新布局,但是高度依然保持无限大。当然,text view会配置自己的
contentSize,这样的话,用户就可以滚动到存在的文本的底部。
当你改变text view的
textContainerInset时,它会调整文本容器的尺寸来搭配。在默认的配置中,它会修改文本容器的宽度;顶部和底部的insets是通过文本容器在内容矩形中的位置决定的。在文本容器中,额外的侧边距对应文本容器的
lineFragmentPadding;默认是5,但是你可以修改。
如果text view的
scrollEnabled为false的话,默认地,它的文本容器的
widthTracksTextView和
heightTracksTextView都是true,文本容器的尺寸会被调整,这样的话,文本就会填充text view,在这种情况下,你也可以设置文本容器的
lineBreakMode,这就像UILabel的line break mode。例如,如果line break mode是
.ByTruncatingTail,那么最后一行在末端就会有省略号(如果文本内容足够长的话)。你也可以设置文本容器的
maximumNumberOfLines,就像UILabel的
numberOfLines。
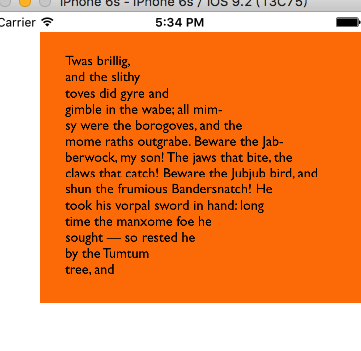
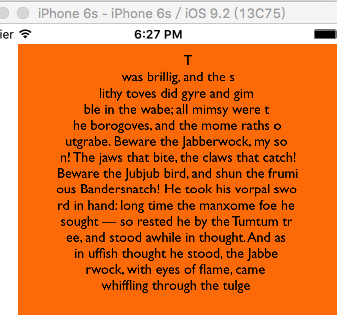
但是,不能滚动的text view不仅仅是label,因为你可以获取它背后的Text Kit 栈。例如,你可以对文本容器应用exclusion path。如下:
class ViewController: UIViewController {

@IBOutlet weak var tv: UITextView!
override func viewDidLoad() {
super.viewDidLoad()
self.tv.backgroundColor = UIColor.orangeColor()
let path = NSBundle.mainBundle().pathForResource("brillig", ofType: "txt")
let s = try! String(contentsOfFile: path!, encoding: NSUTF8StringEncoding)
let s2 = s.stringByReplacingOccurrencesOfString("\n", withString: "")
let mas = NSMutableAttributedString(string: s2, attributes: [NSFontAttributeName: UIFont(name: "GillSans", size: 14)!])
let para = NSMutableParagraphStyle()
para.alignment = .Left
para.lineBreakMode = .ByWordWrapping
para.hyphenationFactor = 1
mas.addAttribute(NSParagraphStyleAttributeName, value: para, range: NSMakeRange(0,1))
self.tv.attributedText = mas
self.tv.textContainerInset = UIEdgeInsetsMake(20, 20, 20, 0)
self.tv.scrollEnabled = false
}

override func viewDidLayoutSubviews() {
let sz = self.tv.textContainer.size
let p = UIBezierPath()
p.moveToPoint(CGPointMake(sz.width/4.0, 0))
p.addLineToPoint(CGPointMake(sz.width, 0))
p.addLineToPoint(CGPointMake(sz.width, sz.height))
p.addLineToPoint(CGPointMake(sz.width/4.0, sz.height))
p.addLineToPoint(CGPointMake(sz.width, sz.height/2.0))
p.closePath()
self.tv.textContainer.exclusionPaths = [p]
}

}
效果如下:
如效果图,文本一开始越来越长,接着越来越短,因为在文本容器的右侧有一个exclusion path。
除了exclusion path外,你也可以子类化
NSTextContainer来修改放置”一片(a piece of text)”文本的矩形。每”片”文本实际上是一行”碎片”(a line fragment)。下面的示例展示的是文本在圆中:
myTextContainer.swift
import UIKit

class MyTextContainer: NSTextContainer {
override var simpleRectangularTextContainer : Bool { return false }
override func lineFragmentRectForProposedRect(proposedRect: CGRect, atIndex characterIndex: Int, writingDirection baseWritingDirection: NSWritingDirection, remainingRect: UnsafeMutablePointer<CGRect>) -> CGRect {
var result = super.lineFragmentRectForProposedRect(proposedRect, atIndex: characterIndex, writingDirection: baseWritingDirection, remainingRect: remainingRect)
let r = self.size.height / 2.0
let y = r - result.origin.y
let theta = asin(y/r)
let x = r * cos(theta)
let offset = self.size.width/2.0 - r
result.origin.x = r - x + offset
result.size.width = 2*x
return result
}
}
ViewController.swift
import UIKit

class ViewController: UIViewController {

@IBOutlet weak var tv: UITextView!
override func viewDidLoad() {
super.viewDidLoad()
self.tv.backgroundColor = UIColor.orangeColor()
let path = NSBundle.mainBundle().pathForResource("brillig", ofType: "txt")
let s = try! String(contentsOfFile: path!, encoding: NSUTF8StringEncoding)
let s2 = s.stringByReplacingOccurrencesOfString("\n", withString: "")
let mas = NSMutableAttributedString(string: s2, attributes: [NSFontAttributeName: UIFont(name: "GillSans", size: 14)!])
let para = NSMutableParagraphStyle()
para.alignment = .Left
para.lineBreakMode = .ByCharWrapping
para.hyphenationFactor = 1
mas.addAttribute(NSParagraphStyleAttributeName, value: para, range: NSMakeRange(0,1))

let r = self.tv.frame
let lm = NSLayoutManager()
let ts = NSTextStorage()
ts.addLayoutManager(lm)

let tc = MyTextContainer(size: CGSizeMake(r.width,r.height))
lm.addTextContainer(tc)
let tv = UITextView(frame: r, textContainer: tc)
self.tv.removeFromSuperview()
self.view.addSubview(tv)
self.tv = tv

self.tv.attributedText = mas
self.tv.contentInset = UIEdgeInsetsMake(2, 3, 3, 3)
self.tv.scrollEnabled = false
self.tv.backgroundColor = UIColor.orangeColor()

}

}
效果图如下:
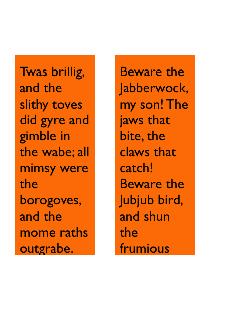
2.可替换的Text Kit 栈架构
默认的Text Kit 栈是一个文本存储(text storage),包含一个布局管理器(layout manager),而布局管理器包含一个文本容器(text container)。但是,一个文本存储可以包含多个布局管理器,而一个布局管理器可以包含多个文本容器。
如果一个布局管理器有多个文本容器,那么溢出的文本容器会被下一个绘制。下面的例子中,有两个text view,文本填充了第一个text view,然后会流进第二个text view。这是一种获取多列和多页布局的方式。示例代码如下:
override func viewDidLoad() {
super.viewDidLoad()
let r = CGRectMake(20, 180, 80, 200)
let r2 = CGRectMake(120, 180, 80, 200)
let ts = NSTextStorage(attributedString: getAttributedString())
let lm = NSLayoutManager()
ts.addLayoutManager(lm)
let tc1 = NSTextContainer(size: r.size)
lm.addTextContainer(tc1)
let tc2 = NSTextContainer(size: r2.size)
lm.addTextContainer(tc2)
let tv = UITextView(frame: r, textContainer: tc1)
let tv2 = UITextView(frame: r2, textContainer: tc2)
self.view.addSubview(tv)
tv.backgroundColor = UIColor.orangeColor()
self.view.addSubview(tv2)
tv2.backgroundColor = UIColor.orangeColor()

}

func getAttributedString() -> NSMutableAttributedString {
let path = NSBundle.mainBundle().pathForResource("brillig", ofType: "txt")
let s = try! String(contentsOfFile: path!, encoding: NSUTF8StringEncoding)
let s2 = s.stringByReplacingOccurrencesOfString("\n", withString: "")
let mas = NSMutableAttributedString(string: s2, attributes: [NSFontAttributeName: UIFont(name: "GillSans", size: 14)!])
return mas
}
运行效果如图:
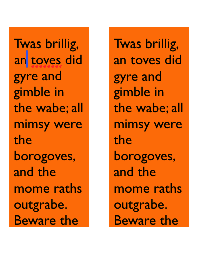
如果一个文本存包含多个布局管理器,那么每个管理器就会展示相同的文本。下面的例子中,两个text view展示相同的文本。值得提的事情就是当你编辑一个text view时,另一个text view也会发生变化来搭配(那就是Xcode允许你在不同的窗口、标签和面板中编辑相同的代码文件的原因)。代码如下:
override func viewDidLoad() {
super.viewDidLoad()
self.tv.hidden = true
let r = CGRectMake(20, 180, 80, 200)
let r2 = CGRectMake(120, 180, 80, 200)
let ts = NSTextStorage(attributedString: getAttributedString())

let lm1 = NSLayoutManager()
ts.addLayoutManager(lm1)
let lm2 = NSLayoutManager()
ts.addLayoutManager(lm2)

let tc1 = NSTextContainer(size: r.size)
let tc2 = NSTextContainer(size: r2.size)
lm1.addTextContainer(tc1)
lm2.addTextContainer(tc2)
let tv = UITextView(frame: r, textContainer: tc1)
let tv2 = UITextView(frame: r2, textContainer: tc2)
self.view.addSubview(tv)
self.view.addSubview(tv2)
tv.backgroundColor = UIColor.orangeColor()
tv2.backgroundColor = UIColor.orangeColor()
}

func getAttributedString() -> NSMutableAttributedString {
let path = NSBundle.mainBundle().pathForResource("brillig", ofType: "txt")
let s = try! String(contentsOfFile: path!, encoding: NSUTF8StringEncoding)
let s2 = s.stringByReplacingOccurrencesOfString("\n", withString: "")
let mas = NSMutableAttributedString(string: s2, attributes: [NSFontAttributeName: UIFont(name: "GillSans", size: 14)!])
return mas
}
效果图:
3.布局管理器(Layout Manager)
了解布局管理器的第一件事情就是它涉及的几何学。为了探索布局管理器的几何学,弄清楚字形(glyphs)和行”碎片”(line fragments)
Glyph:字符的物理表现形式,布局管理器的主要工作是根据字体得到字形,然后绘制它们。
Line fragment:一个矩形,字形(glyphs)会在里面绘制,一个接着一个(它是行碎片,而不仅仅是一行,因为一行可能会被文本容器的exclusion path打断)。
4.不用Text View的Text Kit
UITextView是唯一的内置iOS类,拥有能够让你获取的Text Kit栈,但是并不意味着它是唯一你能够使用Text Kit绘制的地方。你可以在任何地方使用Text Kit绘制,即任何绘制上下文(graphics context)中。当你这样绘制的时候,应该按照顺序调用下面的两个方法:
drawBackgroundForGlyphRange:atPoint:和
drawGlyphsForGlyphRange:atPoint:。.
point:参数表明文本容器的起始点(origin)在当前图形上下文中的位置。
示例代码:
class DrawView: UIView {

@NSCopying var attributedText: NSAttributedString! {
didSet {
self.setNeedsDisplay()
}
}

override func drawRect(rect: CGRect) {
let lm = NSLayoutManager()
let ts = NSTextStorage(attributedString: self.attributedText)
ts.addLayoutManager(lm)
let tc = NSTextContainer(size: rect.size)
lm.addTextContainer(tc)
tc.lineFragmentPadding = 0
let r = lm.glyphRangeForTextContainer(tc)
lm.drawBackgroundForGlyphRange(r, atPoint: CGPointMake(0, 2))
lm.drawGlyphsForGlyphRange(r, atPoint: CGPointMake(0, 2))
}

}
为简单的例子手动构建整个Text Kit栈似乎是耗费时间的,但是想一下,既然我已经获取了整个Text Kit栈,我还能做其它什么事情呢?可以使用属性(properties),子类化(subclassing)和代理(delegation)。之前,不深入到Core Text是很难实现这些效果的。

相关文章推荐
- pat 1107. Social Clusters (30)
- viewpage:The specified child already has a parent. " + "You must call removeView() on the child's pa
- 工具站点
- 基于Theano的深度学习(Deep Learning)框架Keras学习随笔-01-FAQ
- stl_10 : 算法
- 由匿名函数引发的‘血案’
- HTML 5 Audio Video中怎样来插入音频和视频?
- 部署和调优 2.4 tomcat安装
- 【遇到的问题】想写一个通用的adapter,样式一样但是数据源是不同的,怎么做
- 百度换肤技术
- 测量宽高祖传代码
- <LeetCode OJ> 231 / 342 Power of (Two / Four)
- 大数据仓库-增量更新
- Gradle 快速入门
- 使用Spring配置实现bean工厂
- pb9在64位系统下提示:error opening DLL library pbws32.dll for external function
- 如何用API从应用程序到资源管理器拖放文件??????
- tyvj P1431 [Tyvj Jan]分配任务(最大流)
- 本文介绍Android中Intent的各种常见作用
- iOS开发中输入框的英文和中文的字数限制