折叠UITableView分组实现方法
2015-12-16 13:53
435 查看
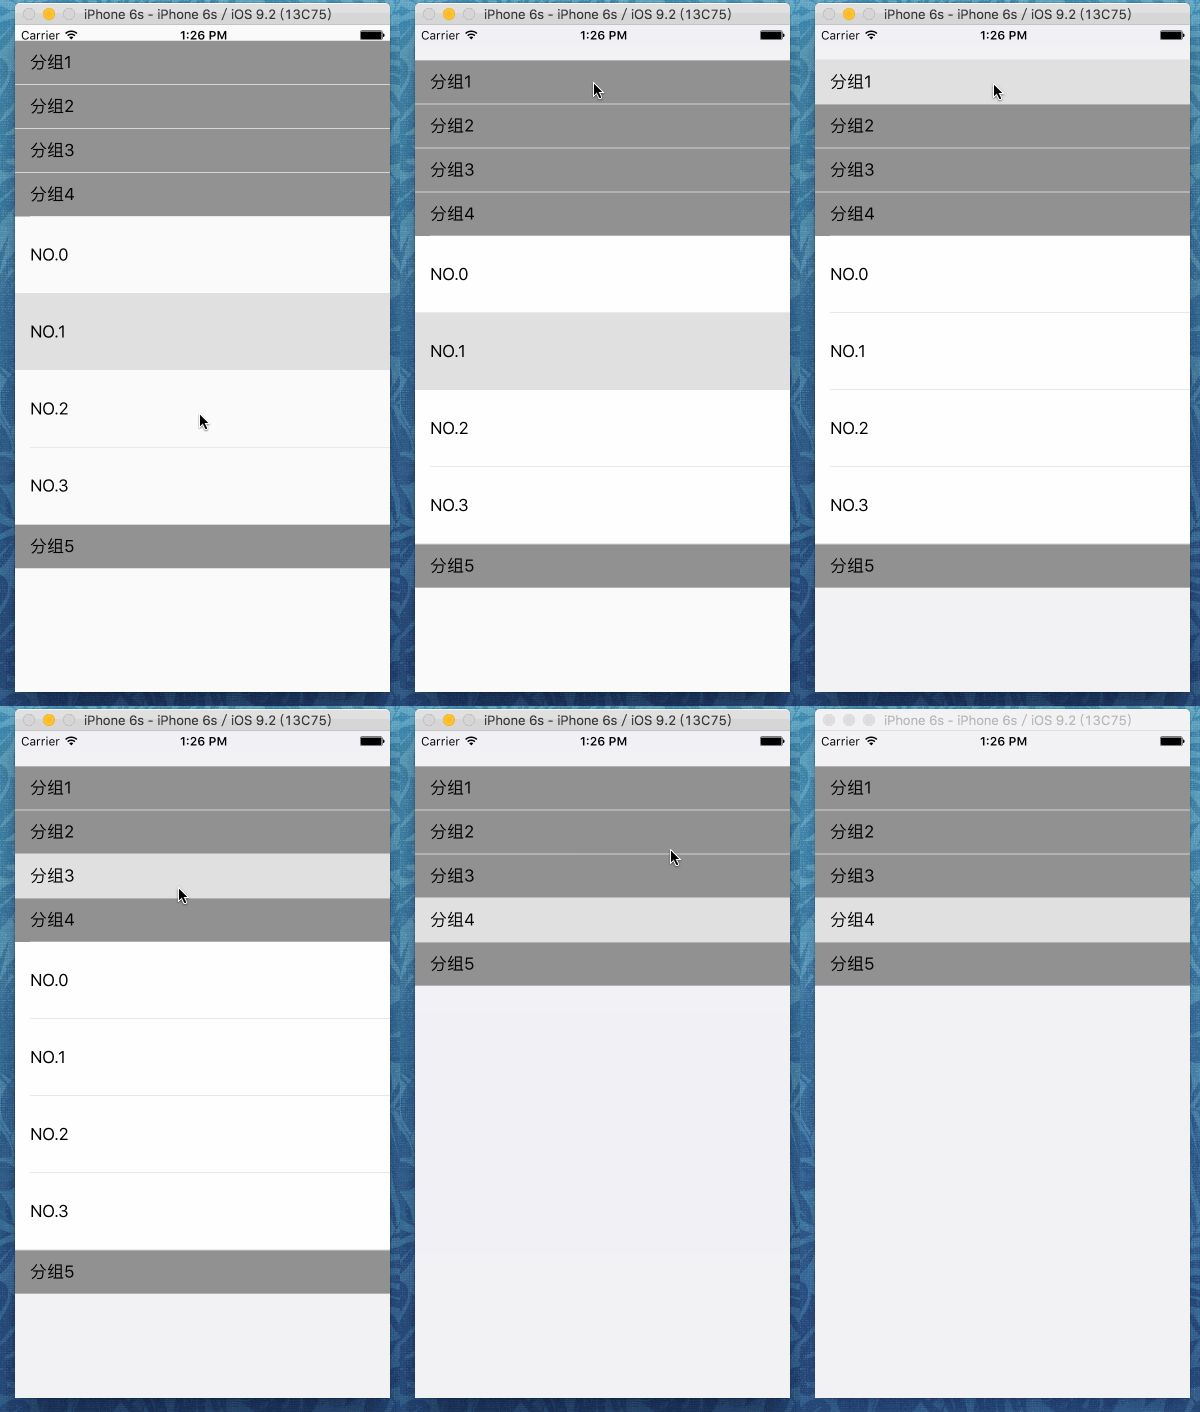
做项目的时侯用到了折叠分组,最近就研究了一下,找了一些网上的项目,发现有一些缺点,研究了几天自己终于写出了一个。而且分组的数据源比较灵活,每组之间的状态没有什么影响。
实现的大体思路是每个分组用一个section来保存,row0用来保存分组的标题,后面的cell保存每个分组的数据。

1.首先要创建一个保存每组的分组信息的model类,包括分组名,每组里面的cell,和当前组的开关状态。
2.通过一个viewController来管理tableView。
3.AppDelegate里面没什么特别的了,不过还是贴出来吧。
这样就大功告成了,可以根据情况获取数据源。不过博主也是刚学习了一段时间的菜鸟,有什么错误希望大家指正,共同进步。
实现的大体思路是每个分组用一个section来保存,row0用来保存分组的标题,后面的cell保存每个分组的数据。

1.首先要创建一个保存每组的分组信息的model类,包括分组名,每组里面的cell,和当前组的开关状态。
//MySection.h
#import <Foundation/Foundation.h>

@interface MySection : NSObject

@property (nonatomic) BOOL isOpen;
@property (nonatomic) NSMutableArray *dataArray;
@property (nonatomic) NSString *name;

@end
//MySection.m
#import "MySection.h"

@interface MySection ()

@end

@implementation MySection

- (instancetype)init
{
self = [super init];
self.isOpen = false;
self.name = @"分组";
self.dataArray = [[NSMutableArray alloc]init];
for (int i = 0; i < 5; i++) {
NSString *string = [NSString stringWithFormat:@"NO.%i",i];

[self.dataArray addObject:string];
}

return self;
}

@end
2.通过一个viewController来管理tableView。
//ViewController.h
#import <UIKit/UIKit.h>

@interface ViewController : UIViewController<UITableViewDataSource, UITableViewDelegate>

@end
//ViewController.m
#import "ViewController.h"
#import "MySection.h"

@interface ViewController ()

@property (nonatomic) UITableView *tableView;
@property (nonatomic) NSIndexPath *selectedIndexPath;
@property (nonatomic) NSMutableArray *sections;

@end

@implementation ViewController

- (void)viewDidLoad {
[super viewDidLoad];

self.tableView = [[UITableView alloc]initWithFrame:self.view.bounds style:UITableViewStyleGrouped];

self.sections = [[NSMutableArray alloc]init];
[self initData];

self.tableView.delegate = self;
self.tableView.dataSource = self;

//设置每组之间的距离为0
self.tableView.sectionFooterHeight = 0;
self.tableView.sectionHeaderHeight = 0;

[self.view addSubview:self.tableView];

}

//初始化数据
- (void)initData
{
for (int i = 0; i < 5; i++) {
MySection *section = [[MySection alloc]init];
section.name = [NSString stringWithFormat:@"分组%i",i + 1];
[self.sections addObject:section];
}
}

- (void)didReceiveMemoryWarning {
[super didReceiveMemoryWarning];
}

- (NSInteger)tableView:(UITableView *)tableView numberOfRowsInSection:(NSInteger)section
{
MySection *theSection = self.sections[section];

//根据分组开关状态和数据源动态改变每组row的个数
if (theSection.isOpen) {
return [theSection.dataArray count];
}else{
return 1;
}
}

//分组数目
- (NSInteger)numberOfSectionsInTableView:(UITableView *)tableView
{
return [self.sections count];
}

- (UITableViewCell *)tableView:(UITableView *)tableView cellForRowAtIndexPath:(NSIndexPath *)indexPath
{
UITableViewCell *cell = [[UITableViewCell alloc]init];

//从数据源数组中取出当前cell对应的对象
MySection *section = self.sections[indexPath.section];

//如果row为0,则为标题
if (indexPath.row == 0) {
cell.textLabel.text = section.name;
cell.backgroundColor = [UIColor grayColor];
}else{
//为每组中cell赋值
cell.textLabel.text = section.dataArray[indexPath.row - 1];
}

return cell;
}

- (void) tableView:(UITableView *)tableView didSelectRowAtIndexPath:(NSIndexPath *)indexPath
{
MySection *section = self.sections[indexPath.section];

//选中标题cell,且对应的组没有打开
if (!section.isOpen) {

NSLog(@"section:%@ open!",section.name);
section.isOpen = YES;

NSMutableArray *a = [[NSMutableArray alloc]init];

for (int i = 1; i < [section.dataArray count]; i++) {
NSIndexPath *addIndexPath = [NSIndexPath indexPathForRow:i inSection:indexPath.section];
[a addObject:addIndexPath];
}

[self.tableView beginUpdates];

[self.tableView insertRowsAtIndexPaths:a withRowAnimation:UITableViewRowAnimationNone];

[self.tableView endUpdates];
}else if (indexPath.row == 0){
//选中的cell对应的组已经打开,且选中的是row0
NSLog(@"section:%@ close!",section.name);
section.isOpen = !section.isOpen;

NSMutableArray *b = [[NSMutableArray alloc]init];

for (int i = 1; i < [section.dataArray count]; i++) {
NSIndexPath *redIndexPath = [NSIndexPath indexPathForRow:i inSection:indexPath.section];
[b addObject:redIndexPath];
}
[self.tableView beginUpdates];

[self.tableView deleteRowsAtIndexPaths:b withRowAnimation:UITableViewRowAnimationTop];

[self.tableView endUpdates];
}

}

//判断是否为标题cell设置行高
- (CGFloat)tableView:(UITableView *)tableView heightForRowAtIndexPath:(NSIndexPath *)indexPath
{
if (indexPath.row != 0) {
return 77;
}else{
return 44;
}
}

@end
3.AppDelegate里面没什么特别的了,不过还是贴出来吧。
//AppDelegate.m
#import "AppDelegate.h"
#import "ViewController.h"

@interface AppDelegate ()

@end

@implementation AppDelegate

- (BOOL)application:(UIApplication *)application didFinishLaunchingWithOptions:(NSDictionary *)launchOptions {

self.window = [[UIWindow alloc]initWithFrame:[UIScreen mainScreen].bounds];

ViewController *vc = [[ViewController alloc]init];

self.window.rootViewController = vc;
self.window.backgroundColor = [UIColor whiteColor];

[self.window makeKeyAndVisible];

return YES;
}

@end
这样就大功告成了,可以根据情况获取数据源。不过博主也是刚学习了一段时间的菜鸟,有什么错误希望大家指正,共同进步。
相关文章推荐
- iOS学习之UICollectionVuew基本使用
- 我对UI自动化测试的理解[转]
- iOS控件——UITableView详解
- iOS开发~interface Builder(简称 IB) 界面构建器
- OpenWRT开发之——BuildPackage剖析
- Win7+VS2010环境下CEGUI 0.8.4编译过程详解
- Android UiAutomator编译与运行测试代码
- Educational Codeforces Round 2 B. Queries about less or equal elements
- Quicksort
- UIViewController的生命周期
- UINavigationBar Background Color
- 关于UI布局中的常见布局类型、控件、控件属性以及引入布局的说明
- UICollectionView的使用
- iOS开发~视图(UIView)与控件(UIControl)
- UIPageViewController-浅析
- EASYUI COMBOBOX 自动补齐功能
- UItable配合数组的简单用法
- SQLiteDatabase中query、insert、update、delete方法参数说明
- Android UiAutomator第一个测试工程
- sonarquer搭建问题
