rtpMIDI Tutorial
2015-12-15 22:12
706 查看
Tobias Erichsen
private stuff & software for audio, midi and more
SearchMain menu
Skip to primary contentSkip to secondary content
About
Software
Contact
rtpMIDI Tutorial
About
The rtpMIDI driver is a network MIDI-driver for Windows operating-systems from XP up to Windows 7. It can be installed and used on both 32bit and 64bit systems.Every Apple-computer based on OS X since “Tiger” (10.4) includes a network-MIDI driver as a standard system-component. You find the configuration of this driver when using spotlight-search for “Audio-MIDI-Setup”.
The rtpMIDI-driver is compatible to the driver contained in OS X. So you can interface your Windows PC with your Macs in the studio.
Apple has now also implemented network MIDI as part of their Core-MIDI services for iOS 4.2 as well. So you can now do WiFi-MIDI between your iPhone, iPod Touch & iPad and a Windows PC using this driver!
rtpMIDI is implemented as a Windows service. Therefore it is automatically starts up as soon as the system boots up. The graphical interface that you can open to configure your network-MIDI-ports just communicates with the service. So even if you close down the graphical interface, your ports will still continue to be available.
Installation
For installation of rtpMIDI, just double-click the rtpMIDI_xxx.msi file.If your system does not include the Apple Bonjour component (which is installed by default when installing applications like iTunes), the installer will detect this and suggest to visit the Apple-download-page for Bonjour.
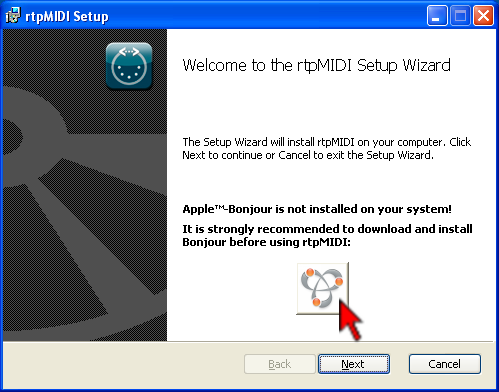
If the installer indicates the abscence of Bonjour, resume installation only after you have downloaded and installed Bonjour.
The role of Bonjour on either Apple or Windows PCs is its use for the so-called “Zero-Config”.
With Bonjour, applications can find specific services on the local network without having a central DNS-server. Almost all applications doing networking on OS X use this for painless plug & play configuration.
Some people have previously disabled Bonjour since they did not use the Zero-config functionality on their PCs. It is important to reactivate this to use rtpMIDI – otherwise the driver cannot announce its activated ports on the network and can also not find its potential peers!
Configuration
After the default-installation you will find the icon to the configuration of rtpMIDI on your desktop.When you start this configuration, you will find a config-screen that closely resembles the one in OS X. So if you are familiar with network-MIDI setup on a Mac, you will find your way without any further hints 😉
On the configuration panel you find the section “My Sessions” on the top left side. Here you can add and remove new MIDI-ports with the “+” and “-” buttons:
After you have added a port, you can override the default names that have been assigned by the driver in the field “Session” on the right side of the configuration-dialog.
The “local Name” is the name that your newly created port will be visible as in your DAW-applications. The “Bonjour-Name” is the name that other peers on the network will find:
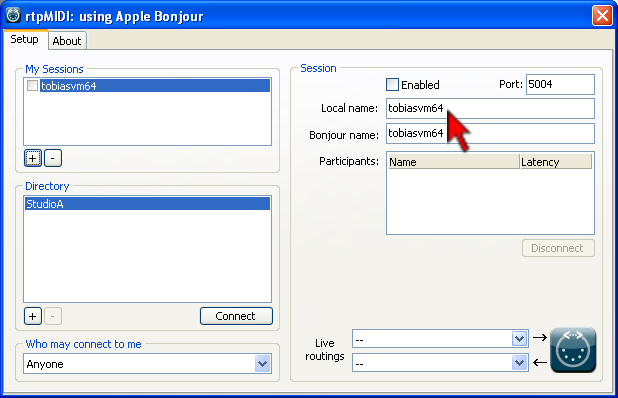
After you have completed the desired naming of your midi-port, you can activate it by either marking the checkbox at the top of the “Session”-section, or the appropriate checkbox in the “My Sessions” section:

At this point, the local MIDI-port has been created and the service has been announced on the network for other peers to be found.
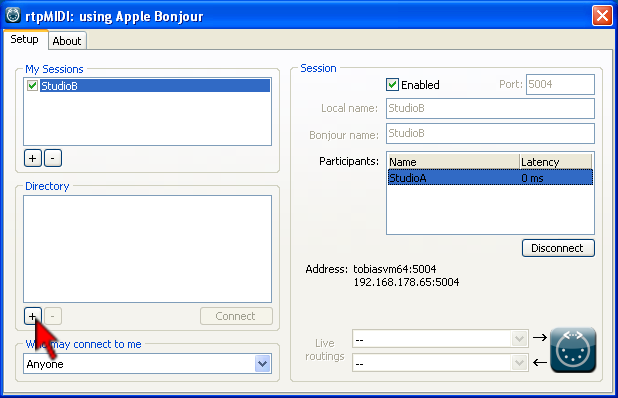
In the section “Directory” on the left side of the dialog, you find other peers in your LAN. If you select one of those peers and press the “connect”-button, this peer will be connected to the Session that you have selected in “My Sessions”:
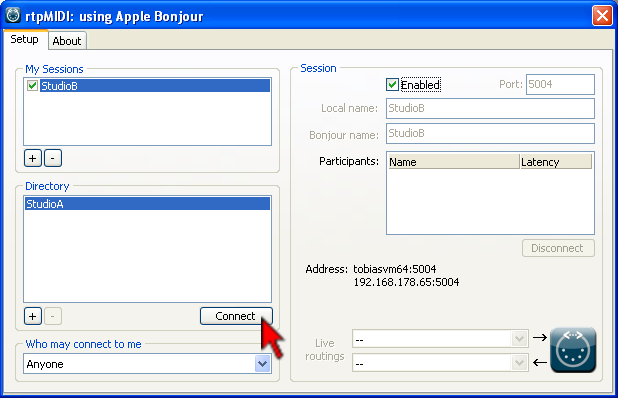
The peer should show up under “Participants”. You are now ready to transfer MIDI-commands between your two connected PCs or Macs…
If you have connected a remote peer to your session, rtpMIDI will try to re-establish the connection every time you boot up your computer, so you don’t have to connect every single time you want to use this connection.
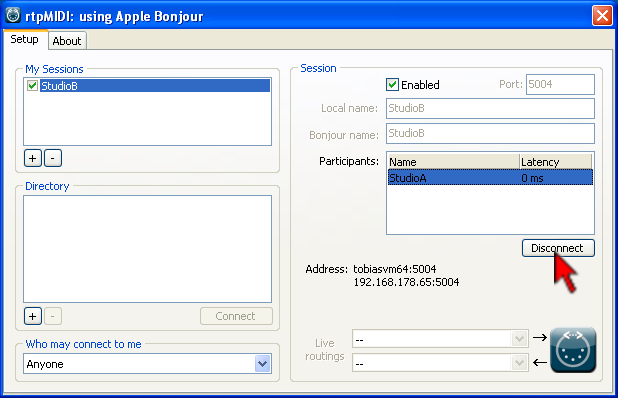
It can also happen that “the other side” is initiating the connection. In this case, the participant will just appear in the participant-list of the corresponding session.
You can manually disconnect every participant of your session by pressing the “disconnect”-button below the participant-list:
Thats pretty much all you need to know to successfully work with rtpMIDI.
Advanced Configuration
Attention: This section is only for special circumstances. For “normal” operation, connecting rtpMIDI to a Mac or an iOS-device, none of the instructions below are necessary!Prior to the activation of a session, you can select a hardware-MIDI device for this session with the “Live routings” drop-down boxes:
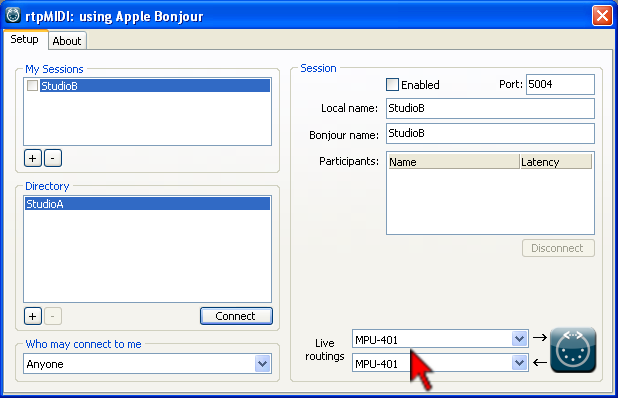
If you do so, after session-activation all the data coming from this hardware-MIDI-device will be routed towards all the participants of your session. Also all the MIDI-data coming from the participants of your session will be routed to the hardware-device. This way rtpMIDI can work as MIDI-gateway for your local MIDI-hardware to be used from remote computers!
In “Who may connect to me”, you can define if you want to allow incoming connections from other peers to the session on your computer. You can either specify Anyone, Noone or “Only computers in my directory”. This way you could assure that no undesired connections will be incoming.
To add or remove computers to your directory, you use the “+” and “-” in the “Directory” section:
If you press “+”, a dialog opens up where you can add manual peers. This may be useful for connecting to peers that do not announce their presence via Bonjour (the Kiss-Box for example):
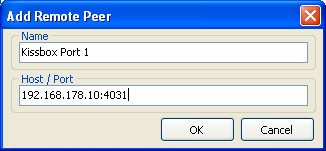
It can also be used to create manual connections to peers on the internet! If you know the IP-address and the correct port-number of a session of someone around the globe, you can connect to this person as well.
[ Caution: the stuff below is only necessary if you want to connect via RTP-MIDI over the Internet, there is no need to do any configuration on your router if you stay in your LAN / WLAN ]
You (and the remote peer) need to create a “port-forward” on your DSL-router for the ports in use. Otherwise the connection will fail. Please also note that latency over WAN-connections can vary and there is the chance of packet-loss.
I cannot provide you with the actual instructions to implement those port-forwarding rules on your router, so please consult your local network-technician 😉 One important point is that rtpMIDI (and therefore also the Apple network-MIDI-driver) use two consecutive ports for operation.
So if port 5004 is specified in the configuration of your session, you need to forward 5004 & 5005 on your router.
Copyright 2010-2015 by Tobias Erichsen

相关文章推荐
- 周鸿祎教你怎么做产品经理
- CCBPM 表结构说明
- 专家:雾霾天PM2.5会渗进室内 里外差别不大
- 产品经理职责:如何对产品进行数据分析?
- 学习popupmenu
- Head First PMP – 6 – 时间管理(Time Management)
- 我们该如何有效的与PD沟通呢?
- PopupMenu消失(Dismiss)抓住
- 关于perl缺少XML/LibXML.pm问题解决方法
- deb和rpm文件安装
- 一张图记住PMP十大只是领域
- mysql rpm安装5.6
- 使用 pm2-web 监控 pm2 服务运行状态
- JBPM4.4:再说活动、任务、事件及在网页中高亮正在执行的活动
- JBPM4.4:流程定义语言和活动、事件
- JBPM4.4:执行流程实例(启动、向后一步、查询任务、拾取任务、完成任务、设置获取流程变量)
- JBPM4.4:API风格、管理(部署、删除、更改、查询(文件资源、活动坐标))流程定义
- JBPM4.4:入门
- 车间生产过程管控系统(PMS)
- IOS视频开发之MPMoviePlayerController