Dlib机器学习库系列2----人脸检测
2015-12-02 15:51
274 查看
这是Dlib库学习系列的第二篇,主要介绍人脸检测。Dlib库的人脸检测算法使用的hog特征与级联分类器。废话少说,下面开始。
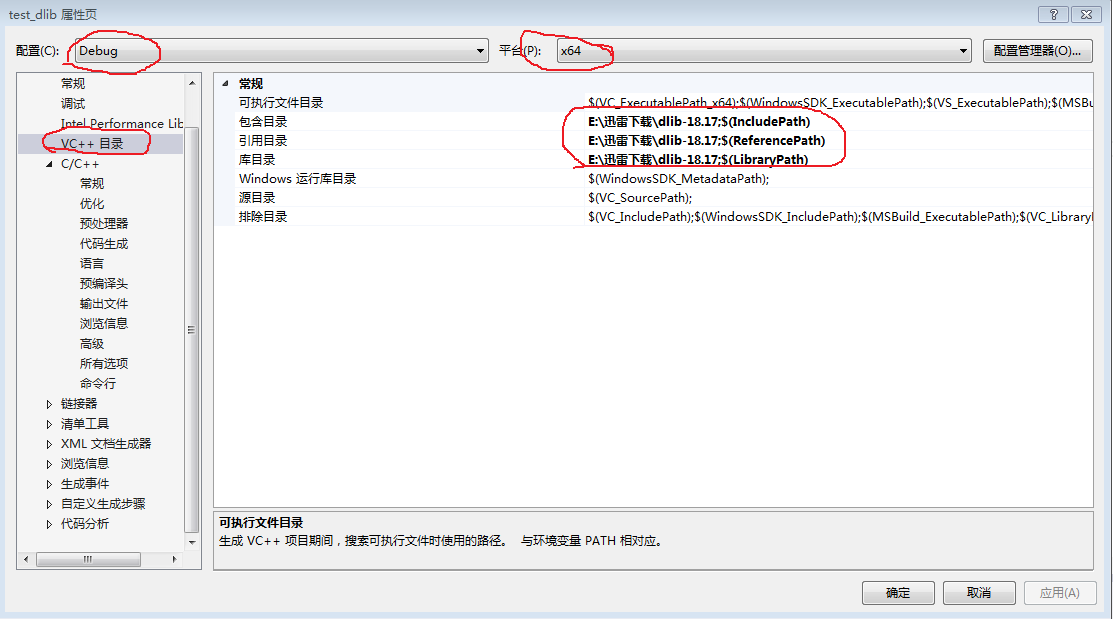
步骤一:建立工程,配置工程。
建立工程就不多说了,不用预编译头,建立一个空项目就可以。下面主要说配置。
(1)
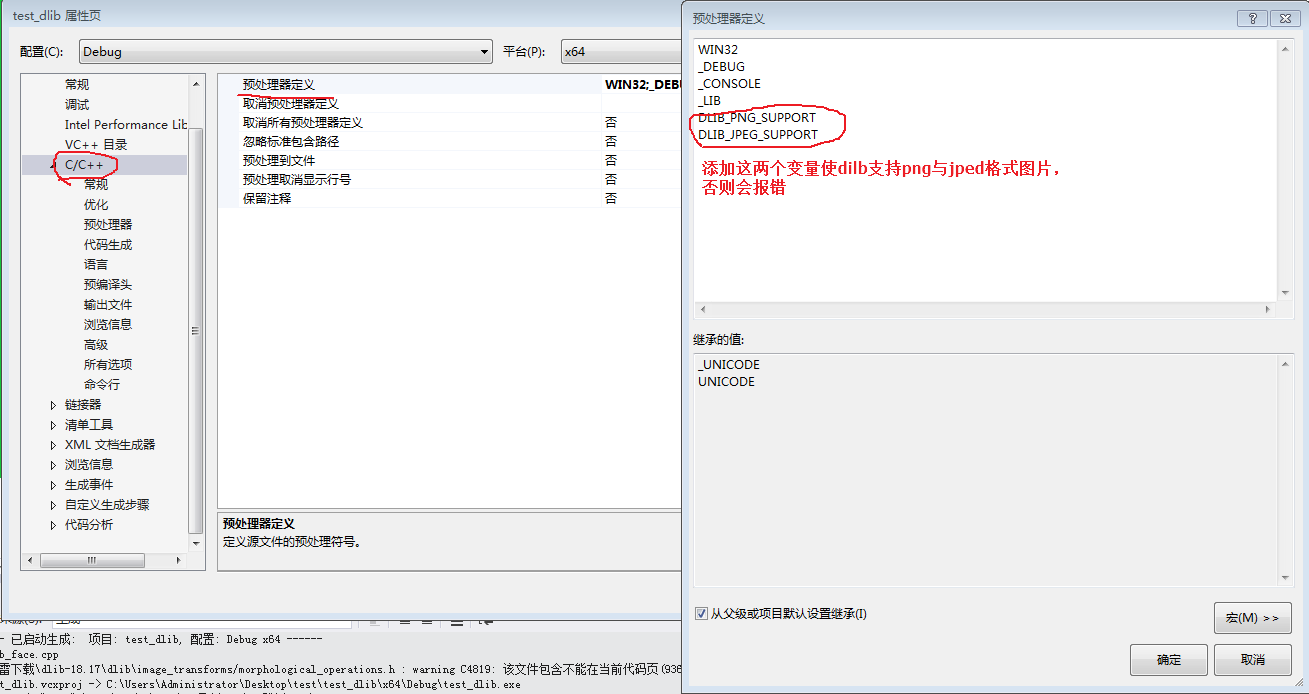
(2)
(3)就是把上一篇博客中生成的dlib.lib导入工程中
步骤二:编写代码
在此我使用的dlib库提供的例子,我只是增加了中文注释
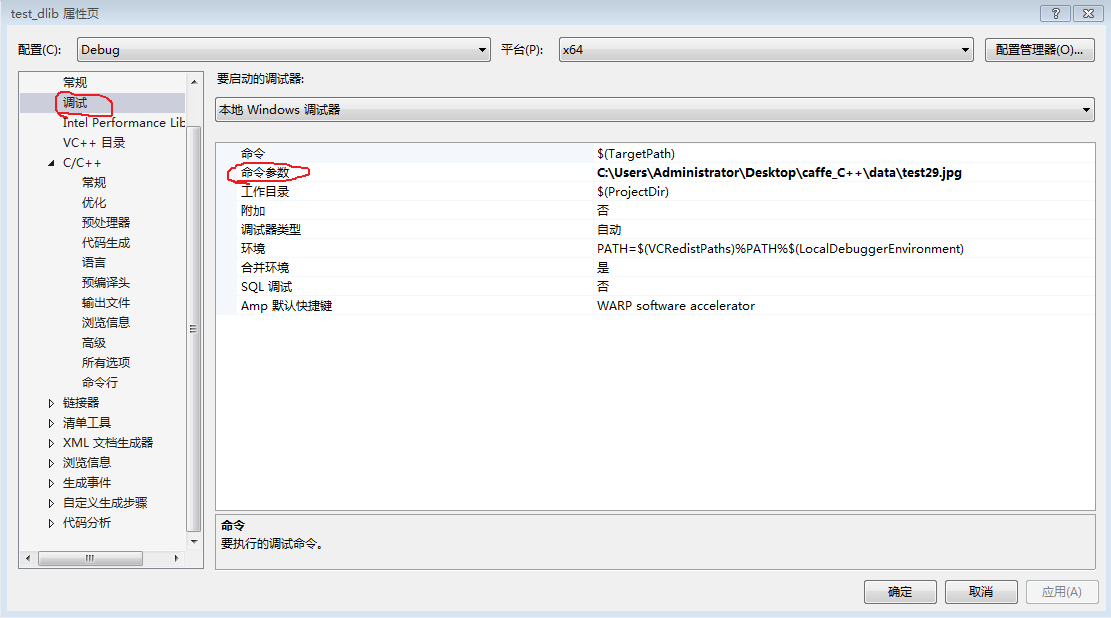
(2)这个代码是带参主函数,我们可以编译完后用命令行的形式运行。如果你不想那么麻烦,我们可以在属性里设置命令参数
做完这一切,编译运行就可以了。
注意!!!
如果有如下报错1>dlib.lib(base_widgets.obj) : error LNK2038: 检测到“_ITERATOR_DEBUG_LEVEL”的不匹配项: 值“2”不匹配值“0”(dlib_face.obj 中)
1>dlib.lib(base_widgets.obj) : error LNK2038: 检测到“RuntimeLibrary”的不匹配项: 值“MDd_DynamicDebug”不匹配值“MD_DynamicRelease”(dlib_face.obj 中)
原因是,你生成的dlib.lib是debug版本,而你的工程建立的是release版本,所有会有这个包括,只要将两者保持一致,就没有在这个报错了!
步骤一:建立工程,配置工程。
建立工程就不多说了,不用预编译头,建立一个空项目就可以。下面主要说配置。
(1)
(2)
(3)就是把上一篇博客中生成的dlib.lib导入工程中
步骤二:编写代码
在此我使用的dlib库提供的例子,我只是增加了中文注释
// The contents of this file are in the public domain. See LICENSE_FOR_EXAMPLE_PROGRAMS.txt
/*

This example program shows how to find frontal human faces in an image.  In
particular, this program shows how you can take a list of images from the
command line and display each on the screen with red boxes overlaid on each
human face.
检测正脸,可检测一系列的图片上的人脸并用红色方框表示

The examples/faces folder contains some jpg images of people.  You can run
this program on them and see the detections by executing the following command:
./face_detection_ex faces/*.jpg  可以使用此命令运行该程序

This face detector is made using the now classic Histogram of Oriented
Gradients (HOG) feature combined with a linear classifier, an image pyramid,
and sliding window detection scheme.  This type of object detector is fairly
general and capable of detecting many types of semi-rigid objects in
addition to human faces.  Therefore, if you are interested in making your
own object detectors then read the fhog_object_detector_ex.cpp example
program.  It shows how to use the machine learning tools which were used to
create dlib's face detector.

Finally, note that the face detector is fastest when compiled with at least
SSE2 instructions enabled.  So if you are using a PC with an Intel or AMD
chip then you should enable at least SSE2 instructions.  If you are using
cmake to compile this program you can enable them by using one of the
following commands when you create the build project:
cmake path_to_dlib_root/examples -DUSE_SSE2_INSTRUCTIONS=ON
cmake path_to_dlib_root/examples -DUSE_SSE4_INSTRUCTIONS=ON
cmake path_to_dlib_root/examples -DUSE_AVX_INSTRUCTIONS=ON
This will set the appropriate compiler options for GCC, clang, Visual
Studio, or the Intel compiler.  If you are using another compiler then you
need to consult your compiler's manual to determine how to enable these
instructions.  Note that AVX is the fastest but requires a CPU from at least
2011.  SSE4 is the next fastest and is supported by most current machines.
*/

#include <dlib/image_processing/frontal_face_detector.h>
#include <dlib/gui_widgets.h>
#include <dlib/image_io.h>
#include <iostream>

using namespace dlib;
using namespace std;

// ----------------------------------------------------------------------------------------

int main(int argc, char** argv)
{
try
{
if (argc == 1)
{
cout << "Give some image files as arguments to this program." << endl;
return 0;
}

frontal_face_detector detector = get_frontal_face_detector();//定义一个frontal_face_detctor类的实例detector,用get_frontal_face_detector函数初始化该实例
image_window win;//一个显示窗口

// Loop over all the images provided on the command line.
// 循环所有的图片
for (int i = 1; i < argc; ++i)
{
cout << "processing image " << argv[i] << endl;
array2d<unsigned char> img;
load_image(img, argv[i]);// 加载一张图片,从argv[i](图片路劲)加载到变量img
// Make the image bigger by a factor of two.  This is useful since
// the face detector looks for faces that are about 80 by 80 pixels
// or larger.  Therefore, if you want to find faces that are smaller
// than that then you need to upsample the image as we do here by
// calling pyramid_up().  So this will allow it to detect faces that
// are at least 40 by 40 pixels in size.  We could call pyramid_up()
// again to find even smaller faces, but note that every time we
// upsample the image we make the detector run slower since it must
// process a larger image.
/*确保检测图片是检测器的两倍。这第一点是十分有用的,因为脸部检测器搜寻的人脸大小是80*80或者更大。
因此,如果你想找到比80*80小的人脸,需要将检测图片进行上采样,我们可以调用pyramid_up()函数。
执行一次pyramid_up()我们能检测40*40大小的了,如果我们想检测更小的人脸,那还需要再次执行pyramid_up()函数。
注意,上采样后,速度会减慢!*/
pyramid_up(img);//对图像进行上采用,检测更小的人脸

// Now tell the face detector to give us a list of bounding boxes
// around all the faces it can find in the image.
//开始检测,返回一系列的边界框
std::vector<rectangle> dets = detector(img);//detector()函数检测人脸,返回一系列边界盒子

cout << "Number of faces detected: " << dets.size() << endl;//dets.size 人脸数量
// Now we show the image on the screen and the face detections as
// red overlay boxes.
// 在原图片上显示结果
win.clear_overlay();
win.set_image(img);
win.add_overlay(dets, rgb_pixel(255, 0, 0));

cout << "Hit enter to process the next image..." << endl;
cin.get();
}
}
catch (exception& e)
{
cout << "\nexception thrown!" << endl;
cout << e.what() << endl;
}
}

// ----------------------------------------------------------------------------------------
(2)这个代码是带参主函数,我们可以编译完后用命令行的形式运行。如果你不想那么麻烦,我们可以在属性里设置命令参数
做完这一切,编译运行就可以了。
注意!!!
如果有如下报错1>dlib.lib(base_widgets.obj) : error LNK2038: 检测到“_ITERATOR_DEBUG_LEVEL”的不匹配项: 值“2”不匹配值“0”(dlib_face.obj 中)
1>dlib.lib(base_widgets.obj) : error LNK2038: 检测到“RuntimeLibrary”的不匹配项: 值“MDd_DynamicDebug”不匹配值“MD_DynamicRelease”(dlib_face.obj 中)
原因是,你生成的dlib.lib是debug版本,而你的工程建立的是release版本,所有会有这个包括,只要将两者保持一致,就没有在这个报错了!

相关文章推荐
- vs2008 dlib编译问题USER_ERROR__missing_dlib_all_source_cpp_file__OR__inconsistent_use_of_DEBUG_or_ENABLE
- OpenCV+Dlib实现人脸68个特征点检测
- OpenCV + Dlib对人脸位置进行校准
- OpenCV+Dlib进行实时脸部检测
- vs2013配置dlib库
- Opencv与dlib联合进行人脸关键点检测与识别
- Dlib人脸关键点检测顺序
- 人脸旋转归一化 (根据特征点定位,dlib+opencv)
- SVM分类器的实现(包括交叉验证选择参数,Dlib,可视化)
- Windows环境 安装dlib(python) 总结
- 人脸检测,人脸识别,机器学习库Dlib在VS2015上的详细安装教程,示例运行
- win10下vs2013+DLib机器学习库安装及配置
- 利用opencv,dlib,python编写人脸检测程序
- Dlib与Opencv的图像转换
- 【Dlib+Python+Ubuntu】人脸landmark
- 裸机Ubuntu16.04配置Dlib19.4 (Python人脸检测例子)
- Dlib库【1】——3D点云显示(鼠标控制)
- 人脸检测的三种提速尝试
- 表情识别的简单实现(实时,C++,SVM+Dlib)
- Dlib人脸特征点检测性能测试(光照+各部分功能模块运行时间)