How to Enable Failed Request Tracing for UNC Hosting
2015-12-02 02:43
561 查看
http://www.iis.net/learn/troubleshoot/using-failed-request-tracing/how-to-enable-failed-request-tracing-for-unc-hosting
Placing application content and code on a UNC share for hosting scenarios is increasingly important on web application servers. In hosting scenarios, it is important to be able to keep the logs alongside the web application content and code. Logs include the
Failed Request Tracing log files, as well as the hit logs that IIS logs for the web site. This document walks you through the creation of the appropriate directories, setting the right permissions on them, and then configuring IIS on how to use the directories
for the various log files.
The basic naming conventions for the log file directories, user accounts, and permissions settings are consistent with the "Shared Hosting Walkthrough" document also available on this site. This walkthrough also makes distinctions on how to do the various actions
via :
UI : Using the IIS Manager or Explorer to perform the action
CMD : Using command line (PowerShell, AppCmd, etc.) to perform the action
XML : Manually edit configuration to perform the action.
Failed Request Tracing is a powerful diagnostics feature helps developers and administrators determine where problems occur in their applications and why they are happening. Failed Request Tracing after installation is quite difficult to use by developers who
are non-administrators on the machine. This section helps setup Failed Request Tracing to be accessible by developers by:
Unlocking the sections necessary to allow developers to define their own failed request tracing rules for their applications
Setting up Failed Request Tracing to log to a UNC share for the application owner
Remember that there are two different sections of configuration for Failed Request Tracing:
<traceFailedRequestsLogging> :
This section is always restricted to IIS administrators. This section allows administrators to enable or disable the Failed Request Tracing feature for a site, configure the maximum # of log files, size of the log files, and the directory where the log files
are to live. For these reasons, (i.e. controlling the ability to fill the disk with log files) administrators must maintain control over this section.
<traceFailedRequests> :
This section is where you create your failure definitions - what URLs to capture traces for and under what conditions to save those traces to disk as XML. This is
the section that we will allow to be unlocked.
After installation of the Failed Request Tracing Module (see the Troubleshooting
Failed Requests Using Tracing on IIS.net for information regarding the installation and basic usage of Failed Request Tracing), the <traceFailedRequests> section
is already set for Read/Write permissions. This allows application owners to define their own Failed Request Tracing rules, without the administrator defining these rules for them.
To verify that <traceFailedRequests> has been setup for delegation from the IIS Manager UI, do the following:
Click Start and type in inetmgr. Enter
administrator credentials if you are not already administrator.
Click the Machine name, then Feature
Delegation.
Verify that Failed Request Tracing
Rules is set to Read/Write.
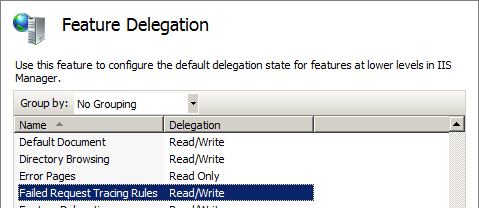
This allows developers who do not have access to ApplicationHost.config to create their own failure definitions in their application web.config files. Only when the administrator turns on failure request tracing will the rules then take effect.
To verify that <traceFailedRequests> has been setup for delegation via ApplicationHost.config, do the following:
Start an administrator-elevated command prompt.
Change directories to %windir%\system32\inetsrv\config,
and run notepad applicationHost.config.
In applicationHost.config, search for the string <section
name="traceFailedRequests" - this section is delegated if it isoverrideModeDefault="Allow".
In order for IIS to be able to write its Failed Request Log Files to a UNC share, the worker process identity must be given Full Control on the network share and the filesystem path on the UNC server. This is because it must be able to list directory contents,
create new log files and directories, and delete old log files.
If you use one of the built-in accounts (like IUSR or Network Service) as the application Pool ID, these accounts appear as ANONYMOUS on the UNC server. It is highly recommended that
you either:
DOMAIN
USAGE : Create a domain user account for the application pool, then use that application Pool ID to ACL down the share and filesystem directory where the Failure Request Log Files live. Both the web server and the UNC server must be members of the domain.
NON-DOMAIN
USAGE : If the UNC and Web Servers are not joined to the domain, the same account with the same account password must be created on each machine. This is the example used in this walkthrough.
These directions should be repeated on both the UNC server as well as the web server. Create a user called "PoolId1", whose password will be "!p4ssw0rd"
From an Administrator-elevated command prompt, run start
lusrmgr.msc.
Right-click on the Users folder
and select New
User... .
Fill in the New
User dialog entries as follows:
a. User name : PoolId1
b. Password (& Confirm Password) : !p4ssw0rd
c. uncheck "User must change password at next logon"
d. check "user cannot change password"
e. Click Create,
then Close.

Make sure to create the PoolId1 user
on both the front-end IIS Web Server & the back end UNC server.
You also need to add the PoolId1 to
the IIS_IUSRS group on the Front End Web Server. To do so:
Click the Groups folder
on the lusrmgr MMC snapin.
Right-click on IIS_IUSRS and
select Add
to Group.
Click Add...,
then put <servername>\PoolId1 in
as the identity to add.
To add the new PoolId1 identity
from the command line, do the following:
Run an administrator elevated command prompt.
In the command prompt window, run the following commands:
Note: The
"net localgroup" command is only required on the Front End Web Server.
Part of the shared hosting guidance that the IIS team is creating is a new application pool; set its identity to the PoolId1 that
we just created.
On the IIS front end server, run Start->Inetmgr.
Click on Application
Pools node in the UI, then select under Actions -> Add
Application Pool...
make the name Pool_Site1,
leave all other settings alone, and click OK.
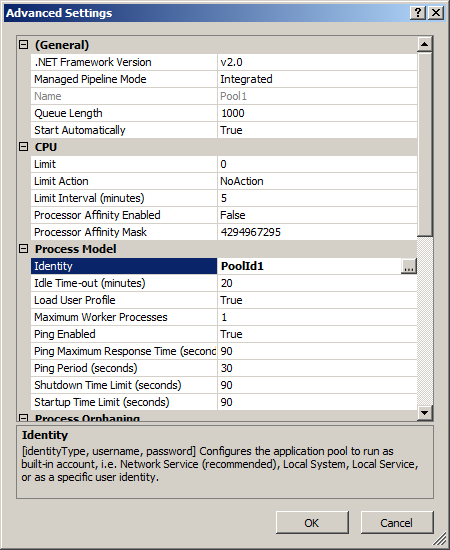
Right-click the Pool_Site1 and
select Advanced
Settings...
Under Process Model, select
the Identity row and then
on the ... button.
Click the Set button
and configure the Custom Identity to
match our user identity we just created - PoolId1. Click OK andOK again
to change the identity of the application pool. You see:
We must also drop a site into this application pool. Use Default Web Site for the purposes of this walkthrough. You can also create a new site for this (SITE1) via INETMGR.exe. Do the following:
Click on the Sites folder,
then on Default
Web Site.
In the right Actions pane,
select Basic
Settings...
To the right of Application
Pool: click on Select...
Choose the new Pool_Site1 application
Pool we just created and click OK,
then OK again.
To do the above steps from the command line:
Start an administrator-elevated command prompt .
To add the new application pool run the following command:
%windir%\system32\inetsrv\appcmd
add AppPool
-name:Pool_Site1
-processModel.username:ERICDE-DELL-W\PoolId1
-processModel.password:!p4ssw0rd
-processModel.identityType:SpecificUser
To set the root application of the Default Web Site to run in Pool_Site1, run the following command:
Now create and lock down the UNC share & its file system directories.
On the UNC server do the following:
Create a filesystem path (call it content)
where we will dump the content.
Underneath that, create a new directory called Site1,
and under that another directory called Logs,
and the final directory called failedReqLogFiles.
What you should see is:
g:\content
Site1
Logs
failedReqLogFIles
On g:\content\Site1\Logs\failedReqLogFiles, set the permissions on the filesystem path to give the PoolId1 full
control over the Logs directory. This is required, as the worker process identity must be able to list contents, write new files, create new directories, and delete old files. To do this from an administrator elevated command prompt, run the following command:
Windows Server® 2003 Fileserver :
Windows Server 2003 Fileserver :
Share the directory out. From the command line, do the following:
Now that Share is shared out and the right permissions established, configure Failed Request Tracing to log to the UNC Path.
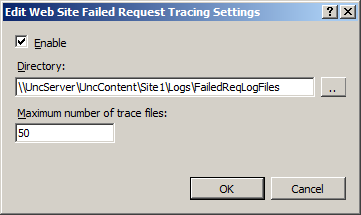
To configure Failed Request Tracing to log to our UNC path, follow these directions on the Web Server:
Open INETMGR by running Start->Inetmgr.
Click on Default Web Site,
then under Configure click
on Failed
Request Tracing...
Check the Enabled check
box.
Under Directory, type in
the path to the UNC share ->
Configure a rule to catch all 200s for all URLs for All
Content to run a test.
1. In the INETMGR UI again, expand the Sites folder
and click on Default Web Site.
2. Double-click on Failed
Request Tracing Rules.
3. Under Actions on the right,
click on Add...

4. Click Next,
and set the status code to 200:
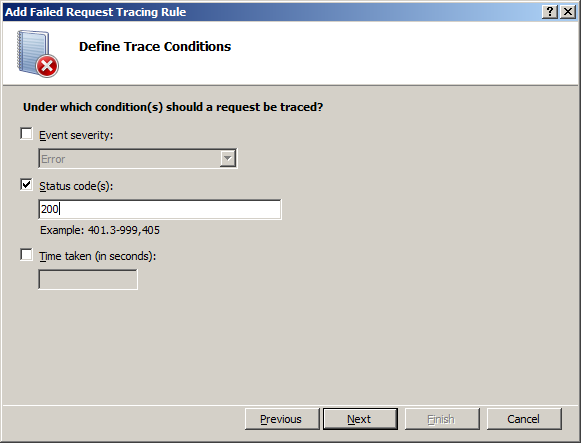
5. Click Next,
and leave the default to collect everything, then click Finish.
The actual XML looks like the following in the web.config file for the Default Web Site:
Browse to the website that we set up in order to log Failed Request Tracing rules to the UNC path (sayhttp://uncsite/default.aspx)
. Check the UNC back end server directory where you are logging. Notice that a new directory called W3SVC1 has been created within the configured Failed Request Log File Directory. Browse into that directory, and see the log file and the FREB.xsl file.
Configuring Failed Request Tracing and Logging for a Hosting Scenario
Placing application content and code on a UNC share for hosting scenarios is increasingly important on web application servers. In hosting scenarios, it is important to be able to keep the logs alongside the web application content and code. Logs include theFailed Request Tracing log files, as well as the hit logs that IIS logs for the web site. This document walks you through the creation of the appropriate directories, setting the right permissions on them, and then configuring IIS on how to use the directories
for the various log files.
The basic naming conventions for the log file directories, user accounts, and permissions settings are consistent with the "Shared Hosting Walkthrough" document also available on this site. This walkthrough also makes distinctions on how to do the various actions
via :
UI : Using the IIS Manager or Explorer to perform the action
CMD : Using command line (PowerShell, AppCmd, etc.) to perform the action
XML : Manually edit configuration to perform the action.
Configuring Failed Requests Tracing for a Hosting Scenario
Failed Request Tracing is a powerful diagnostics feature helps developers and administrators determine where problems occur in their applications and why they are happening. Failed Request Tracing after installation is quite difficult to use by developers whoare non-administrators on the machine. This section helps setup Failed Request Tracing to be accessible by developers by:
Unlocking the sections necessary to allow developers to define their own failed request tracing rules for their applications
Setting up Failed Request Tracing to log to a UNC share for the application owner
Delegating <traceFailedRequests> to Non-Administrators
Remember that there are two different sections of configuration for Failed Request Tracing:<traceFailedRequestsLogging> :
This section is always restricted to IIS administrators. This section allows administrators to enable or disable the Failed Request Tracing feature for a site, configure the maximum # of log files, size of the log files, and the directory where the log files
are to live. For these reasons, (i.e. controlling the ability to fill the disk with log files) administrators must maintain control over this section.
<traceFailedRequests> :
This section is where you create your failure definitions - what URLs to capture traces for and under what conditions to save those traces to disk as XML. This is
the section that we will allow to be unlocked.
After installation of the Failed Request Tracing Module (see the Troubleshooting
Failed Requests Using Tracing on IIS.net for information regarding the installation and basic usage of Failed Request Tracing), the <traceFailedRequests> section
is already set for Read/Write permissions. This allows application owners to define their own Failed Request Tracing rules, without the administrator defining these rules for them.
UI: VERIFYING <TRACEFAILEDREQUESTS> DELEGATION FROM THE IIS MANAGER
To verify that <traceFailedRequests> has been setup for delegation from the IIS Manager UI, do the following:Click Start and type in inetmgr. Enter
administrator credentials if you are not already administrator.
Click the Machine name, then Feature
Delegation.
Verify that Failed Request Tracing
Rules is set to Read/Write.
This allows developers who do not have access to ApplicationHost.config to create their own failure definitions in their application web.config files. Only when the administrator turns on failure request tracing will the rules then take effect.
XML: VERIFYING <TRACEFAILEDREQUESTS> DELEGATION IN APPLICATIONHOST.CONFIG
To verify that <traceFailedRequests> has been setup for delegation via ApplicationHost.config, do the following:Start an administrator-elevated command prompt.
Change directories to %windir%\system32\inetsrv\config,
and run notepad applicationHost.config.
In applicationHost.config, search for the string <section
name="traceFailedRequests" - this section is delegated if it isoverrideModeDefault="Allow".
<configSections>
...other config sectionGroups...
<sectionGroup name="system.webServer">
...other sections...
<sectionGroup name="tracing">
<section name="traceFailedRequests" overrideModeDefault="Allow" />
...
</sectionGroup>
...
</sectionGroup>
</configSections>
Configuring the UNC Share and Application Pool IDs
In order for IIS to be able to write its Failed Request Log Files to a UNC share, the worker process identity must be given Full Control on the network share and the filesystem path on the UNC server. This is because it must be able to list directory contents,create new log files and directories, and delete old log files.
If you use one of the built-in accounts (like IUSR or Network Service) as the application Pool ID, these accounts appear as ANONYMOUS on the UNC server. It is highly recommended that
you either:
DOMAIN
USAGE : Create a domain user account for the application pool, then use that application Pool ID to ACL down the share and filesystem directory where the Failure Request Log Files live. Both the web server and the UNC server must be members of the domain.
NON-DOMAIN
USAGE : If the UNC and Web Servers are not joined to the domain, the same account with the same account password must be created on each machine. This is the example used in this walkthrough.
UI: CREATING THE NEW LOCAL ACCOUNT ON THE UNC SERVER AND FRONT END WEB SERVER
These directions should be repeated on both the UNC server as well as the web server. Create a user called "PoolId1", whose password will be "!p4ssw0rd"From an Administrator-elevated command prompt, run start
lusrmgr.msc.
Right-click on the Users folder
and select New
User... .
Fill in the New
User dialog entries as follows:
a. User name : PoolId1
b. Password (& Confirm Password) : !p4ssw0rd
c. uncheck "User must change password at next logon"
d. check "user cannot change password"
e. Click Create,
then Close.
Make sure to create the PoolId1 user
on both the front-end IIS Web Server & the back end UNC server.
You also need to add the PoolId1 to
the IIS_IUSRS group on the Front End Web Server. To do so:
Click the Groups folder
on the lusrmgr MMC snapin.
Right-click on IIS_IUSRS and
select Add
to Group.
Click Add...,
then put <servername>\PoolId1 in
as the identity to add.
CMD: CREATING THE NEW LOCAL ACCOUNT ON THE UNC SERVER AND FRONT END WEB SERVER
To add the new PoolId1 identityfrom the command line, do the following:
Run an administrator elevated command prompt.
In the command prompt window, run the following commands:
net user PoolId1 !p4ssw0rd /ADD /passwordchg:no

net localgroup IIS_IUSRS PoolId1 /ADD
Note: The
"net localgroup" command is only required on the Front End Web Server.
UI: CREATE A NEW APPLICATION POOL FOR THE WEB SITE AND CHANGE ITS IDENTITY
Part of the shared hosting guidance that the IIS team is creating is a new application pool; set its identity to the PoolId1 thatwe just created.
On the IIS front end server, run Start->Inetmgr.
Click on Application
Pools node in the UI, then select under Actions -> Add
Application Pool...
make the name Pool_Site1,
leave all other settings alone, and click OK.
Right-click the Pool_Site1 and
select Advanced
Settings...
Under Process Model, select
the Identity row and then
on the ... button.
Click the Set button
and configure the Custom Identity to
match our user identity we just created - PoolId1. Click OK andOK again
to change the identity of the application pool. You see:
We must also drop a site into this application pool. Use Default Web Site for the purposes of this walkthrough. You can also create a new site for this (SITE1) via INETMGR.exe. Do the following:
Click on the Sites folder,
then on Default
Web Site.
In the right Actions pane,
select Basic
Settings...
To the right of Application
Pool: click on Select...
Choose the new Pool_Site1 application
Pool we just created and click OK,
then OK again.
CMD: CREATE A NEW APPLICATION POOL FOR THE WEB SITE AND CHANGE ITS IDENTITY
To do the above steps from the command line:Start an administrator-elevated command prompt .
To add the new application pool run the following command:
%windir%\system32\inetsrv\appcmd
add AppPool
-name:Pool_Site1
-processModel.username:ERICDE-DELL-W\PoolId1
-processModel.password:!p4ssw0rd
-processModel.identityType:SpecificUser
To set the root application of the Default Web Site to run in Pool_Site1, run the following command:
%windir%\system32\inetsrv\appcmd set app -app.name:"Default Web Site/" -applicationPool:Pool_Site1
Creating and Locking Down the ACLs for the UNC Share
Now create and lock down the UNC share & its file system directories.
CMD: CREATING & LOCKING DOWN THE ACLS FOR THE UNC SHARE
On the UNC server do the following:Create a filesystem path (call it content)
where we will dump the content.
Underneath that, create a new directory called Site1,
and under that another directory called Logs,
and the final directory called failedReqLogFiles.
What you should see is:
g:\content
Site1
Logs
failedReqLogFIles
On g:\content\Site1\Logs\failedReqLogFiles, set the permissions on the filesystem path to give the PoolId1 full
control over the Logs directory. This is required, as the worker process identity must be able to list contents, write new files, create new directories, and delete old files. To do this from an administrator elevated command prompt, run the following command:
Windows Server® 2003 Fileserver :
icacls g:\content\Site1\Logs\failedReqLogFiles /g PoolId1:F
Windows Server 2003 Fileserver :
cacls g:\content\Site1\Logs\failedReqLogFiles /g PoolId1:F /e
Share the directory out. From the command line, do the following:
net share content$=g:\content /GRANT:Users,CHANGE
Setting Failed Request Tracing to Log to the UNC Path
Now that Share is shared out and the right permissions established, configure Failed Request Tracing to log to the UNC Path.
UI: CONFIGURING FAILED REQUEST TRACING TO LOG TO UNC
To configure Failed Request Tracing to log to our UNC path, follow these directions on the Web Server:Open INETMGR by running Start->Inetmgr.
Click on Default Web Site,
then under Configure click
on Failed
Request Tracing...
Check the Enabled check
box.
Under Directory, type in
the path to the UNC share ->
\\<UncServerName>\UNCContent\Site1\Logs\FailedReqLogFiles
Testing
Configure a rule to catch all 200s for all URLs for AllContent to run a test.
1. In the INETMGR UI again, expand the Sites folder
and click on Default Web Site.
2. Double-click on Failed
Request Tracing Rules.
3. Under Actions on the right,
click on Add...
4. Click Next,
and set the status code to 200:
5. Click Next,
and leave the default to collect everything, then click Finish.
XML: CONFIGURING THE FAILED REQUEST TRACING RULE IN WEB.CONFIG
The actual XML looks like the following in the web.config file for the Default Web Site:<?xml version="1.0" encoding="UTF-8"?> <configuration> <system.webServer> <tracing> <traceFailedRequests> <add path="*"> <traceAreas> <add provider="ASP" verbosity="Verbose" /> <add provider="ASPNET" areas="Infrastructure,Module,Page,AppServices" verbosity="Verbose" /> <add provider="ISAPI Extension" verbosity="Verbose" /> <add provider="WWW Server" areas="Authentication,Security,Filter,StaticFile,CGI,Compression,Cache,RequestNotifications" verbosity="Verbose" /> </traceAreas> <failureDefinitions statusCodes="200" /> </add> </traceFailedRequests> </tracing> </system.webServer> </configuration>
Checking the UNC Back End
Browse to the website that we set up in order to log Failed Request Tracing rules to the UNC path (sayhttp://uncsite/default.aspx). Check the UNC back end server directory where you are logging. Notice that a new directory called W3SVC1 has been created within the configured Failed Request Log File Directory. Browse into that directory, and see the log file and the FREB.xsl file.

相关文章推荐
- Trace Failed Requests <traceFailedRequests>
- 如何点击运动中的Button(控件)
- [解决]Error:failed to find Build Tools revision
- UESTC 1019 SSRaligun酱的魔法符文 用记忆实际区间最左min1最右max1来减小时间复
- IOS UITableView (三)
- iOS运用runtime全局修改UILabel的默认字体
- poj3481 Double Queue
- Vivado AXI Reference Guide 阅读笔记
- UIView的概念与使用
- IOS UITableView (二)
- pcduino 无法打开usb摄像头。
- PMON failed to acquire latch, see PMON dump
- UIAlertViewController 2
- IOS UITableView
- Queue、BlockingQueue以及利用BlockingQueue实现生产者/消费者模型
- UI基础_UIImage
- 【干货】jsMind思维导图整合Easyui的右键菜单
- Unique Binary Search Trees
- iOS-自定义 UITabBarController
- iOS-自定义 UITabBarController