MaxScript 例子 渲染
2015-11-24 17:42
295 查看
MaxScript 渲染的例子
macroScript NewTextureRender category:"WJL"(
--烘焙函数
fn BakeDiffuseAndLighting obj size =
(
--清空所有渲染元素
obj.iNodeBakeProperties.removeAllBakeElements()
--准备烘焙元素
be1 = diffusemap()
be1.outputSzX = be1.outputSzY = size --set the size of the baked map
be1.fileType = (getDir #image+"\\"+obj.name+"_diffuse.tga")
be1.fileName = filenameFromPath be1.fileType
be1.filterOn = true --enable filtering
be1.shadowsOn = false --disable shadows
be1.lightingOn = false --disable lighting
be1.enabled = true --enable baking
be2 = LightingMap() -- 实例灯光烘焙元素
be2.outputSzX = be2.outputSzY = size --set the size of the baked map
be2.fileType = (getDir #image+"\\"+obj.name+"_lighting.tga")
be2.fileName = filenameFromPath be2.fileType
be2.filterOn = true --enable filtering
be2.shadowsOn =true --enable shadows
be2.enabled = true --enable baking
--准备烘焙
obj.INodeBakeProperties.addBakeElement be1 --add first element
obj.INodeBakeProperties.addBakeElement be2 --add second element
obj.INodeBakeProperties.bakeEnabled = true --enabling baking
obj.INodeBakeProperties.bakeChannel = 1 --channel to bake
obj.INodeBakeProperties.nDilations = 1 --expand the texture a bit
--烘焙选中项,所以选中obj
select obj
--调用渲染烘焙
render rendertype:#bakeSelected vfb:off progressBar:true outputSize:[size,size]
--创建一个复合纹理
theComp = CompositeTextureMap()
theComp.add() --添加第二个层
theComp.blendMode = #(0,5) --设置层位模式 5:Multiply
--创建两个纹理,一个拥有diffuse,另一个用于lighting 纹理
theMap1 = bitmaptexture filename:be1.fileType
theMap2 = bitmaptexture filename:be2.fileType
--复合两个纹理
theComp.mapList = #(theMap1, theMap2)
--设置灯光纹理为70%的透明度
theComp.opacity = #(100,70)
--创建一个标准的纹理,并设置diffuseMap为 theComp,纹理光照强度为100
bakedMat = standard diffusemap:theComp selfIllumAmount:100
--创建一个Shell_Material纹理并赋值给obj
obj.material = Shell_Material originalMaterial:obj.material \
bakedMaterial:bakedMat viewportMtlIndex:1 renderMtlIndex:1
--显示烘焙纹理到视口中
showTextureMap obj.material obj.material.bakedMaterial true
)--end fn
--重置场景
resetMaxFile #noprompt
--创建灯光
theLight = omniLight pos:[0,-60,100] rgb:white
theLight.baseobject.castshadows = true
--创建一个纹理球
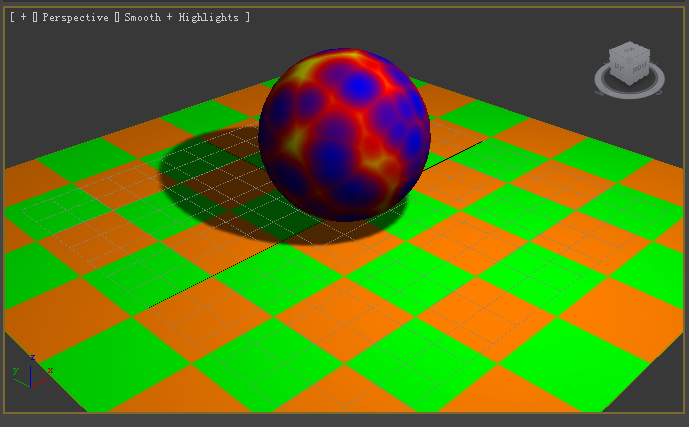
theObject = Sphere segs:32 mapcoords:true pos:[0,0,25]
--创建一个网格纹理
theMap = cellular cellColor:blue divColor1:red divColor2:yellow size:15
theObject.material = standard diffusemap:theMap
--调用烘焙函数
BakeDiffuseAndLighting theObject 256
--创建一个带有纹理的平面对象
theObject = Plane width:200 length:200 mapcoords:true
--创建一个 checker map ,设置 tiling 为 4x4
theMap = checker Color1:green Color2:orange
theMap.coordinates.uTiling = theMap.coordinates.vTiling = 4
theObject.material = standard diffusemap:theMap
--调用烘焙函数
BakeDiffuseAndLighting theObject 256
delete theLight
max select none
)
效果图:

相关文章推荐
- ruby 一些简单的例子
- 多文件上传的例子
- JDBC-ODBC翻页例子
- 5个可以帮你理解JavaScript核心闭包和作用域的小例子
- Python编程实现使用线性回归预测数据
- C++爱好者博客
- 各种例子
- crontab 分时日月周的例子
- java synchronized详解
- python小例子系列启动之公示
- python小例子之1 -- 递归遍历目录
- python小例子之2 -- 处理命令行参数
- hbase MapReduce程序样例入门
- Spring JMX demo 例子
- Android笔记之handler
- 一则sql优化的例子
- 一则sql优化的例子
- max场景瘦身,加快场景的打开速度(多种方法)
- 3ds max maxscript python 入门--执行python的三种途径
- mysql 存储过程动态执行sql 例子