LINUX驱动编程
2015-11-23 18:45
549 查看
字符设备的注册与设备节点的自动创建
cdev 结构
内核内部使用struct cdevlinuxcdevh来表示一个字符设备
注册字符设备
动态初始化
静态初始化
向内核注册添加设备
注销字符设备
早期的方法
注册字符设备
注销设备
设备节点的自动创建
使用手动创建
自动创建设备节点
删除设备节点
实例
初始化 添加设备到内核
自动创建设备节点
主要的文件操作方法实现
结构体
open方法
read方法
检测用户空间地址的有效性
简单模块调试技术
并发 竞态 信号量与自旋锁
代码传至并发竞态控制 并发进程 导致竞态的一个例子
并发与竞态
信号量
创建信号量
V操作
初始化
锁定
解锁
死锁
死锁的名词解释
解决死锁的方法
第三次看了LDD3了(虽然现在已经是kernel3.0但从这本书商还是能学到很多) 每次都有一些收获 现在终于能够些一些代码了
驱动程序的作用:
简单来说 驱动程序就是使计算机与设备通信的特殊的代码,在作单片机时候(无OS)我们自己定义接口及自定义的结构来操作相关硬件,而在有OS的模式下我们操作的硬件是去实现对应的接口(这些接口是已定义好的,我们需要实现这些接口)而无需自己定义接口,这样既能正确的控制设备。又能很好的维护(如果需要升级驱动,上边的应用程序不需要改变)
编写驱动考虑的因素
提供给用户更多的选项
保持用户操作的简单性
编写驱动的时间
驱动分类:
字符设备:能够像字节流(类似文件)一样被访问的设备(至少实现open, close, read ,write等功能)
快设备: 用户空间接口与字符设备相同, 内部实与字符设备完全不同(可以被随即访问,一般在类UNIX系统中快设备的读取每次只能读一整块在linux可以操作任意字节)
网络设备:网络通路通过网络设备形成,能够与主机交换数据的设备
内核功能划分:
进程管理(PM):进程的创建与撤销,在单个或者多个CPU上实现多进程的抽象
内存管理(MM):管理内存分配及回收的策略
文件系统(FS/VFS): Linux 非常依赖于文件系统,内核在没有结构的硬件系统上构造结文件系统,而文件抽象在整个系统中会广泛使用,Linux支持多种文件系统类型
设备控制:驱动程序,操控硬件以及相应总线设备
网络(NET): 在网络接口于应用程序之间传输数据。
好了 理论行得东西介绍的差不多了,下边说点有用的,内核的驱动可以做成模块在需要的时候装载,在不需要的时候卸载
我们在编写用户程序的时候总喜欢从编写hello world 写起 , 在内核驱动模块也是一样,下边是一个hello_world的一个模块
//hello_world.c
#include <linux/init.h>
#include <linux/module.h>
MODULE_LICENSE("GPL");
static int hello_init(void)
{
printk(KERN_ALERT "hello module\n");
return 0;
}
static void hello_exit(void)
{
printk(KERN_ALERT "hello module exit\n");
}
module_init(hello_init);
module_exit(hello_exit);
以及对应的Makefile
ifneq ($(KERNELRELEASE),)
# call from kernel build system
obj-m := hello_world.o
#if we need more than one source code to build the module
#we should use the variable below: example: modules-objs := file1.o file2.o
modules-objs :=
else
#kernel PTAH
KERNELDIR ?= /lib/modules/$(shell uname -r)/build
PWD := $(shell pwd)
modules:
$(MAKE) -C $(KERNELDIR) M=$(PWD) modules
endif
clean:
rm -rf *.o *~ core .depend .*.cmd *.ko *.mod.c .tmp_versions
有几点与用户空间程序不同的地方
模块程序没有main函数(那么程序入口在哪里?)
打印函数使用的printk 而不是用户空间的printf 而且使用方式不一样
模块的编译不是通常的方式
头文件不是常见的那些头文件
以及编译之后不会产生可执行文件,而是 .ko 文件
...
模块没有main函数,在装载模块 insmod 时会调用module_init注册的函数 此处为hello_init
在模块卸载remod时 会调用module_exit注册的函数 此处为hello_exit
在module_init 注册的函数主要是进行初始化,分配内存, 注册设备等
而module_exit中注册的函数与之相反, 设备注销, 释放内存等
具体的编译模块的Makefile我在另一篇文章中有说到 此处不再赘述
内核的打印函数使用printk去打印信息, printk不支持浮点类型, 在printk中可以加入信息级别有7中
#define KERN_EMERG "<0>" /* system is unusable */
#define KERN_ALERT "<1>" /* action must be taken immediately */
#define KERN_CRIT "<2>" /* critical conditions */
#define KERN_ERR "<3>" /* error conditions */
#define KERN_WARNING "<4>" /* warning conditions */
#define KERN_NOTICE "<5>" /* normal but significant */
#define KERN_INFO "<6>" /* informational */
#define KERN_DEBUG "<7>" /* debug-level messages */
对应与不同的错误等级 选择不懂的option, 并做不同的处理, 小于一定等级的信息会直接打印到终端(非X-window下的终端),可以使用dmesg来查看全部的打印信息
编译内核的头文件是在/lib/modules/$(shell uname -r)/build/include下得,而不是用户模式下得/usr/include
编译后不会生产可执行文件,会生成一个.ko的文件
使用insmod xxx.ko去装载模块
使用lsmod去查看已装载的模块
使用rmmod xxx 去卸载相应模块(卸载是不带.ko)
简单字符设备驱动
1、主次设备号
主设备号标识设备连接的的驱动,此设备好由内核使用,标识在相应驱动下得对应的设备
在linux中设备号是一个32位的dev_t类型
typedef __u32 __kernel_dev_t;
typedef __kernel_dev_t dev_t;
crw------- 1 root root 10, 1 Apr 11 2011 psaux
crw------- 1 root root 4, 1 Oct 2803:04 tty1
crw-rw-rw- 1 root tty 4, 64 Apr 11 2011 ttys0
crw-rw---- 1 root uucp 4, 65 Apr 11 2011 ttyS
上图是再/dev目录下用$ls -l 命令显示的部分结果可以看到tty driver的主设备号都为4(各个系统版本有差别),次设备号不同
由主次设备号生成设备号
可以使用宏MKDEV
dev_t dev_num = MKDEV(dev_t major, dev_t minor);
2、分配与释放设备号
在linux2.6的字符设备中(kernel3.0也是)首先做的事就是申请一个或者多个设备号
/* 静态分配设备号
* parameter:
* first : 分配的第一个设备号
* count: 分配的设备个数
* name : 设备名
* return value:
* 0: success
* 负值:出现错误,错误码
*/
int register_chrdev_region(dev_t first, unsigned int count, char *name);
/* 动态分配设备号
* parameter:
* dev : 用来存储分配的设备号值
* firstminor: 次设备号(一般填0)
* count: 分配的设备个数
* name : 设备名
* return value:
* 0: success
* 负值:出现错误,错误码
*/
int alloc_chrdev_region(dev_t *dev, unsigned int firstminor, unsigned int count, char *name);
/* 释放设备号
* parameter:
* first: 设备号
* count: 分配的设备个数
*/
void unregister_chrdev_region(dev_t first, unsigned int count);
静态分配设备号,是在已经知道一个可用设备号的时候使用,而程序员在编写程序之前大多并知道设备号是否可用,或者现在可用,不能确保在系统升级时候次设备还是可用的
所以linux社区极力推荐使用动态分配,它会去寻找可用的设备号,而不会产生冲突。在次设备卸载的时候需要释放次设备号。
3、一个没有作用的字符设备驱动
#include <linux/init.h>
#include <linux/module.h>
#include <linux/types.h>
#include <linux/fs.h>
#define SIMPLE_DEBUG 1
#define DEV_COUNT 2
#define SIMPLE_NAME "simple_char"
static int simple_major = 108;
static int simple_minor = 0;
static __init int simple_init(void)
{
dev_t dev;
int err;
#if SIMPLE_DEBUG
printk(KERN_INFO "In %s\n", __func__);
#endif
dev = MKDEV(simple_major, simple_minor); //求取设备号
if(dev > 0)//设备号有效
{
#if SIMPLE_DEBUG
printk(KERN_INFO "try to register static char dev %d \n", dev);
#endif
err = register_chrdev_region(dev,DEV_COUNT, SIMPLE_NAME); //静态分配设备号
if(err < 0) //静态分配出错 尝试使用动态分配
{
printk(KERN_WARNING "register static char dev error\n");
err = alloc_chrdev_region(&dev, 0, DEV_COUNT, SIMPLE_NAME); //动态分配设备号
if(err < 0)
{
printk(KERN_ERR "register char dev error in line %d\n",__LINE__);
goto error;
}
else
{
simple_major = MAJOR(dev);//重新计算主设备号
simple_minor = MINOR(dev);//重新计算此设备号
}
}
else{
}
}
else //设备号无效使用动态分配
{
#if SIMPLE_DEBUG
printk(KERN_INFO "try to register alloc char dev \n");
#endif
err = alloc_chrdev_region(&dev, 0, DEV_COUNT, SIMPLE_NAME);
if(err < 0)
{
printk(KERN_ERR "register char dev error in line %d\n\n",__LINE__);
goto error;
}
else
{
simple_major = MAJOR(dev);
simple_minor = MINOR(dev);
}
}
#if SIMPLE_DEBUG
printk(KERN_INFO "register char dev success major = %d minor = %d \n", simple_major, simple_minor);
#endif
error:
return err;
}
static __exit void simple_exit(void)
{
dev_t dev;
#if SIMPLE_DEBUG
printk(KERN_INFO "In %s\n", __func__);
#endif
dev = MKDEV(simple_major, simple_minor);
unregister_chrdev_region(dev, DEV_COUNT); //释放设备号
}
module_init(simple_init);
module_exit(simple_exit);
MODULE_LICENSE("GPL");
MODULE_AUTHOR("kai_zhang(jsha.zk@163.com)");
MODULE_DESCRIPTION("simple char driver!");
这里只在模块初始化的时候去分配设备号,在模块注销的时候去释放次驱动拥有的设备号
在函数里边我们看到用到了在应用编程里边声名狼藉的goto函数,在linux驱动编程时 goto 函数可以让我们的编程更加有条理性,在出现错误时候能更快的去处理。
如果在调用函数检查返回者都去做错误处理则模块函数就显得臃肿,庞大。所以还是建议合理使用goto函数的。
加载次模块后
运行 $cat /proc/devices可以看到 simple_char 的设备以及主设备号。

这里我们看到原来假设的主设备号是不可用的,所以使用的动态分配设备号,由此我们申请到主设备号为249,我们可以在上边添加我们的设备,具体操作下一节会讲到。呵呵留点悬念先。
字符设备中 重要的数据结构
大部分字符驱动设计三个重要的数据结构
<linux/fs.h>
struct file_operations
struct file
struct inode
一、文件操作
在之前的一篇文章中已经有介绍了如何去生情字符设备设备号,但是没有做任何的工作,也就只能写一个不能工作的字符设备;
struct file_operations 结构域用来连接设备与操作,实现系统调用。
重要字段介绍:
struct file_operations {
struct module *owner;//表示拥有这个结构模块的指针,几乎所有的驱动都会设置为THIS_MODULE<linux/module.h>
loff_t (*llseek) (struct file *, loff_t, int);//文件读写位置调整函数
ssize_t (*read) (struct file *, char __user *, size_t, loff_t *);//从设备读取数据
ssize_t (*write) (struct file *, const char __user *, size_t, loff_t *);//项设备写入数据
unsigned int (*poll) (struct file *, struct poll_table_struct *);//查询文件描述符上的读取写入是否被阻塞
int (*mmap) (struct file *, struct vm_area_struct *);//将设备内存映射到进程空间
int (*open) (struct inode *, struct file *);//对应于打开设备
int (*release) (struct inode *, struct file *);//对应于关闭一个设备
.
.
.
};
结构还有很多的操作因为还没有学会,就没有多做介绍,(ioctl函数操作在2.6.35之后就变成了unlocked_ioctl、compat_ioctl其实作用也不是很大 也没有做介绍,以后有机会再做介绍)
当open 与release置为NULL时 就以内核默认的方式进行打开或者关闭,并且不会出错,
当其他函数没有被定义时候,应用程序调用会出错。
下边是一个最重要的几个设备操作方法的定义。
struct file_operations simple_fops={
.owner = THIS_MODULE,
.open = simple_open,
.release = simple_close,
.read = simple_read,
.write = simple_write,
.llseek = simple_llseek,
.poll = simple_poll,
.mmap = simple_mmap,
};
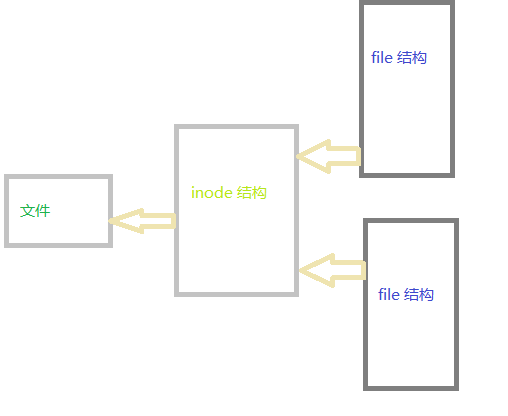
二、file结构
这里介绍的file结构并不是C语言中的FILE结构,两者没有任何关联,struct file只是一个内核的结构,每一个打开的文件,都会对应一个struct file结构,一个文件可以对应于不同的struct file结构
struct file {
struct path f_path; //文件位置
const struct file_operations *f_op;.//文件操作符
spinlock_t f_lock;
atomic_long_t f_count;
unsigned int f_flags;//文件标识(O_NONBLOCK, O_RDONLY等由应用程序传入)
fmode_t f_mode;//文件模式可读可写
loff_t f_pos;//文件读写位置
struct fown_struct f_owner;
const struct cred *f_cred;
struct file_ra_state f_ra;
.
.
.
void *private_data; //most important!! 私有数据,驱动可以使用它指向任何的数据结构
};
三、inode结构
linux内核使用inode结构表示一个文件,与file不同,file可以理解为用来表示文件描述符的结构,一个文件可以对应很多的文件描述符,而最后只会指向同一个inode结构
struct inode {
...
dev_t i_rdev; //保存设备号
union {
struct pipe_inode_info *i_pipe;
struct block_device *i_bdev;
struct cdev *i_cdev; //指向了struct cdev结构
};
...
};
四、file 结构 与inode结构图解
似乎每一章介绍的内容比较少,但学习是一个循序渐进的过程,不在于一天学多少,重要的一天能真正的学懂多少,所以我主张一步一步来,从多个渠道去学习知识,实现互补。
本节测试代码传到此处了:char_step1 大家可以下载测试一下。
struct cdev {
struct kobject kobj; //kobj设备模型以后介绍
struct module *owner;
const struct file_operations *ops;//文件操作
struct list_head list;
dev_t dev;//设备号
unsigned int count; //设备个数
};
struct cdev *my_cdev = cdev_alloc();
my_cdev->ops = &my_ops;
struct cdev my_cdev;
cdev_init(&my_dev, &my_ops);
int cdev_add(struct cdev *dev, dev_t num, unsigned count);
dev: 指向以初始化的字符设备结构
num: 设备号
count: 所要添加的设备个数
返回值:
成功返回0 失败返回错误码,设备被注册时候可能立即会呗调用,所以在驱动程序还没有准备好处理设备操作时候不要先调用cdev_add
在不需要用西设备时候需要注销设备
void cdev_del(struct cdev *);
在2.6的内核之前注册字符设备有一个简单易用的方法,现在也可以使用但是不建议使用,因为到最后这个方法会从内核消失
static inline int register_chrdev(unsigned int major,
const char *name, const struct file_operations *fops);
major: 主设备号 (当major为0时表示有内核分配一个可用的主设备号并返回)
name: 驱动名
fops: 文件操作
缺点: 不能同时注册多个设备, 他是用一种默认的方式去建立一个cdev结构,而这样的话它不能使用大于255的主次设备号
static inline void unregister_chrdev(unsigned int major, const char *name)
在上一个程序中,虽然能够争取的得到一个设备号,但是并不会在/dev/目录下生成一个设备节点。
mknod /dev/device_name c major minor
device_name: 指设备名,
c: 表述创建字符设备节点(同理b 表示创建块设备文件节点)
major: 主设备号
minor: 次设备号
在做测试时候这样做事可以理解的,而在作为一个模块要发行时候,这样就太不方面了,①要先查看设备是否成功创建,②查看注册设备的主设备号,③输入命令创建文件节点
当然可以写一个shell脚本来完成这些事情。
需要的纤体内核空间支持udev,在内核配置,及busybox配置时候需要指定
内核中定义了struct class 与 struct devic结构<linux/device.h>
创建一个class结构
#define class_create(owner, name) \
({ \
static struct lock_class_key __key; \
__class_create(owner, name, &__key); \
})
owner表示拥有这个模块的指针
name 表示设备名
调用此函数后 创建了一个struct class结构放在sysfs下边,而后调用
struct device *device_create(struct class *cls,
struct device *parent,
dev_t devt, void *drvdata,
const char *fmt, ...)
在/dev目录下创建设备节点
cls : 是上边函数的创建的struct class结构指针
parent: 指向设备的父节点设备(如果没有填NULL
devt: 被添加设备的设备号
drvdata: 回调函数参数
fmt ,args:一个或者多个设备名
至此我们就自动创建了一个设备节点
在设备不需要使用时候我们需要删除设备节点:
void device_destroy(struct class *class, dev_t devt);//删除设备节点
void class_destroy(struct class *cls);//删除sysfs下得struct class结构
至于深层的一些实现机制,没有细细研究,大家干兴趣可以参考相关资料
simple_cdev = cdev_alloc(); //动态初始化字符设备
if(simple_cdev != NULL)
{
simple_cdev->ops = &simple_fops; //文件操作
simple_cdev->owner = THIS_MODULE;
}
else
{
printk(KERN_ERR "alloc cdev err no memory");
unregister_chrdev_region(dev, DEV_COUNT); //如果分配资源出错则释放设备号
return -ENOMEM;
}
err = cdev_add(simple_cdev, dev, DEV_COUNT); //向内核添加设备
if(err < 0)
{
printk(KERN_ERR "add cdev err \n");
goto error1;
}
else
{
#if SIMPLE_DEBUG
printk(KERN_INFO "add char dev OK!\n");
#endif
}
simple_class = class_create(THIS_MODULE, SIMPLE_NAME);
if(simple_class == NULL)
{
printk(KERN_ERR "create simple class error\n");
goto error2;
}
else
{
#if SIMPLE_DEBUG
printk(KERN_INFO "create simple class OK!\n");
#endif
}
simple_dev = device_create(simple_class, NULL, dev, NULL, SIMPLE_NAME);
if(simple_dev == NULL)
{
printk(KERN_ERR "create device error");
goto error3;
}
else
{
#if SIMPLE_DEBUG
printk(KERN_INFO "create simple device OK!\n");
#endif
}
删除设备节点,注销字符设备
dev = MKDEV(simple_major, simple_minor); //计算出设备号
device_destroy(simple_class, dev); //删除设备节点
class_destroy(simple_class);//删除并释放class结构
cdev_del(simple_cdev);//注销设备
cdev_put(simple_cdev);//对动态的设备需要使用cdev_put‘来释放资源
文件操作函数有很多的操作接口,驱动编程需要实现这些接口,在用户编程时候系统调用时候会调用到这些操作
view
plaincopy
to clipboard
struct file_operations {
...
loff_t (*llseek) (struct file *, loff_t, int);
ssize_t (*read) (struct file *, char __user *, size_t, loff_t *);
ssize_t (*write) (struct file *, const char __user *, size_t, loff_t *);
int (*open) (struct inode *, struct file *);
int (*release) (struct inode *, struct file *);
...
};
[cpp] view
plaincopy
struct file_operations {
...
loff_t (*llseek) (struct file *, loff_t, int);
ssize_t (*read) (struct file *, char __user *, size_t, loff_t *);
ssize_t (*write) (struct file *, const char __user *, size_t, loff_t *);
int (*open) (struct inode *, struct file *);
int (*release) (struct inode *, struct file *);
...
};
以上只列出了主要的操作,下面会依次介绍:
本次的测试代码上传在:char_step2
首先 我们会模拟写一个不操作任何设备,而仅仅是存储的一个驱动。
定义自己的一个结构体为:
view
plaincopy
to clipboard
struct simple_dev{
char data[MAX_SIMPLE_LEN];
loff_t count;
struct semaphore semp;
};
[cpp] view
plaincopy
struct simple_dev{
char data[MAX_SIMPLE_LEN];
loff_t count;
struct semaphore semp;
};
data 保存数据, count表示文件的数据有效的位置, semp是一个信号量锁,在以后的编程中使用,
之后的程序中结构体也会做相应的变化,以适应linux编写驱动的习惯
打开设备并进一步初始化工作,在没有定义open方法时内核以一种默认的方式打开设备,保证每次都能正确打开。
open方法中有有struct inode参数,包含了设备号,程序中可以使用次设备号得到正操作的设备
在struct file中主要的操作是private_data指针,他可以传递任何自己创建的结构。
总得说来open方法的作用有3
1、获得操作的设备(通过设备号)
2、进一步的初始化设备
3、初始化file结构体的private_data
view
plaincopy
to clipboard
static int simple_open(struct inode *inodp, struct file *filp)
{
struct simple_dev *temp_dev = NULL;
int minor = 0;
#if SIMPLE_DEBUG
printk(KERN_INFO "In %s \n", __func__);
#endif
minor = iminor(inodp);//获得操作的设备的次设备号
if(minor > DEV_COUNT-1){
printk(KERN_ERR "the char dev in invalid \n");
return -ENODEV;
}
#if SIMPLE_DEBUG
printk(KERN_INFO "the minor is %d \n", minor);
#endif
temp_dev = &char2_dev[minor];//获得真正操作的设备
/* 进一步 初始化设备 因为是操作一个模拟的设备 故省去*/
filp->private_data = temp_dev; //初始化 private_data
return 0;
}
[cpp] view
plaincopy
static int simple_open(struct inode *inodp, struct file *filp)
{
struct simple_dev *temp_dev = NULL;
int minor = 0;
#if SIMPLE_DEBUG
printk(KERN_INFO "In %s \n", __func__);
#endif
minor = iminor(inodp);//获得操作的设备的次设备号
if(minor > DEV_COUNT-1){
printk(KERN_ERR "the char dev in invalid \n");
return -ENODEV;
}
#if SIMPLE_DEBUG
printk(KERN_INFO "the minor is %d \n", minor);
#endif
temp_dev = &char2_dev[minor];//获得真正操作的设备
/* 进一步 初始化设备 因为是操作一个模拟的设备 故省去*/
filp->private_data = temp_dev; //初始化 private_data
return 0;
}
release方法:
主要是对open进一步初始化的操作的反操作
比如open时候分配了内存,在release时就需要释放它等
例子中因为操作内存设备,故在release时无需做什么事
read 是把设备中的数据传递给调用者
主要步骤
1、检测偏移量有效(有些设备驱动不需要检测)
2、检测用户空间地址有效
3、将数据传给用户(在此步骤中调用的函数可能会自己检测步骤2)
4、调整偏移量
5、返回读到的数据长度
(read write 用法相对灵活,不要依赖上边的步骤,设备驱动程序要根据设备特性去设计此方法)
这里先介绍一个会检测用户空间地址是否有效的copy函数
用户调用read读设备,而在内核空间就是将数据传给用户,是一个to的操作
view
plaincopy
to clipboard
unsigned long __must_check copy_to_user(void __user *to, const void *from, unsigned long n)
[cpp] view
plaincopy
unsigned long __must_check copy_to_user(void __user *to, const void *from, unsigned long n)
__must_check表述必须检测其返回值,操作成功返回0,不成功返回负的错误码
to是用户空间指针 也就是read函数传入的用户空间的指针,
from指向设备要传送的数据
n标识传入长度
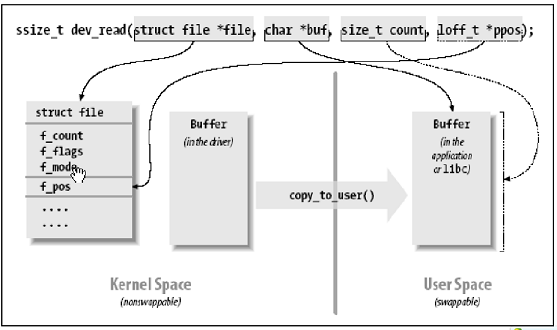
上图是 摘自LDD3上的经典视图, 应该比较能说明read的方法
view
plaincopy
to clipboard
static ssize_t simple_read(struct file *filp, char __user *userstr, size_t count, loff_t *loff)
{
struct simple_dev *dev = NULL;
int data_remain = 0;
int err;
#if SIMPLE_DEBUG
printk(KERN_INFO "In %s \n", __func__);
#endif
dev = filp->private_data;
data_remain = dev->count - *loff;
if(MAX_SIMPLE_LEN < *loff)//检测偏移量
{
printk(KERN_ERR "the offset is illegal in func %s \n",__func__ );
return -EINVAL;
}
else if(data_remain <= 0)
{
printk(KERN_WARNING "there was not much data in the device\n");
return 0;
}
else
{
if(count > data_remain)
{
#if SIMPLE_DEBUG
printk(KERN_INFO "the data is less than the user want to read\n");
#endif
count = data_remain;
}
else
{
}
}
err = copy_to_user(userstr, (dev->data)+(*loff), count); //调用内核函数进行数据拷贝,它会检测用户地址是否有效
if(err != 0)
{
printk(KERN_ERR "an error occured when copy data to user\n");
return err;
}
else
{
#if SIMPLE_DEBUG
printk(KERN_INFO "data copy to user OK\n");
#endif
*loff = *loff + count; //调整偏移量
return count; //返回写入的数据量
}
}
[cpp] view
plaincopy
static ssize_t simple_read(struct file *filp, char __user *userstr, size_t count, loff_t *loff)
{
struct simple_dev *dev = NULL;
int data_remain = 0;
int err;
#if SIMPLE_DEBUG
printk(KERN_INFO "In %s \n", __func__);
#endif
dev = filp->private_data;
data_remain = dev->count - *loff;
if(MAX_SIMPLE_LEN < *loff)//检测偏移量
{
printk(KERN_ERR "the offset is illegal in func %s \n",__func__ );
return -EINVAL;
}
else if(data_remain <= 0)
{
printk(KERN_WARNING "there was not much data in the device\n");
return 0;
}
else
{
if(count > data_remain)
{
#if SIMPLE_DEBUG
printk(KERN_INFO "the data is less than the user want to read\n");
#endif
count = data_remain;
}
else
{
}
}
err = copy_to_user(userstr, (dev->data)+(*loff), count); //调用内核函数进行数据拷贝,它会检测用户地址是否有效
if(err != 0)
{
printk(KERN_ERR "an error occured when copy data to user\n");
return err;
}
else
{
#if SIMPLE_DEBUG
printk(KERN_INFO "data copy to user OK\n");
#endif
*loff = *loff + count; //调整偏移量
return count; //返回写入的数据量
}
}
write方法:
与read类似 它是从用户传数据给设备驱动
从内核空间看就是一个从用户空间取数据 是一个from操作
view
plaincopy
to clipboard
long __must_check strncpy_from_user(char *dst, const char __user *src, long count)
[cpp] view
plaincopy
long __must_check strncpy_from_user(char *dst, const char __user *src, long count)
dst 驱动保存数据的地址
src 用户空间传入的数据
count 标识数据长度
view
plaincopy
to clipboard
static ssize_t simple_write(struct file *filp, const char __user *userstr, size_t count, loff_t *loff)
{
struct simple_dev *dev = NULL;
int err;
int remain_space = 0;
#if SIMPLE_DEBUG
printk(KERN_INFO "In %s\n",__func__);
#endif
dev = filp->private_data;
if(MAX_SIMPLE_LEN <= *loff) //检测偏移量
{
printk(KERN_ERR "the offset is illegal in func %s\n", __func__);
return -EINVAL;
}
else
{
remain_space = MAX_SIMPLE_LEN - *loff;
if(count > remain_space)
{
#if SIMPLE_DEBUG
printk(KERN_WARNING "the data is to long to write to the device\n");
#endif
count = remain_space;
}
else
{
}
}
err = copy_from_user((dev->data)+(*loff),userstr,count);//取得数据
if(err != 0)
{
printk(KERN_ERR "an error occured when copy data from user\n");
return err;
}
else
{
#if SIMPLE_DEBUG
printk(KERN_INFO "data copy from user OK\n");
#endif
*loff = *loff + count; //跳着偏移
if(*loff > dev->count)
{
dev->count = *loff;
}
else
{
}
return count; //返回写入的数据量
}
}
[cpp] view
plaincopy
static ssize_t simple_write(struct file *filp, const char __user *userstr, size_t count, loff_t *loff)
{
struct simple_dev *dev = NULL;
int err;
int remain_space = 0;
#if SIMPLE_DEBUG
printk(KERN_INFO "In %s\n",__func__);
#endif
dev = filp->private_data;
if(MAX_SIMPLE_LEN <= *loff) //检测偏移量
{
printk(KERN_ERR "the offset is illegal in func %s\n", __func__);
return -EINVAL;
}
else
{
remain_space = MAX_SIMPLE_LEN - *loff;
if(count > remain_space)
{
#if SIMPLE_DEBUG
printk(KERN_WARNING "the data is to long to write to the device\n");
#endif
count = remain_space;
}
else
{
}
}
err = copy_from_user((dev->data)+(*loff),userstr,count);//取得数据
if(err != 0)
{
printk(KERN_ERR "an error occured when copy data from user\n");
return err;
}
else
{
#if SIMPLE_DEBUG
printk(KERN_INFO "data copy from user OK\n");
#endif
*loff = *loff + count; //跳着偏移
if(*loff > dev->count)
{
dev->count = *loff;
}
else
{
}
return count; //返回写入的数据量
}
}
lseek方法:
根据用户传入的参数调整文件偏移
mode
file结构的f_pos保存了文件的偏移量
在调整文件偏移后需要 更新file中得f_pos成员
view
plaincopy
to clipboard
static loff_t simple_llseek(struct file *filp, loff_t loff, int mode)
{
struct simple_dev *dev = NULL;
loff_t tmp_len;
#if SIMPLE_DEBUG
printk(KERN_INFO "In %s\n",__func__);
#endif
dev = filp->private_data;
switch ( mode )
{
case SEEK_SET:
if( loff < 0 )
{
printk(KERN_ERR "can't move above file line %d \n", __LINE__);
return -1;
}
else if(loff > dev->count)
{
printk(KERN_ERR "offset is too long line %d\n", __LINE__);
return -1;
}
else
{
filp->f_pos = loff;
}
break;
case SEEK_CUR:
if((tmp_len = filp->f_pos+loff) < 0)
{
printk(KERN_ERR "can't move above file line %d \n", __LINE__);
return -1;
}
else if(tmp_len > dev->count)
{
printk(KERN_ERR "offset is too long line %d\n", __LINE__);
return -1;
}
else
{
filp->f_pos = tmp_len;
}
break;
case SEEK_END:
if((tmp_len = dev->count+loff ) < 0)
{
printk(KERN_ERR "can't move above file line %d \n", __LINE__);
return -1;
}
else if(tmp_len > dev->count)
{
printk(KERN_ERR "offset is too long line %d\n", __LINE__);
return -1;
}
else
{
filp->f_pos = tmp_len;
}
break;
default :
printk(KERN_INFO "illigal lseek mode! \n");
return -1;
break;
}
return filp->f_pos;
}
用户地址检测 简单模块调试 以及一些杂项
上一节中提到在read write时候要检测用户空间传递的参数地址是否是有效地址,有的内核函数会自行检测,但是在调用轻量级的内核函数时候,就可能不去检测用户空间的地址是否有效,如果此时用户无传递一个无效地址,而内核函数去操作了它,这时棘手的问题出现了,轻则内核oops 关机重启就OK了,在特别严重的情况下,可能你的系统就崩溃了(我又遇到过),所以,我们在驱动程序中操作用户空间地址时候要小心加小心。如果电脑配置可以就在虚拟机中玩, 或者在开发板上试,当然这边的测试代码我都有试过,不至于让你系统崩溃的。
如何检测呢?
调用一个access_ok函数去检测
view
plaincopy
to clipboard
#define access_ok(type,addr,size)
[cpp] view
plaincopy
#define access_ok(type,addr,size)
type 标识读写操作VERIFY_READ表示地址可读,VERIFY_WRITE表示地址可写
addr 用户传入的地址
size 读写的长度
此代码在有内存管理的芯片与无内存管理之间有区别
我们 看一段内核代码 (path : arch/arm/include/asm/uaccess.h)
view
plaincopy
to clipboard
#define access_ok(type,addr,size) (__range_ok(addr,size) == 0)
#ifdef CONFIG_MMU
...
#define __range_ok(addr,size) ({ \
unsigned long flag, roksum; \
__chk_user_ptr(addr); \
__asm__("adds %1, %2, %3; sbcccs %1, %1, %0; movcc %0, #0" \
: "=&r" (flag), "=&r" (roksum) \
: "r" (addr), "Ir" (size), "0" (current_thread_info()->addr_limit) \
: "cc"); \
flag; })
#else
...
#define __range_ok(addr,size)<span style="white-space:pre"> </span>(0)
[cpp] view
plaincopy
#define access_ok(type,addr,size) (__range_ok(addr,size) == 0)
#ifdef CONFIG_MMU
...
#define __range_ok(addr,size) ({ \
unsigned long flag, roksum; \
__chk_user_ptr(addr); \
__asm__("adds %1, %2, %3; sbcccs %1, %1, %0; movcc %0, #0" \
: "=&r" (flag), "=&r" (roksum) \
: "r" (addr), "Ir" (size), "0" (current_thread_info()->addr_limit) \
: "cc"); \
flag; })
#else
...
#define __range_ok(addr,size)<span style="white-space:pre"> </span>(0)
即在有内存管理并配置了内存管理的芯片内调用次函数会执行检测操作,而在没有配置内存管理的芯片中此函数总是返回真,而做驱动的不应该做这些假设,所以传入的参数在有必要的情况下还是要自行检测再看看copy_to_user函数
view
plaincopy
to clipboard
static inline unsigned long __must_check copy_to_user(void __user *to, const void *from, unsigned long n)
{
if (access_ok(VERIFY_WRITE, to, n))
n = __copy_to_user(to, from, n);
return n;
}
[cpp] view
plaincopy
static inline unsigned long __must_check copy_to_user(void __user *to, const void *from, unsigned long n)
{
if (access_ok(VERIFY_WRITE, to, n))
n = __copy_to_user(to, from, n);
return n;
}
可以看到他在函数内部做了这种检测
而当我们调用
view
plaincopy
to clipboard
__copy_to_user
__copy_from_user
get_user
__get_user
put_user
__put_user
[cpp] view
plaincopy
__copy_to_user
__copy_from_user
get_user
__get_user
put_user
__put_user
时都需要检测用户地址是否可用
为什么要加简单呢? 因为这边只介绍了用打印来调试程序。
看了LDD3上边介绍的很多调试技术 查询调试 观察调试之类
我觉得 打印调试来的最简单最直接 虽然他有一些限制
1、大量的使用printk会使系统变慢
2、没次打印一行都会引起磁盘操作
...
在printk中有7中 消息的选项 表示着不同的消息等级
内核中定义了DEFAULT_MESSAGE_LOGLEVEL(在printk.c中)默认数值小于它的消息类型才会被答应到终端,我们可以把他设置为8则所有的信息都会被终端打印出来。
在系统中我们 可以使用 echo 8 > /proc/sys/kernel/printk 来调整这个数值(要root权限) 使信息全部被打印出来。
当然我们 也可以通过dmesg来查看所有的打印信息(有一点不适用,就是当系统出现oops的时候 就不行了 因为你已经死机了 也就输不了这个命令 就看不到打印信息了)。
view
plaincopy
to clipboard
#if SIMPLE_DEBUG
#define D(...) printk(KERN_DEBUG __VA_ARGS__)
#define WAR(...) printk(KERN_WARNING __VA_ARGS__)
#else
#define D(...) ((void)0)
#define WAR(...) ((void)0)
#endif
[cpp] view
plaincopy
#if SIMPLE_DEBUG
#define D(...) printk(KERN_DEBUG __VA_ARGS__)
#define WAR(...) printk(KERN_WARNING __VA_ARGS__)
#else
#define D(...) ((void)0)
#define WAR(...) ((void)0)
#endif
在需要调试的时候,我们去定义SIMPLE_DEBUG这个宏,在驱动代码测试都OK可以发行时候,去掉这个定义。
在需要打印的地方我们就使用
view
plaincopy
to clipboard
D(“print the log int func:%s line:%d”, __func__ ,__LINE__);
[cpp] view
plaincopy
D(“print the log int func:%s line:%d”, __func__ ,__LINE__);
当然要修改成有意义的debug信息
打印当前进程信息
内核模块不像应用程序一样顺序执行,只用应用进程调用到想关联的函数才会到内核模块中call这个接口,那可不可以 打印调用进程的信息呢?
答案是肯定的,linux中定义了current这个变量(<linux/sched.h>)current指向了当前的进程,他是一个task_struct类型
其中有两个重要的成员
comm 表示了 当前的命令名名
pid 表示了当前进程号
view
plaincopy
to clipboard
D("[process: %s] [pid: %d] xxx\n" , current->comm, current->pid);
[cpp] view
plaincopy
D("[process: %s] [pid: %d] xxx\n" , current->comm, current->pid);
内核的container_of函数
在写字符设备驱动时候我们都会去自定义一个结构,其中包含了cdev结构
view
plaincopy
to clipboard
struct simple_dev{
char *data;
loff_t count;
struct cdev cdev;
struct semaphore semp;
};
[cpp] view
plaincopy
struct simple_dev{
char *data;
loff_t count;
struct cdev cdev;
struct semaphore semp;
};
在open方法中除了上一节看到的那样用一个次设备好来获取结构(有时候会出错 如果我们次设备号不是从0开始分配)
所以需要寻求一种安全的方法
container_of为我们提供了这么一个很好的接口
view
plaincopy
to clipboard
/**
* container_of - cast a member of a structure out to the containing structure
* @ptr: the pointer to the member.
* @type: the type of the container struct this is embedded in.
* @member: the name of the member within the struct.
*
*/
#define container_of(ptr, type, member)
[cpp] view
plaincopy
/**
* container_of - cast a member of a structure out to the containing structure
* @ptr: the pointer to the member.
* @type: the type of the container struct this is embedded in.
* @member: the name of the member within the struct.
*
*/
#define container_of(ptr, type, member)
再解释一下
ptr是指结构体一个成员的地址
type 指要获得的结构体
member ptr指向的成员在结构体中的名字
view
plaincopy
to clipboard
/*container_of(pointer, container_type, container_fild)
we can get the container_type with one number in the container
by this function. container_fild is the one of the number in the
container_type , pointer point to confain_field type
*/
temp_dev = container_of(inodp->i_cdev, struct simple_dev, cdev);
[cpp] view
plaincopy
/*container_of(pointer, container_type, container_fild)
we can get the container_type with one number in the container
by this function. container_fild is the one of the number in the
container_type , pointer point to confain_field type
*/
temp_dev = container_of(inodp->i_cdev, struct simple_dev, cdev);
上边的E文 是我写的 poor English
container_of 的实现基本原理是这样的:
知道了结构体中某个成员的地址, 又可以求的该成员在改结构体中得偏移,拿成员的地址减去这个偏移,就得到了整个结构的地址,太佩服写内核的人了
前面所述的字符驱动都是没有考虑并发竟态的情况,想象一下
一个进程去读一个字符设备,另一个进程在同一时间向这个设备写入(完全有这种情况)
原来设备中存有 A B C D 要想设备写入1 2 3 4 每次读写一个字节
R: read
W:write
所以最后读出了A23D不是原来的ABCD
而如果两个进程同时写入一个设备则写入的值可能既不是A进程想要的又不是B进程想要的。
并发是指 多个进程同时访问相同一段代码(不仅限于内核空间的代码)
竞态 是对共享资源访问的结果, 并发进程访问了相同的数据或结构(硬件资源)等。
解决竞态的思想 主要有两种
1、所有的代码都不使用全局变量
2、使用锁机制确保一次只有一个进程使用共享资源
显然第一种方式是不可能的,我们只能尽量少的使用全局变量,而不能完全避免它
下边介绍 两种锁机制
这个概念对我们来说应该不是很陌生,至少听说过,它有两种操作:通常叫做P操作与V操作
希望进入临界区的进程调用P操作,检测当前信号量,如果信号量大于0,则信号量减1,进入临界区,否则进程等待其他进程释放此信号量,信号量的释放通过一个V操作增加信号量的值,在某些情况下会去唤醒等待此信号量的进程。
以上说到了一个 临界区这个名词 简单来讲就是内部操作了共享数据的代码
Linux 内核中信号量的实现
因为从LLD3(2.6.10)版本出来到现在(3.1)内核函数有了很多的变化,许多书上介绍的函数都已经不存在了,也能几版新kernel之后现在我说的函数也会有变化了。
信号量结构以及相关函数的定义在<linux/semaphore.h>中
void sema_init(struct semaphore *sem, int val)
[cpp] view
plaincopy
void sema_init(struct semaphore *sem, int val)
sem: 信号量结构体
val : 初始化信号量的值(代表了资源数)【val 为1时 表示代码在同一时间只允许一个进程访问 称之为互斥锁】
view
plaincopy
to clipboard
void init_MUTEX();
void init_MUTEX_LOCKED();
[cpp] view
plaincopy
void init_MUTEX();
void init_MUTEX_LOCKED();
两个定义互斥锁的函数 (最新的内核中已经没有这两个函数了,所以不要用它)
struct simple_dev{
char *data;
loff_t count;
struct cdev cdev;
struct semaphore semp;
};
static __init int simple_init(void)
{
...
for( index = 0 ; index < DEV_COUNT ; ++index )
{
sema_init(&char5_dev[index].semp,1);
//init_MUTEX(&(char5_dev[index].semp));
init_waitqueue_head(&(char5_dev[index].queue));
}
...
}
[cpp] view
plaincopy
struct simple_dev{
char *data;
loff_t count;
struct cdev cdev;
struct semaphore semp;
};
static __init int simple_init(void)
{
...
for( index = 0 ; index < DEV_COUNT ; ++index )
{
sema_init(&char5_dev[index].semp,1);
//init_MUTEX(&(char5_dev[index].semp));
init_waitqueue_head(&(char5_dev[index].queue));
}
...
}
P操作
void down(struct semaphore *sem);
int __must_check down_interruptible(struct semaphore *sem);
int __must_check down_killable(struct semaphore *sem);
int __must_check down_trylock(struct semaphore *sem);
int __must_check down_timeout(struct semaphore *sem, long jiffies)
[cpp] view
plaincopy
void down(struct semaphore *sem);
int __must_check down_interruptible(struct semaphore *sem);
int __must_check down_killable(struct semaphore *sem);
int __must_check down_trylock(struct semaphore *sem);
int __must_check down_timeout(struct semaphore *sem, long jiffies)
第一个函数在信号量大于0时直接将信号量的值减一程序继续运行,在信号量为0时进程睡眠只有等到有其他进程释放信号量时候才被唤醒(不推荐使用)
第二个函数 在第一个操作的基础上,如果进程因为没有得到信号量睡眠,在别的进程释放信号量或者发成中断的情况下都会被唤醒,在被中断信号唤醒时候返回-EINTR,成功返回0
第三个函数 如果没有另外的任务会获取此信号量,则可以调用此函数,在收到中断信号时会返回-EINTR
第四个函数 试图去获取信号量,在获取不到的时候不会睡眠,而是继续运行,返回0值表示得到了此信号量, 返回1 表示没能获取到。
第五个函数 可以去设置最长睡眠时间, 但是 此函数不可中断
void up(struct semaphore *sem)
[cpp] view
plaincopy
void up(struct semaphore *sem)
此操作 首先检测时候有其他进程等待此信号量,如果有则唤醒此进程,不改变信号量的值,如果没有则将信号量的值加1。
static ssize_t simple_read(struct file *filp, char __user *userstr, size_t count, loff_t *loff)
{
struct simple_dev *dev = NULL;
int data_remain = 0;
int err;
D("[%s:] In %s \n",current->comm, __func__);
dev = filp->private_data;
err = down_interruptible(&dev->semp);
if(err)
{
if(err == -EINTR)
WAR("return by an interrupt signal\n");
else
printk(KERN_ERR "an error occured in down_interruptible\n");
return err;
}
else
{
D("have get the mutex %d\n", __LINE__);
}
/*******************************************
* 临界区代码
********************************************/
up(&dev->semp);
return count;
}
[cpp] view
plaincopy
static ssize_t simple_read(struct file *filp, char __user *userstr, size_t count, loff_t *loff)
{
struct simple_dev *dev = NULL;
int data_remain = 0;
int err;
D("[%s:] In %s \n",current->comm, __func__);
dev = filp->private_data;
err = down_interruptible(&dev->semp);
if(err)
{
if(err == -EINTR)
WAR("return by an interrupt signal\n");
else
printk(KERN_ERR "an error occured in down_interruptible\n");
return err;
}
else
{
D("have get the mutex %d\n", __LINE__);
}
/*******************************************
* 临界区代码
********************************************/
up(&dev->semp);
return count;
}
自旋锁
自旋锁是另一种锁机制,信号量会引起进程的休眠,而在不能睡眠的代码中我们就需要使用自旋锁。
自旋锁也是一个互斥的概念,有“锁定”与“解锁”两个操作,当程序需要锁定时候,则先检测锁是否可用,如果可用则获得锁,程序进入临界区,否则进入忙等待重复检测这个锁是否可用(这就是自旋),临界区代码操作完成则解锁。
信号量实现中其实也用到了自旋锁机制(有兴趣的刻一看内核源码,这边不展开,等以后写内核时候再介绍)
因为自旋锁在得不到锁的时候会“自旋” 即不会让出CPU ,所以我们的临界区执行速度应该尽量的快,最好使用原子操作(不会睡眠)。这也是使用自旋锁的核心规则,在多数情况下我们做不到这一点,所以自旋锁在驱动程序中使用的不如信号量频繁。
view
plaincopy
to clipboard
spin_lock_init(_lock)
[cpp] view
plaincopy
spin_lock_init(_lock)
static inline void spin_lock(spinlock_t *lock)
static inline int spin_trylock(spinlock_t *lock)
static inline void spin_lock_irq(spinlock_t *lock)
spin_lock_irqsave(lock, flags)
static inline void spin_lock_bh(spinlock_t *lock)
[cpp] view
plaincopy
static inline void spin_lock(spinlock_t *lock)
static inline int spin_trylock(spinlock_t *lock)
static inline void spin_lock_irq(spinlock_t *lock)
spin_lock_irqsave(lock, flags)
static inline void spin_lock_bh(spinlock_t *lock)
第一个函数是 不去禁止中断 直接锁定
第二个函数 会尝试加锁,检测返回之判断是否锁定,在不能锁定时候程序也继续运行
第三个函数 禁止中断,不保存保存原先的中断状态
第四个函数 在禁止中断之前,保存原先的中断状态,
第五个函数 表示只禁止软件中断而保持硬件中断的打开
因为自旋锁本质上要不会被中断,所以调用时候建议使用包含有禁止中断的函数
static inline void spin_unlock(spinlock_t *lock)
//static inline void spin_unlock(spinlock_t *lock)
static inline void spin_unlock_irq(spinlock_t *lock)
static inline void spin_unlock_irqrestore(spinlock_t *lock, unsigned long flags)
static inline void spin_unlock_bh(spinlock_t *lock)
[cpp] view
plaincopy
static inline void spin_unlock(spinlock_t *lock)
//static inline void spin_unlock(spinlock_t *lock)
static inline void spin_unlock_irq(spinlock_t *lock)
static inline void spin_unlock_irqrestore(spinlock_t *lock, unsigned long flags)
static inline void spin_unlock_bh(spinlock_t *lock)
对应于锁定的五个函数,分别解锁,(对应于锁定的第二个操作,在加锁成功时候需要使用spin_unlock来解锁)
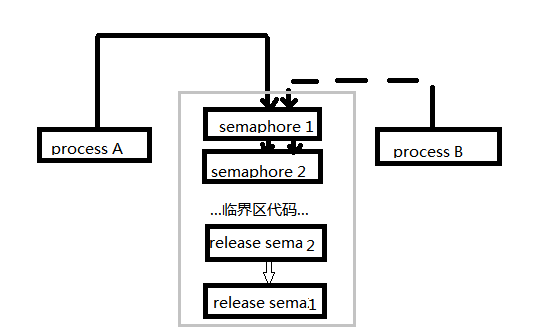
上边只提到了使用锁的好处,以及如何使用锁,但是引入锁机制也会带来风险,那就是死锁,进程死锁最明显的表现就是死机。

如上图所示,A进程占有锁1,并在持有锁1的时候需要得到锁2程序才能继续进行
B进程占有锁2, 并在保持锁2的同时去获取锁1程序才能继续运行,这样A, B 进程就卡在这里,互不相让,这就导致了死锁。
亦或 在一个进程内同时试图获取同样的锁
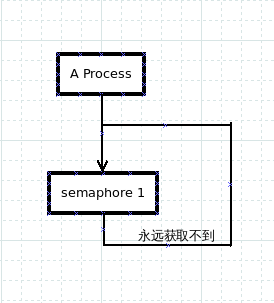
是指两个或两个以上的进程在执行过程中,因争夺资源而造成的一种互相等待的现象,若无外力作用,它们都将无法推进下去。此时称系统处于死锁状态或系统产生了死锁
1、加解锁顺序一致
在必须使用多个锁的时候,应该始终以相同的顺序获取,也最好以获取锁顺序逆序解锁。
2、使用原子变量
原子变量不会被多个进程并发操作,内核提供了一种原子类型(atomic_t <asm/stomic.h>中)
3、设置加锁timeout值
在一定时间内不能获得锁,就放弃,并释放已占有的锁
cdev 结构
内核内部使用struct cdevlinuxcdevh来表示一个字符设备
注册字符设备
动态初始化
静态初始化
向内核注册添加设备
注销字符设备
早期的方法
注册字符设备
注销设备
设备节点的自动创建
使用手动创建
自动创建设备节点
删除设备节点
实例
初始化 添加设备到内核
自动创建设备节点
主要的文件操作方法实现
结构体
open方法
read方法
检测用户空间地址的有效性
简单模块调试技术
并发 竞态 信号量与自旋锁
代码传至并发竞态控制 并发进程 导致竞态的一个例子
并发与竞态
信号量
创建信号量
V操作
初始化
锁定
解锁
死锁
死锁的名词解释
解决死锁的方法
第三次看了LDD3了(虽然现在已经是kernel3.0但从这本书商还是能学到很多) 每次都有一些收获 现在终于能够些一些代码了
驱动程序的作用:
简单来说 驱动程序就是使计算机与设备通信的特殊的代码,在作单片机时候(无OS)我们自己定义接口及自定义的结构来操作相关硬件,而在有OS的模式下我们操作的硬件是去实现对应的接口(这些接口是已定义好的,我们需要实现这些接口)而无需自己定义接口,这样既能正确的控制设备。又能很好的维护(如果需要升级驱动,上边的应用程序不需要改变)
编写驱动考虑的因素
提供给用户更多的选项
保持用户操作的简单性
编写驱动的时间
驱动分类:
字符设备:能够像字节流(类似文件)一样被访问的设备(至少实现open, close, read ,write等功能)
快设备: 用户空间接口与字符设备相同, 内部实与字符设备完全不同(可以被随即访问,一般在类UNIX系统中快设备的读取每次只能读一整块在linux可以操作任意字节)
网络设备:网络通路通过网络设备形成,能够与主机交换数据的设备
内核功能划分:
进程管理(PM):进程的创建与撤销,在单个或者多个CPU上实现多进程的抽象
内存管理(MM):管理内存分配及回收的策略
文件系统(FS/VFS): Linux 非常依赖于文件系统,内核在没有结构的硬件系统上构造结文件系统,而文件抽象在整个系统中会广泛使用,Linux支持多种文件系统类型
设备控制:驱动程序,操控硬件以及相应总线设备
网络(NET): 在网络接口于应用程序之间传输数据。
好了 理论行得东西介绍的差不多了,下边说点有用的,内核的驱动可以做成模块在需要的时候装载,在不需要的时候卸载
我们在编写用户程序的时候总喜欢从编写hello world 写起 , 在内核驱动模块也是一样,下边是一个hello_world的一个模块
//hello_world.c
#include <linux/init.h>
#include <linux/module.h>
MODULE_LICENSE("GPL");
static int hello_init(void)
{
printk(KERN_ALERT "hello module\n");
return 0;
}
static void hello_exit(void)
{
printk(KERN_ALERT "hello module exit\n");
}
module_init(hello_init);
module_exit(hello_exit);
以及对应的Makefile
ifneq ($(KERNELRELEASE),)
# call from kernel build system
obj-m := hello_world.o
#if we need more than one source code to build the module
#we should use the variable below: example: modules-objs := file1.o file2.o
modules-objs :=
else
#kernel PTAH
KERNELDIR ?= /lib/modules/$(shell uname -r)/build
PWD := $(shell pwd)
modules:
$(MAKE) -C $(KERNELDIR) M=$(PWD) modules
endif
clean:
rm -rf *.o *~ core .depend .*.cmd *.ko *.mod.c .tmp_versions
有几点与用户空间程序不同的地方
模块程序没有main函数(那么程序入口在哪里?)
打印函数使用的printk 而不是用户空间的printf 而且使用方式不一样
模块的编译不是通常的方式
头文件不是常见的那些头文件
以及编译之后不会产生可执行文件,而是 .ko 文件
...
模块没有main函数,在装载模块 insmod 时会调用module_init注册的函数 此处为hello_init
在模块卸载remod时 会调用module_exit注册的函数 此处为hello_exit
在module_init 注册的函数主要是进行初始化,分配内存, 注册设备等
而module_exit中注册的函数与之相反, 设备注销, 释放内存等
具体的编译模块的Makefile我在另一篇文章中有说到 此处不再赘述
内核的打印函数使用printk去打印信息, printk不支持浮点类型, 在printk中可以加入信息级别有7中
#define KERN_EMERG "<0>" /* system is unusable */
#define KERN_ALERT "<1>" /* action must be taken immediately */
#define KERN_CRIT "<2>" /* critical conditions */
#define KERN_ERR "<3>" /* error conditions */
#define KERN_WARNING "<4>" /* warning conditions */
#define KERN_NOTICE "<5>" /* normal but significant */
#define KERN_INFO "<6>" /* informational */
#define KERN_DEBUG "<7>" /* debug-level messages */
对应与不同的错误等级 选择不懂的option, 并做不同的处理, 小于一定等级的信息会直接打印到终端(非X-window下的终端),可以使用dmesg来查看全部的打印信息
编译内核的头文件是在/lib/modules/$(shell uname -r)/build/include下得,而不是用户模式下得/usr/include
编译后不会生产可执行文件,会生成一个.ko的文件
使用insmod xxx.ko去装载模块
使用lsmod去查看已装载的模块
使用rmmod xxx 去卸载相应模块(卸载是不带.ko)
简单字符设备驱动
1、主次设备号
主设备号标识设备连接的的驱动,此设备好由内核使用,标识在相应驱动下得对应的设备
在linux中设备号是一个32位的dev_t类型
typedef __u32 __kernel_dev_t;
typedef __kernel_dev_t dev_t;
crw------- 1 root root 10, 1 Apr 11 2011 psaux
crw------- 1 root root 4, 1 Oct 2803:04 tty1
crw-rw-rw- 1 root tty 4, 64 Apr 11 2011 ttys0
crw-rw---- 1 root uucp 4, 65 Apr 11 2011 ttyS
上图是再/dev目录下用$ls -l 命令显示的部分结果可以看到tty driver的主设备号都为4(各个系统版本有差别),次设备号不同
| 前12位标识主设备号 | MAJOR(dev_t dev) | 获得主设备号 |
| 后20位标识此设备号 | MINOR(dev_t dev) | 获得此设备号 |
可以使用宏MKDEV
dev_t dev_num = MKDEV(dev_t major, dev_t minor);
2、分配与释放设备号
在linux2.6的字符设备中(kernel3.0也是)首先做的事就是申请一个或者多个设备号
/* 静态分配设备号
* parameter:
* first : 分配的第一个设备号
* count: 分配的设备个数
* name : 设备名
* return value:
* 0: success
* 负值:出现错误,错误码
*/
int register_chrdev_region(dev_t first, unsigned int count, char *name);
/* 动态分配设备号
* parameter:
* dev : 用来存储分配的设备号值
* firstminor: 次设备号(一般填0)
* count: 分配的设备个数
* name : 设备名
* return value:
* 0: success
* 负值:出现错误,错误码
*/
int alloc_chrdev_region(dev_t *dev, unsigned int firstminor, unsigned int count, char *name);
/* 释放设备号
* parameter:
* first: 设备号
* count: 分配的设备个数
*/
void unregister_chrdev_region(dev_t first, unsigned int count);
静态分配设备号,是在已经知道一个可用设备号的时候使用,而程序员在编写程序之前大多并知道设备号是否可用,或者现在可用,不能确保在系统升级时候次设备还是可用的
所以linux社区极力推荐使用动态分配,它会去寻找可用的设备号,而不会产生冲突。在次设备卸载的时候需要释放次设备号。
3、一个没有作用的字符设备驱动
#include <linux/init.h>
#include <linux/module.h>
#include <linux/types.h>
#include <linux/fs.h>
#define SIMPLE_DEBUG 1
#define DEV_COUNT 2
#define SIMPLE_NAME "simple_char"
static int simple_major = 108;
static int simple_minor = 0;
static __init int simple_init(void)
{
dev_t dev;
int err;
#if SIMPLE_DEBUG
printk(KERN_INFO "In %s\n", __func__);
#endif
dev = MKDEV(simple_major, simple_minor); //求取设备号
if(dev > 0)//设备号有效
{
#if SIMPLE_DEBUG
printk(KERN_INFO "try to register static char dev %d \n", dev);
#endif
err = register_chrdev_region(dev,DEV_COUNT, SIMPLE_NAME); //静态分配设备号
if(err < 0) //静态分配出错 尝试使用动态分配
{
printk(KERN_WARNING "register static char dev error\n");
err = alloc_chrdev_region(&dev, 0, DEV_COUNT, SIMPLE_NAME); //动态分配设备号
if(err < 0)
{
printk(KERN_ERR "register char dev error in line %d\n",__LINE__);
goto error;
}
else
{
simple_major = MAJOR(dev);//重新计算主设备号
simple_minor = MINOR(dev);//重新计算此设备号
}
}
else{
}
}
else //设备号无效使用动态分配
{
#if SIMPLE_DEBUG
printk(KERN_INFO "try to register alloc char dev \n");
#endif
err = alloc_chrdev_region(&dev, 0, DEV_COUNT, SIMPLE_NAME);
if(err < 0)
{
printk(KERN_ERR "register char dev error in line %d\n\n",__LINE__);
goto error;
}
else
{
simple_major = MAJOR(dev);
simple_minor = MINOR(dev);
}
}
#if SIMPLE_DEBUG
printk(KERN_INFO "register char dev success major = %d minor = %d \n", simple_major, simple_minor);
#endif
error:
return err;
}
static __exit void simple_exit(void)
{
dev_t dev;
#if SIMPLE_DEBUG
printk(KERN_INFO "In %s\n", __func__);
#endif
dev = MKDEV(simple_major, simple_minor);
unregister_chrdev_region(dev, DEV_COUNT); //释放设备号
}
module_init(simple_init);
module_exit(simple_exit);
MODULE_LICENSE("GPL");
MODULE_AUTHOR("kai_zhang(jsha.zk@163.com)");
MODULE_DESCRIPTION("simple char driver!");
这里只在模块初始化的时候去分配设备号,在模块注销的时候去释放次驱动拥有的设备号
在函数里边我们看到用到了在应用编程里边声名狼藉的goto函数,在linux驱动编程时 goto 函数可以让我们的编程更加有条理性,在出现错误时候能更快的去处理。
如果在调用函数检查返回者都去做错误处理则模块函数就显得臃肿,庞大。所以还是建议合理使用goto函数的。
加载次模块后
运行 $cat /proc/devices可以看到 simple_char 的设备以及主设备号。
这里我们看到原来假设的主设备号是不可用的,所以使用的动态分配设备号,由此我们申请到主设备号为249,我们可以在上边添加我们的设备,具体操作下一节会讲到。呵呵留点悬念先。
字符设备中 重要的数据结构
大部分字符驱动设计三个重要的数据结构
<linux/fs.h>
struct file_operations
struct file
struct inode
一、文件操作
在之前的一篇文章中已经有介绍了如何去生情字符设备设备号,但是没有做任何的工作,也就只能写一个不能工作的字符设备;
struct file_operations 结构域用来连接设备与操作,实现系统调用。
重要字段介绍:
struct file_operations {
struct module *owner;//表示拥有这个结构模块的指针,几乎所有的驱动都会设置为THIS_MODULE<linux/module.h>
loff_t (*llseek) (struct file *, loff_t, int);//文件读写位置调整函数
ssize_t (*read) (struct file *, char __user *, size_t, loff_t *);//从设备读取数据
ssize_t (*write) (struct file *, const char __user *, size_t, loff_t *);//项设备写入数据
unsigned int (*poll) (struct file *, struct poll_table_struct *);//查询文件描述符上的读取写入是否被阻塞
int (*mmap) (struct file *, struct vm_area_struct *);//将设备内存映射到进程空间
int (*open) (struct inode *, struct file *);//对应于打开设备
int (*release) (struct inode *, struct file *);//对应于关闭一个设备
.
.
.
};
结构还有很多的操作因为还没有学会,就没有多做介绍,(ioctl函数操作在2.6.35之后就变成了unlocked_ioctl、compat_ioctl其实作用也不是很大 也没有做介绍,以后有机会再做介绍)
当open 与release置为NULL时 就以内核默认的方式进行打开或者关闭,并且不会出错,
当其他函数没有被定义时候,应用程序调用会出错。
下边是一个最重要的几个设备操作方法的定义。
struct file_operations simple_fops={
.owner = THIS_MODULE,
.open = simple_open,
.release = simple_close,
.read = simple_read,
.write = simple_write,
.llseek = simple_llseek,
.poll = simple_poll,
.mmap = simple_mmap,
};
二、file结构
这里介绍的file结构并不是C语言中的FILE结构,两者没有任何关联,struct file只是一个内核的结构,每一个打开的文件,都会对应一个struct file结构,一个文件可以对应于不同的struct file结构
struct file {
struct path f_path; //文件位置
const struct file_operations *f_op;.//文件操作符
spinlock_t f_lock;
atomic_long_t f_count;
unsigned int f_flags;//文件标识(O_NONBLOCK, O_RDONLY等由应用程序传入)
fmode_t f_mode;//文件模式可读可写
loff_t f_pos;//文件读写位置
struct fown_struct f_owner;
const struct cred *f_cred;
struct file_ra_state f_ra;
.
.
.
void *private_data; //most important!! 私有数据,驱动可以使用它指向任何的数据结构
};
三、inode结构
linux内核使用inode结构表示一个文件,与file不同,file可以理解为用来表示文件描述符的结构,一个文件可以对应很多的文件描述符,而最后只会指向同一个inode结构
struct inode {
...
dev_t i_rdev; //保存设备号
union {
struct pipe_inode_info *i_pipe;
struct block_device *i_bdev;
struct cdev *i_cdev; //指向了struct cdev结构
};
...
};
四、file 结构 与inode结构图解
似乎每一章介绍的内容比较少,但学习是一个循序渐进的过程,不在于一天学多少,重要的一天能真正的学懂多少,所以我主张一步一步来,从多个渠道去学习知识,实现互补。
本节测试代码传到此处了:char_step1 大家可以下载测试一下。
字符设备的注册与设备节点的自动创建
cdev 结构
内核内部使用struct cdev<linux/cdev.h>来表示一个字符设备
struct cdev {struct kobject kobj; //kobj设备模型以后介绍
struct module *owner;
const struct file_operations *ops;//文件操作
struct list_head list;
dev_t dev;//设备号
unsigned int count; //设备个数
};
注册字符设备
动态初始化:
struct cdev *my_cdev = cdev_alloc();my_cdev->ops = &my_ops;
静态初始化:
struct cdev my_cdev;cdev_init(&my_dev, &my_ops);
向内核注册(添加设备):
int cdev_add(struct cdev *dev, dev_t num, unsigned count);dev: 指向以初始化的字符设备结构
num: 设备号
count: 所要添加的设备个数
返回值:
成功返回0 失败返回错误码,设备被注册时候可能立即会呗调用,所以在驱动程序还没有准备好处理设备操作时候不要先调用cdev_add
注销字符设备:
在不需要用西设备时候需要注销设备void cdev_del(struct cdev *);
早期的方法
在2.6的内核之前注册字符设备有一个简单易用的方法,现在也可以使用但是不建议使用,因为到最后这个方法会从内核消失
注册字符设备:
static inline int register_chrdev(unsigned int major,const char *name, const struct file_operations *fops);
major: 主设备号 (当major为0时表示有内核分配一个可用的主设备号并返回)
name: 驱动名
fops: 文件操作
缺点: 不能同时注册多个设备, 他是用一种默认的方式去建立一个cdev结构,而这样的话它不能使用大于255的主次设备号
注销设备:
static inline void unregister_chrdev(unsigned int major, const char *name)
设备节点的自动创建
在上一个程序中,虽然能够争取的得到一个设备号,但是并不会在/dev/目录下生成一个设备节点。
使用手动创建
mknod /dev/device_name c major minordevice_name: 指设备名,
c: 表述创建字符设备节点(同理b 表示创建块设备文件节点)
major: 主设备号
minor: 次设备号
在做测试时候这样做事可以理解的,而在作为一个模块要发行时候,这样就太不方面了,①要先查看设备是否成功创建,②查看注册设备的主设备号,③输入命令创建文件节点
当然可以写一个shell脚本来完成这些事情。
自动创建设备节点
需要的纤体内核空间支持udev,在内核配置,及busybox配置时候需要指定内核中定义了struct class 与 struct devic结构<linux/device.h>
创建一个class结构
#define class_create(owner, name) \
({ \
static struct lock_class_key __key; \
__class_create(owner, name, &__key); \
})
owner表示拥有这个模块的指针
name 表示设备名
调用此函数后 创建了一个struct class结构放在sysfs下边,而后调用
struct device *device_create(struct class *cls,
struct device *parent,
dev_t devt, void *drvdata,
const char *fmt, ...)
在/dev目录下创建设备节点
cls : 是上边函数的创建的struct class结构指针
parent: 指向设备的父节点设备(如果没有填NULL
devt: 被添加设备的设备号
drvdata: 回调函数参数
fmt ,args:一个或者多个设备名
至此我们就自动创建了一个设备节点
删除设备节点
在设备不需要使用时候我们需要删除设备节点:void device_destroy(struct class *class, dev_t devt);//删除设备节点
void class_destroy(struct class *cls);//删除sysfs下得struct class结构
至于深层的一些实现机制,没有细细研究,大家干兴趣可以参考相关资料
实例:
初始化 添加设备到内核
simple_cdev = cdev_alloc(); //动态初始化字符设备if(simple_cdev != NULL)
{
simple_cdev->ops = &simple_fops; //文件操作
simple_cdev->owner = THIS_MODULE;
}
else
{
printk(KERN_ERR "alloc cdev err no memory");
unregister_chrdev_region(dev, DEV_COUNT); //如果分配资源出错则释放设备号
return -ENOMEM;
}
err = cdev_add(simple_cdev, dev, DEV_COUNT); //向内核添加设备
if(err < 0)
{
printk(KERN_ERR "add cdev err \n");
goto error1;
}
else
{
#if SIMPLE_DEBUG
printk(KERN_INFO "add char dev OK!\n");
#endif
}
自动创建设备节点
simple_class = class_create(THIS_MODULE, SIMPLE_NAME);if(simple_class == NULL)
{
printk(KERN_ERR "create simple class error\n");
goto error2;
}
else
{
#if SIMPLE_DEBUG
printk(KERN_INFO "create simple class OK!\n");
#endif
}
simple_dev = device_create(simple_class, NULL, dev, NULL, SIMPLE_NAME);
if(simple_dev == NULL)
{
printk(KERN_ERR "create device error");
goto error3;
}
else
{
#if SIMPLE_DEBUG
printk(KERN_INFO "create simple device OK!\n");
#endif
}
删除设备节点,注销字符设备
dev = MKDEV(simple_major, simple_minor); //计算出设备号
device_destroy(simple_class, dev); //删除设备节点
class_destroy(simple_class);//删除并释放class结构
cdev_del(simple_cdev);//注销设备
cdev_put(simple_cdev);//对动态的设备需要使用cdev_put‘来释放资源
主要的文件操作方法实现
文件操作函数有很多的操作接口,驱动编程需要实现这些接口,在用户编程时候系统调用时候会调用到这些操作view
plaincopy
to clipboard
struct file_operations {
...
loff_t (*llseek) (struct file *, loff_t, int);
ssize_t (*read) (struct file *, char __user *, size_t, loff_t *);
ssize_t (*write) (struct file *, const char __user *, size_t, loff_t *);
int (*open) (struct inode *, struct file *);
int (*release) (struct inode *, struct file *);
...
};
[cpp] view
plaincopy
struct file_operations {
...
loff_t (*llseek) (struct file *, loff_t, int);
ssize_t (*read) (struct file *, char __user *, size_t, loff_t *);
ssize_t (*write) (struct file *, const char __user *, size_t, loff_t *);
int (*open) (struct inode *, struct file *);
int (*release) (struct inode *, struct file *);
...
};
以上只列出了主要的操作,下面会依次介绍:
本次的测试代码上传在:char_step2
结构体:
首先 我们会模拟写一个不操作任何设备,而仅仅是存储的一个驱动。定义自己的一个结构体为:
view
plaincopy
to clipboard
struct simple_dev{
char data[MAX_SIMPLE_LEN];
loff_t count;
struct semaphore semp;
};
[cpp] view
plaincopy
struct simple_dev{
char data[MAX_SIMPLE_LEN];
loff_t count;
struct semaphore semp;
};
data 保存数据, count表示文件的数据有效的位置, semp是一个信号量锁,在以后的编程中使用,
之后的程序中结构体也会做相应的变化,以适应linux编写驱动的习惯
open方法:
打开设备并进一步初始化工作,在没有定义open方法时内核以一种默认的方式打开设备,保证每次都能正确打开。open方法中有有struct inode参数,包含了设备号,程序中可以使用次设备号得到正操作的设备
在struct file中主要的操作是private_data指针,他可以传递任何自己创建的结构。
总得说来open方法的作用有3
1、获得操作的设备(通过设备号)
2、进一步的初始化设备
3、初始化file结构体的private_data
view
plaincopy
to clipboard
static int simple_open(struct inode *inodp, struct file *filp)
{
struct simple_dev *temp_dev = NULL;
int minor = 0;
#if SIMPLE_DEBUG
printk(KERN_INFO "In %s \n", __func__);
#endif
minor = iminor(inodp);//获得操作的设备的次设备号
if(minor > DEV_COUNT-1){
printk(KERN_ERR "the char dev in invalid \n");
return -ENODEV;
}
#if SIMPLE_DEBUG
printk(KERN_INFO "the minor is %d \n", minor);
#endif
temp_dev = &char2_dev[minor];//获得真正操作的设备
/* 进一步 初始化设备 因为是操作一个模拟的设备 故省去*/
filp->private_data = temp_dev; //初始化 private_data
return 0;
}
[cpp] view
plaincopy
static int simple_open(struct inode *inodp, struct file *filp)
{
struct simple_dev *temp_dev = NULL;
int minor = 0;
#if SIMPLE_DEBUG
printk(KERN_INFO "In %s \n", __func__);
#endif
minor = iminor(inodp);//获得操作的设备的次设备号
if(minor > DEV_COUNT-1){
printk(KERN_ERR "the char dev in invalid \n");
return -ENODEV;
}
#if SIMPLE_DEBUG
printk(KERN_INFO "the minor is %d \n", minor);
#endif
temp_dev = &char2_dev[minor];//获得真正操作的设备
/* 进一步 初始化设备 因为是操作一个模拟的设备 故省去*/
filp->private_data = temp_dev; //初始化 private_data
return 0;
}
release方法:
主要是对open进一步初始化的操作的反操作
比如open时候分配了内存,在release时就需要释放它等
例子中因为操作内存设备,故在release时无需做什么事
read方法:
read 是把设备中的数据传递给调用者主要步骤
1、检测偏移量有效(有些设备驱动不需要检测)
2、检测用户空间地址有效
3、将数据传给用户(在此步骤中调用的函数可能会自己检测步骤2)
4、调整偏移量
5、返回读到的数据长度
(read write 用法相对灵活,不要依赖上边的步骤,设备驱动程序要根据设备特性去设计此方法)
这里先介绍一个会检测用户空间地址是否有效的copy函数
用户调用read读设备,而在内核空间就是将数据传给用户,是一个to的操作
view
plaincopy
to clipboard
unsigned long __must_check copy_to_user(void __user *to, const void *from, unsigned long n)
[cpp] view
plaincopy
unsigned long __must_check copy_to_user(void __user *to, const void *from, unsigned long n)
__must_check表述必须检测其返回值,操作成功返回0,不成功返回负的错误码
to是用户空间指针 也就是read函数传入的用户空间的指针,
from指向设备要传送的数据
n标识传入长度
上图是 摘自LDD3上的经典视图, 应该比较能说明read的方法
view
plaincopy
to clipboard
static ssize_t simple_read(struct file *filp, char __user *userstr, size_t count, loff_t *loff)
{
struct simple_dev *dev = NULL;
int data_remain = 0;
int err;
#if SIMPLE_DEBUG
printk(KERN_INFO "In %s \n", __func__);
#endif
dev = filp->private_data;
data_remain = dev->count - *loff;
if(MAX_SIMPLE_LEN < *loff)//检测偏移量
{
printk(KERN_ERR "the offset is illegal in func %s \n",__func__ );
return -EINVAL;
}
else if(data_remain <= 0)
{
printk(KERN_WARNING "there was not much data in the device\n");
return 0;
}
else
{
if(count > data_remain)
{
#if SIMPLE_DEBUG
printk(KERN_INFO "the data is less than the user want to read\n");
#endif
count = data_remain;
}
else
{
}
}
err = copy_to_user(userstr, (dev->data)+(*loff), count); //调用内核函数进行数据拷贝,它会检测用户地址是否有效
if(err != 0)
{
printk(KERN_ERR "an error occured when copy data to user\n");
return err;
}
else
{
#if SIMPLE_DEBUG
printk(KERN_INFO "data copy to user OK\n");
#endif
*loff = *loff + count; //调整偏移量
return count; //返回写入的数据量
}
}
[cpp] view
plaincopy
static ssize_t simple_read(struct file *filp, char __user *userstr, size_t count, loff_t *loff)
{
struct simple_dev *dev = NULL;
int data_remain = 0;
int err;
#if SIMPLE_DEBUG
printk(KERN_INFO "In %s \n", __func__);
#endif
dev = filp->private_data;
data_remain = dev->count - *loff;
if(MAX_SIMPLE_LEN < *loff)//检测偏移量
{
printk(KERN_ERR "the offset is illegal in func %s \n",__func__ );
return -EINVAL;
}
else if(data_remain <= 0)
{
printk(KERN_WARNING "there was not much data in the device\n");
return 0;
}
else
{
if(count > data_remain)
{
#if SIMPLE_DEBUG
printk(KERN_INFO "the data is less than the user want to read\n");
#endif
count = data_remain;
}
else
{
}
}
err = copy_to_user(userstr, (dev->data)+(*loff), count); //调用内核函数进行数据拷贝,它会检测用户地址是否有效
if(err != 0)
{
printk(KERN_ERR "an error occured when copy data to user\n");
return err;
}
else
{
#if SIMPLE_DEBUG
printk(KERN_INFO "data copy to user OK\n");
#endif
*loff = *loff + count; //调整偏移量
return count; //返回写入的数据量
}
}
write方法:
与read类似 它是从用户传数据给设备驱动
从内核空间看就是一个从用户空间取数据 是一个from操作
view
plaincopy
to clipboard
long __must_check strncpy_from_user(char *dst, const char __user *src, long count)
[cpp] view
plaincopy
long __must_check strncpy_from_user(char *dst, const char __user *src, long count)
dst 驱动保存数据的地址
src 用户空间传入的数据
count 标识数据长度
view
plaincopy
to clipboard
static ssize_t simple_write(struct file *filp, const char __user *userstr, size_t count, loff_t *loff)
{
struct simple_dev *dev = NULL;
int err;
int remain_space = 0;
#if SIMPLE_DEBUG
printk(KERN_INFO "In %s\n",__func__);
#endif
dev = filp->private_data;
if(MAX_SIMPLE_LEN <= *loff) //检测偏移量
{
printk(KERN_ERR "the offset is illegal in func %s\n", __func__);
return -EINVAL;
}
else
{
remain_space = MAX_SIMPLE_LEN - *loff;
if(count > remain_space)
{
#if SIMPLE_DEBUG
printk(KERN_WARNING "the data is to long to write to the device\n");
#endif
count = remain_space;
}
else
{
}
}
err = copy_from_user((dev->data)+(*loff),userstr,count);//取得数据
if(err != 0)
{
printk(KERN_ERR "an error occured when copy data from user\n");
return err;
}
else
{
#if SIMPLE_DEBUG
printk(KERN_INFO "data copy from user OK\n");
#endif
*loff = *loff + count; //跳着偏移
if(*loff > dev->count)
{
dev->count = *loff;
}
else
{
}
return count; //返回写入的数据量
}
}
[cpp] view
plaincopy
static ssize_t simple_write(struct file *filp, const char __user *userstr, size_t count, loff_t *loff)
{
struct simple_dev *dev = NULL;
int err;
int remain_space = 0;
#if SIMPLE_DEBUG
printk(KERN_INFO "In %s\n",__func__);
#endif
dev = filp->private_data;
if(MAX_SIMPLE_LEN <= *loff) //检测偏移量
{
printk(KERN_ERR "the offset is illegal in func %s\n", __func__);
return -EINVAL;
}
else
{
remain_space = MAX_SIMPLE_LEN - *loff;
if(count > remain_space)
{
#if SIMPLE_DEBUG
printk(KERN_WARNING "the data is to long to write to the device\n");
#endif
count = remain_space;
}
else
{
}
}
err = copy_from_user((dev->data)+(*loff),userstr,count);//取得数据
if(err != 0)
{
printk(KERN_ERR "an error occured when copy data from user\n");
return err;
}
else
{
#if SIMPLE_DEBUG
printk(KERN_INFO "data copy from user OK\n");
#endif
*loff = *loff + count; //跳着偏移
if(*loff > dev->count)
{
dev->count = *loff;
}
else
{
}
return count; //返回写入的数据量
}
}
lseek方法:
根据用户传入的参数调整文件偏移
mode
| SEEK_SET | 从文件起始处开始偏移 |
| SEEK_CUR | 从文件当前位置计算偏移 |
| SEEK_END | 从文件末尾计算偏移 |
在调整文件偏移后需要 更新file中得f_pos成员
view
plaincopy
to clipboard
static loff_t simple_llseek(struct file *filp, loff_t loff, int mode)
{
struct simple_dev *dev = NULL;
loff_t tmp_len;
#if SIMPLE_DEBUG
printk(KERN_INFO "In %s\n",__func__);
#endif
dev = filp->private_data;
switch ( mode )
{
case SEEK_SET:
if( loff < 0 )
{
printk(KERN_ERR "can't move above file line %d \n", __LINE__);
return -1;
}
else if(loff > dev->count)
{
printk(KERN_ERR "offset is too long line %d\n", __LINE__);
return -1;
}
else
{
filp->f_pos = loff;
}
break;
case SEEK_CUR:
if((tmp_len = filp->f_pos+loff) < 0)
{
printk(KERN_ERR "can't move above file line %d \n", __LINE__);
return -1;
}
else if(tmp_len > dev->count)
{
printk(KERN_ERR "offset is too long line %d\n", __LINE__);
return -1;
}
else
{
filp->f_pos = tmp_len;
}
break;
case SEEK_END:
if((tmp_len = dev->count+loff ) < 0)
{
printk(KERN_ERR "can't move above file line %d \n", __LINE__);
return -1;
}
else if(tmp_len > dev->count)
{
printk(KERN_ERR "offset is too long line %d\n", __LINE__);
return -1;
}
else
{
filp->f_pos = tmp_len;
}
break;
default :
printk(KERN_INFO "illigal lseek mode! \n");
return -1;
break;
}
return filp->f_pos;
}
用户地址检测 简单模块调试 以及一些杂项
检测用户空间地址的有效性
上一节中提到在read write时候要检测用户空间传递的参数地址是否是有效地址,有的内核函数会自行检测,但是在调用轻量级的内核函数时候,就可能不去检测用户空间的地址是否有效,如果此时用户无传递一个无效地址,而内核函数去操作了它,这时棘手的问题出现了,轻则内核oops 关机重启就OK了,在特别严重的情况下,可能你的系统就崩溃了(我又遇到过),所以,我们在驱动程序中操作用户空间地址时候要小心加小心。如果电脑配置可以就在虚拟机中玩, 或者在开发板上试,当然这边的测试代码我都有试过,不至于让你系统崩溃的。如何检测呢?
调用一个access_ok函数去检测
view
plaincopy
to clipboard
#define access_ok(type,addr,size)
[cpp] view
plaincopy
#define access_ok(type,addr,size)
type 标识读写操作VERIFY_READ表示地址可读,VERIFY_WRITE表示地址可写
addr 用户传入的地址
size 读写的长度
此代码在有内存管理的芯片与无内存管理之间有区别
我们 看一段内核代码 (path : arch/arm/include/asm/uaccess.h)
view
plaincopy
to clipboard
#define access_ok(type,addr,size) (__range_ok(addr,size) == 0)
#ifdef CONFIG_MMU
...
#define __range_ok(addr,size) ({ \
unsigned long flag, roksum; \
__chk_user_ptr(addr); \
__asm__("adds %1, %2, %3; sbcccs %1, %1, %0; movcc %0, #0" \
: "=&r" (flag), "=&r" (roksum) \
: "r" (addr), "Ir" (size), "0" (current_thread_info()->addr_limit) \
: "cc"); \
flag; })
#else
...
#define __range_ok(addr,size)<span style="white-space:pre"> </span>(0)
[cpp] view
plaincopy
#define access_ok(type,addr,size) (__range_ok(addr,size) == 0)
#ifdef CONFIG_MMU
...
#define __range_ok(addr,size) ({ \
unsigned long flag, roksum; \
__chk_user_ptr(addr); \
__asm__("adds %1, %2, %3; sbcccs %1, %1, %0; movcc %0, #0" \
: "=&r" (flag), "=&r" (roksum) \
: "r" (addr), "Ir" (size), "0" (current_thread_info()->addr_limit) \
: "cc"); \
flag; })
#else
...
#define __range_ok(addr,size)<span style="white-space:pre"> </span>(0)
即在有内存管理并配置了内存管理的芯片内调用次函数会执行检测操作,而在没有配置内存管理的芯片中此函数总是返回真,而做驱动的不应该做这些假设,所以传入的参数在有必要的情况下还是要自行检测再看看copy_to_user函数
view
plaincopy
to clipboard
static inline unsigned long __must_check copy_to_user(void __user *to, const void *from, unsigned long n)
{
if (access_ok(VERIFY_WRITE, to, n))
n = __copy_to_user(to, from, n);
return n;
}
[cpp] view
plaincopy
static inline unsigned long __must_check copy_to_user(void __user *to, const void *from, unsigned long n)
{
if (access_ok(VERIFY_WRITE, to, n))
n = __copy_to_user(to, from, n);
return n;
}
可以看到他在函数内部做了这种检测
而当我们调用
view
plaincopy
to clipboard
__copy_to_user
__copy_from_user
get_user
__get_user
put_user
__put_user
[cpp] view
plaincopy
__copy_to_user
__copy_from_user
get_user
__get_user
put_user
__put_user
时都需要检测用户地址是否可用
简单模块调试技术
为什么要加简单呢? 因为这边只介绍了用打印来调试程序。看了LDD3上边介绍的很多调试技术 查询调试 观察调试之类
我觉得 打印调试来的最简单最直接 虽然他有一些限制
1、大量的使用printk会使系统变慢
2、没次打印一行都会引起磁盘操作
...
在printk中有7中 消息的选项 表示着不同的消息等级
| KERN_GMERG<0> | 用于紧急消息, 常常是那些崩溃前的消息. |
| KERN_ALERT<1> | 需要立刻动作的情形. |
| KERN_CRIT<2> | 严重情况, 常常与严重的硬件或者软件失效有关. |
| KERN_ERR<3> | 用来报告错误情况; 设备驱动常常使用 来报告硬件故障. |
| KERN_WARNING<4> | 有问题的情况的警告, 这些情况自己不会引起系统的严重问题 |
| KERN_NOTICE<5> | 正常情况, 但是仍然值得注意. 在这个级别一些安全相关的情况会报告. |
| KERN_INFO<6> | 信息型消息. 比如 :打印它们发现的硬件的信息. |
| KERN_DEBUG<7> | 用作调试消息. |
在系统中我们 可以使用 echo 8 > /proc/sys/kernel/printk 来调整这个数值(要root权限) 使信息全部被打印出来。
当然我们 也可以通过dmesg来查看所有的打印信息(有一点不适用,就是当系统出现oops的时候 就不行了 因为你已经死机了 也就输不了这个命令 就看不到打印信息了)。
view
plaincopy
to clipboard
#if SIMPLE_DEBUG
#define D(...) printk(KERN_DEBUG __VA_ARGS__)
#define WAR(...) printk(KERN_WARNING __VA_ARGS__)
#else
#define D(...) ((void)0)
#define WAR(...) ((void)0)
#endif
[cpp] view
plaincopy
#if SIMPLE_DEBUG
#define D(...) printk(KERN_DEBUG __VA_ARGS__)
#define WAR(...) printk(KERN_WARNING __VA_ARGS__)
#else
#define D(...) ((void)0)
#define WAR(...) ((void)0)
#endif
在需要调试的时候,我们去定义SIMPLE_DEBUG这个宏,在驱动代码测试都OK可以发行时候,去掉这个定义。
在需要打印的地方我们就使用
view
plaincopy
to clipboard
D(“print the log int func:%s line:%d”, __func__ ,__LINE__);
[cpp] view
plaincopy
D(“print the log int func:%s line:%d”, __func__ ,__LINE__);
当然要修改成有意义的debug信息
打印当前进程信息
内核模块不像应用程序一样顺序执行,只用应用进程调用到想关联的函数才会到内核模块中call这个接口,那可不可以 打印调用进程的信息呢?
答案是肯定的,linux中定义了current这个变量(<linux/sched.h>)current指向了当前的进程,他是一个task_struct类型
其中有两个重要的成员
comm 表示了 当前的命令名名
pid 表示了当前进程号
view
plaincopy
to clipboard
D("[process: %s] [pid: %d] xxx\n" , current->comm, current->pid);
[cpp] view
plaincopy
D("[process: %s] [pid: %d] xxx\n" , current->comm, current->pid);
内核的container_of函数
在写字符设备驱动时候我们都会去自定义一个结构,其中包含了cdev结构
view
plaincopy
to clipboard
struct simple_dev{
char *data;
loff_t count;
struct cdev cdev;
struct semaphore semp;
};
[cpp] view
plaincopy
struct simple_dev{
char *data;
loff_t count;
struct cdev cdev;
struct semaphore semp;
};
在open方法中除了上一节看到的那样用一个次设备好来获取结构(有时候会出错 如果我们次设备号不是从0开始分配)
所以需要寻求一种安全的方法
container_of为我们提供了这么一个很好的接口
view
plaincopy
to clipboard
/**
* container_of - cast a member of a structure out to the containing structure
* @ptr: the pointer to the member.
* @type: the type of the container struct this is embedded in.
* @member: the name of the member within the struct.
*
*/
#define container_of(ptr, type, member)
[cpp] view
plaincopy
/**
* container_of - cast a member of a structure out to the containing structure
* @ptr: the pointer to the member.
* @type: the type of the container struct this is embedded in.
* @member: the name of the member within the struct.
*
*/
#define container_of(ptr, type, member)
再解释一下
ptr是指结构体一个成员的地址
type 指要获得的结构体
member ptr指向的成员在结构体中的名字
view
plaincopy
to clipboard
/*container_of(pointer, container_type, container_fild)
we can get the container_type with one number in the container
by this function. container_fild is the one of the number in the
container_type , pointer point to confain_field type
*/
temp_dev = container_of(inodp->i_cdev, struct simple_dev, cdev);
[cpp] view
plaincopy
/*container_of(pointer, container_type, container_fild)
we can get the container_type with one number in the container
by this function. container_fild is the one of the number in the
container_type , pointer point to confain_field type
*/
temp_dev = container_of(inodp->i_cdev, struct simple_dev, cdev);
上边的E文 是我写的 poor English
container_of 的实现基本原理是这样的:
知道了结构体中某个成员的地址, 又可以求的该成员在改结构体中得偏移,拿成员的地址减去这个偏移,就得到了整个结构的地址,太佩服写内核的人了
并发 竞态 (信号量与自旋锁)
代码传至并发竞态控制
并发进程 导致竞态的一个例子
前面所述的字符驱动都是没有考虑并发竟态的情况,想象一下一个进程去读一个字符设备,另一个进程在同一时间向这个设备写入(完全有这种情况)
原来设备中存有 A B C D 要想设备写入1 2 3 4 每次读写一个字节
| t1 | t2 | t3 | t4 | t5 | t6 | t7 | t8 |
| R | W | W | R | W | R | R | W |
| A | 1 | 2 | 2 | 3 | 3 | D | 4 |
W:write
所以最后读出了A23D不是原来的ABCD
而如果两个进程同时写入一个设备则写入的值可能既不是A进程想要的又不是B进程想要的。
并发与竞态
并发是指 多个进程同时访问相同一段代码(不仅限于内核空间的代码)竞态 是对共享资源访问的结果, 并发进程访问了相同的数据或结构(硬件资源)等。
解决竞态的思想 主要有两种
1、所有的代码都不使用全局变量
2、使用锁机制确保一次只有一个进程使用共享资源
显然第一种方式是不可能的,我们只能尽量少的使用全局变量,而不能完全避免它
下边介绍 两种锁机制
信号量
这个概念对我们来说应该不是很陌生,至少听说过,它有两种操作:通常叫做P操作与V操作希望进入临界区的进程调用P操作,检测当前信号量,如果信号量大于0,则信号量减1,进入临界区,否则进程等待其他进程释放此信号量,信号量的释放通过一个V操作增加信号量的值,在某些情况下会去唤醒等待此信号量的进程。
以上说到了一个 临界区这个名词 简单来讲就是内部操作了共享数据的代码
Linux 内核中信号量的实现
因为从LLD3(2.6.10)版本出来到现在(3.1)内核函数有了很多的变化,许多书上介绍的函数都已经不存在了,也能几版新kernel之后现在我说的函数也会有变化了。
信号量结构以及相关函数的定义在<linux/semaphore.h>中
创建信号量
void sema_init(struct semaphore *sem, int val)[cpp] view
plaincopy
void sema_init(struct semaphore *sem, int val)
sem: 信号量结构体
val : 初始化信号量的值(代表了资源数)【val 为1时 表示代码在同一时间只允许一个进程访问 称之为互斥锁】
view
plaincopy
to clipboard
void init_MUTEX();
void init_MUTEX_LOCKED();
[cpp] view
plaincopy
void init_MUTEX();
void init_MUTEX_LOCKED();
两个定义互斥锁的函数 (最新的内核中已经没有这两个函数了,所以不要用它)
struct simple_dev{
char *data;
loff_t count;
struct cdev cdev;
struct semaphore semp;
};
static __init int simple_init(void)
{
...
for( index = 0 ; index < DEV_COUNT ; ++index )
{
sema_init(&char5_dev[index].semp,1);
//init_MUTEX(&(char5_dev[index].semp));
init_waitqueue_head(&(char5_dev[index].queue));
}
...
}
[cpp] view
plaincopy
struct simple_dev{
char *data;
loff_t count;
struct cdev cdev;
struct semaphore semp;
};
static __init int simple_init(void)
{
...
for( index = 0 ; index < DEV_COUNT ; ++index )
{
sema_init(&char5_dev[index].semp,1);
//init_MUTEX(&(char5_dev[index].semp));
init_waitqueue_head(&(char5_dev[index].queue));
}
...
}
P操作
void down(struct semaphore *sem);
int __must_check down_interruptible(struct semaphore *sem);
int __must_check down_killable(struct semaphore *sem);
int __must_check down_trylock(struct semaphore *sem);
int __must_check down_timeout(struct semaphore *sem, long jiffies)
[cpp] view
plaincopy
void down(struct semaphore *sem);
int __must_check down_interruptible(struct semaphore *sem);
int __must_check down_killable(struct semaphore *sem);
int __must_check down_trylock(struct semaphore *sem);
int __must_check down_timeout(struct semaphore *sem, long jiffies)
第一个函数在信号量大于0时直接将信号量的值减一程序继续运行,在信号量为0时进程睡眠只有等到有其他进程释放信号量时候才被唤醒(不推荐使用)
第二个函数 在第一个操作的基础上,如果进程因为没有得到信号量睡眠,在别的进程释放信号量或者发成中断的情况下都会被唤醒,在被中断信号唤醒时候返回-EINTR,成功返回0
第三个函数 如果没有另外的任务会获取此信号量,则可以调用此函数,在收到中断信号时会返回-EINTR
第四个函数 试图去获取信号量,在获取不到的时候不会睡眠,而是继续运行,返回0值表示得到了此信号量, 返回1 表示没能获取到。
第五个函数 可以去设置最长睡眠时间, 但是 此函数不可中断
V操作
void up(struct semaphore *sem)[cpp] view
plaincopy
void up(struct semaphore *sem)
此操作 首先检测时候有其他进程等待此信号量,如果有则唤醒此进程,不改变信号量的值,如果没有则将信号量的值加1。
static ssize_t simple_read(struct file *filp, char __user *userstr, size_t count, loff_t *loff)
{
struct simple_dev *dev = NULL;
int data_remain = 0;
int err;
D("[%s:] In %s \n",current->comm, __func__);
dev = filp->private_data;
err = down_interruptible(&dev->semp);
if(err)
{
if(err == -EINTR)
WAR("return by an interrupt signal\n");
else
printk(KERN_ERR "an error occured in down_interruptible\n");
return err;
}
else
{
D("have get the mutex %d\n", __LINE__);
}
/*******************************************
* 临界区代码
********************************************/
up(&dev->semp);
return count;
}
[cpp] view
plaincopy
static ssize_t simple_read(struct file *filp, char __user *userstr, size_t count, loff_t *loff)
{
struct simple_dev *dev = NULL;
int data_remain = 0;
int err;
D("[%s:] In %s \n",current->comm, __func__);
dev = filp->private_data;
err = down_interruptible(&dev->semp);
if(err)
{
if(err == -EINTR)
WAR("return by an interrupt signal\n");
else
printk(KERN_ERR "an error occured in down_interruptible\n");
return err;
}
else
{
D("have get the mutex %d\n", __LINE__);
}
/*******************************************
* 临界区代码
********************************************/
up(&dev->semp);
return count;
}
自旋锁
自旋锁是另一种锁机制,信号量会引起进程的休眠,而在不能睡眠的代码中我们就需要使用自旋锁。
自旋锁也是一个互斥的概念,有“锁定”与“解锁”两个操作,当程序需要锁定时候,则先检测锁是否可用,如果可用则获得锁,程序进入临界区,否则进入忙等待重复检测这个锁是否可用(这就是自旋),临界区代码操作完成则解锁。
信号量实现中其实也用到了自旋锁机制(有兴趣的刻一看内核源码,这边不展开,等以后写内核时候再介绍)
因为自旋锁在得不到锁的时候会“自旋” 即不会让出CPU ,所以我们的临界区执行速度应该尽量的快,最好使用原子操作(不会睡眠)。这也是使用自旋锁的核心规则,在多数情况下我们做不到这一点,所以自旋锁在驱动程序中使用的不如信号量频繁。
初始化
viewplaincopy
to clipboard
spin_lock_init(_lock)
[cpp] view
plaincopy
spin_lock_init(_lock)
锁定
static inline void spin_lock(spinlock_t *lock)static inline int spin_trylock(spinlock_t *lock)
static inline void spin_lock_irq(spinlock_t *lock)
spin_lock_irqsave(lock, flags)
static inline void spin_lock_bh(spinlock_t *lock)
[cpp] view
plaincopy
static inline void spin_lock(spinlock_t *lock)
static inline int spin_trylock(spinlock_t *lock)
static inline void spin_lock_irq(spinlock_t *lock)
spin_lock_irqsave(lock, flags)
static inline void spin_lock_bh(spinlock_t *lock)
第一个函数是 不去禁止中断 直接锁定
第二个函数 会尝试加锁,检测返回之判断是否锁定,在不能锁定时候程序也继续运行
第三个函数 禁止中断,不保存保存原先的中断状态
第四个函数 在禁止中断之前,保存原先的中断状态,
第五个函数 表示只禁止软件中断而保持硬件中断的打开
因为自旋锁本质上要不会被中断,所以调用时候建议使用包含有禁止中断的函数
解锁
static inline void spin_unlock(spinlock_t *lock)//static inline void spin_unlock(spinlock_t *lock)
static inline void spin_unlock_irq(spinlock_t *lock)
static inline void spin_unlock_irqrestore(spinlock_t *lock, unsigned long flags)
static inline void spin_unlock_bh(spinlock_t *lock)
[cpp] view
plaincopy
static inline void spin_unlock(spinlock_t *lock)
//static inline void spin_unlock(spinlock_t *lock)
static inline void spin_unlock_irq(spinlock_t *lock)
static inline void spin_unlock_irqrestore(spinlock_t *lock, unsigned long flags)
static inline void spin_unlock_bh(spinlock_t *lock)
对应于锁定的五个函数,分别解锁,(对应于锁定的第二个操作,在加锁成功时候需要使用spin_unlock来解锁)
死锁
上边只提到了使用锁的好处,以及如何使用锁,但是引入锁机制也会带来风险,那就是死锁,进程死锁最明显的表现就是死机。如上图所示,A进程占有锁1,并在持有锁1的时候需要得到锁2程序才能继续进行
B进程占有锁2, 并在保持锁2的同时去获取锁1程序才能继续运行,这样A, B 进程就卡在这里,互不相让,这就导致了死锁。
亦或 在一个进程内同时试图获取同样的锁
死锁的名词解释
是指两个或两个以上的进程在执行过程中,因争夺资源而造成的一种互相等待的现象,若无外力作用,它们都将无法推进下去。此时称系统处于死锁状态或系统产生了死锁
解决死锁的方法:
1、加解锁顺序一致在必须使用多个锁的时候,应该始终以相同的顺序获取,也最好以获取锁顺序逆序解锁。
2、使用原子变量
原子变量不会被多个进程并发操作,内核提供了一种原子类型(atomic_t <asm/stomic.h>中)
3、设置加锁timeout值
在一定时间内不能获得锁,就放弃,并释放已占有的锁

相关文章推荐
- 开发过程中常用的linux小技巧集锦
- Linux crontab 命令格式与详细例子
- Linux Advance--打印文件类型
- 每天一个linux命令(12):more命令
- linux tar的用法
- linux socket 缓冲区默认大小
- linux svn 取代码报错
- linux下使用tar命令
- Linux的一些常用命令
- 【Linux C/C++系列教程】 第一讲 HelloWorld程序内存分区详解
- Linux系统调用列表
- Linux中head,tail,wc的使用
- 【centos安装wordpress】要执行请求的操作,WordPress 需要访问您网页服务器的权限。 请输入您的 FTP 登录XXXX”完美解决方法
- linux安装sz rz工具记
- Linux内核模块命令相关
- Linux input子系统实例分析(一)
- linux命令: sort
- centos7中 npm install express 时Error: Cannot find module 'express'错误
- Linux下编译Phantomjs
- linux系统时间对java.Timer执行产生的影响