iOS开发中CAlayer层的属性以及自定义层的方法
CAlayer层的属性
一、position和anchorPoint
1.简单介绍
CALayer有2个非常重要的属性:position和anchorPoint
@property CGPoint position;
用来设置CALayer在父层中的位置
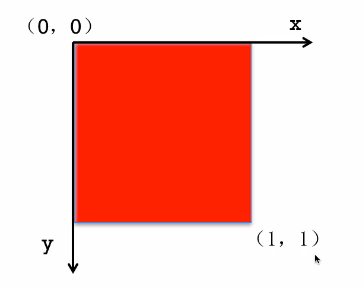
以父层的左上角为原点(0, 0)
@property CGPoint anchorPoint;
称为“定位点”、“锚点”
决定着CALayer身上的哪个点会在position属性所指的位置
以自己的左上角为原点(0, 0)
它的x、y取值范围都是0~1,默认值为(0.5, 0.5)
2.图示
anchorPoint
它的取值为0~1
红色图层的anchorPoint为(0,0)

红色图层的anchorPoint为(0.5,0.5)

红色图层的anchorPoint为(1,1)

红色图层的anchorPoint为(0.5,0)

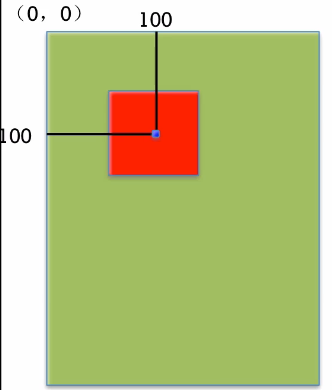
position和anchorPoint
添加一个红色图层到绿色图层上,红色图层显示到什么位置,由position属性决定
假设红色图层的position是(100,100)
到底把红色图层的哪个点移动到(100,100)的坐标位置,锚点。
红色图层的锚点是(0,0)

红色图层的锚点是(0.5,0.5)
红色图层的锚点是(1,1)

红色图层的锚点是(0.5,0)

3.代码示例
(1)没有设置锚点。默认的锚点位置为(0.5,0.5)
//
// YYViewController.m
// 03-锚点等属性
//
// Created by apple on 14-6-21.
// Copyright (c) 2014年 itcase. All rights reserved.
//
#import "YYViewController.h"
@interface YYViewController ()
@end
复制代码 代码如下:
@implementation YYViewController
- (void)viewDidLoad
{
[super viewDidLoad];
//创建图层
CALayer *layer=[CALayer layer];
//设置图层的属性
layer.backgroundColor=[UIColor redColor].CGColor;
layer.bounds=CGRectMake(0, 0, 100, 100);
//添加图层
[self.view.layer addSublayer:layer];
}
@end
显示效果:

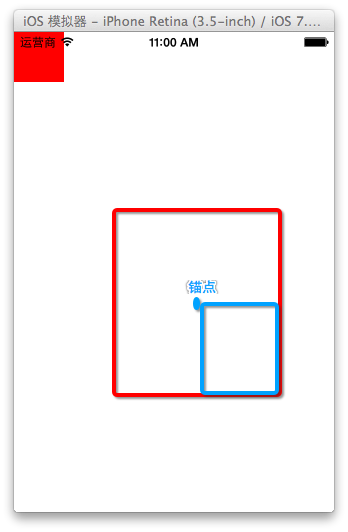
(1)设置锚点位置为(0,0)
- (void)viewDidLoad
{
[super viewDidLoad];
//创建图层
CALayer *layer=[CALayer layer];
//设置图层的属性
layer.backgroundColor=[UIColor redColor].CGColor;
layer.bounds=CGRectMake(0, 0, 100, 100);
//设置锚点为(0,0)
layer.anchorPoint=CGPointZero;
//添加图层
[self.view.layer addSublayer:layer];
}
@end
显示效果:

二、隐式动画
1.简单说明
每一个UIView内部都默认关联着一个CALayer,我们可用称这个Layer为Root Layer(根层)
所有的非Root Layer,也就是手动创建的CALayer对象,都存在着隐式动画
什么是隐式动画?
当对非Root Layer的部分属性进行修改时,默认会自动产生一些动画效果
而这些属性称为Animatable Properties(可动画属性)
列举几个常见的Animatable Properties:
bounds:用于设置CALayer的宽度和高度。修改这个属性会产生缩放动画
backgroundColor:用于设置CALayer的背景色。修改这个属性会产生背景色的渐变动画
position:用于设置CALayer的位置。修改这个属性会产生平移动画
2.代码示例
//
// YYViewController.m
// 04-隐式动画
//
// Created by apple on 14-6-21.
// Copyright (c) 2014年 itcase. All rights reserved.
//
#import "YYViewController.h"
@interface YYViewController ()
@property(nonatomic,strong)CALayer *layer;
@end
复制代码 代码如下:
@implementation YYViewController
- (void)viewDidLoad
{
[super viewDidLoad];
//创建图层
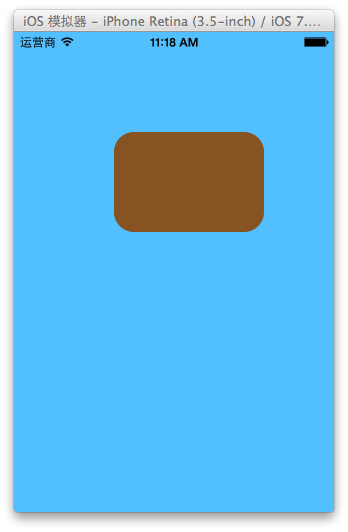
CALayer *mylayer=[CALayer layer];
//设置图层属性
mylayer.backgroundColor=[UIColor brownColor].CGColor;
mylayer.bounds=CGRectMake(0, 0, 150, 100);
//显示位置
mylayer.position=CGPointMake(100, 100);
mylayer.anchorPoint=CGPointZero;
mylayer.cornerRadius=20;
//添加图层
[self.view.layer addSublayer:mylayer];
self.layer=mylayer;
}
-(void)touchesBegan:(NSSet *)touches withEvent:(UIEvent *)event
{
//隐式动画
self.layer.bounds=CGRectMake(0, 0, 200, 60);
self.layer.backgroundColor=[UIColor yellowColor].CGColor;
}
@end

关闭隐式动画:
[CATransaction begin];
[CATransaction setDisableActions:YES];
//隐式动画
self.layer.bounds=CGRectMake(0, 0, 200, 60);
self.layer.backgroundColor=[UIColor yellowColor].CGColor;
[CATransaction commit];
如何查看CALayer的某个属性是否支持隐式动画?
可以查看头文件,看有没有Animatable,如果有则表示支持。

也可以查看官方文档

文档中标明的这些属性都是支持隐式动画的
自定义layer
一、第一种方式
1.简单说明
以前想要在view中画东西,需要自定义view,创建一个类与之关联,让这个类继承自UIView,然后重写它的DrawRect:方法,然后在该方法中画图。
绘制图形的步骤:
(1)获取上下文
(2)绘制图形
(3)渲染图形
如果在layer上画东西,与上面的过程类似。
代码示例:
新建一个类,让该类继承自CALayer

YYMylayer.m文件
//
// YYMylayer.m
// 05-自定义layer(1)
//
// Created by apple on 14-6-21.
// Copyright (c) 2014年 itcase. All rights reserved.
//
#import "YYMylayer.h"
@implementation YYMylayer
//重写该方法,在该方法内绘制图形
-(void)drawInContext:(CGContextRef)ctx
{
//1.绘制图形
//画一个圆
CGContextAddEllipseInRect(ctx, CGRectMake(50, 50, 100, 100));
//设置属性(颜色)
// [[UIColor yellowColor]set];
CGContextSetRGBFillColor(ctx, 0, 0, 1, 1);
//2.渲染
CGContextFillPath(ctx);
}
@end
复制代码 代码如下:
在控制器中,创建一个自定义的类
//
// YYViewController.m
// 05-自定义layer(1)
//
// Created by apple on 14-6-21.
// Copyright (c) 2014年 itcase. All rights reserved.
//
#import "YYViewController.h"
#import "YYMylayer.h"
@interface YYViewController ()
@end
复制代码 代码如下:
@implementation YYViewController
- (void)viewDidLoad
{
[super viewDidLoad];
//1.创建自定义的layer
YYMylayer *layer=[YYMylayer layer];
//2.设置layer的属性
layer.backgroundColor=[UIColor brownColor].CGColor;
layer.bounds=CGRectMake(0, 0, 200, 150);
layer.anchorPoint=CGPointZero;
layer.position=CGPointMake(100, 100);
layer.cornerRadius=20;
layer.shadowColor=[UIColor blackColor].CGColor;
layer.shadowOffset=CGSizeMake(10, 20);
layer.shadowOpacity=0.6;
[layer setNeedsDisplay];
//3.添加layer
[self.view.layer addSublayer:layer];
}
@end
注意点:
(1)默认为无色,不会显示。要想让绘制的图形显示出来,还需要设置图形的颜色。注意不能直接使用UI框架中的类
(2)在自定义layer中的-(void)drawInContext:方法不会自己调用,只能自己通过setNeedDisplay方法调用,在view中画东西DrawRect:方法在view第一次显示的时候会自动调用。
实现效果:

2.拓展
UIView中绘图说明
#import "YYVIEW.h"
@implementation YYVIEW
- (void)drawRect:(CGRect)rect
{
//1.获取上下文
CGContextRef ctx=UIGraphicsGetCurrentContext();
//2.绘制图形
CGContextAddEllipseInRect(ctx, CGRectMake(50, 50, 100, 100));
//设置属性(颜色)
// [[UIColor yellowColor]set];
CGContextSetRGBFillColor(ctx, 0, 0, 1, 1);
//3.渲染
CGContextFillPath(ctx);
//在执行渲染操作的时候,本质上它的内部相当于调用了下面的方法
[self.layer drawInContext:ctx];
}
说明:在UIView中绘制图形,获取的上下文就是这个view对应的layer的上下文。在渲染的时候,就是把图形渲染到对应的layer上。
在执行渲染操作的时候,本质上它的内部相当于执行了 [self.layer drawInContext:ctx];
二、第二种方式
方法描述:设置CALayer的delegate,然后让delegate实现drawLayer:inContext:方法,当CALayer需要绘图时,会调用delegate的drawLayer:inContext:方法进行绘图。
代码示例:
//
// YYViewController.m
// 06-自定义layer(2)
//
// Created by apple on 14-6-21.
// Copyright (c) 2014年 itcase. All rights reserved.
#import "YYViewController.h"
@interface YYViewController ()
@end
复制代码 代码如下:
@implementation YYViewController
- (void)viewDidLoad
{
[super viewDidLoad];
//1.创建自定义的layer
CALayer *layer=[CALayer layer];
//2.设置layer的属性
layer.backgroundColor=[UIColor brownColor].CGColor;
layer.bounds=CGRectMake(0, 0, 200, 150);
layer.anchorPoint=CGPointZero;
layer.position=CGPointMake(100, 100);
layer.cornerRadius=20;
layer.shadowColor=[UIColor blackColor].CGColor;
layer.shadowOffset=CGSizeMake(10, 20);
layer.shadowOpacity=0.6;
//设置代理
layer.delegate=self;
[layer setNeedsDisplay];
//3.添加layer
[self.view.layer addSublayer:layer];
}
-(void)drawLayer:(CALayer *)layer inContext:(CGContextRef)ctx
{
//1.绘制图形
//画一个圆
CGContextAddEllipseInRect(ctx, CGRectMake(50, 50, 100, 100));
//设置属性(颜色)
// [[UIColor yellowColor]set];
CGContextSetRGBFillColor(ctx, 0, 0, 1, 1);
//2.渲染
CGContextFillPath(ctx);
}
@end
实现效果:

注意点:不能再将某个UIView设置为CALayer的delegate,因为UIView对象已经是它内部根层的delegate,再次设置为其他层的delegate就会出问题。
在设置代理的时候,它并不要求我们遵守协议,说明这个方法是nsobject中的,就不需要再额外的显示遵守协议了。

提示:以后如果要设置某个类的代理,但是这个代理没要求我们遵守什么特定的协议,那么可以认为这个协议方法是NSObject里边的。
三、补充说明
(1)无论采取哪种方法来自定义层,都必须调用CALayer的setNeedsDisplay方法才能正常绘图。
(2)详细现实过程:
当UIView需要显示时,它内部的层会准备好一个CGContextRef(图形上下文),然后调用delegate(这里就是UIView)的drawLayer:inContext:方法,并且传入已经准备好的CGContextRef对象。而UIView在drawLayer:inContext:方法中又会调用自己的drawRect:方法。平时在drawRect:中通过UIGraphicsGetCurrentContext()获取的就是由层传入的CGContextRef对象,在drawRect:中完成的所有绘图都会填入层的CGContextRef中,然后被拷贝至屏幕。
您可能感兴趣的文章:

- 峰回路转,Firefox 浏览器即将重返 iOS 平台
- 峰回路转,Firefox 浏览器即将重返 iOS 平台
- 不可修补的 iOS 漏洞可能导致 iPhone 4s 到 iPhone X 永久越狱
- iOS 12.4 系统遭黑客破解,漏洞危及数百万用户
- 每日安全资讯:NSO,一家专业入侵 iPhone 的神秘公司
- [转][源代码]Comex公布JailbreakMe 3.0源代码
- 讲解iOS开发中基本的定位功能实现
- js判断客户端是iOS还是Android等移动终端的方法
- IOS开发环境windows化攻略
- 浅析iOS应用开发中线程间的通信与线程安全问题
- 检测iOS设备是否越狱的方法
- .net平台推送ios消息的实现方法
- 探讨Android与iOS,我们将何去何从?
- Android、iOS和Windows Phone中的推送技术详解
- IOS 改变键盘颜色代码
- 举例详解iOS开发过程中的沙盒机制与文件
- Android和IOS的浏览器中检测是否安装某个客户端的方法
- 分享一个iOS下实现基本绘画板功能的简单方法
- javascript实现阻止iOS APP中的链接打开Safari浏览器