iPhone上使用原生ViewController实现Popover
2015-11-22 17:10
274 查看
Xcode has a built-in adaptive segue called “Present As Popover” but by default it only behaves the way you’d expect it to — presenting a view in a speech-bubble style floating popover — on the iPad. On the iPhone your views are presented modally, full-screen. This is on purpose and is yet another subtle encouragement from Apple that we should build our apps with adaptivity in mind, but it’s almost never what I actually want my popovers to do. Here’s how to fix that.
Drag a new view controller onto your storyboard and tweak these settings:

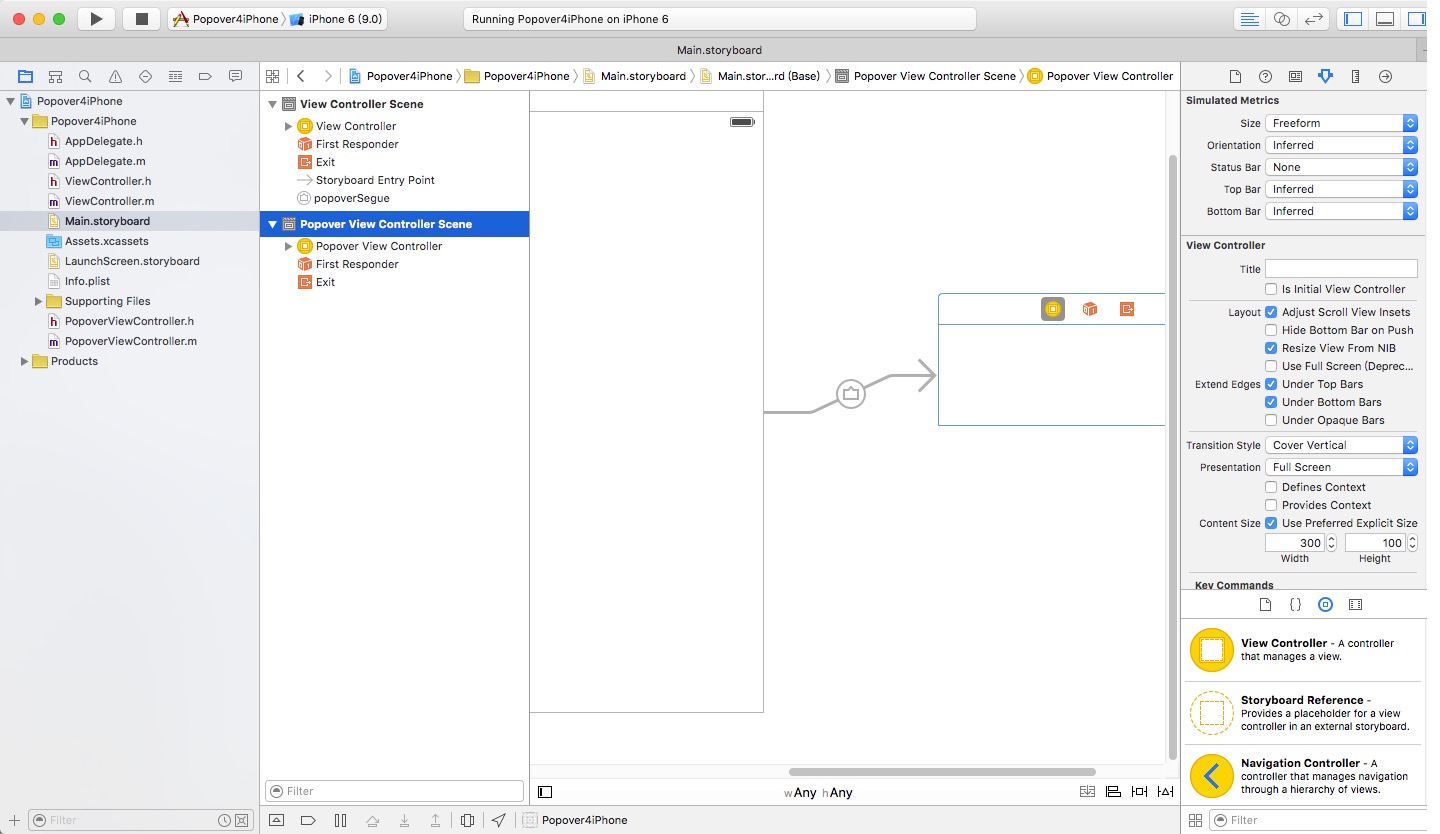
Under “Simulated Metrics” change “Size” to “Freeform” and “Status Bar” to “None.”

Under “Simulated Size” change your view’s height and width to the actual size you want your popover’s content to be.
Back on the attributes inspector check the box next to “Use Preferred Explicit Size” and make sure the height and width match the sizes you set in the previous step.
Drag a new segue from a control on your presenting view controller (a UIBarButtonItem is a good fit) to your popover view controller. Choose “popover presentation” from the dropdown and then give your segue an ID:

Open your view controller class file and add the
Override the
Finally, implement the

That’s it.
Edited 4/24/15: Changed an
上述内容引用地址:http://richardallen.me/2014/11/28/popovers.html
上面内容为从网络获取,之后自己使用OC测试是可以实现的,个人测试使用xib实现 ,下面将个人源码贴一下
主viewcontroller.m
其中PopoverViewController为popover显示的controller,这里面什么也不作用 ,只要在PopoverViewController的xib文加上进行如下截图做的设置即可,同上述

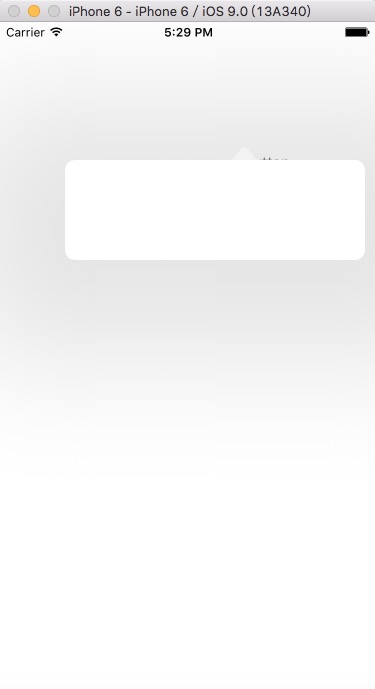
运行截图如下:
如果不想自己实现,可以直接用现成的第三方库,下面推荐一个 https://github.com/nicolaschengdev/WYPopoverController
Drag a new view controller onto your storyboard and tweak these settings:
Under “Simulated Metrics” change “Size” to “Freeform” and “Status Bar” to “None.”
Under “Simulated Size” change your view’s height and width to the actual size you want your popover’s content to be.
Back on the attributes inspector check the box next to “Use Preferred Explicit Size” and make sure the height and width match the sizes you set in the previous step.
Drag a new segue from a control on your presenting view controller (a UIBarButtonItem is a good fit) to your popover view controller. Choose “popover presentation” from the dropdown and then give your segue an ID:
Open your view controller class file and add the
UIPopoverPresentationControllerDelegateprotocol:
class ViewController: UIViewController, UIPopoverPresentationControllerDelegate {Override the
prepareForSeguefunction to catch your popover segue. Set the
modalPresentationStyleto
.Popoverto explicitly state that you want a popover and then assign the delegate property of the view’s
popoverPresentationControllerto
self:
override func prepareForSegue(segue: UIStoryboardSegue, sender: AnyObject?)
{
if segue.identifier == "popoverSegue" {
let popoverViewController = segue.destinationViewController as! UIViewController                     popoverViewController.modalPresentationStyle = UIModalPresentationStyle.Popover
popoverViewController.popoverPresentationController!.delegate = self
}
}
Finally, implement the
adaptivePresentationStyleForPresentationControllerfunction to tell your app that you really want that popover presentation and will accept no substitutions:
func adaptivePresentationStyleForPresentationController(controller: UIPresentationController) -> UIModalPresentationStyle {
return UIModalPresentationStyle.None
}
That’s it.
Edited 4/24/15: Changed an
asto an
as!for Swift 1.2
上述内容引用地址:http://richardallen.me/2014/11/28/popovers.html
上面内容为从网络获取,之后自己使用OC测试是可以实现的,个人测试使用xib实现 ,下面将个人源码贴一下
主viewcontroller.m
#import "ViewController.h"
#import "PopoverViewController.h"

@interface ViewController ()

@end

@implementation ViewController

- (void)viewDidLoad {
[super viewDidLoad];
// Do any additional setup after loading the view, typically from a nib.
}

- (void)prepareForSegue:(UIStoryboardSegue *)segue sender:(id)sender
{
if ([segue.identifier isEqualToString:@"popoverSegue"]) {
PopoverViewController *pop = segue.destinationViewController;
pop.modalPresentationStyle = UIModalPresentationPopover;
pop.popoverPresentationController.delegate = self;
}
}

- (UIModalPresentationStyle)adaptivePresentationStyleForPresentationController:(UIPresentationController *)controller
{
return UIModalPresentationNone;
}
其中PopoverViewController为popover显示的controller,这里面什么也不作用 ,只要在PopoverViewController的xib文加上进行如下截图做的设置即可,同上述
运行截图如下:
如果不想自己实现,可以直接用现成的第三方库,下面推荐一个 https://github.com/nicolaschengdev/WYPopoverController

相关文章推荐
- 分布式监控系统Ganglia学习------(1)基本原理
- 解决一台机器同时运行多个Tomcat服务
- linux压缩及归档
- sqoop安装
- sqoop安装
- Linux系统启动流程
- 更改Apache默认网站根目录
- openWRT自学---自己编译的第一个 backfire10.03 版本的过程记录(转)
- Linux top命令
- PowerShell GUI之创建Button和输入框
- linux 时间同步
- Extjs的架构设计思考,单页面应用 or 多页面?
- openstack用bosh安装cloudfoundry(四)---用micro bosh部署bosh
- Linux find命令用法小结
- PropertyGrid控件基础
- Linux系统设置网卡为混杂模式
- LINUX下网站压力测试工具webbench
- docker新版的实践(一:docker-compose)
- tomcat并发数优化maxThreads、acceptCount(最大线程数、最大排队数)
- 20151115linux 下这么去搜文件? ( which,whereis,locate, find )使用!