MySQL双主配置
2015-11-15 21:50
711 查看
MySQL双主配置
准备环境:服务器操作系统为RHEL6.4 x86_64,为最小化安装。主机A和主机B均关闭防火墙和SELINUX ,IP地址分别为192.168.131.129和192.168.131.130,MySQL版本为5.6.26,为通用二进制包。
安装MySQL
1.主机A操作
# tar xf mysql-5.6.26-linux-glibc2.5-x86_64.tar.gz
# mv mysql-5.6.26-linux-glibc2.5-x86_64 /usr/local/mysql
# useradd -M -s /sbin/nologin mysql
# chown -R root:root /usr/local/mysql/*
# chown -R mysql:mysql /usr/local/mysql/data/
# yum -y install libaio
# cd /usr/local/mysql/scripts/
# ./mysql_install_db --datadir=/usr/local/mysql/data/ --user=mysql --basedir=/usr/local/mysql/
# cp /usr/local/mysql/support-files/mysql.server /etc/init.d/mysqld
# echo 'export PATH=$PATH:/usr/local/mysql/bin' >>/etc/profile
# source /etc/profile
# vim /etc/my.cnf
[mysqld]
datadir=/usr/local/mysql/data
socket=/tmp/mysql.sock
user=mysql
symbolic-links=0
[mysqld_safe]
log-error=/var/log/mysqld.log
pid-file=/var/run/mysqld/mysqld.pid
# service mysqld start
#chkconfig mysqld on
# ss -tunlp | grep 3306

# mysqladmin -uroot password '123456' #设置数据库密码
2.主机B操作(同上)
二、配置双主
1、主机A操作
# vim /etc/my.cnf
server-id=20
log-bin=mysql-bin
log-bin-index=mysql-bin.index
replicate-ignore-db=test
binlog-ignore-db=mysql
binlog-ignore-db=information_schema
auto-increment-increment=2
auto-increment-offset=1
# service mysqld restart
# mysql -uroot -p123456
mysql> flush tables with read lock;
再打开一个远程终端窗口,执行以下操作
# mysqldump -uroot -p123456 -B test > test.sql
返回之前的终端窗口,做以下操作
mysql> unlock tables;
mysql> grant replication slave on *.* to 'wdd'@'192.168.131.130' identified by '123456';
mysql> flush privileges;
# scp test.sql 192.168.131.130:/root
2、主机B操作
# vim /etc/my.cnf
server-id = 21
log-bin=mysql-bin
log-bin-index= mysql-bin.index
replicate-do-db=test
binlog-ignore-db=mysql
binlog-ignore-db=information_schema
auto-increment-increment=2
auto-increment-offset=2
#service mysqld restart
# mysql -uroot -p123456 < test.sql
# mysql -uroot -p123456
mysql> grant replication slave on *.* to 'wdd'@'192.168.131.129' identified by '123456';
mysql> flush privileges;
3.主机A和主机B分别作如下操作
主机A
①# mysql -uroot -p123456
mysql> SHOW MASTER STATUS;

mysql> change master to
master_host='192.168.131.130',
master_user='wdd',
master_password='123456',
master_log_file=' mysql-bin.000002',
master_log_pos=420;
mysql> start slave;
mysql> show slave status\G;

②# mysql -uroot -p123456
mysql> show master status;

mysql> change master to
master_host='192.168.131.129',
master_user='wdd',
master_password='123456',
master_log_file='mysql-bin.000002',
master_log_pos=689;
mysql> start slave;
mysql> show slave status\G;

三、测试
1、主机A进行一下操作
mysql> use test;
mysql> create table info(
-> id int(10) not null auto_increment primary key,
-> name char(20));
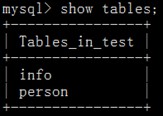
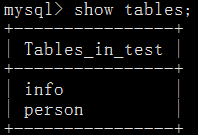
mysql> show tables;

2、主机B进行操作
mysql> use test;
mysql> show tables;

mysql> create table person (
-> id int(20) unsigned not null auto_increment primary key,
-> name char(20));
mysql> show tables;
3.在主机A进行操作检验
准备环境:服务器操作系统为RHEL6.4 x86_64,为最小化安装。主机A和主机B均关闭防火墙和SELINUX ,IP地址分别为192.168.131.129和192.168.131.130,MySQL版本为5.6.26,为通用二进制包。
安装MySQL
1.主机A操作
# tar xf mysql-5.6.26-linux-glibc2.5-x86_64.tar.gz
# mv mysql-5.6.26-linux-glibc2.5-x86_64 /usr/local/mysql
# useradd -M -s /sbin/nologin mysql
# chown -R root:root /usr/local/mysql/*
# chown -R mysql:mysql /usr/local/mysql/data/
# yum -y install libaio
# cd /usr/local/mysql/scripts/
# ./mysql_install_db --datadir=/usr/local/mysql/data/ --user=mysql --basedir=/usr/local/mysql/
# cp /usr/local/mysql/support-files/mysql.server /etc/init.d/mysqld
# echo 'export PATH=$PATH:/usr/local/mysql/bin' >>/etc/profile
# source /etc/profile
# vim /etc/my.cnf
[mysqld]
datadir=/usr/local/mysql/data
socket=/tmp/mysql.sock
user=mysql
symbolic-links=0
[mysqld_safe]
log-error=/var/log/mysqld.log
pid-file=/var/run/mysqld/mysqld.pid
# service mysqld start
#chkconfig mysqld on
# ss -tunlp | grep 3306
# mysqladmin -uroot password '123456' #设置数据库密码
2.主机B操作(同上)
二、配置双主
1、主机A操作
# vim /etc/my.cnf
server-id=20
log-bin=mysql-bin
log-bin-index=mysql-bin.index
replicate-ignore-db=test
binlog-ignore-db=mysql
binlog-ignore-db=information_schema
auto-increment-increment=2
auto-increment-offset=1
# service mysqld restart
# mysql -uroot -p123456
mysql> flush tables with read lock;
再打开一个远程终端窗口,执行以下操作
# mysqldump -uroot -p123456 -B test > test.sql
返回之前的终端窗口,做以下操作
mysql> unlock tables;
mysql> grant replication slave on *.* to 'wdd'@'192.168.131.130' identified by '123456';
mysql> flush privileges;
# scp test.sql 192.168.131.130:/root
2、主机B操作
# vim /etc/my.cnf
server-id = 21
log-bin=mysql-bin
log-bin-index= mysql-bin.index
replicate-do-db=test
binlog-ignore-db=mysql
binlog-ignore-db=information_schema
auto-increment-increment=2
auto-increment-offset=2
#service mysqld restart
# mysql -uroot -p123456 < test.sql
# mysql -uroot -p123456
mysql> grant replication slave on *.* to 'wdd'@'192.168.131.129' identified by '123456';
mysql> flush privileges;
3.主机A和主机B分别作如下操作
主机A
①# mysql -uroot -p123456
mysql> SHOW MASTER STATUS;
mysql> change master to
master_host='192.168.131.130',
master_user='wdd',
master_password='123456',
master_log_file=' mysql-bin.000002',
master_log_pos=420;
mysql> start slave;
mysql> show slave status\G;
②# mysql -uroot -p123456
mysql> show master status;
mysql> change master to
master_host='192.168.131.129',
master_user='wdd',
master_password='123456',
master_log_file='mysql-bin.000002',
master_log_pos=689;
mysql> start slave;
mysql> show slave status\G;
三、测试
1、主机A进行一下操作
mysql> use test;
mysql> create table info(
-> id int(10) not null auto_increment primary key,
-> name char(20));
mysql> show tables;
2、主机B进行操作
mysql> use test;
mysql> show tables;
mysql> create table person (
-> id int(20) unsigned not null auto_increment primary key,
-> name char(20));
mysql> show tables;
3.在主机A进行操作检验

相关文章推荐
- mysql导入大sql文件
- MySql 免安装版 配置
- MySql服务启动不了的问题
- 我的MYSQL学习心得链接
- mysql主从复制配置管理
- mysql事务处理用法与实例详解
- Mysql在select子句中聚集函数和普通属性一起写出现的一个有趣的问题!
- mysql事务,SET AUTOCOMMIT,START TRANSACTION
- MySQL_MyISAM和InnoDB存储引擎的比较
- ERROR 1044 (42000): Access denied for user ''@'localhost' to database 'mysql'
- Ubuntu 安装mysql和简单操作
- 老男孩mysql学习笔记<1>
- mysql分表的3种方法
- mysql 分区概念测试
- Mysql 更新时间(加上或者减去一段时间)
- 如何在 MySQL 中判断中文字符?
- MySql自动备份数据库, 数据库主(master)从(slave)配置
- 【MySQL学习】Unknown column 'PASSWORD'|Access denied for user 'root'@'localhost'
- 60. MySQLi 扩展拾遗
- 深入Mysql字符集设置