Arduino平台基于DbC的软件调试
2015-11-10 00:39
465 查看
基于LED和串口通信的DBC调试工具:HAssert --- Hyper LED/Serial Assert 。
本文基于DbC思想 ,在Arduino平台上实现了两种断言显示方式---LED显示和串口输出显示。
LED显示方式
适用于没有串口(这种情况很少),或者串口已经被占用的情况,只用一个LED的显示次数来调试程序;
串口输出显示方式
可以把断言内容传送到PC机,在PC机看到出错的位置(文件名和行号)。
以下的HAssert.h和HAssert.cpp实现了DbC调试的断言。
2.利用串口通信的DbC测试
本文中只给出串口DbC测试的运行效果,LED的DbC测试是在Arduino板上用LED闪亮次数来表示出错的位置。
本文基于DbC思想 ,在Arduino平台上实现了两种断言显示方式---LED显示和串口输出显示。
LED显示方式
适用于没有串口(这种情况很少),或者串口已经被占用的情况,只用一个LED的显示次数来调试程序;
串口输出显示方式
可以把断言内容传送到PC机,在PC机看到出错的位置(文件名和行号)。
以下的HAssert.h和HAssert.cpp实现了DbC调试的断言。
一.HAssert.h头文件
#ifndef H_ASSERT_H
#define H_ASSERT_H
#include <stdint.h>                 // C99-standard exact-width integers
#include <avr/pgmspace.h>
//#define ROM_BYTE(rom_var_)    pgm_read_byte_near(&(rom_var_))
//#define ROM   PROGMEM
/// 1.有/无断言选择开关(配置1)
// (1)调试时,   H_ASSERT = 1,断言有效
// (2)发布软件时,H_ASSERT = 0,自动去掉代码中插入的所有断言
#define H_ASSERT_EN  1
///2.LED/串口显示断言选择开关(配置2)
//(1)H_LED_ASSERT_EN = 1时,选择LED显示断言
//(2)H_LED_ASSERT_EN = 0时,选择串口显示断言
#define H_LED_ASSERT_EN   0
//=================================================
/// 状态LED引脚 (配置3)
#define H_ASSERT_LED_PIN    13 //Arduino板用13; MSR和SWT板用RxErr状态LED,7.
/// 状态LED延时时间(配置4)
// (1)仿真用了10000ms, 实际上可以修改成1秒的时间
#define H_ASSERT_LED_DELAY_TIME    1000 // ms
//================================================
///3.H_ASSERT_EN == 0,去掉断言宏
#if  H_ASSERT_EN == 0
#define H_ASSERT_ID(id, test)
#define H_REQUIRE_ID(id, test)
#define H_ERROR_ID(id)
#define H_BREAKPOINT_ID(id)
#define H_DEFINE_THIS_FILE
#define H_DEFINE_THIS_MODULE(name_)
#define H_ASSERT(test)
#define H_REQUIRE(test)
#define H_ERROR()
#define H_BREAK_POINT()
///4.H_ASSERT_EN == 1,加入断言宏
#else
///4.0.声明断言函数
#ifdef __cplusplus
extern "C" {
#endif
void H_onAssert_id(uint8_t id); //LED显示断言回调函数声明
void H_onAssert(char const PROGMEM * const file, int line); //串口显示断言回调函数声明
#ifdef __cplusplus
}
#endif
///4.1.LED断言宏
#if H_LED_ASSERT_EN == 1
///LED断言---带id参数
//(1).id参数可以指示错误分类等,如用LED闪亮的次数分类
//(2). 建议id = 2~255, id=0和1都算做1次,以下类同
///断言宏
#define H_ASSERT_ID(id, test)     if (test) { \
} \
else (H_onAssert_id((id)))
///必要条件
#define H_REQUIRE_ID(id, test)   H_ASSERT_ID(id, test)
///错误
#define H_ERROR_ID(id)           (H_onAssert_id((id)))
///断点
#define H_BREAKPOINT_ID(id)      (H_onAssert_id((id)))
///4.2.串口断言宏
#else
///加入到每个文件的#include "HSAssert.h"之后,文件的前边。
//绝对路径文件,太长!
#define H_DEFINE_THIS_FILE \
static char const PROGMEM l_file[] = __FILE__;
///自己写文件名,或模块名
#define H_DEFINE_THIS_MODULE(module_name_) \
static char const PROGMEM l_file[] = #module_name_;
///断言宏
#define H_ASSERT(test)     if (test) {\
} \
else (H_onAssert(l_file, __LINE__))
///必要条件
#define H_REQUIRE(test)  H_ASSERT(test)
///错误
#define H_ERROR()       (H_onAssert(l_file, __LINE__))
///断点 停止
#define H_BREAKPOINT()      { Serial.print("--- Breakpoint --- ");\
(H_onAssert(l_file, __LINE__)); \
cli();\
while(1);\
} while(0)
#endif
#endif
#endif
二.HAssert.cpp文件
#include <Arduino.h>
#include "HAssert.h"
///1.LED断言函数实现---显示闪亮次数
//(1).用一个LED亮表示有错,闪亮次数表示错误类型
//(2).有代码中不同的位置放id不同的断言宏,用闪亮的次数表示错误类型
//(3).建议id = 2~255,不建议用0和1.
//(4).有错误就会停止
void H_onAssert_id(uint8_t id) {
pinMode(H_ASSERT_LED_PIN, OUTPUT);
sei();
delay(H_ASSERT_LED_DELAY_TIME);
for (uint8_t i = 0; i < id; i++) {
digitalWrite(H_ASSERT_LED_PIN, LOW);
delay(H_ASSERT_LED_DELAY_TIME);
digitalWrite(H_ASSERT_LED_PIN, HIGH);
delay(H_ASSERT_LED_DELAY_TIME);
}
cli();
while(1) { ; }  //停止,断言不会返回,错误就得处理掉!
//asm volatile ("jmp 0x0000");    // 复位
}
///2.串行断言函数实现---显示文件和出错行
//只有H_BREAKPOINT()会停止
void H_onAssert(char const PROGMEM * const file, int line) {
int i =0 ;
char ch, buffer[60];
do {
ch = (char)pgm_read_word(file + i);
buffer[i++] = ch;
} while((ch != 0)&&(i < 60) );
Serial.print(line - 3,DEC); Serial.print(" Line Error in ");
Serial.print(buffer); Serial.println(" file.");
}
三.DbC测试程序
1.利用LED的DbC测试//////////////////////////////////////////////////////////////////////////////
// 名称:利用LED的DbC测试
//////////////////////////////////////////////////////////////////////////////
///LED断言要求:HAssert.h中
//配置1:H_ASSERT_EN = 1
//配置2:H_LED_ASSERT_EN = 1
#include "HAssert.h"
void setup() {
}
void loop() {
uint8_t x = 5;
uint8_t y = 6;
H_REQUIRE_ID(2,x==y); //判断逻辑错误时,闪亮2次,最后保持亮
H_REQUIRE_ID(3,x != y); //判断逻辑正确时,不亮
H_ERROR_ID(10); //闪亮10次,最后保持亮
H_BREAKPOINT_ID(10);//与 H_ERROR_ID(10)一样
delay(100);
while(1);
}2.利用串口通信的DbC测试
//////////////////////////////////////////////////////////////////////////////
// 名称:利用串口通信的DbC测试
//////////////////////////////////////////////////////////////////////////////
///串口断言要求:HAssert.h中
//配置1:H_ASSERT_EN = 1
//配置2:H_LED_ASSERT_EN = 0
#include "HAssert.h"
#include <Arduino.h>
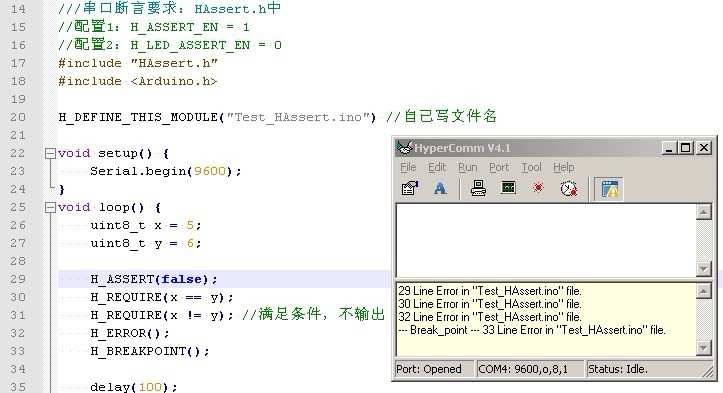
H_DEFINE_THIS_MODULE("Test_HAssert.ino") //自己写文件名
//HS_DEFINE_THIS_FILE //绝对路径文件,太长!不用
void setup() {
Serial.begin(9600);
}
void loop() {
uint8_t x = 5;
uint8_t y = 6;
H_ASSERT(false);
H_REQUIRE(x == y);
H_REQUIRE(x != y); //满足条件,不输出
H_ERROR();
H_BREAKPOINT();
delay(100);
//while(1);
}四.串口通信DbC测试效果
本文中只给出串口DbC测试的运行效果,LED的DbC测试是在Arduino板上用LED闪亮次数来表示出错的位置。

相关文章推荐
- 【POJ 1679 The Unique MST】最小生成树
- UILable根据文字内容,自适应高度
- QuickSort及其变种算法的总结
- UICollectionView实现瀑布流
- switch Value 拨码开关
- UI设计
- POJ 1503 Integer Inquiry
- UIDatePicker
- UIPickerView
- 在IOS8及IOS9中使用UILocationNotification本地推送时不显示推送
- leetcode-Unique Paths II
- Longest Increasing Subsequence (Medium)
- Longest Increasing Subsequence (Medium)
- [Leetcode]Permutation Sequence
- java队列queue
- leetcode-Unique Paths
- 【技巧】LightOj Answering Queries 1369
- UINavigationController的title添加点击事件
- require.js 入门学习 (share)
- StringBuffer与StringBuilder与String