UITableView --- 通讯录demo1
2015-11-07 15:19
435 查看
准备工作:
创建一个工程
Model:
载有数据的 Person.plist 文件(里面包含了通讯录的所有内容,包括姓名 ,电话号码,头像等)
Person 类
把装有 头像图片的文件夹 拖入到工程中
-------------------------------------------------------------------------------------------------------------------------------
主要代码:
ContactView.h
#import <UIKit/UIKit.h>
@interface ContactView : UIView
@property(nonatomic,strong)UITableView *mainTableView;
@end
ContactView.m
#import "ContactView.h"
@implementation ContactView
- (instancetype)initWithFrame:(CGRect)frame
{
self = [super initWithFrame:frame];
if (self) {
[self createMainTableView];
}
return self;
}
-(void)createMainTableView{
//UITableViewStyleGrouped 分组有头部和尾部
//UITableViewStylePlain 无分组,可加
self.mainTableView = [[UITableView alloc]initWithFrame:[UIScreen mainScreen].bounds style:UITableViewStylePlain];
[self addSubview:self.mainTableView];
}
@end
对应的控制器
ContactViewController.m
//
// ContactViewController.m
// UI10_lesson1
//
// Created by lanou3g on 15/11/4.
// Copyright (c) 2015年 lirui. All rights reserved.
//
#import "ContactViewController.h"
#import "ContactView.h"
#import "Person.h"
#import "DetailViewController.h"
@interface ContactViewController ()<UITableViewDataSource,UITableViewDelegate>
//创建根视图
@property(nonatomic,strong)ContactView *rootView;
//创建字典,存储联系人
@property(nonatomic,strong)NSMutableDictionary *contactDict;
//定义数组,专门用来存放分组名(A,B,C...)
@property(nonatomic,strong)NSMutableArray *groupNameArray;
@end
@implementation ContactViewController
//懒加载 字典
-(NSMutableDictionary *)contactDict{
if (_contactDict == nil) {
_contactDict = [NSMutableDictionary dictionary];
}
return _contactDict;
}
//懒加载 数组
-(NSMutableArray *)groupNameArray{
if (_groupNameArray == nil) {
_groupNameArray = [NSMutableArray array];
}
return _groupNameArray;
}
-(void)loadView{
self.rootView = [[ContactView alloc]initWithFrame:[UIScreen mainScreen].bounds];
self.view = self.rootView;
}
- (void)viewDidLoad {
[super viewDidLoad];
self.title = @"通讯录";
//plist 文件路径
NSString *path = [[NSBundle mainBundle]pathForResource:@"Person" ofType:@"plist"];
//取出 plist 文件整体的内容
NSDictionary *sumDict = [NSDictionary dictionaryWithContentsOfFile:path];
//循环遍历 sumDict (相当于遍历分组名)
for (NSString *key in sumDict) {
//拿出分组所在的数组(存储的是一组联系人)
NSArray *valueArray = [sumDict objectForKey:key];
//把分组名存储起来(groupNameArray)
[self.groupNameArray addObject:key];
//创建可变数组,用来存储联系人模型
NSMutableArray *array = [NSMutableArray array];
//遍历 valueArray(遍历一个分组联系人)
for (NSDictionary *dict in valueArray) {
//创建对应的模型,并且使用 KVC 赋值
Person *p = [[Person alloc]init];
[p setValuesForKeysWithDictionary:dict];
//把模型存入对应的可变数组
[array addObject:p];
}
//把上面创建的 可变数组 存入 ContactDict;
[self.contactDict setObject:array forKey:key];
}
//给 groupNameArray 进行排序(仅限数组存的是 字符串)
[self.groupNameArray sortUsingSelector:@selector(compare:)];
//设置 mainTableView 的代理
self.rootView.mainTableView.dataSource = self;
self.rootView.mainTableView.delegate = self;
UIBarButtonItem *rightButton = [[UIBarButtonItem alloc]initWithTitle:@"编辑" style:UIBarButtonItemStylePlain target:self action:@selector(rightButtonDidClicked:)];
self.navigationItem.rightBarButtonItem = rightButton;
}
#pragma mark 导航栏右侧按钮的编辑事件
-(void)rightButtonDidClicked:(UIBarButtonItem *)sender {
if ([sender.title isEqualToString:@"编辑"]) {
//让 mainTableView 进入编辑状态
[self.rootView.mainTableView setEditing:YES animated:YES];
sender.title = @"完成";
} else {
// 结束编辑状态
[self.rootView.mainTableView setEditing:NO animated:YES];
sender.title = @"编辑";
}
}
#pragma mark 返回多少个分组
-(NSInteger)numberOfSectionsInTableView:(UITableView *)tableView {
return self.groupNameArray.count;
}
#pragma mark 每个分组返回多少行
-(NSInteger)tableView:(UITableView *)tableView numberOfRowsInSection:(NSInteger)section {
//取出 key 值 (分组名)
NSString *key = self.groupNameArray[section];
NSArray *groupArray = self.contactDict[key];
return groupArray.count;
}
#pragma mark 每行显示的内容(cell 上面的内容)
-(UITableViewCell *)tableView:(UITableView *)tableView cellForRowAtIndexPath:(NSIndexPath *)indexPath {
//cell 的重用机制
static NSString *cell_id = @"flag"; //(static 只创建一次)
//先到重用池里找可用的 cell (flag 标示符必须一样)
UITableViewCell *cell = [tableView dequeueReusableCellWithIdentifier:cell_id];
//如果找不到,重新创建
if (cell == nil) {
cell = [[UITableViewCell alloc]initWithStyle:UITableViewCellStyleSubtitle reuseIdentifier:cell_id];
}
// cell 的下一级菜单指示
cell.accessoryType = UITableViewCellAccessoryDisclosureIndicator;
// 可以 自定义 : 添加到 cell.accessoryView
//赋值操作
NSString *key = self.groupNameArray[indexPath.section];
NSArray *valuesArray = self.contactDict[key];
Person *p = valuesArray[indexPath.row];
cell.textLabel.text = p.name;
cell.detailTextLabel.text = p.phoneNumber;
cell.imageView.image = [UIImage imageNamed:p.picture];
return cell;
}
#pragma mark 返回cell的高度
-(CGFloat)tableView:(UITableView *)tableView heightForRowAtIndexPath:(NSIndexPath *)indexPath {
return 50.0f;
}
#pragma mark 设置分组头部的 title
//-(NSString *)tableView:(UITableView *)tableView titleForHeaderInSection:(NSInteger)section {
//
// return self.groupNameArray[section];
//}
#pragma mark 自定义 tableView 分区头部
-(UIView *)tableView:(UITableView *)tableView viewForHeaderInSection:(NSInteger)section {
UIView *headerView = [[UITableView alloc]initWithFrame:CGRectMake(0, 0, [UIScreen mainScreen].bounds.size.width, 30)];
UIImageView *imageView = [[UIImageView alloc]initWithImage:[UIImage imageNamed:@"NavBar_64@2x.jpg"]];
imageView.frame = headerView.bounds;
//把图片添加到 headerView
[headerView addSubview:imageView];
UILabel *label = [[UILabel alloc]initWithFrame:headerView.bounds];
label.text = self.groupNameArray[section];
label.textAlignment = NSTextAlignmentCenter; //居中
[headerView addSubview:label];
return headerView;
}
#pragma mark 设置分区头部的高度
-(CGFloat)tableView:(UITableView *)tableView heightForHeaderInSection:(NSInteger)section {
return 30.0f;
}
#pragma mark 以下是关于 tableView 设置尾部的方法(只是为了看看效果,太丑了,就注释了)
/* ------
#pragma mark 设置尾部的高度
-(CGFloat)tableView:(UITableView *)tableView heightForFooterInSection:(NSInteger)section {
return 20;
}
#pragma mark 尾部的 title
-(NSString *)tableView:(UITableView *)tableView titleForFooterInSection:(NSInteger)section {
return @"玩完了";
}
#pragma mark 自定义尾部
-(UIView *)tableView:(UITableView *)tableView viewForFooterInSection:(NSInteger)section {
return nil;
}
------------------------- */
#pragma mark tableView 索引
-(NSArray *)sectionIndexTitlesForTableView:(UITableView *)tableView {
return self.groupNameArray;
}
#pragma mark tableView cell 的点击方法
-(void)tableView:(UITableView *)tableView didSelectRowAtIndexPath:(NSIndexPath *)indexPath {
//细节处理:取消 cell 的选中状态
[tableView deselectRowAtIndexPath:indexPath animated:YES];
//跳转到详情页面
DetailViewController *detailVC = [[DetailViewController alloc]init];
//通过属性传值过程
NSString *key = self.groupNameArray[indexPath.section];
NSArray *personArray = self.contactDict[key];
detailVC.receivePerson = personArray[indexPath.row];
[self.navigationController pushViewController:detailVC animated:YES];
}
//以下 3个方法 一起使用
#pragma mark 通知 tableView 哪些行可以进行编辑(添加和删除)
-(BOOL)tableView:(UITableView *)tableView canEditRowAtIndexPath:(NSIndexPath *)indexPath {
return YES;
}
#pragma mark 指定编辑的类型(删除还是添加)
-(UITableViewCellEditingStyle)tableView:(UITableView *)tableView editingStyleForRowAtIndexPath:(NSIndexPath *)indexPath {
if (indexPath.section == 0) {
return UITableViewCellEditingStyleDelete;//删除
}else {
return UITableViewCellEditingStyleInsert;//添加
}
}
#pragma mark 提交编辑结果
-(void)tableView:(UITableView *)tableView commitEditingStyle:(UITableViewCellEditingStyle)editingStyle forRowAtIndexPath:(NSIndexPath *)indexPath {
if (editingStyle == UITableViewCellEditingStyleDelete) {
//1.必须首先修改数据源
NSString *key = self.groupNameArray[indexPath.section];
NSMutableArray *mutableArray = self.contactDict[key];
//根据下标 删除数组里面对应的模型
[mutableArray removeObjectAtIndex:indexPath.row];
//如果 分组里面元素个数 小于1 (没有其他联系人了),需要删除整个分组
if (mutableArray.count < 1) {
[self.contactDict removeObjectForKey:key];
[self.groupNameArray removeObject:key];
}
//2.修改UI
// 方式① ---- reloadData 直接刷新数据
// [tableView reloadData];
//方式②
if (mutableArray.count < 1) {
//删除整个分组
NSIndexSet *deleteIndexSet = [NSIndexSet indexSetWithIndex:indexPath.section];
[tableView deleteSections:deleteIndexSet withRowAnimation:UITableViewRowAnimationAutomatic];
} else {
//删除某一行
[tableView deleteRowsAtIndexPaths:@[indexPath] withRowAnimation:UITableViewRowAnimationAutomatic];
}
} else {
//添加联系人
Person *insertPerson = [[Person alloc]init];
insertPerson.name = @"测试添加";
insertPerson.phoneNumber = @"13011777838";
//1.修改数据源
//分组名
NSString *key = self.groupNameArray[indexPath.section];
NSMutableArray *personArray = self.contactDict[key];
//给数组插入一个元素
[personArray insertObject:insertPerson atIndex:indexPath.row + 1];
//2.修改 UI
//方式①
// [tableView reloadData];
//方法②
//构造一个新的 indexPath
NSIndexPath *insertIndexPath = [NSIndexPath indexPathForRow:indexPath.row + 1 inSection:indexPath.section];
[tableView insertRowsAtIndexPaths:@[insertIndexPath] withRowAnimation:UITableViewRowAnimationAutomatic];
}
}
#pragma mark 修改滑动删除时候的显示字样,默认是 Delete
-(NSString *)tableView:(UITableView *)tableView titleForDeleteConfirmationButtonForRowAtIndexPath:(NSIndexPath *)indexPath {
return @"删除";
}
- (void)didReceiveMemoryWarning {
[super didReceiveMemoryWarning];
// Dispose of any resources that can be recreated.
}
/*
#pragma mark - Navigation
// In a storyboard-based application, you will often want to do a little preparation before navigation
- (void)prepareForSegue:(UIStoryboardSegue *)segue sender:(id)sender {
// Get the new view controller using [segue destinationViewController].
// Pass the selected object to the new view controller.
}
*/
@end
其中重点部分有:1. plist文件的解析过程
2.cell 的重用机制
设置代理后,代理方法的使用也要熟练掌握。
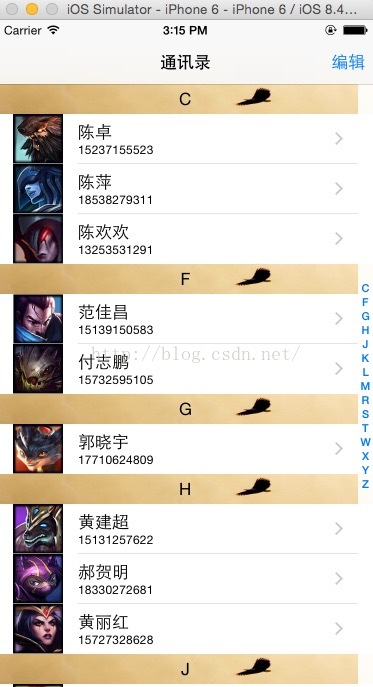
点击 导航栏 右侧的 编辑按钮
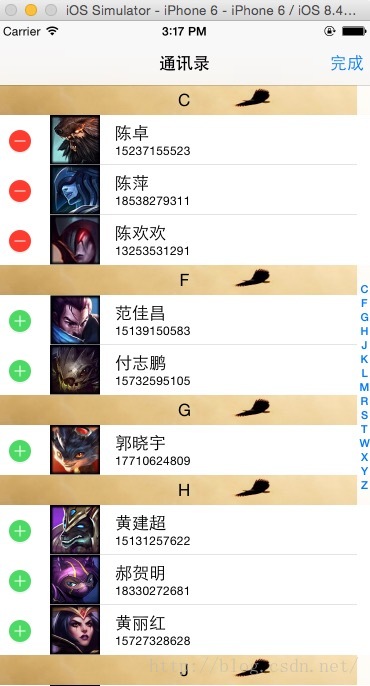
左滑进行删除

创建一个工程
Model:
载有数据的 Person.plist 文件(里面包含了通讯录的所有内容,包括姓名 ,电话号码,头像等)
Person 类
把装有 头像图片的文件夹 拖入到工程中
-------------------------------------------------------------------------------------------------------------------------------
主要代码:
ContactView.h
#import <UIKit/UIKit.h>
@interface ContactView : UIView
@property(nonatomic,strong)UITableView *mainTableView;
@end
ContactView.m
#import "ContactView.h"
@implementation ContactView
- (instancetype)initWithFrame:(CGRect)frame
{
self = [super initWithFrame:frame];
if (self) {
[self createMainTableView];
}
return self;
}
-(void)createMainTableView{
//UITableViewStyleGrouped 分组有头部和尾部
//UITableViewStylePlain 无分组,可加
self.mainTableView = [[UITableView alloc]initWithFrame:[UIScreen mainScreen].bounds style:UITableViewStylePlain];
[self addSubview:self.mainTableView];
}
@end
对应的控制器
ContactViewController.m
//
// ContactViewController.m
// UI10_lesson1
//
// Created by lanou3g on 15/11/4.
// Copyright (c) 2015年 lirui. All rights reserved.
//
#import "ContactViewController.h"
#import "ContactView.h"
#import "Person.h"
#import "DetailViewController.h"
@interface ContactViewController ()<UITableViewDataSource,UITableViewDelegate>
//创建根视图
@property(nonatomic,strong)ContactView *rootView;
//创建字典,存储联系人
@property(nonatomic,strong)NSMutableDictionary *contactDict;
//定义数组,专门用来存放分组名(A,B,C...)
@property(nonatomic,strong)NSMutableArray *groupNameArray;
@end
@implementation ContactViewController
//懒加载 字典
-(NSMutableDictionary *)contactDict{
if (_contactDict == nil) {
_contactDict = [NSMutableDictionary dictionary];
}
return _contactDict;
}
//懒加载 数组
-(NSMutableArray *)groupNameArray{
if (_groupNameArray == nil) {
_groupNameArray = [NSMutableArray array];
}
return _groupNameArray;
}
-(void)loadView{
self.rootView = [[ContactView alloc]initWithFrame:[UIScreen mainScreen].bounds];
self.view = self.rootView;
}
- (void)viewDidLoad {
[super viewDidLoad];
self.title = @"通讯录";
//plist 文件路径
NSString *path = [[NSBundle mainBundle]pathForResource:@"Person" ofType:@"plist"];
//取出 plist 文件整体的内容
NSDictionary *sumDict = [NSDictionary dictionaryWithContentsOfFile:path];
//循环遍历 sumDict (相当于遍历分组名)
for (NSString *key in sumDict) {
//拿出分组所在的数组(存储的是一组联系人)
NSArray *valueArray = [sumDict objectForKey:key];
//把分组名存储起来(groupNameArray)
[self.groupNameArray addObject:key];
//创建可变数组,用来存储联系人模型
NSMutableArray *array = [NSMutableArray array];
//遍历 valueArray(遍历一个分组联系人)
for (NSDictionary *dict in valueArray) {
//创建对应的模型,并且使用 KVC 赋值
Person *p = [[Person alloc]init];
[p setValuesForKeysWithDictionary:dict];
//把模型存入对应的可变数组
[array addObject:p];
}
//把上面创建的 可变数组 存入 ContactDict;
[self.contactDict setObject:array forKey:key];
}
//给 groupNameArray 进行排序(仅限数组存的是 字符串)
[self.groupNameArray sortUsingSelector:@selector(compare:)];
//设置 mainTableView 的代理
self.rootView.mainTableView.dataSource = self;
self.rootView.mainTableView.delegate = self;
UIBarButtonItem *rightButton = [[UIBarButtonItem alloc]initWithTitle:@"编辑" style:UIBarButtonItemStylePlain target:self action:@selector(rightButtonDidClicked:)];
self.navigationItem.rightBarButtonItem = rightButton;
}
#pragma mark 导航栏右侧按钮的编辑事件
-(void)rightButtonDidClicked:(UIBarButtonItem *)sender {
if ([sender.title isEqualToString:@"编辑"]) {
//让 mainTableView 进入编辑状态
[self.rootView.mainTableView setEditing:YES animated:YES];
sender.title = @"完成";
} else {
// 结束编辑状态
[self.rootView.mainTableView setEditing:NO animated:YES];
sender.title = @"编辑";
}
}
#pragma mark 返回多少个分组
-(NSInteger)numberOfSectionsInTableView:(UITableView *)tableView {
return self.groupNameArray.count;
}
#pragma mark 每个分组返回多少行
-(NSInteger)tableView:(UITableView *)tableView numberOfRowsInSection:(NSInteger)section {
//取出 key 值 (分组名)
NSString *key = self.groupNameArray[section];
NSArray *groupArray = self.contactDict[key];
return groupArray.count;
}
#pragma mark 每行显示的内容(cell 上面的内容)
-(UITableViewCell *)tableView:(UITableView *)tableView cellForRowAtIndexPath:(NSIndexPath *)indexPath {
//cell 的重用机制
static NSString *cell_id = @"flag"; //(static 只创建一次)
//先到重用池里找可用的 cell (flag 标示符必须一样)
UITableViewCell *cell = [tableView dequeueReusableCellWithIdentifier:cell_id];
//如果找不到,重新创建
if (cell == nil) {
cell = [[UITableViewCell alloc]initWithStyle:UITableViewCellStyleSubtitle reuseIdentifier:cell_id];
}
// cell 的下一级菜单指示
cell.accessoryType = UITableViewCellAccessoryDisclosureIndicator;
// 可以 自定义 : 添加到 cell.accessoryView
//赋值操作
NSString *key = self.groupNameArray[indexPath.section];
NSArray *valuesArray = self.contactDict[key];
Person *p = valuesArray[indexPath.row];
cell.textLabel.text = p.name;
cell.detailTextLabel.text = p.phoneNumber;
cell.imageView.image = [UIImage imageNamed:p.picture];
return cell;
}
#pragma mark 返回cell的高度
-(CGFloat)tableView:(UITableView *)tableView heightForRowAtIndexPath:(NSIndexPath *)indexPath {
return 50.0f;
}
#pragma mark 设置分组头部的 title
//-(NSString *)tableView:(UITableView *)tableView titleForHeaderInSection:(NSInteger)section {
//
// return self.groupNameArray[section];
//}
#pragma mark 自定义 tableView 分区头部
-(UIView *)tableView:(UITableView *)tableView viewForHeaderInSection:(NSInteger)section {
UIView *headerView = [[UITableView alloc]initWithFrame:CGRectMake(0, 0, [UIScreen mainScreen].bounds.size.width, 30)];
UIImageView *imageView = [[UIImageView alloc]initWithImage:[UIImage imageNamed:@"NavBar_64@2x.jpg"]];
imageView.frame = headerView.bounds;
//把图片添加到 headerView
[headerView addSubview:imageView];
UILabel *label = [[UILabel alloc]initWithFrame:headerView.bounds];
label.text = self.groupNameArray[section];
label.textAlignment = NSTextAlignmentCenter; //居中
[headerView addSubview:label];
return headerView;
}
#pragma mark 设置分区头部的高度
-(CGFloat)tableView:(UITableView *)tableView heightForHeaderInSection:(NSInteger)section {
return 30.0f;
}
#pragma mark 以下是关于 tableView 设置尾部的方法(只是为了看看效果,太丑了,就注释了)
/* ------
#pragma mark 设置尾部的高度
-(CGFloat)tableView:(UITableView *)tableView heightForFooterInSection:(NSInteger)section {
return 20;
}
#pragma mark 尾部的 title
-(NSString *)tableView:(UITableView *)tableView titleForFooterInSection:(NSInteger)section {
return @"玩完了";
}
#pragma mark 自定义尾部
-(UIView *)tableView:(UITableView *)tableView viewForFooterInSection:(NSInteger)section {
return nil;
}
------------------------- */
#pragma mark tableView 索引
-(NSArray *)sectionIndexTitlesForTableView:(UITableView *)tableView {
return self.groupNameArray;
}
#pragma mark tableView cell 的点击方法
-(void)tableView:(UITableView *)tableView didSelectRowAtIndexPath:(NSIndexPath *)indexPath {
//细节处理:取消 cell 的选中状态
[tableView deselectRowAtIndexPath:indexPath animated:YES];
//跳转到详情页面
DetailViewController *detailVC = [[DetailViewController alloc]init];
//通过属性传值过程
NSString *key = self.groupNameArray[indexPath.section];
NSArray *personArray = self.contactDict[key];
detailVC.receivePerson = personArray[indexPath.row];
[self.navigationController pushViewController:detailVC animated:YES];
}
//以下 3个方法 一起使用
#pragma mark 通知 tableView 哪些行可以进行编辑(添加和删除)
-(BOOL)tableView:(UITableView *)tableView canEditRowAtIndexPath:(NSIndexPath *)indexPath {
return YES;
}
#pragma mark 指定编辑的类型(删除还是添加)
-(UITableViewCellEditingStyle)tableView:(UITableView *)tableView editingStyleForRowAtIndexPath:(NSIndexPath *)indexPath {
if (indexPath.section == 0) {
return UITableViewCellEditingStyleDelete;//删除
}else {
return UITableViewCellEditingStyleInsert;//添加
}
}
#pragma mark 提交编辑结果
-(void)tableView:(UITableView *)tableView commitEditingStyle:(UITableViewCellEditingStyle)editingStyle forRowAtIndexPath:(NSIndexPath *)indexPath {
if (editingStyle == UITableViewCellEditingStyleDelete) {
//1.必须首先修改数据源
NSString *key = self.groupNameArray[indexPath.section];
NSMutableArray *mutableArray = self.contactDict[key];
//根据下标 删除数组里面对应的模型
[mutableArray removeObjectAtIndex:indexPath.row];
//如果 分组里面元素个数 小于1 (没有其他联系人了),需要删除整个分组
if (mutableArray.count < 1) {
[self.contactDict removeObjectForKey:key];
[self.groupNameArray removeObject:key];
}
//2.修改UI
// 方式① ---- reloadData 直接刷新数据
// [tableView reloadData];
//方式②
if (mutableArray.count < 1) {
//删除整个分组
NSIndexSet *deleteIndexSet = [NSIndexSet indexSetWithIndex:indexPath.section];
[tableView deleteSections:deleteIndexSet withRowAnimation:UITableViewRowAnimationAutomatic];
} else {
//删除某一行
[tableView deleteRowsAtIndexPaths:@[indexPath] withRowAnimation:UITableViewRowAnimationAutomatic];
}
} else {
//添加联系人
Person *insertPerson = [[Person alloc]init];
insertPerson.name = @"测试添加";
insertPerson.phoneNumber = @"13011777838";
//1.修改数据源
//分组名
NSString *key = self.groupNameArray[indexPath.section];
NSMutableArray *personArray = self.contactDict[key];
//给数组插入一个元素
[personArray insertObject:insertPerson atIndex:indexPath.row + 1];
//2.修改 UI
//方式①
// [tableView reloadData];
//方法②
//构造一个新的 indexPath
NSIndexPath *insertIndexPath = [NSIndexPath indexPathForRow:indexPath.row + 1 inSection:indexPath.section];
[tableView insertRowsAtIndexPaths:@[insertIndexPath] withRowAnimation:UITableViewRowAnimationAutomatic];
}
}
#pragma mark 修改滑动删除时候的显示字样,默认是 Delete
-(NSString *)tableView:(UITableView *)tableView titleForDeleteConfirmationButtonForRowAtIndexPath:(NSIndexPath *)indexPath {
return @"删除";
}
- (void)didReceiveMemoryWarning {
[super didReceiveMemoryWarning];
// Dispose of any resources that can be recreated.
}
/*
#pragma mark - Navigation
// In a storyboard-based application, you will often want to do a little preparation before navigation
- (void)prepareForSegue:(UIStoryboardSegue *)segue sender:(id)sender {
// Get the new view controller using [segue destinationViewController].
// Pass the selected object to the new view controller.
}
*/
@end
其中重点部分有:1. plist文件的解析过程
2.cell 的重用机制
设置代理后,代理方法的使用也要熟练掌握。
点击 导航栏 右侧的 编辑按钮
左滑进行删除

相关文章推荐
- 并发编程之Operation Queue
- UIImageView的图片切割问题
- 获取手机UUID
- scrapy 爬网站 显示 Filtered offsite request to 错误.
- UIImageView实现图片移动,缩放、旋转的代码片段
- 触摸事件UITouch的用法
- 解决UIToolbar 顶部的黑色线条问题
- easyui动态添加validType
- IOS之高级UI控件之插曲 NSTimer
- Fuel 7 安装
- MSBuild Tools解决办法
- @RequestParam @RequestBody @PathVariable 等参数绑定注解详解(转)
- Android线程 异步 asynctask Looper MessageQueue handler
- codeforces-559B-Equivalent Strings
- 解决 证书报 UUID 不匹配问题 Your build settings specify a provisioning profile with the UUID
- Android Studio运行工程报错:java.exe'' finished with non-zero exit value 1
- 核心动画(Core Animation)
- request获取网页单选框的值
- EasyUI学习笔记_3
- 【十一年】注入框架RoboGuice采用:(Your First Injection into a Custom View class)