Android内容提供器简单实例(读取系统联系人)
2015-11-06 00:00
417 查看
摘要: 文件存储和SharePreference存储以及数据存储一般为了安全,最好用于当前应用程序中访问和存储数据。内容提供器(Content Provider)主要用于在不同的应用程序之间实现数据共享的功能,它提供了一套完整的机制,允许一个程序访问另一个程序中的数据,同时还能保证被访问数据的安全性。目前使用内容提供器是android实现跨程序共享数据的标准方式。内容提供器可以选择只对一部分数据进行共享,从而保证我们的程序中的隐私数据不会有泄漏的风险。
这一节,我来讲讲,Android内容提供器简单实例--读取系统联系人信息。
内容提供器的用法一般有两种,一种是使用现有的内容提供器来读取和操作相应程序中的数据,另一种是创建自己的内容提供器给我们程序的数据提供外部访问接口。
访问其他程序中的数据
当一个应用程序通过内容提供器对其数据了外部访问接口,任何其他的应用程序就都可以对这部分数据进行访问了。android系统中自带的电话薄,短信,媒体等程序都提供了类似的访问接口,这就使得第三方应用程序可以充分地利用这部分数据来实现更好的功能。
ContentResolver的基本用法
对于一个应用程序来说,如果想要访问内容提供器中共享的数据,就一定要借助ContentResolver类,可以通过Context中的getContentResolver()方法获取到该类的实例。ContentResolver中提供了一系列的方法用于对数据进行CRUD操作,其中insert()方法用于添加数据,update()方法用于更新数据,delete()方法用于删除数据,query()方法用于查询数据。
不同于SQLiteDatabase,ContentResolver中的增删改查方法都是不接收表名参数的,而是使用一个Uri参数替代,这个参数被称为内容URI。内容URI给内容提供器中的数据建立了唯一标识符,它主要由2部分组成,权限(authority)和路径(path)。权限是用于对不同的应用程序做区分的,一般为了避免冲突,都会采用程序包名的方式来进行命名。比如某个程序的包名是com.example.app,那么该程序对应的权限就可以命名为com.example.app.provider.路径则是用于对同一应用程序中不同的表做区分的,通常都会添加到权限的后面。比如某个程序的数据库里存在两张表,table1和table2,这时就可以将路径分别命名为/table1和table2,然后把权限和路径进行组合,内容URI就变成了com.example.app.provider/table1和com.example.app.provider/table2.不过目前还很难辨认出这两个字符串是两个内容URI,我们还需要在字符串的头部加上协议声明,因此,内容提供器最标准的格式写法如下:
content://com.example.app.provider/table1
content://com.example.app.provider/table2
这时候URI就可以非常清楚地表达我们想要访问哪个程序中哪张表里的数据。
在得到了内容URI字符串之后,我们还需要将他解析成Uri对象才可以作为参数传入。解析的方法也相当简单,代码如下:
Uri uri=Uri.parse("content://com.example.app.provider/table1");
只需要调用Uri.parse()方法,就可以将内容URI字符串解析成Uri对象了。
现在就可以使用这个Uri对象来查询table1表中的数据了,代码如下所示:
Cursor cursor=getContentResolver().query(
uri,
projection,
selection,
selectionArgs,
sortOrder
);
参数的详细解释见下面的内容:
查询完成后返回的仍然是一个Cursor对象,这时我们就可以将数据从Cursor对象中逐个读取出来了。读取的思路仍然是通过移动游标的位置来遍历Cursor的所有行,然后再取出每一行中相应列的数据,代码如下所示:
if(cursor!=null){
while(cursor.moveToNext()){
String column1=cursor.getString(cursor.getColumnIndex("column1"));
String column2=cursor.getString(cursor.getColumnIndex("column2"));
}
cursor.close();
}
掌握了查询操作,下面我们来看看如何向table1中添加一条数据,代码如下:
ContentValues values=new ContentValues();
values.put("column1"."text");
values.put("column2",1);
getContentResolver().insert(uri,values);
可以看到仍然是将待添加的数据组装到ContentValues中,然后调用ContentResolver的insert()方法,将Uri和ContentValues作为参数传入即可。
如果我们想要更新这条新添加的数据,把column1的值清空,可以借助ContentResolver的update()方法实现,代码如下:
ContentValues values=new ContentValues();
values.put("column1"."");
getContentResolver().update(uri,values,"column1=? and column2=?",new String[]{"text","1"});
注意上述代码使用了selection和selectionArgs参数来对想要更新的数据进行约束,以防止所有行都会受影响。
最后,可以调用ContentResolver的delete()方法将这条数据删除掉,代码如下:
getContentResolver().delete(uri,values,"column2=?",new String[]{"1"});
-------------------------下面是简单的实战案例了-------------------------
由于要读取系统的联系人信息,而模拟器中没有联系人信息的存在,所以先手动添加几个联系人信息。打开电话簿程序,界面如下所示:
我新建了4个通讯录好友信息,做好这些准备工作后,我们接下来新建一个Android项目工程ContactsDev,
然后修改mian_activity.xml文件代码入下:
由代码可知,主布局文件并不复杂,只是加入一个ListView,仅此而已。
接下来就是要修改MainActivity.java的代码了,其代码入下:
由于代码比较短,还是比较容易能看懂的,所以,我就不加入注释了,这就是这个项目的所有代码了。
有兴趣的可以运行一下,下面是该程序运行的效果图:

这一节,我来讲讲,Android内容提供器简单实例--读取系统联系人信息。
内容提供器的用法一般有两种,一种是使用现有的内容提供器来读取和操作相应程序中的数据,另一种是创建自己的内容提供器给我们程序的数据提供外部访问接口。
访问其他程序中的数据
当一个应用程序通过内容提供器对其数据了外部访问接口,任何其他的应用程序就都可以对这部分数据进行访问了。android系统中自带的电话薄,短信,媒体等程序都提供了类似的访问接口,这就使得第三方应用程序可以充分地利用这部分数据来实现更好的功能。
ContentResolver的基本用法
对于一个应用程序来说,如果想要访问内容提供器中共享的数据,就一定要借助ContentResolver类,可以通过Context中的getContentResolver()方法获取到该类的实例。ContentResolver中提供了一系列的方法用于对数据进行CRUD操作,其中insert()方法用于添加数据,update()方法用于更新数据,delete()方法用于删除数据,query()方法用于查询数据。
不同于SQLiteDatabase,ContentResolver中的增删改查方法都是不接收表名参数的,而是使用一个Uri参数替代,这个参数被称为内容URI。内容URI给内容提供器中的数据建立了唯一标识符,它主要由2部分组成,权限(authority)和路径(path)。权限是用于对不同的应用程序做区分的,一般为了避免冲突,都会采用程序包名的方式来进行命名。比如某个程序的包名是com.example.app,那么该程序对应的权限就可以命名为com.example.app.provider.路径则是用于对同一应用程序中不同的表做区分的,通常都会添加到权限的后面。比如某个程序的数据库里存在两张表,table1和table2,这时就可以将路径分别命名为/table1和table2,然后把权限和路径进行组合,内容URI就变成了com.example.app.provider/table1和com.example.app.provider/table2.不过目前还很难辨认出这两个字符串是两个内容URI,我们还需要在字符串的头部加上协议声明,因此,内容提供器最标准的格式写法如下:
content://com.example.app.provider/table1
content://com.example.app.provider/table2
这时候URI就可以非常清楚地表达我们想要访问哪个程序中哪张表里的数据。
在得到了内容URI字符串之后,我们还需要将他解析成Uri对象才可以作为参数传入。解析的方法也相当简单,代码如下:
Uri uri=Uri.parse("content://com.example.app.provider/table1");
只需要调用Uri.parse()方法,就可以将内容URI字符串解析成Uri对象了。
现在就可以使用这个Uri对象来查询table1表中的数据了,代码如下所示:
Cursor cursor=getContentResolver().query(
uri,
projection,
selection,
selectionArgs,
sortOrder
);
参数的详细解释见下面的内容:
| query() | 对应SQL部分 | 描述 |
| uri | from table_name | 指定查询某个应用程序下的某一张表 |
| projection | selection column1,column2 | 指定查询的列名 |
| selection | where column=value | 指定where的约束条件 |
| selectionArgs | - | 为where中的占位符提供具体的值 |
| sortOrder | order by column1,column2 | 指定查询结果的排序方式 |
if(cursor!=null){
while(cursor.moveToNext()){
String column1=cursor.getString(cursor.getColumnIndex("column1"));
String column2=cursor.getString(cursor.getColumnIndex("column2"));
}
cursor.close();
}
掌握了查询操作,下面我们来看看如何向table1中添加一条数据,代码如下:
ContentValues values=new ContentValues();
values.put("column1"."text");
values.put("column2",1);
getContentResolver().insert(uri,values);
可以看到仍然是将待添加的数据组装到ContentValues中,然后调用ContentResolver的insert()方法,将Uri和ContentValues作为参数传入即可。
如果我们想要更新这条新添加的数据,把column1的值清空,可以借助ContentResolver的update()方法实现,代码如下:
ContentValues values=new ContentValues();
values.put("column1"."");
getContentResolver().update(uri,values,"column1=? and column2=?",new String[]{"text","1"});
注意上述代码使用了selection和selectionArgs参数来对想要更新的数据进行约束,以防止所有行都会受影响。
最后,可以调用ContentResolver的delete()方法将这条数据删除掉,代码如下:
getContentResolver().delete(uri,values,"column2=?",new String[]{"1"});
-------------------------下面是简单的实战案例了-------------------------
由于要读取系统的联系人信息,而模拟器中没有联系人信息的存在,所以先手动添加几个联系人信息。打开电话簿程序,界面如下所示:
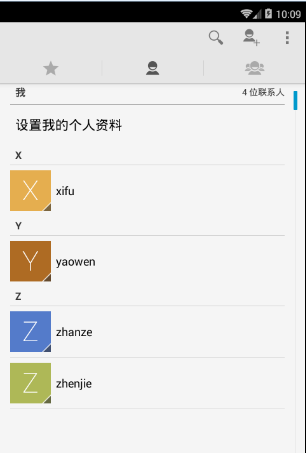
我新建了4个通讯录好友信息,做好这些准备工作后,我们接下来新建一个Android项目工程ContactsDev,
然后修改mian_activity.xml文件代码入下:
<?xml version="1.0" encoding="utf-8"?>
<LinearLayout xmlns:android="http://schemas.android.com/apk/res/android"
xmlns:tools="http://schemas.android.com/tools"
android:layout_width="match_parent"
android:layout_height="match_parent"
tools:context=".MainActivity">

<ListView
android:id="@+id/contactsList"
android:layout_width="match_parent"
android:layout_height="match_parent"></ListView>
</LinearLayout>
由代码可知,主布局文件并不复杂,只是加入一个ListView,仅此而已。
接下来就是要修改MainActivity.java的代码了,其代码入下:
package com.yaowen.contactsdev;

import android.database.Cursor;
import android.os.Bundle;
import android.provider.ContactsContract;
import android.support.v7.app.AppCompatActivity;
import android.widget.ArrayAdapter;
import android.widget.ListView;

import java.util.ArrayList;
import java.util.List;

public class MainActivity extends AppCompatActivity {
private ListView contactsView;
private ArrayAdapter<String> adapter;
private List<String> contactList = new ArrayList<String>();

@Override
protected void onCreate(Bundle savedInstanceState) {
super.onCreate(savedInstanceState);
setContentView(R.layout.activity_main);
contactsView = (ListView) findViewById(R.id.contactsList);
adapter = new ArrayAdapter<String>(this, android.R.layout.simple_list_item_1, contactList);
contactsView.setAdapter(adapter);
readContacts();
}

private void readContacts() {
Cursor cursor = null;
try {
cursor = (Cursor) getContentResolver().query(ContactsContract.CommonDataKinds.Phone.CONTENT_URI,
null, null, null, null);
while (cursor.moveToNext()) {
String name = cursor.getString(cursor.getColumnIndex(
ContactsContract.CommonDataKinds.Phone.DISPLAY_NAME));
String number = cursor.getString(cursor.getColumnIndex(
ContactsContract.CommonDataKinds.Phone.NUMBER));
contactList.add("姓名:"+name + "\n手机:" + number);
}
} catch (Exception e) {
e.printStackTrace();
} finally {
if (cursor != null) {
cursor.close();
}
}

}
}
由于代码比较短,还是比较容易能看懂的,所以,我就不加入注释了,这就是这个项目的所有代码了。
有兴趣的可以运行一下,下面是该程序运行的效果图:

相关文章推荐
- Android的AsyncTask类的简单教程
- Android之NDK开发
- android源码中的资源文件目录
- 20-2第一篇:关于android对话框
- Android Studio 插件
- dpi 、 dip 、分辨率、屏幕尺寸、px、density 关系以及换算
- Android中的service
- Android 屏幕方向监听
- Mac OS X下设置android NDK的环境(详细实测有图)
- Android USB转串口编程
- android MotionEvent的相关的类的介绍
- android开发中应该注意的问题
- Android5.0 SharedElement的使用
- 挨踢人的脚步(2015.11.05)
- Android SlidingMenu 使用详解
- 初识Android中的IPC
- No resource found that matches the given name 'android:Theme.Holo.Light'
- Android Studio中NDK开发
- android 6.0 Runtime Permissions Check
- Android tips