iOS 集成环信(三) 添加好友
2015-11-02 12:21
369 查看
新的一周又开始了,继续上周未完成的任务,继续集成环信。今天打开程序看了下,突然感觉导航条有点丑,所以让我们一起来给导航条来整下容。
然后在YCTabBarViewController.m中的viewDidLoad方法中添加设置tabBarItem Tag的语句。喔,这里还新增了一个“添加好友”的按钮。
效果图如下:
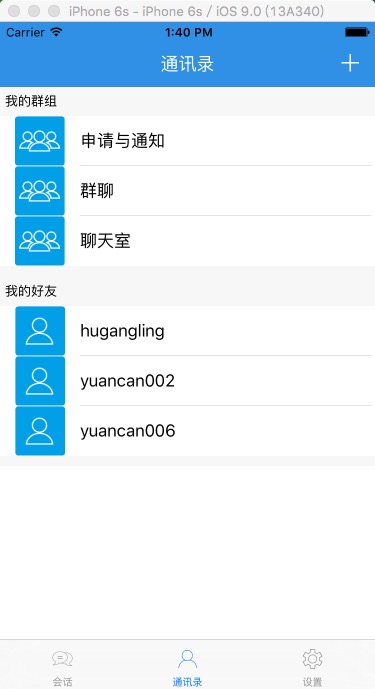
整下容之后,是不是感觉有点像模像样了吧。
记得,在YCTabBarController中添加头文件:
在AddFriendViewController.m中添加如下代码:
好吧,我们不着急往下做,先来编译一下,看看效果如何。
然后,在AppDelegate.m文件didFinishLaunchingWithOptions方法中,添加注册一个监听方法:
我这里,将接受到的好友申请消息的用户名和消息存储在在UserDefaults中了。这里只会告诉用户,收到了一个好友申请,但是这里仅仅只是提醒而已,至于是否接受或者拒绝不在这里进行处理。
编译一下,看看效果如何。
在SystemNotificationViewController添加如下代码:
OK,大功告成,编译来看看效果。
Demo下载地址
一、改变系统导航条的风格
1、设置导航条的背景颜色和标题
进入AppDelegate.m中,添加如下代码:- (BOOL)application:(UIApplication *)application didFinishLaunchingWithOptions:(NSDictionary *)launchOptions {
//初始化环信SDK
[[EaseMob sharedInstance] registerSDKWithAppKey:APPKEY apnsCertName:APNSCert];
LoginViewController *loginVC = [[LoginViewController alloc] init];
UINavigationController *navigation = [[UINavigationController alloc] initWithRootViewController:loginVC];
self.window.rootViewController = navigation;
//设置系统导航条的背景颜色和标题颜色
[[UINavigationBar appearance] setBackgroundImage:[YCCommonCtrl imageWithColor:kColor_Blue] forBarMetrics:UIBarMetricsDefault];
[[UINavigationBar appearance] setShadowImage:[YCCommonCtrl imageWithColor:kColor_Blue]];
[[UINavigationBar appearance] setTitleTextAttributes:@{NSFontAttributeName:FONT(18),NSForegroundColorAttributeName:kColor_White}];
[[UINavigationBar appearance] setTintColor:kColor_White];
return YES;
}2、设置TabBar的标题
进入YCTabBarViewController.m中,加入一个tabBar didSelectItem方法,如下:#pragma mark - UITabBarDelegate
- (void)tabBar:(UITabBar *)tabBar didSelectItem:(UITabBarItem *)item
{
if (item.tag == 0) {
self.title = @"会话";
self.navigationItem.rightBarButtonItem = nil;
}else if (item.tag == 1){
self.title = @"通讯录";
self.navigationItem.rightBarButtonItem = btnAddFriend;
}else if (item.tag == 2){
self.title = @"设置";
self.navigationItem.rightBarButtonItem = nil;
}
}然后在YCTabBarViewController.m中的viewDidLoad方法中添加设置tabBarItem Tag的语句。喔,这里还新增了一个“添加好友”的按钮。
@interface YCTabBarViewController ()
{
UIBarButtonItem *btnAddFriend;
}

@end

@implementation YCTabBarViewController

- (void)viewDidLoad {
[super viewDidLoad];

self.navigationItem.hidesBackButton = YES; //隐藏系统的返回按钮

ChatListViewController *chatListVC = [[ChatListViewController alloc] init];
chatListVC.tabBarItem.title = @"会话";
chatListVC.tabBarItem.image = [UIImage imageNamed:@"tabbar_chatsHL"];
chatListVC.tabBarItem.tag = 0;

AddressBookViewController *addressBookVC = [[AddressBookViewController alloc] init];
addressBookVC.tabBarItem.title = @"通讯录";
addressBookVC.tabBarItem.image = [UIImage imageNamed:@"tabbar_contactsHL"];
addressBookVC.tabBarItem.tag = 1;

SettingsViewController *settingVC = [[SettingsViewController alloc] init];
settingVC.tabBarItem.title = @"设置";
settingVC.tabBarItem.image = [UIImage imageNamed:@"tabbar_settingHL"];
settingVC.tabBarItem.tag = 2;

self.viewControllers = @[chatListVC,addressBookVC,settingVC];

btnAddFriend = [[UIBarButtonItem alloc] initWithBarButtonSystemItem:UIBarButtonSystemItemAdd
target:self
action:@selector(btnAddFriend:)];
}
3.通讯录界面添加表头表尾
进入AddressBookViewContrller.m中添加设置表头表尾的代码://设置表头高度
- (CGFloat)tableView:(UITableView *)tableView heightForHeaderInSection:(NSInteger)section
{
return 30.0f;
}
//设置表尾高度
- (CGFloat)tableView:(UITableView *)tableView heightForFooterInSection:(NSInteger)section {
return 10.0f;
}
//添加标头中的内容
-(UIView *)tableView:(UITableView *)tableView viewForHeaderInSection:(NSInteger)section
{
static NSString *headerSectionID = @"headerSectionID";
UITableViewHeaderFooterView *headerView = [tableView dequeueReusableHeaderFooterViewWithIdentifier:headerSectionID];
UILabel *label;
if (headerView == nil) {
headerView = [[UITableViewHeaderFooterView alloc] initWithReuseIdentifier:headerSectionID];
label = [[UILabel alloc] initWithFrame:CGRectMake(5, 5, 200, 20)];
label.font = FONT(13);
[headerView addSubview:label];
}
if (section == 0) {
label.text = @"我的群组";
}else {
label.text = @"我的好友";
}
return headerView;
}效果图如下:
整下容之后,是不是感觉有点像模像样了吧。
二、发送添加好友申请
1. 新建AddFriendViewController类
首先,我们新建一个类,用于添加好友,我给这个类取个名字叫做AddFriendViewController。之前我们已经在YCTabBarController.m中已经创建了一个btnAddFriend按钮,下面就给这个按钮添加一个点击跳转的事件://添加好友
- (void)btnAddFriend:(id)sender
{
AddFriendViewController *addFriendVC = [[AddFriendViewController alloc] init];
[self.navigationController pushViewController:addFriendVC animated:YES];
}记得,在YCTabBarController中添加头文件:
#import "AddFriendViewController.h"
2. 发送好友申请
环信官方文档提供的好友申请接口为:BOOL isSuccess = [[EaseMob sharedInstance].chatManager addBuddy:@"6001" message:@"我想加您为好友" error:&error];
if (isSuccess && !error) {
NSLog(@"添加成功");
}在AddFriendViewController.m中添加如下代码:
#import "AddFriendViewController.h"
@interface AddFriendViewController ()
{
UITextField *textField;
}
@end
@implementation AddFriendViewController
- (void)viewDidLoad {
[super viewDidLoad];
self.title = @"添加好友";
self.view.backgroundColor = [UIColor groupTableViewBackgroundColor];
UIBarButtonItem *btnItme = [[UIBarButtonItem alloc] initWithTitle:@"查找"
style:(UIBarButtonItemStyleDone)
target:self
action:@selector(btnSearch:)];
self.navigationItem.rightBarButtonItem = btnItme;
textField = [YCCommonCtrl commonTextFieldWithFrame:CGRectMake(10, 10, SCREEN_WIDTH-20, 35)
placeholder:@"用户名"
color:kColor_Gray
font:kFont_Title
secureTextEntry:NO
delegate:self];
[YCCommonCtrl setViewBorderWithView:textField borderColor:kColor_LightGray borderWidth:1.0 cornerRadius:5.0]; //设置边框
[self.view addSubview:textField];
}
#pragma mark - Private Menthods
//查找好友
- (void)btnSearch:(id)sender
{
if (textField.text.length == 0) {
UIAlertController *alterController = [YCCommonCtrl commonAlterControllerWithTitle:nil message:@"请先输入好友的用户名"];
[self presentViewController:alterController animated:YES completion:nil];
return;
}
UIView *view = [YCCommonCtrl commonViewWithFrame:CGRectMake(0, 55, SCREEN_WIDTH, 55) backgroundColor:kColor_White];
[self.view addSubview:view];
UIImageView *imgView = [YCCommonCtrl commonImageViewWithFrame:CGRectMake(10, 5, 45, 45) image:[UIImage imageNamed:@"chatListCellHead"]];
[view addSubview:imgView];
UILabel *label = [YCCommonCtrl commonLableWithFrame:CGRectMake(60, 5, SCREEN_WIDTH-150, 45)
text:textField.text
color:kColor_Gray
font:kFont_Title
textAlignment:NSTextAlignmentLeft];
label.numberOfLines = 0;
[view addSubview:label];
UIButton *btn = [YCCommonCtrl commonButtonWithFrame:CGRectMake(SCREEN_WIDTH-70, 10, 60, 35)
title:@"添加"
color:kColor_White
font:kFont_Button
backgroundImage:[YCCommonCtrl imageWithColor:kColor_Blue]
target:self
action:@selector(btnAdd:)];
[YCCommonCtrl setViewBorderWithView:btn borderColor:kColor_Blue borderWidth:1.0 cornerRadius:5.0]; //设置边框
[view addSubview:btn];
}
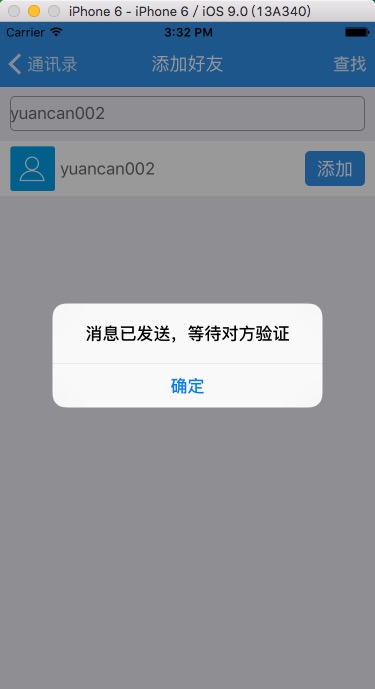
//发送添加好友申请
- (void)btnAdd:(id)sender
{
EMError *error;
BOOL isSuccess = [[EaseMob sharedInstance].chatManager addBuddy:textField.text message:@"我想加您为好友" error:&error];
if (isSuccess && !error) {
UIAlertController *alterController = [YCCommonCtrl commonAlterControllerWithTitle:nil message:@"消息已发送,等待对方验证"];
[self presentViewController:alterController animated:YES completion:nil];
}
}好吧,我们不着急往下做,先来编译一下,看看效果如何。
三、接受好友申请
已经成功的发送了好友申请了,那么下一步就是等待你的好友接受你的申请,然后你们就可以成为好友思密达啦。1. 添加监听方法
首先,在AppDelegate.m中遵循IChatManagerDelegate协议:@interface AppDelegate ()<IChatManagerDelegate> @end
然后,在AppDelegate.m文件didFinishLaunchingWithOptions方法中,添加注册一个监听方法:
//注册一个监听对象到监听列表中
[[EaseMob sharedInstance].chatManager addDelegate:self delegateQueue:nil];
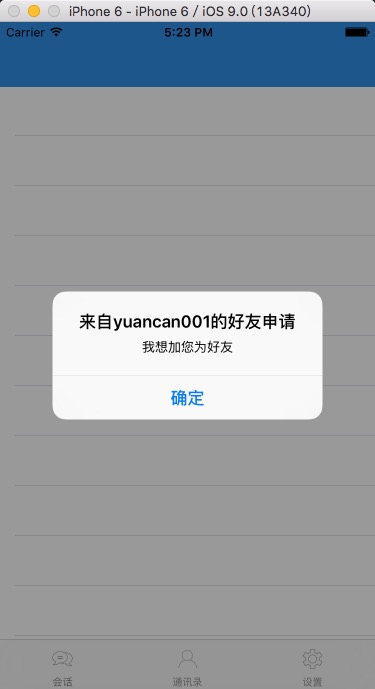
2. 监听好友申请消息
//监听好友申请消息
- (void)didReceiveBuddyRequest:(NSString *)username
message:(NSString *)message
{
NSDictionary *dic = [[NSDictionary alloc] initWithObjectsAndKeys:username,@"username",message,@"message", nil];
NSUserDefaults *userDefaults = [NSUserDefaults standardUserDefaults];
[userDefaults setObject:dic forKey:@"dic"];
[userDefaults synchronize];
NSString *title = [NSString stringWithFormat:@"来自%@的好友申请",username];
UIAlertController *alterController = [YCCommonCtrl commonAlterControllerWithTitle:title message:message];
[self.window.rootViewController presentViewController:alterController animated:YES completion:nil];
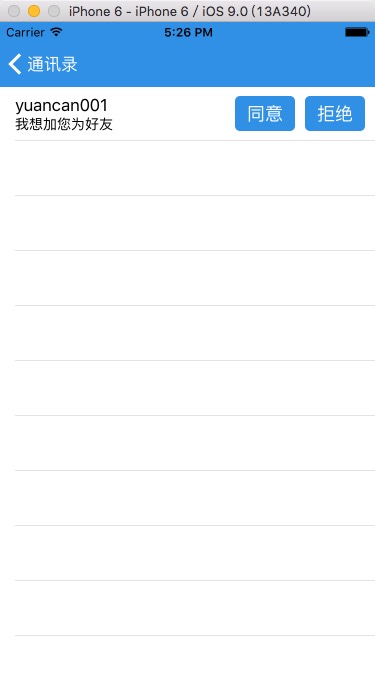
}我这里,将接受到的好友申请消息的用户名和消息存储在在UserDefaults中了。这里只会告诉用户,收到了一个好友申请,但是这里仅仅只是提醒而已,至于是否接受或者拒绝不在这里进行处理。
编译一下,看看效果如何。
3. 处理好友申请消息
1、新建一个好友消息处理的界面,继承于YCBaseTableViewController,命名为SystemNotificationViewController。YCBaseTableViewController是我自己写的一个列表的基类。在SystemNotificationViewController添加如下代码:
#import "SystemNotificationViewController.h"

@interface SystemNotificationViewController ()
{
NSMutableArray *arrList;

NSString *username;

NSUserDefaults *userDefaultes;

}

@end

@implementation SystemNotificationViewController

- (void)viewDidLoad {
[super viewDidLoad];

arrList = [[NSMutableArray alloc] init];

userDefaultes = [NSUserDefaults standardUserDefaults];
NSDictionary *dic = [userDefaultes objectForKey:@"dic"];

if (dic.count >0) {
username = [dic objectForKey:@"username"];
[arrList addObject:dic];
}
self.tableView.rowHeight = 55.0f;

}

#pragma mark - UITableView Delegate & DataSource

- (NSInteger)tableView:(UITableView *)tableView numberOfRowsInSection:(NSInteger)section {
return arrList.count;
}

- (UITableViewCell *)tableView:(UITableView *)tableView cellForRowAtIndexPath:(NSIndexPath *)indexPath {
static NSString *cellIdentifier = @"CELL";
UITableViewCell *cell = [tableView dequeueReusableCellWithIdentifier:cellIdentifier];
if (cell == nil) {
cell = [[UITableViewCell alloc] initWithStyle:UITableViewCellStyleSubtitle reuseIdentifier:cellIdentifier];

UIButton *btnAccept = [[UIButton alloc] initWithFrame:CGRectMake(SCREEN_WIDTH-140, 10.0, 60, 35.0)];
[btnAccept setTag:100];
[cell.contentView addSubview:btnAccept];

UIButton *btnCancel = [[UIButton alloc] initWithFrame:CGRectMake(SCREEN_WIDTH-70, 10.0, 60, 35.0)];
[btnCancel setTag:101];
[cell.contentView addSubview:btnCancel];
}

NSDictionary *dic = [arrList objectAtIndex:indexPath.row];
cell.textLabel.text = [dic objectForKey:@"username"];
cell.textLabel.font = kFont_Title;
cell.detailTextLabel.text = [dic objectForKey:@"message"];
cell.detailTextLabel.font = kFont_Large;

UIButton *btnAccept = (UIButton *)[cell viewWithTag:100];
[btnAccept setTitle:@"同意" forState:UIControlStateNormal];
[btnAccept setBackgroundImage:[YCCommonCtrl imageWithColor:kColor_Blue] forState:UIControlStateNormal];
[btnAccept addTarget:self action:@selector(btnAccept:) forControlEvents:UIControlEventTouchUpInside];
[YCCommonCtrl setViewBorderWithView:btnAccept borderColor:kColor_Blue borderWidth:1.0f cornerRadius:5.0f];

UIButton *btnCancel = (UIButton *)[cell viewWithTag:101];
[btnCancel setTitle:@"拒绝" forState:UIControlStateNormal];
[btnCancel setBackgroundImage:[YCCommonCtrl imageWithColor:kColor_Blue] forState:UIControlStateNormal];
[btnCancel addTarget:self action:@selector(btnCancel:) forControlEvents:UIControlEventTouchUpInside];
[YCCommonCtrl setViewBorderWithView:btnCancel borderColor:kColor_Blue borderWidth:1.0f cornerRadius:5.0f];

return cell;
}

- (void)btnAccept:(id)sender
{
//同意好友请求
[[EaseMob sharedInstance].chatManager acceptBuddyRequest:username error:nil];

[userDefaultes removeObjectForKey:@"dic"];

[arrList removeAllObjects];
[self.tableView reloadData];
}

- (void)btnCancel:(id)sender
{
//拒绝好友请求
[[EaseMob sharedInstance].chatManager rejectBuddyRequest:username reason:@"不认识你" error:nil];

[userDefaultes removeObjectForKey:@"dic"];

[arrList removeAllObjects];
[self.tableView reloadData];

}
4. 更改页面跳转
在AddressBookController.m文件中的列表点击方法中,增加SystemNotificationViewController的调整方法:- (void)tableView:(UITableView *)tableView didSelectRowAtIndexPath:(NSIndexPath *)indexPath {
if (indexPath.section == 0) {
switch (indexPath.row) {
case 0:
{
SystemNotificationViewController *sysVC = [[SystemNotificationViewController alloc] init];
[self.navigationController pushViewController:sysVC animated:YES];
break;
}
default:
break;
}
}else {
EMBuddy *buddy = [arrFriends objectAtIndex:indexPath.row];
ChatViewController *chatVC = [[ChatViewController alloc] initWithChatter:buddy.username isGroup:NO];
chatVC.title = buddy.username; //好友的名字
[self.navigationController pushViewController:chatVC animated:YES];
}
}OK,大功告成,编译来看看效果。
Demo下载地址

相关文章推荐
- 峰回路转,Firefox 浏览器即将重返 iOS 平台
- 峰回路转,Firefox 浏览器即将重返 iOS 平台
- 不可修补的 iOS 漏洞可能导致 iPhone 4s 到 iPhone X 永久越狱
- iOS 12.4 系统遭黑客破解,漏洞危及数百万用户
- 每日安全资讯:NSO,一家专业入侵 iPhone 的神秘公司
- [转][源代码]Comex公布JailbreakMe 3.0源代码
- 讲解iOS开发中基本的定位功能实现
- js判断客户端是iOS还是Android等移动终端的方法
- IOS开发环境windows化攻略
- 检测iOS设备是否越狱的方法
- .net平台推送ios消息的实现方法
- 探讨Android与iOS,我们将何去何从?
- Android、iOS和Windows Phone中的推送技术详解
- IOS 改变键盘颜色代码
- 举例详解iOS开发过程中的沙盒机制与文件
- Android和IOS的浏览器中检测是否安装某个客户端的方法
- 分享一个iOS下实现基本绘画板功能的简单方法
- javascript实现阻止iOS APP中的链接打开Safari浏览器
- IOS开发第三方语音-微信语音