Linux HA Cluster的实例演示(2)
2015-10-27 17:26
633 查看
一、实验环境
node1:192.168.194.131
node2:192.168.194.132
NFS服务器与仲裁设备:192.168.194.129
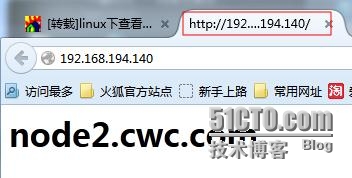
VIP:192.168.194.140
二、相关准备工作
1、配置host文件使节点间可通过主机名通信
node1节点配置
node1节点配置
node1节点配置
1、测试每个节点httpd能否正常运行并关闭开机启动
(1)安装相关软件包及依赖包
说明:Heartbeat主要3个配置文件:ha.cf,authkeys,haresources,需要放置在/etc/ha.d 目录下,但默认这三个文件是在/usr/share/doc/heartbeat-2.1.4/下面
ha.cf: 主配置文件,定义各节点上的heartbeat HA集群的基本属性;
authkeys:集群内节点间彼此传递消息时使用加密算法及密钥;
haresources: 为heartbeat v1提供资源管理器配置接口;v1版本专用的配置接口
authkeys文件配置
2、通过使用 ip link set eth0 multicast on|off 命令设置是否开启网卡组播功能
haresources文件配置
2、如果节点node1掉线,资源会自动根据ha.cf的定义转移至node2,而当node1恢复正常后,会重新将集群资源接管,
将上面三个配置文件复制到node2节点
(1)测试通过vip地址能否访问node1的web界面

(2)切换节点node1为备用节点,看资源是否转移都node2
此次heartbeat+haresources演示完成
四、配置演示测试环境1---->hrartbeat v2+CRM(lamp+wordpress)
目的:通过LAMP组合,基于heartbeat v2 crm实现HA;要求,部署wordpress,用于编辑的文章中的任何数据在节点切换后都能正常访问
说明:集群node相关信息引用上面资源
1、配置NFS服务器
(1)新建nfs文件夹及用户
(1)测试各节点能否正常挂载
(1)在node1与node2上分别安装heartbeat-gui的rpm包
(1) 登入界面如下:


(2)通过CRM配置高可用资源
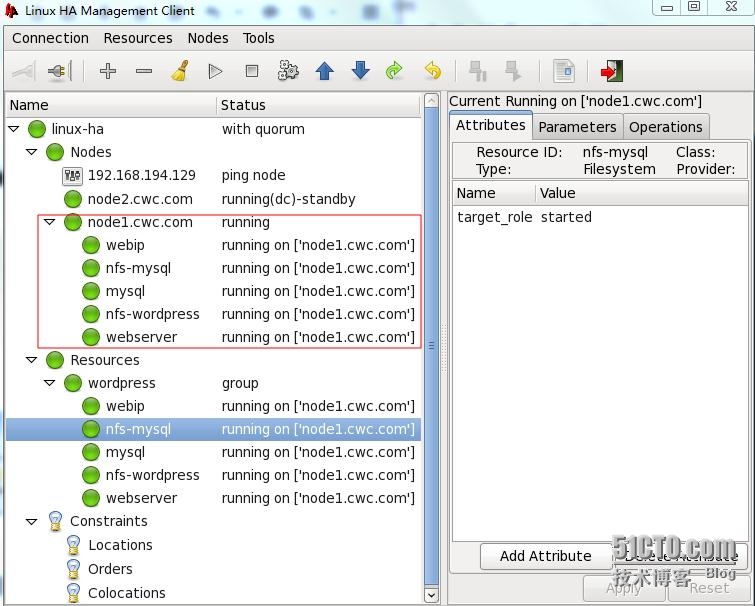
说明:此次演示高可用资源主要包括VIP,httpd,mysql,共享存储(通过nfs实现,包含web页面文件与mysql数据库文件)
配置:由于考虑资源粘性和资源约束,此次可使用资源组group来管理,此次组名设置为ID=wordpress
资源:VIP 资源名为webip
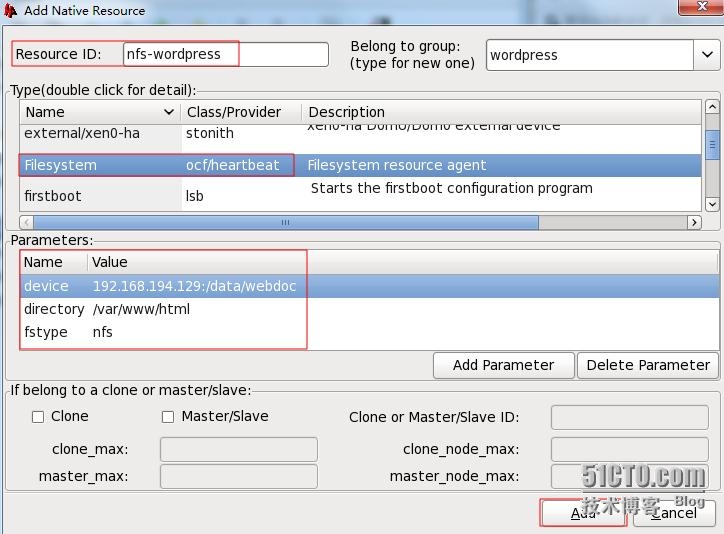
web页面文件资源名为nfs-wordpress
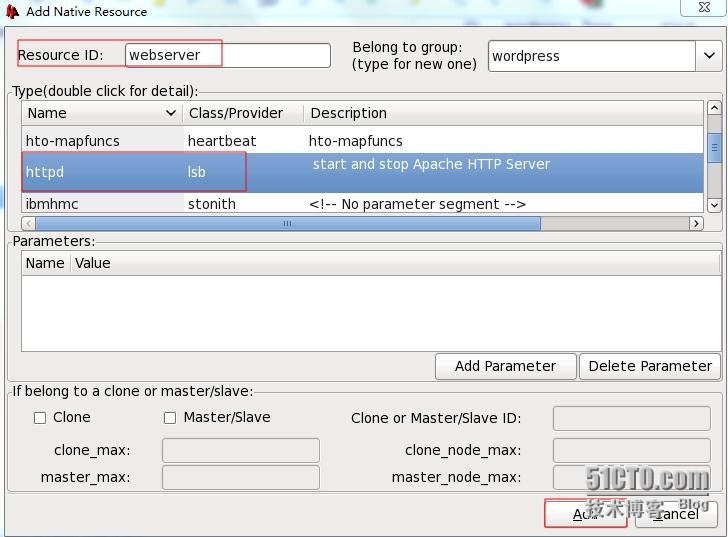
httpd 资源名为webserver
mysqld资源名为mysql
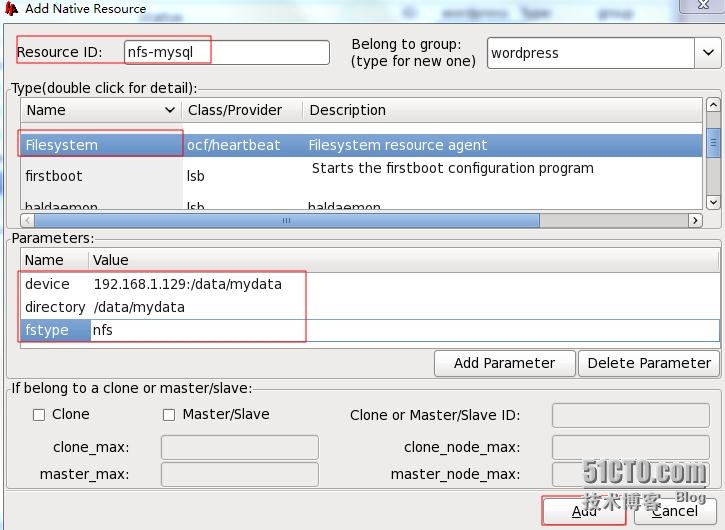
数据存储资源名为nfs-mysql
(a)新增资源组(wordpress)
(b)添加具体资源VIP,设置VIP地址为:192.168.194.140/24,ID=webip
通过上图的Add Parameter 按钮添加vip的其他参数
设置vip在哪个网口别名上
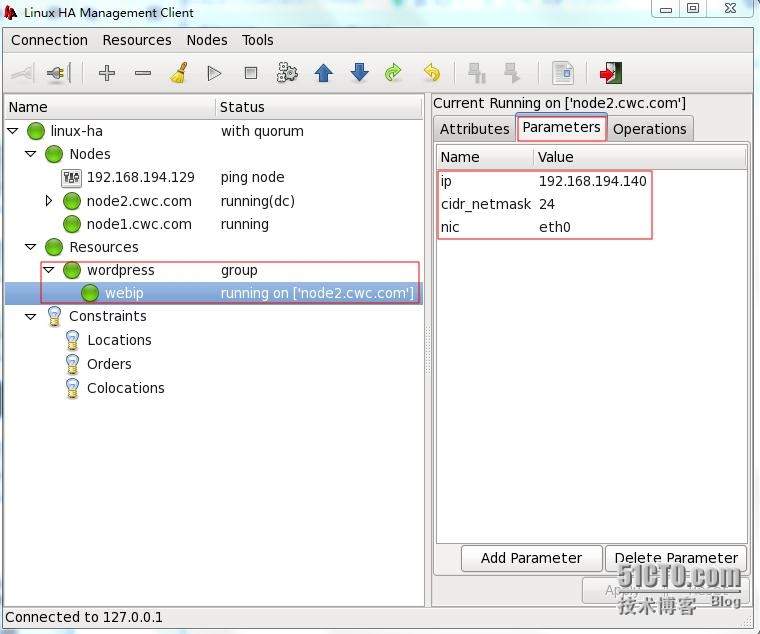
测试能否此webip资源能否正常启动
wepip已经在node2上 正常运行
(c)按照以下顺序配置剩下资源:nfs-mysql,mysql,nfs-wordpress,httpd

最后添加完所有资源,然后开始运行,如下图:
5、测试wordpress能否正常登入并切换node1后能否正常打开node2创建的文章
(1)完成wordpress的数据库及网页配置
(2)测试能否创建文章并打开网页

(3)将后台资源切换到node1,看文章能否依然存在
此次LAMP+heartbeatV2+CRM演示完成
node1:192.168.194.131
node2:192.168.194.132
NFS服务器与仲裁设备:192.168.194.129
VIP:192.168.194.140
二、相关准备工作
1、配置host文件使节点间可通过主机名通信
node1节点配置
[root@node1 ~]# cat /etc/hosts
127.0.0.1   localhost localhost.localdomain localhost4 localhost4.localdomain4
::1         localhost localhost.localdomain localhost6 localhost6.localdomain6
192.168.194.131 node1.cwc.com node1
192.168.194.132 node2.cwc.com node2
[root@node1 ~]# ping node2
PING node2.cwc.com (192.168.194.132) 56(84) bytes of data.
64 bytes from node2.cwc.com (192.168.194.132): icmp_seq=1 ttl=64 time=3.10 ms
64 bytes from node2.cwc.com (192.168.194.132): icmp_seq=2 ttl=64 time=0.645 ms
64 bytes from node2.cwc.com (192.168.194.132): icmp_seq=3 ttl=64 time=0.460 ms
node2节点配置
[root@node2 ~]# cat /etc/hosts
127.0.0.1   localhost localhost.localdomain localhost4 localhost4.localdomain4
::1         localhost localhost.localdomain localhost6 localhost6.localdomain6
192.168.194.132 node2.cwc.com node2
192.168.194.131 node1.cwc.com node1

[root@node2 ~]# ping node1
PING node1.cwc.com (192.168.194.131) 56(84) bytes of data.
64 bytes from node1.cwc.com (192.168.194.131): icmp_seq=1 ttl=64 time=0.451 ms
64 bytes from node1.cwc.com (192.168.194.131): icmp_seq=2 ttl=64 time=0.495 ms
64 bytes from node1.cwc.com (192.168.194.131): icmp_seq=3 ttl=64 time=0.494 msms
2、ssh到相关节点通过root账号基于秘钥认证;
node1节点配置
[root@node1 ~]# ssh-keygen -t rsa
Generating public/private rsa key pair.
Enter file in which to save the key (/root/.ssh/id_rsa):
Enter passphrase (empty for no passphrase):
Enter same passphrase again:
Your identification has been saved in /root/.ssh/id_rsa.
Your public key has been saved in /root/.ssh/id_rsa.pub.
The key fingerprint is:
23:3a:bf:f6:1f:6d:42:ae:2a:4b:92:eb:14:1e:2d:af root@node1.cwc.com
The key's randomart image is:
+--[ RSA 2048]----+
|                 |
|                 |
|                 |
|   .             |
|  + . . S .      |
| . * . . + .     |
|  = =     + o    |
| . =.o.  . +     |
| .E .+++o..      |
+-----------------+
[root@node1 ~]# ssh-copy-id -i /root/.ssh/id_rsa.pub root@node2
The authenticity of host 'node2 (192.168.194.132)' can't be established.
RSA key fingerprint is dd:4a:08:9a:15:cc:16:57:2a:4a:8f:73:8e:57:9b:cc.
Are you sure you want to continue connecting (yes/no)? yes
Warning: Permanently added 'node2,192.168.194.132' (RSA) to the list of known hosts.
root@node2's password:
Now try logging into the machine, with "ssh 'root@node2'", and check in:

.ssh/authorized_keys

to make sure we haven't added extra keys that you weren't expecting.
[root@node1 ~]# ssh node2
Last login: Tue Oct 27 19:50:41 2015 from node1.cwc.com
[root@node2 ~]# exit
node2节点配置
[root@node2 ~]# ssh node1
Last login: Tue Oct 27 19:58:45 2015 from node2.cwc.com
[root@node1 ~]# exit
3、配置节点间时间同步
node1节点配置
[root@node1 ~]# rpm -qa | grep ntp
ntpdate-4.2.6p5-1.el6.centos.x86_64
fontpackages-filesystem-1.41-1.1.el6.noarch
ntp-4.2.6p5-1.el6.centos.x86_64
[root@node1 ~]# ntpdate cn.pool.ntp.org  #更新ntp服务器时间
27 Oct 20:08:19 ntpdate[3048]: step time server 202.112.29.82 offset -12.788115 sec
[root@node1 ~]# crontab -e               #创建同步ntp服务器的任务计划
*/2 * * * * /usr/sbin/ntpdate cn.pool.ntp.org &> /dev/null
node2节点配置
[root@node2 ~]# rpm -qa | grep ntp
fontpackages-filesystem-1.41-1.1.el6.noarch
ntp-4.2.4p8-3.el6.centos.x86_64
ntpdate-4.2.4p8-3.el6.centos.x86_64
[root@node2 ~]# ntpdate cn.pool.ntp.org
27 Oct 20:12:09 ntpdate[3147]: step time server 202.112.29.82 offset -13.179396 sec
[root@node2 ~]# date; ssh node1 date
Tue Oct 27 20:12:45 CST 2015
Tue Oct 27 20:12:45 CST 2015
[root@node2 ~]# crontab -e
*/2 * * * * /usr/sbin/ntpdate cn.pool.ntp.org &> /dev/null
4、考虑是否用到仲裁设备
[root@node1 ~]# ping 192.168.194.129
PING 192.168.194.129 (192.168.194.129) 56(84) bytes of data.
64 bytes from 192.168.194.129: icmp_seq=1 ttl=64 time=2.57 ms
64 bytes from 192.168.194.129: icmp_seq=2 ttl=64 time=0.586 ms

[root@node2 ~]# ping 192.168.194.129
PING 192.168.194.129 (192.168.194.129) 56(84) bytes of data.
64 bytes from 192.168.194.129: icmp_seq=1 ttl=64 time=1.46 ms
64 bytes from 192.168.194.129: icmp_seq=2 ttl=64 time=0.812 ms
64 bytes from 192.168.194.129: icmp_seq=3 ttl=64 time=0.646 ms
三、配置演示测试环境1---->hrartbeat v1+haresources
1、测试每个节点httpd能否正常运行并关闭开机启动
[root@node1 ~]# curl http://node1.cwc.com; ssh node2 curl http://node2.cwc.com <h1>node1.cwc.com</h1>
% Total    % Received % Xferd  Average Speed   Time    Time     Time  Current
Dload  Upload   Total   Spent    Left  Speed
0    23    0    23    0     0   5419      0 --:--:-- --:--:-- --:--:--     0
<h1>node2.cwc.com</h1>
[root@node1 ~]# service httpd stop ; ssh node2 service httpd stop
Stopping httpd:                                            [  OK  ]
Stopping httpd: [  OK  ]
[root@node1 ~]# chkconfig httpd off; ssh node2 chkconfig httpd off #关闭开机启动
2、安装HA heartbeat 高可用软件并配置
(1)安装相关软件包及依赖包
[root@node1 ~]# yum install net-snmp-libs libnet PyXML    #提醒libnet是在epel源中才有
[root@node1 heartbeat2]# rpm -ivh heartbeat-2.1.4-12.el6.x86_64.rpm heartbeat-pils-2.1.4-12.el6.x86_64.rpm heartbeat-stonith-2.1.4-12.el6.x86_64.rpm
Preparing...                ########################################### [100%]
1:heartbeat-pils         ########################################### [ 33%]
2:heartbeat-stonith      ########################################### [ 67%]
3:heartbeat              ########################################### [100%]
# node2节点做同样配置
(2)配置heartbeat+haresourxes
说明:Heartbeat主要3个配置文件:ha.cf,authkeys,haresources,需要放置在/etc/ha.d 目录下,但默认这三个文件是在/usr/share/doc/heartbeat-2.1.4/下面
ha.cf: 主配置文件,定义各节点上的heartbeat HA集群的基本属性;
authkeys:集群内节点间彼此传递消息时使用加密算法及密钥;
haresources: 为heartbeat v1提供资源管理器配置接口;v1版本专用的配置接口
authkeys文件配置
[root@node1 ha.d]# openssl rand -base64 8  #生成随机数
r5K5w1/SZFY=
[root@node1 ha.d]# vim authkeys
auth 2  # 选中秘钥认证方式
#1 crc
#2 sha1 HI!
#3 md5 Hello!
2 sha1 r5K5w1/SZFY=
[root@node1 ha.d]# chmod 600 authkeys
[root@node1 ha.d]# ls -l
total 48
-rw------- 1 root root   664 Oct 28 11:26 authkeys
ha.cf文件配置
[root@node1 ha.d]# egrep -v "(#|^$)" ha.cf
logfile    /var/log/ha-log
#heartbeat的ha-log存放位置,默认开启的是logfacility发送给syslog,
#可通过vim /etc/rsyslog.conf 添加 local.* /var/log/heartbeat.log
keepalive 2  # 配置默认2秒发送一次心跳信息
deadtime 30  # 配置节点挂掉的时间,默认是30秒
warntime 10  # 警告时间,2秒探测一次,如果10秒后还收不到心跳信息,日志开始报警
udpport    694  # heartbeat默认使用UDP端口,端口号694
mcast eth0 225.0.0.1 694 1 0  # 心跳信息使用UPD多播传递,TTL=1 loop=0(不允许出路由器),
auto_failback on  # 设置定义主节点是否在故障恢复后,将资源从备份节点收回重新接管
node node1.cwc.com  # 节点名称,必须与uname -r 一致
node node2.cwc.com
ping 192.168.194.130 #选中ping 作为仲裁
说明:1、ha.cf中compression bz2表示对传输数据进行压缩,compression_threshold 2表示小于2k不压缩
2、通过使用 ip link set eth0 multicast on|off 命令设置是否开启网卡组播功能
haresources文件配置
[root@node1 ha.d]# vim haresources
node1.cwc.com 192.168.194.140/24/eth0 httpd
说明: 1、VIP 为192.168.194.140,优先访问集群节点node1.cwc.com
2、如果节点node1掉线,资源会自动根据ha.cf的定义转移至node2,而当node1恢复正常后,会重新将集群资源接管,
将上面三个配置文件复制到node2节点
[root@node1 ha.d]# scp -p ha.cf haresources authkeys node2:/etc/ha.d
ha.cf                                  100%   10KB  10.3KB/s   00:00
haresources                            100% 5950     5.8KB/s   00:00
authkeys                               100%  664     0.7KB/s   00:00
3、启动heartbeat服务,测试相关功能
(1)测试通过vip地址能否访问node1的web界面
[root@node1 ha.d]# service heartbeat start ; ssh node2 service heartbeat start
Starting High-Availability services:
2015/10/28_12:55:57 INFO:  Resource is stopped
Done.

Starting High-Availability services:
2015/10/28_12:55:56 INFO:  Resource is stopped
Done.
[root@node1 ha.d]# ss -unlp
UNCONN      0      0    225.0.0.1:694   *:*      users:(("heartbeat",36824,8),("heartbeat",36825,8))
UNCONN      0      0    *:33760         *:*      users:(("heartbeat",36824,7),("heartbeat",36825,7))
[root@node1 ha.d]# ifconfig
eth0      Link encap:Ethernet  HWaddr 00:0C:29:8E:50:22
inet addr:192.168.194.131  Bcast:192.168.194.255  Mask:255.255.255.0
inet6 addr: fe80::20c:29ff:fe8e:5022/64 Scope:Link
UP BROADCAST RUNNING MULTICAST  MTU:1500  Metric:1
RX packets:99535 errors:0 dropped:0 overruns:0 frame:0
TX packets:68648 errors:0 dropped:0 overruns:0 carrier:0
collisions:0 txqueuelen:1000
RX bytes:82927987 (79.0 MiB)  TX bytes:6644571 (6.3 MiB)

eth0:0    Link encap:Ethernet  HWaddr 00:0C:29:8E:50:22
inet addr:192.168.194.140  Bcast:192.168.194.255  Mask:255.255.255.0
UP BROADCAST RUNNING MULTICAST  MTU:1500  Metric:1
(2)切换节点node1为备用节点,看资源是否转移都node2
[root@node1 ha.d]# /usr/lib64/heartbeat/hb_standby
2015/10/28_13:09:27 Going standby [all].
[root@node2 heartbeat2]# ifconfig    # VIP已经转移到node2
eth0      Link encap:Ethernet  HWaddr 00:0C:29:03:08:5B
inet addr:192.168.194.132  Bcast:192.168.194.255  Mask:255.255.255.0
inet6 addr: fe80::20c:29ff:fe03:85b/64 Scope:Link
UP BROADCAST RUNNING MULTICAST  MTU:1500  Metric:1
RX packets:95527 errors:0 dropped:0 overruns:0 frame:0
TX packets:59057 errors:0 dropped:0 overruns:0 carrier:0
collisions:0 txqueuelen:1000
RX bytes:87538256 (83.4 MiB)  TX bytes:5573367 (5.3 MiB)

eth0:0    Link encap:Ethernet  HWaddr 00:0C:29:03:08:5B
inet addr:192.168.194.140  Bcast:192.168.194.255  Mask:255.255.255.0
UP BROADCAST RUNNING MULTICAST  MTU:1500  Metric:1
刷新页面后
此次heartbeat+haresources演示完成
四、配置演示测试环境1---->hrartbeat v2+CRM(lamp+wordpress)
目的:通过LAMP组合,基于heartbeat v2 crm实现HA;要求,部署wordpress,用于编辑的文章中的任何数据在节点切换后都能正常访问
说明:集群node相关信息引用上面资源
1、配置NFS服务器
(1)新建nfs文件夹及用户
[root@lamp ~]#  mkdir /data/{webdoc,mydata} -pv
mkdir: created directory `/data/webdoc'
mkdir: created directory `/data/mydata'
[root@lamp ~]# groupadd -g 27 mysql
[root@lamp ~]# useradd -u 27 -g mysql -s /sbin/nologin mysql
[root@lamp ~]# id mysql
uid=27(mysql) gid=27(mysql) groups=27(mysql)
[root@lamp ~]# id apache
uid=48(apache) gid=48(apache) groups=48(apache)

# 要求NFS服务器上的mysql用户与node1,node2的mysql用户gid,uid必须保持一致
[root@node1 ha.d]# id mysql
uid=27(mysql) gid=27(mysql) groups=27(mysql)
[root@node1 ha.d]# id  apache
uid=48(apache) gid=48(apache) groups=48(apache)

[root@node2 heartbeat2]# id mysql
uid=27(mysql) gid=27(mysql) groups=27(mysql)
[root@node2 heartbeat2]# id apache
uid=48(apache) gid=48(apache) groups=48(apache)(2)配置nfs共享目录及用户权限# 修改目录文件夹权限 [root@lamp data]# chown -R mysql.mysql mydata/ [root@lamp data]# chown -R apache.apache webdoc/ [root@lamp data]# ls -l total 8 drwxr-xr-x 2 mysql mysql 4096 Oct 28 14:37 mydata drwxr-xr-x 2 apache apache 4096 Oct 28 14:37 webdoc # 设置NFS目录访问权限 [root@lamp data]# vim /etc/exports # 注意配置权限时IP属性与权限属性之间没有空格 /data/mydata 192.168.194.0/24(rw,sync,no_root_squash) /data/webdoc 192.168.194.0/24(rw,sync,no_root_squash) [root@lamp data]# service nfs restart Shutting down NFS daemon: [ OK ] Shutting down NFS mountd: [ OK ] Shutting down NFS services: [ OK ] Shutting down RPC idmapd: [ OK ] Starting NFS services: [ OK ] Starting NFS mountd: [ OK ] Starting NFS daemon: [ OK ] Starting RPC idmapd: [ OK ] [root@lamp data]# exportfs -avr exporting 192.168.194.0/24:/data/webdoc exporting 192.168.194.0/24:/data/mydata [root@lamp data]# rpcinfo -p localhost # 查看NFS 监听端口是否开启 program vers proto port service 100024 1 udp 30004 status 100024 1 tcp 30004 status 100005 1 udp 30003 mountd 100005 1 tcp 30003 mountd 100005 2 udp 30003 mountd 100005 2 tcp 30003 mountd 100005 3 udp 30003 mountd 100005 3 tcp 30003 mountd 100003 2 tcp 2049 nfs 100003 3 tcp 2049 nfs 100003 4 tcp 2049 nfs 100227 2 tcp 2049 nfs_acl 100227 3 tcp 2049 nfs_acl 100003 2 udp 2049 nfs 100003 3 udp 2049 nfs 100003 4 udp 2049 nfs 100227 2 udp 2049 nfs_acl 100227 3 udp 2049 nfs_acl(3)下载wordpress 软件包解压到/data/webdoc
[root@lamp ~]# tar -zxvf wordpress-4.3.1-zh_CN.tar.gz -C /data/webdoc/
[root@lamp ~]# ls -l /data/webdoc/
total 4
drwxr-xr-x 5 nobody nfsnobody 4096 Sep 16 22:38 wordpress
[root@lamp webdoc]# chown apache.apache wordpress/
[root@lamp webdoc]# ls -l
total 4
drwxr-xr-x 5 apache apache 4096 Sep 16 22:38 wordpress
2、配置节点node1与node2挂载nfs目录,然后安装mysql
(1)测试各节点能否正常挂载
# 编辑mysql配置文件
[root@node1 ~]# vim /etc/my.cnf
[mysqld]
#datadir=/var/lib/mysql/
datadir=/data/mydata
socket=/var/lib/mysql/mysql.sock
user=mysql
# 测试node1能否挂载
[root@node1 ~]# service httpd status
httpd is stopped
[root@node1 data]# mount -t nfs -o vers=3 192.168.194.129:/data/mydata /data/mydata/
# 此时说明挂载时 使用nfs-ver3的版本,因为本机测试默认是挂载的ver4的版本,挂载后权限有问题
[root@node1 data]# mount -a
[root@node1 data]# mount
/dev/sda2 on / type ext4 (rw)
proc on /proc type proc (rw)
sysfs on /sys type sysfs (rw)
devpts on /dev/pts type devpts (rw,gid=5,mode=620)
tmpfs on /dev/shm type tmpfs (rw)
/dev/sda1 on /boot type ext4 (rw)
none on /proc/sys/fs/binfmt_misc type binfmt_misc (rw)
sunrpc on /var/lib/nfs/rpc_pipefs type rpc_pipefs (rw)
gvfs-fuse-daemon on /root/.gvfs type fuse.gvfs-fuse-daemon (rw,nosuid,nodev)
/dev/sr0 on /media/CentOS_6.4_Final type iso9660 (ro,nosuid,nodev,uhelper=udisks,uid=0,gid=0,iocharset=utf8,mode=0400,dmode=0500)
192.168.194.129:/data/mydata on /data/mydata type nfs (rw,vers=3,addr=192.168.194.129)

# 测试node2能否挂载
[root@node2 ~]# mount -t nfs -o vers=3 192.168.194.129:/data/mydata /data/mydata/
[root@node2 ~]# mount -t nfs -o vers=3 192.168.194.129:/data/webdoc /var/www/html/
[root@node2 ~]# mount -a
[root@node2 ~]# mount
/dev/sda2 on / type ext4 (rw)
proc on /proc type proc (rw)
sysfs on /sys type sysfs (rw)
devpts on /dev/pts type devpts (rw,gid=5,mode=620)
tmpfs on /dev/shm type tmpfs (rw)
/dev/sda1 on /boot type ext4 (rw)
none on /proc/sys/fs/binfmt_misc type binfmt_misc (rw)
sunrpc on /var/lib/nfs/rpc_pipefs type rpc_pipefs (rw)
gvfs-fuse-daemon on /root/.gvfs type fuse.gvfs-fuse-daemon (rw,nosuid,nodev)
/dev/sr0 on /media/CentOS_6.4_Final type iso9660 (ro,nosuid,nodev,uhelper=udisks,uid=0,gid=0,iocharset=utf8,mode=0400,dmode=0500)
192.168.194.129:/data/mydata on /data/mydata type nfs (rw,vers=3,addr=192.168.194.129)
192.168.194.129:/data/webdoc on /var/www/html type nfs (rw,vers=3,addr=192.168.194.129)
[root@node2 ~]# umount /data/mydata/
[root@node2 ~]# umount /var/www/html/
(2)在node1安装mysql,然后测试node2能否启动并连接及创建数据库
[root@node1 ~]# /usr/bin/mysql_install_db --user=mysql --datadir=/data/mydata/
Installing MySQL system tables...
OK
Filling help tables...
OK
To start mysqld at boot time you have to copy
support-files/mysql.server to the right place for your system
PLEASE REMEMBER TO SET A PASSWORD FOR THE MySQL root USER !
To do so, start the server, then issue the following commands:
/usr/bin/mysqladmin -u root password 'new-password'
/usr/bin/mysqladmin -u root -h node1.cwc.com password 'new-password'
Alternatively you can run:
/usr/bin/mysql_secure_installation
which will also give you the option of removing the test
databases and anonymous user created by default.  This is
strongly recommended for production servers.
See the manual for more instructions.
You can start the MySQL daemon with:
cd /usr ; /usr/bin/mysqld_safe &
You can test the MySQL daemon with mysql-test-run.pl
cd /usr/mysql-test ; perl mysql-test-run.pl
Please report any problems with the /usr/bin/mysqlbug script!
[root@node2 ~]# service mysqld start
Starting mysqld:                                           [  OK  ]
[root@node2 ~]# mysql
Welcome to the MySQL monitor.  Commands end with ; or \g.
Your MySQL connection id is 2
Server version: 5.1.73 Source distribution
Copyright (c) 2000, 2013, Oracle and/or its affiliates. All rights reserved.
Oracle is a registered trademark of Oracle Corporation and/or its
affiliates. Other names may be trademarks of their respective
owners.
Type 'help;' or '\h' for help. Type '\c' to clear the current input statement.
mysql> show databases;
+--------------------+
| Database           |
+--------------------+
| information_schema |
| mysql              |
| test               |
+--------------------+
3 rows in set (0.09 sec)
mysql> create database cwcdb;
Query OK, 1 row affected (0.02 sec)
mysql> quit;
Bye
3、安装heartbeat-gui组件并进行图形化配置
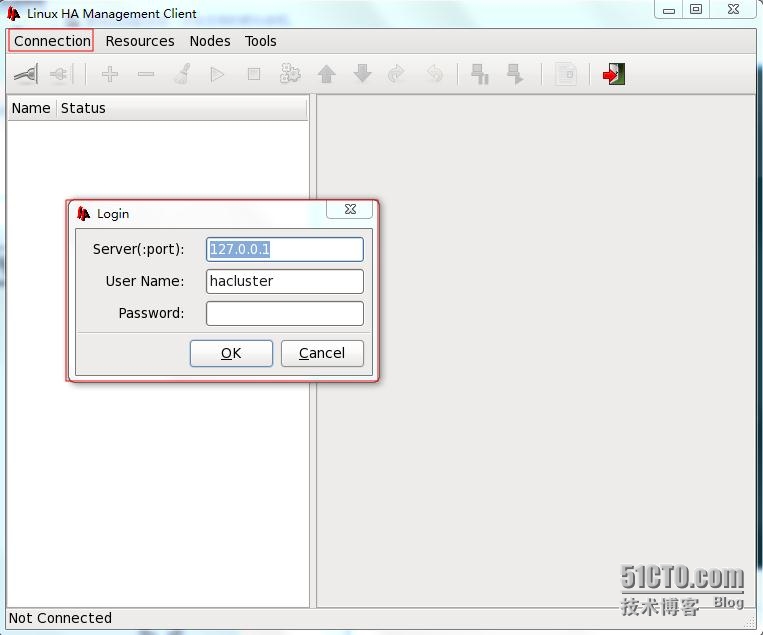
(1)在node1与node2上分别安装heartbeat-gui的rpm包
[root@node1 heartbeat2]# ls -l
total 5708
-rw-r--r-- 1 root root 1420924 Oct 28 10:58 heartbeat-2.1.4-12.el6.x86_64.rpm
-rw-r--r-- 1 root root 3589552 Oct 28 10:58 heartbeat-debuginfo-2.1.4-12.el6.x86_64.rpm
-rw-r--r-- 1 root root  282836 Oct 28 10:58 heartbeat-devel-2.1.4-12.el6.x86_64.rpm
-rw-r--r-- 1 root root  168052 Oct 28 10:58 heartbeat-gui-2.1.4-12.el6.x86_64.rpm
-rw-r--r-- 1 root root  108932 Oct 28 10:58 heartbeat-ldirectord-2.1.4-12.el6.x86_64.rpm
-rw-r--r-- 1 root root   92388 Oct 28 10:58 heartbeat-pils-2.1.4-12.el6.x86_64.rpm
-rw-r--r-- 1 root root  166580 Oct 28 10:58 heartbeat-stonith-2.1.4-12.el6.x86_64.rp
[root@node1 heartbeat2]# rpm -ivh heartbeat-gui-2.1.4-12.el6.x86_64.rpm

[root@node2 ~]# rpm -ivh heartbeat-gui-2.1.4-12.el6.x86_64.rpm
(2)在node1上配置ha.cf文件并复制一份给node2
[root@node1 ~]# vim /etc/ha.d/ha.cf
crm on #加入到配置文件中
[root@node1 ~]# scp /etc/ha.d/ha.cf node2:/etc/ha.d/
ha.cf                                                         100%   10KB  10.3KB/s
(3)启动heartbeat服务并进行图形化配置
# 检查节点node1,node2的服务有没有开机启动
[root@node1 ~]# chkconfig --list | egrep "(mysqld|httpd)"
httpd              0:off    1:off    2:off    3:off    4:off    5:off    6:off
mysqld             0:off    1:off    2:off    3:off    4:off    5:off    6:off

[root@node2 ~]# chkconfig --list | egrep "(mysqld|httpd)"
httpd              0:off    1:off    2:off    3:off    4:off    5:off    6:off
mysqld             0:off    1:off    2:off    3:off    4:off    5:off    6:off

[root@node1 heartbeat2]# service heartbeat start ; ssh node2 service heartbeat start
Starting High-Availability services:
Done.

Starting High-Availability services:
Done.

[root@node1 heartbeat2]# crm_mon # 查看各节点状态,15秒刷新一次
============
Last updated: Wed Oct 28 22:02:28 2015
Current DC: node2.cwc.com (fade8587-972e-4e7d-a831-c96968033547)
2 Nodes configured.
0 Resources configured.
============

Node: node2.cwc.com (fade8587-972e-4e7d-a831-c96968033547): online
Node: node1.cwc.com (bd636e6d-1d11-4dbb-b835-eb328ac8a84f): online

# 打开图形界面
[root@node1 heartbeat2]# tail /etc/passwd
ntp:x:38:38::/etc/ntp:/sbin/nologin
saslauth:x:498:76:"Saslauthd user":/var/empty/saslauth:/sbin/nologin
postfix:x:89:89::/var/spool/postfix:/sbin/nologin
pulse:x:497:496:PulseAudio System Daemon:/var/run/pulse:/sbin/nologin
sshd:x:74:74:Privilege-separated SSH:/var/empty/sshd:/sbin/nologin
tcpdump:x:72:72::/:/sbin/nologin
yguser:x:500:500:yguser:/home/yguser:/bin/bash
apache:x:48:48:Apache:/var/www:/sbin/nologin
mysql:x:27:27:MySQL Server:/var/lib/mysql:/bin/bash
hacluster:x:496:493:heartbeat user:/var/lib/heartbeat/cores/hacluster:/sbin/nologin
# 必须先给hacluster用户设置密码
[root@node1 heartbeat2]# passwd hacluster
Changing password for user hacluster.
New password:
BAD PASSWORD: it is too simplistic/systematic
Retype new password:
passwd: all authentication tokens updated successfully.

[root@node1 ~]# /usr/bin/hb_gui & #启动gui图形窗口
4、图形界面通过CRM配置管理资源
(1) 登入界面如下:
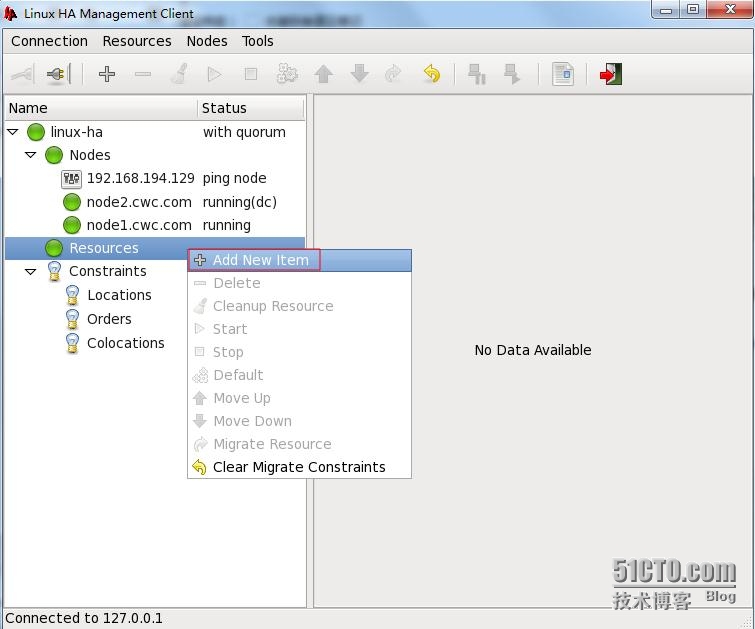
(2)通过CRM配置高可用资源
说明:此次演示高可用资源主要包括VIP,httpd,mysql,共享存储(通过nfs实现,包含web页面文件与mysql数据库文件)
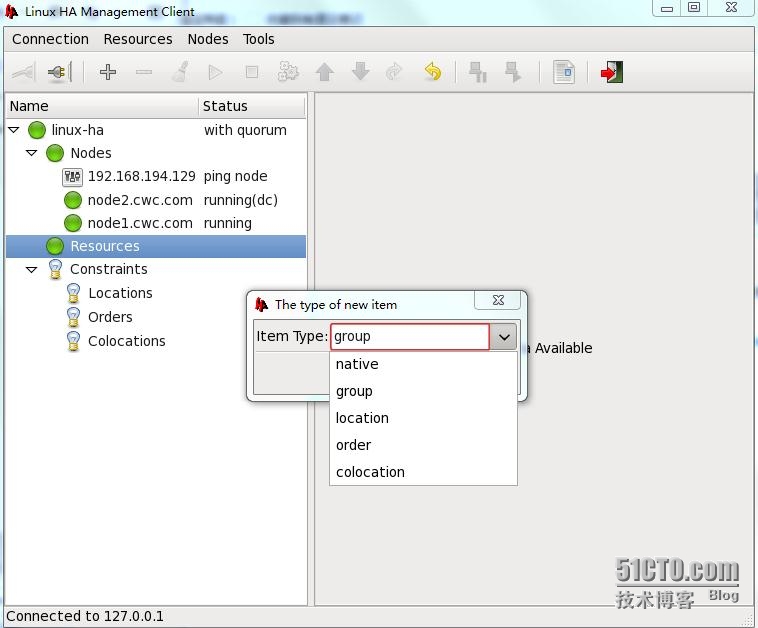
配置:由于考虑资源粘性和资源约束,此次可使用资源组group来管理,此次组名设置为ID=wordpress
资源:VIP 资源名为webip
web页面文件资源名为nfs-wordpress
httpd 资源名为webserver
mysqld资源名为mysql
数据存储资源名为nfs-mysql
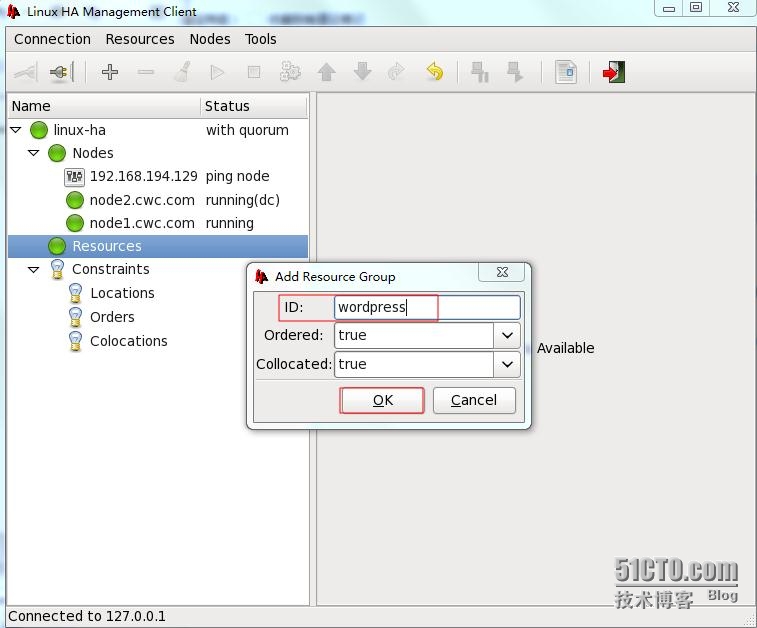
(a)新增资源组(wordpress)
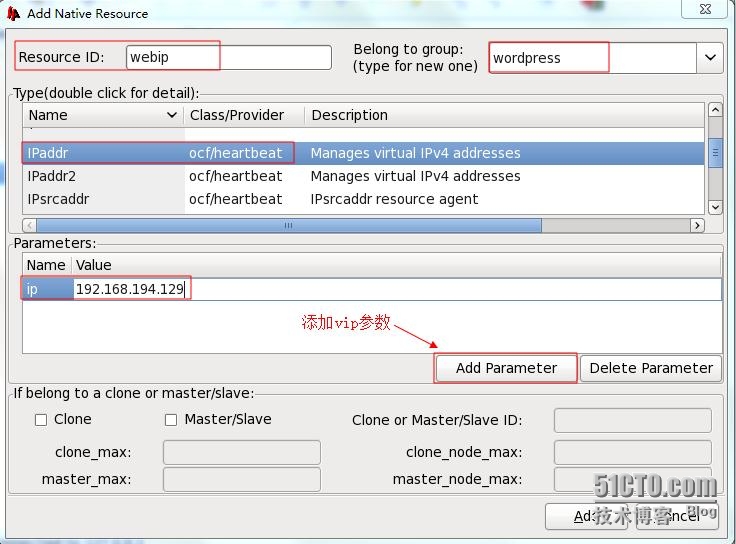
(b)添加具体资源VIP,设置VIP地址为:192.168.194.140/24,ID=webip
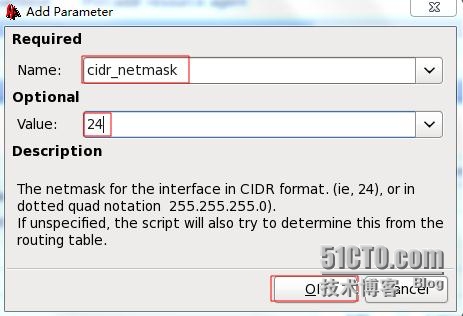
通过上图的Add Parameter 按钮添加vip的其他参数
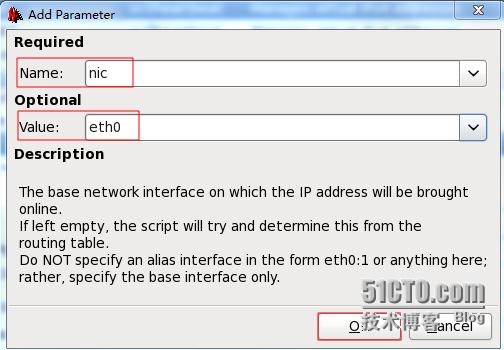
设置vip在哪个网口别名上
测试能否此webip资源能否正常启动
wepip已经在node2上 正常运行
(c)按照以下顺序配置剩下资源:nfs-mysql,mysql,nfs-wordpress,httpd
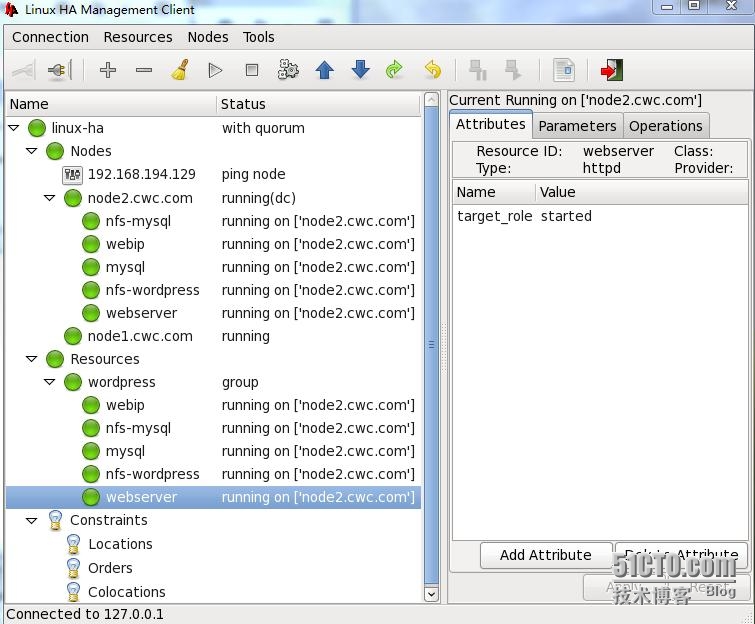
最后添加完所有资源,然后开始运行,如下图:
5、测试wordpress能否正常登入并切换node1后能否正常打开node2创建的文章
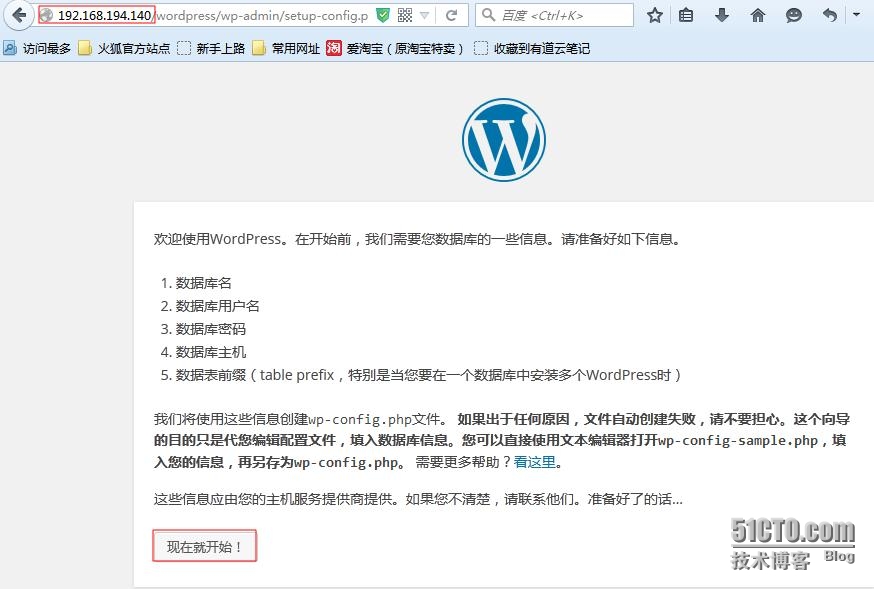
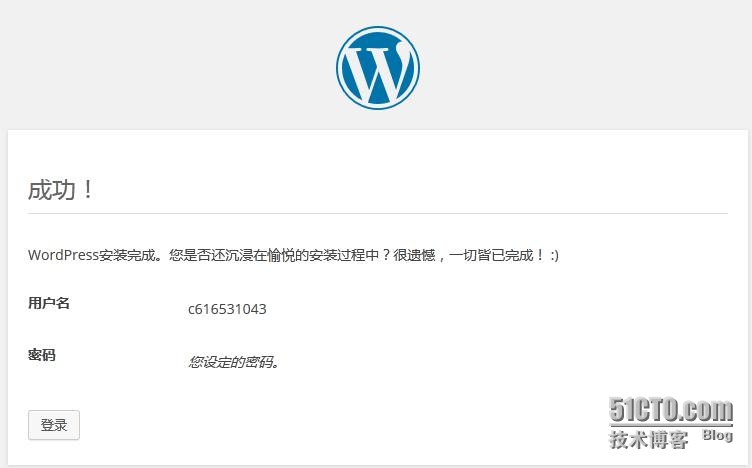
(1)完成wordpress的数据库及网页配置
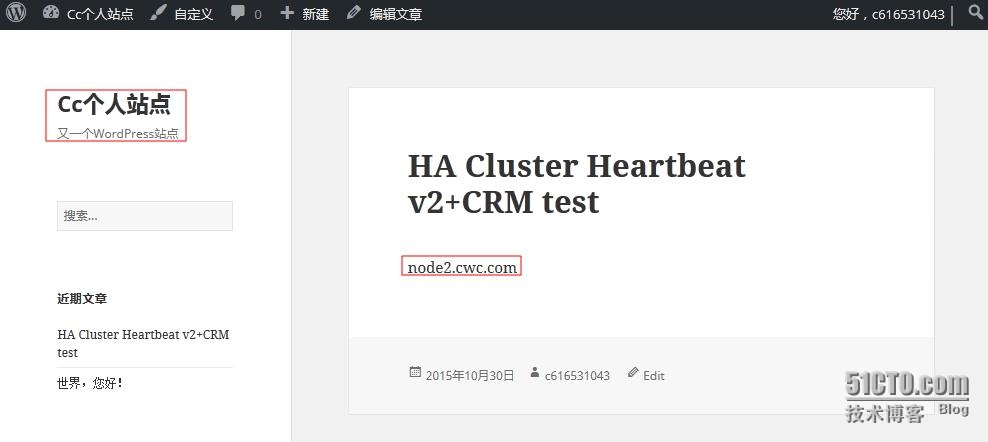
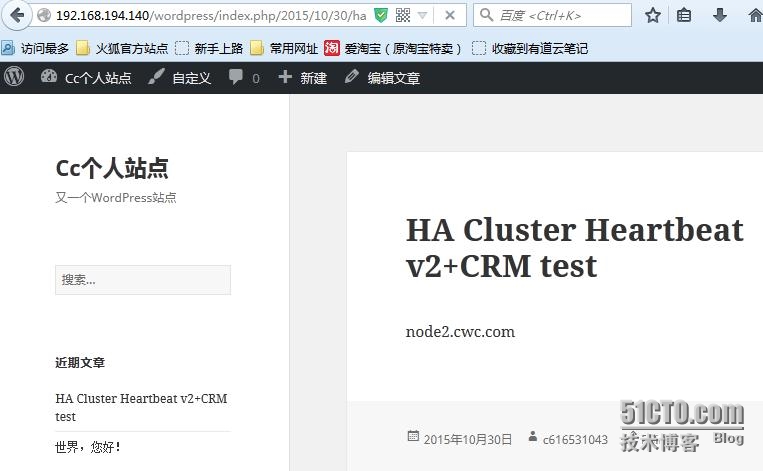
(2)测试能否创建文章并打开网页
(3)将后台资源切换到node1,看文章能否依然存在
此次LAMP+heartbeatV2+CRM演示完成

相关文章推荐
- 接触git,初学git命令记录一下
- linux 常用命令
- Linux下执行.sh文件提示No such file or directory
- Linux资源控制-CPU和内存
- Crontab学习笔记——Linux计划任务
- linux基础(一)
- linux 中sort 的用法
- 探究Linux重定向
- linux安装并通过SSH链接
- Linux下关于热插拔硬盘的指令
- vmware中linux无法动态获取dhcp解决方法
- Linux初学笔记之<用户和用户组操作>
- Selinux
- Linux初学笔记之<cd -和 cd 和whereis命令>
- ARM-Linux应用程序自动升级以及自动回滚的实现
- 疯狂配置第一弹:Linux下安装Java环境
- linux系统安装(三)-跨系统文件拷贝工具Winscp
- linux下解压命令大全
- linux 下查看网卡工作速率
- Linux和windows下检查jsp后门文件的方法