从源码角度深入理解Toast
2015-10-24 12:02
387 查看
Toast这个东西我们在开发中经常用到,使用也很简单,一行代码就能搞定:
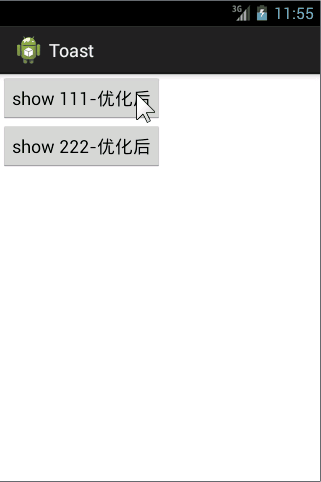
但实际上我们想要的效果应该是这样的:
我们先来看看makeText方法的源码:
这个show方法也不长,先是获得一个服务,然后拿到一个TN对象,再把Toast的视图交给这个TN的实例,最后调用服务的一个队列方法,把这个TN的实例扔到这个队列中去,看到队列两个字我们就应该明白了为什么会出现上面第一幅图的情况,原来我们每点击一次按钮,就会往这个队列中放一个Toast,当我们点击很多次之后不再点击了,但是队列中还是有很多Toast,这时系统就会把这些还没有显示过的Toast一个一个的读出来显示,这就是我们在第一幅图中看到的现象。那么我们循序渐进,一步一步的来分析这里的情况,看看怎么从根本上解决这个问题。先来看一下这里的这个getService()方法。
这里我们重点看一下这个方法的注释,意思是说下面这段代码,获得的是一个与系统通知有关的服务,这个服务控制着整个系统的通知正常有序的进行(大概就是这个意思吧,原谅我英语是个渣渣)。拿到这个服务之后呢,下面就是TN这个类了,我们先来看看TN这类的源码:
这下我们应该有个大致的脉络了,当我们调用Toast的show方法时,并不会直接去显示它,而是先new一个TN变量,将这个TN对象的实例添加到队列中,至于Toast的显示与隐藏,则是通过TN来调控的,比如Toast的cancel方法,我们来看看这个方法的源码:
果然是调用了TN的hide方法。
好了,分析了这么多,下面我们该说说正事了,
我们只要一个Toast实例,当Toast不为空的时候我们只是重新设置它的显示文本和时间,调用方法如下:
调用方式也是很简单,这个时候我们得想想另外一个问题了,假如我们想延长Toast的显示时间该怎么办?duration直接设置为10秒?我们先来看看源码吧:
这一段源码位于\sources\android-16\com\android\server包的NotificationManagerService类中,这里代码很明确的告诉我们,如果我们show一个Toast的时候,设置的时间为Toast.LENGTH_LONG,那么就按Toast.LENGTH_LONG来显示,如果设置了其他值则全部按Toast.LENGTH_SHORT来显示。而LONG_DELAY是3.5秒,SHORT_DELAY是2秒,也就是说一个Toast最长的显示时间为3.5秒。
那么我们有什么方法来延长Toast的显示时间呢?一个简单的方法就是前文说的,先把N个Toast加入到队列中去,然后让他们自己一个一个慢慢去显示,作为这种显示方式的一种优化,我们也可以在一个线程中来显示Toast,思路是这样的:先show一个Toast出来,然后sleep()3秒,这个时候Toast就要消失了,然后我们再show一个出来,就这样循环显示,代码我就不贴了,关于这里的详情请查看android开发之Toast的多种应用。但是这样可控性太差,有没有好一点方法呢?抱歉,我目前还没想到更好的解决方案,如果有哪位童鞋知道,烦请不吝赐教。
本文涉及到的源码下载https://github.com/lenve/Toast
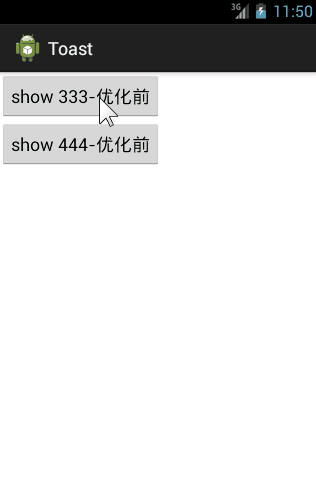
1: Toast.makeText(this, "333", Toast.LENGTH_LONG).show();但是我们经常会遇到这样一种情况,比如说我们有两个按钮,每次点击之后就会弹出一个Toast,但是如果这两个按钮快速点击,我们看到的效果是这样的:
但实际上我们想要的效果应该是这样的:
源码解读
看了上面两张效果图的对比之后,我们应该明白了,第一种情况是在我们点击完之后,Toast还在不断的显示,直到把我们点过的全部显示一遍,那么我们不得不猜测这里有一个Toast队列,每当我们makeText的时候,系统就会往这个队列当中添加一个Toast,然后再不断从队列中取出一个一个的Toast显示,那么真实情况是不是这样呢?看看源码就知道了。我们先来看看makeText方法的源码:
1: public static Toast makeText(Context context, CharSequence text, int duration) {2: Toast result = new Toast(context);
3:
4: LayoutInflater inflate = (LayoutInflater)
5: context.getSystemService(Context.LAYOUT_INFLATER_SERVICE);
6: View v = inflate.inflate(com.android.internal.R.layout.transient_notification, null);
7: TextView tv = (TextView)v.findViewById(com.android.internal.R.id.message);
8: tv.setText(text);
9:
10: result.mNextView = v;
11: result.mDuration = duration;
12:
13: return result;
14: }makeText方法,进来之后先new一个Toast对象,然后就是我们熟悉的LayoutInflater,通过LayoutInflater拿到一个View对象之后,再获取这个View中的TextView,然后把我们传进来的文本内容设置给这个TextView,最后返回一个Toast实例,原来Toast的源码这么简单!!拿到一个Toast对象之后,接下来的工作就是显示了,显示的时候我们调用的是show方法,那就一起来看看这个show方法吧。
1: public void show() {2: if (mNextView == null) {3: throw new RuntimeException("setView must have been called");4: }
5:
6: INotificationManager service = getService();
7: String pkg = mContext.getPackageName();
8: TN tn = mTN;
9: tn.mNextView = mNextView;
10:
11: try {12: service.enqueueToast(pkg, tn, mDuration);
13: } catch (RemoteException e) {14: // Empty
15: }
16: }
这个show方法也不长,先是获得一个服务,然后拿到一个TN对象,再把Toast的视图交给这个TN的实例,最后调用服务的一个队列方法,把这个TN的实例扔到这个队列中去,看到队列两个字我们就应该明白了为什么会出现上面第一幅图的情况,原来我们每点击一次按钮,就会往这个队列中放一个Toast,当我们点击很多次之后不再点击了,但是队列中还是有很多Toast,这时系统就会把这些还没有显示过的Toast一个一个的读出来显示,这就是我们在第一幅图中看到的现象。那么我们循序渐进,一步一步的来分析这里的情况,看看怎么从根本上解决这个问题。先来看一下这里的这个getService()方法。
1: // =======================================================================================
2: // All the gunk below is the interaction with the Notification Service, which handles
3: // the proper ordering of these system-wide.
4: // =======================================================================================
5:
6: private static INotificationManager sService;
7:
8: static private INotificationManager getService() {9: if (sService != null) {10: return sService;
11: }
12: sService = INotificationManager.Stub.asInterface(ServiceManager.getService("notification"));13: return sService;
14: }
这里我们重点看一下这个方法的注释,意思是说下面这段代码,获得的是一个与系统通知有关的服务,这个服务控制着整个系统的通知正常有序的进行(大概就是这个意思吧,原谅我英语是个渣渣)。拿到这个服务之后呢,下面就是TN这个类了,我们先来看看TN这类的源码:
1: private static class TN extends ITransientNotification.Stub {2: final Runnable mShow = new Runnable() {3: @Override
4: public void run() {5: handleShow();
6: }
7: };
8:
9: final Runnable mHide = new Runnable() {10: @Override
11: public void run() {12: handleHide();
13: // Don't do this in handleHide() because it is also invoked by handleShow()
14: mNextView = null;
15: }
16: };
17:
18: private final WindowManager.LayoutParams mParams = new WindowManager.LayoutParams();
19: final Handler mHandler = new Handler();
20:
21: int mGravity = Gravity.CENTER_HORIZONTAL | Gravity.BOTTOM;
22: int mX, mY;
23: float mHorizontalMargin;
24: float mVerticalMargin;
25:
26:
27: View mView;
28: View mNextView;
29:
30: WindowManager mWM;
31:
32: TN() {33: // XXX This should be changed to use a Dialog, with a Theme.Toast
34: // defined that sets up the layout params appropriately.
35: final WindowManager.LayoutParams params = mParams;
36: params.height = WindowManager.LayoutParams.WRAP_CONTENT;
37: params.width = WindowManager.LayoutParams.WRAP_CONTENT;
38: params.flags = WindowManager.LayoutParams.FLAG_NOT_FOCUSABLE
39: | WindowManager.LayoutParams.FLAG_NOT_TOUCHABLE
40: | WindowManager.LayoutParams.FLAG_KEEP_SCREEN_ON;
41: params.format = PixelFormat.TRANSLUCENT;
42: params.windowAnimations = com.android.internal.R.style.Animation_Toast;
43: params.type = WindowManager.LayoutParams.TYPE_TOAST;
44: params.setTitle("Toast");45: }
46:
47: /**
48: * schedule handleShow into the right thread
49: */
50: @Override
51: public void show() {52: if (localLOGV) Log.v(TAG, "SHOW: " + this);
53: mHandler.post(mShow);
54: }
55:
56: /**
57: * schedule handleHide into the right thread
58: */
59: @Override
60: public void hide() {61: if (localLOGV) Log.v(TAG, "HIDE: " + this);
62: mHandler.post(mHide);
63: }
64:
65: public void handleShow() {66: if (localLOGV) Log.v(TAG, "HANDLE SHOW: " + this + " mView=" + mView
67: + " mNextView=" + mNextView);
68: if (mView != mNextView) {69: // remove the old view if necessary
70: handleHide();
71: mView = mNextView;
72: Context context = mView.getContext().getApplicationContext();
73: if (context == null) {74: context = mView.getContext();
75: }
76: mWM = (WindowManager)context.getSystemService(Context.WINDOW_SERVICE);
77: // We can resolve the Gravity here by using the Locale for getting
78: // the layout direction
79: final Configuration config = mView.getContext().getResources().getConfiguration();
80: final int gravity = Gravity.getAbsoluteGravity(mGravity, config.getLayoutDirection());
81: mParams.gravity = gravity;
82: if ((gravity & Gravity.HORIZONTAL_GRAVITY_MASK) == Gravity.FILL_HORIZONTAL) {83: mParams.horizontalWeight = 1.0f;
84: }
85: if ((gravity & Gravity.VERTICAL_GRAVITY_MASK) == Gravity.FILL_VERTICAL) {86: mParams.verticalWeight = 1.0f;
87: }
88: mParams.x = mX;
89: mParams.y = mY;
90: mParams.verticalMargin = mVerticalMargin;
91: mParams.horizontalMargin = mHorizontalMargin;
92: if (mView.getParent() != null) {93: if (localLOGV) Log.v(TAG, "REMOVE! " + mView + " in " + this);
94: mWM.removeView(mView);
95: }
96: if (localLOGV) Log.v(TAG, "ADD! " + mView + " in " + this);
97: mWM.addView(mView, mParams);
98: trySendAccessibilityEvent();
99: }
100: }
101:
102: private void trySendAccessibilityEvent() {103: AccessibilityManager accessibilityManager =
104: AccessibilityManager.getInstance(mView.getContext());
105: if (!accessibilityManager.isEnabled()) {106: return;
107: }
108: // treat toasts as notifications since they are used to
109: // announce a transient piece of information to the user
110: AccessibilityEvent event = AccessibilityEvent.obtain(
111: AccessibilityEvent.TYPE_NOTIFICATION_STATE_CHANGED);
112: event.setClassName(getClass().getName());
113: event.setPackageName(mView.getContext().getPackageName());
114: mView.dispatchPopulateAccessibilityEvent(event);
115: accessibilityManager.sendAccessibilityEvent(event);
116: }
117:
118: public void handleHide() {119: if (localLOGV) Log.v(TAG, "HANDLE HIDE: " + this + " mView=" + mView);
120: if (mView != null) {121: // note: checking parent() just to make sure the view has
122: // been added... i have seen cases where we get here when
123: // the view isn't yet added, so let's try not to crash.
124: if (mView.getParent() != null) {125: if (localLOGV) Log.v(TAG, "REMOVE! " + mView + " in " + this);
126: mWM.removeView(mView);
127: }
128:
129: mView = null;
130: }
131: }
132: }这个类虽然有点长,但是我们不用怕,一点一点来解剖,首先TN这个类继承自ITransientNotification.Stub,这个一看就是个AIDL,这里有两个方法添加了@override注解,看来这个接口里边有两个方法需要我们实现。一个是show一个是hide,这里用到了Handler,关于Handler的讲解,可以查看我的另一个篇博客从源码角度深入理解Handler,我们知道Handler内部也有排队机制,这里的show和hide方法主要是调用了两个线程mShow和mHide,而这两个线程最终调用的是handleShow和handleHide方法,先看这个handleShow方法,首先布局文件肯定得有,然后这里拿到了一个WindowManager,然后就是给mView设置各种布局参数,最后这一行代码非常重要mWM.addView(mView, mParams);看到这里恍然大悟,原来是Toast的视图是通过WindowManager的addView来加载的。再看这个handleHide方法,就是把mView从WindowManager中移除。现在我们再回过头来看TN的构造方法,在构造方法中就是对WindowManager的初始化。
这下我们应该有个大致的脉络了,当我们调用Toast的show方法时,并不会直接去显示它,而是先new一个TN变量,将这个TN对象的实例添加到队列中,至于Toast的显示与隐藏,则是通过TN来调控的,比如Toast的cancel方法,我们来看看这个方法的源码:
1: /**
2: * Close the view if it's showing, or don't show it if it isn't showing yet.
3: * You do not normally have to call this. Normally view will disappear on its own
4: * after the appropriate duration.
5: */
6: public void cancel() {7: mTN.hide();
8:
9: try {10: getService().cancelToast(mContext.getPackageName(), mTN);
11: } catch (RemoteException e) {12: // Empty
13: }
14: }
果然是调用了TN的hide方法。
好了,分析了这么多,下面我们该说说正事了,
就是我们该怎么样随心所欲的控制Toast的显示时间?
我们先说说开篇第二幅图中显示的效果要怎么实现,看了上面的分析我想大家心中应该已经清楚了要怎么实现?就是让我们的队列中时时刻刻只有一个Toast,这样就不会点击完成很久之后Toast还在那里悠哉游哉的显示,下面是具体实现代码:1: public class ToastUtil {2:
3: private static Toast toast;
4:
5: public static void showTextLong(Context context, String text) {6: if (toast == null) {7: toast = Toast.makeText(context, text, Toast.LENGTH_LONG);
8: } else {9: toast.setText(text);
10: toast.setDuration(Toast.LENGTH_LONG);
11: }
12: toast.show();
13: }
14:
15: public static void showTextShort(Context context, String text) {16: if (toast == null) {17: toast = Toast.makeText(context, text, Toast.LENGTH_SHORT);
18: } else {19: toast.setText(text);
20: toast.setDuration(Toast.LENGTH_SHORT);
21: }
22: toast.show();
23: }
24:
25: public static void cancelToast() {26: if (toast != null) {27: toast.cancel();
28: }
29: }
30: }
我们只要一个Toast实例,当Toast不为空的时候我们只是重新设置它的显示文本和时间,调用方法如下:
1: ToastUtil.showTextLong(this, "111");
2:
3: ToastUtil.showTextLong(this, "222");
调用方式也是很简单,这个时候我们得想想另外一个问题了,假如我们想延长Toast的显示时间该怎么办?duration直接设置为10秒?我们先来看看源码吧:
1: private static final int LONG_DELAY = 3500; // 3.5 seconds
2: private static final int SHORT_DELAY = 2000; // 2 seconds
3: private void scheduleTimeoutLocked(ToastRecord r, boolean immediate)
4: {5: Message m = Message.obtain(mHandler, MESSAGE_TIMEOUT, r);
6: long delay = immediate ? 0 : (r.duration == Toast.LENGTH_LONG ? LONG_DELAY : SHORT_DELAY);
7: mHandler.removeCallbacksAndMessages(r);
8: mHandler.sendMessageDelayed(m, delay);
9: }
这一段源码位于\sources\android-16\com\android\server包的NotificationManagerService类中,这里代码很明确的告诉我们,如果我们show一个Toast的时候,设置的时间为Toast.LENGTH_LONG,那么就按Toast.LENGTH_LONG来显示,如果设置了其他值则全部按Toast.LENGTH_SHORT来显示。而LONG_DELAY是3.5秒,SHORT_DELAY是2秒,也就是说一个Toast最长的显示时间为3.5秒。
那么我们有什么方法来延长Toast的显示时间呢?一个简单的方法就是前文说的,先把N个Toast加入到队列中去,然后让他们自己一个一个慢慢去显示,作为这种显示方式的一种优化,我们也可以在一个线程中来显示Toast,思路是这样的:先show一个Toast出来,然后sleep()3秒,这个时候Toast就要消失了,然后我们再show一个出来,就这样循环显示,代码我就不贴了,关于这里的详情请查看android开发之Toast的多种应用。但是这样可控性太差,有没有好一点方法呢?抱歉,我目前还没想到更好的解决方案,如果有哪位童鞋知道,烦请不吝赐教。
本文涉及到的源码下载https://github.com/lenve/Toast

相关文章推荐
- 从源码角度深入理解Toast
- 从源码角度深入理解Toast
- C#入门经典
- 从源码角度深入理解Toast
- POJ 2240 Arbitrage 最短路径 Floyed-Warshall
- bzoj4102【Usaco2015 Open】Bessie
- android studio制作9-patch图片
- 我读Fine-Grained Change Detection of Misaligned Scenes with Varied Illuminations
- 自定义虚拟键盘-光标不随自己点在哪里而移动
- 九度OJ 1135:字符串排序 (排序)
- [CareerCup] 12.2 Find the Reason of Crash 找到程序崩溃的原因
- 九度OJ 1135:字符串排序 (排序)
- 三条坐标轴为母线的圆锥面方程
- [软考]之软件过程模型I
- 九度OJ 1134:密码翻译 (翻译)
- 九度OJ 1134:密码翻译 (翻译)
- 项目目标文档
- POJ1338 Ugly Numbers
- 一波Linux下常用的文件相关命令小整理
- equals、hashCode、toString 方法重写