Android ExpandableListView开发简介
2015-10-23 08:52
441 查看
Android ExpandableListView开发简介
我之前写了一些文章是关于实现带有分组、标签的“ListView”:
(文章1)《类似通讯录分组的Android PinnedSectionListView,且分组标签悬停滑入滑出》文章链接:http://blog.csdn.net/zhangphil/article/details/47144125
(文章2)《Android基于PinnedSectionListView实现联系人通讯录》文章链接:http://blog.csdn.net/zhangphil/article/details/47271741
(文章3)《Android ListView Adapter的getItemViewType和getViewTypeCount多种布局》文章链接:http://blog.csdn.net/zhangphil/article/details/46984367
文章1、2所使用的技术,通常会在一些社交类的APP开发中涉及。社交类APP中一些重要的功能模块是通讯录、联系人、好友等等这些,一般不仅要把这些联系人、好友在一个ListView里面显示出来,同时还要分组,这种需求,最基础的实现技术手段如文章3中那样可以使用Android ListView本身适配器的getItemViewType和getViewTypeCount实现,也可以使用文章1、2中那样使用开源库实现以达到更好的用户体验。不过Android本身的ExpandableListView也可以实现这样的分组功能,且ExpandableListView自身提供众多的接口,方便二次开发和定制使用。
现给出一个完整的例子加以说明。
测试的主activity MainActivity.java:
package zhangphil.expandablelistview;
import java.util.ArrayList;
import java.util.HashMap;
import java.util.List;
import java.util.Map;
import java.util.Random;
import android.app.Activity;
import android.content.Context;
import android.graphics.Color;
import android.os.Bundle;
import android.view.LayoutInflater;
import android.view.View;
import android.view.ViewGroup;
import android.widget.ExpandableListAdapter;
import android.widget.ExpandableListView;
import android.widget.ExpandableListView.OnGroupClickListener;
import android.widget.SimpleExpandableListAdapter;
import android.widget.TextView;
public class MainActivity extends Activity {
private final String GROUP = "group";
private final String CHILD = "child";
private ArrayList<HashMap<String, Object>> data;
@Override
protected void onCreate(Bundle savedInstanceState) {
super.onCreate(savedInstanceState);
setContentView(R.layout.activity_main);
// 分组的标签
String[] g = { "A", "B", "C", "D", "E", "F" };
data = new ArrayList<HashMap<String, Object>>();
// 子数据的计数
int COUNT = 0;
Random rand = new Random();
for (int i = 0; i < g.length; i++) {
HashMap<String, Object> map = new HashMap<String, Object>();
map.put(GROUP, g[i]);
ArrayList<String> child = new ArrayList<String>();
int c = rand.nextInt(10);// 为每个子List随机生成c个测试数据。
for (int j = 0; j < c; j++) {
child.add("数据" + COUNT++);
}
map.put(CHILD, child);
data.add(map);
}
ExpandableListView elv = (ExpandableListView) findViewById(R.id.expandableListView);
elv.setGroupIndicator(null);
// 这是一个参数为空或者null的ExpandableListAdapter
// 构造在子类中完成
ExpandableListAdapter mExpandableListAdapter = new MyExpandableListAdapter(this, null, 0, null, null, null, 0,
null, null);
elv.setAdapter(mExpandableListAdapter);
// 演示
// 展开0组
elv.expandGroup(0);
// 收起1组
elv.collapseGroup(1);
// 展开2组
elv.expandGroup(2);
elv.setOnGroupClickListener(new OnGroupClickListener() {
@Override
public boolean onGroupClick(ExpandableListView arg0, View arg1, int arg2, long arg3) {
// Android默认是返回false。
// 如果返回true,那么,不管是点击已展开的分组还是未展开的分组,都不会相应展开或者收缩的,也就是说这个ExpandableListView将成为一个‘死’的ListView
return false;
}
});
}
private class MyExpandableListAdapter extends SimpleExpandableListAdapter {
private LayoutInflater inflater;
public MyExpandableListAdapter(Context context, List<? extends Map<String, ?>> groupData, int groupLayout,
String[] groupFrom, int[] groupTo, List<? extends List<? extends Map<String, ?>>> childData,
int childLayout, String[] childFrom, int[] childTo) {
super(context, groupData, groupLayout, groupFrom, groupTo, childData, childLayout, childFrom, childTo);
inflater = LayoutInflater.from(context);
}
@Override
public View getChildView(int groupPosition, int childPosition, boolean isLastChild, View convertView,
ViewGroup parent) {
View view = inflater.inflate(android.R.layout.simple_list_item_1, null);
TextView text = (TextView) view.findViewById(android.R.id.text1);
text.setText(getChild(groupPosition, childPosition) + "");
return view;
}
@Override
public int getChildrenCount(int groupPosition) {
ArrayList<String> items = (ArrayList<String>) data.get(groupPosition).get(CHILD);
return items.size();
}
@Override
public int getGroupCount() {
return data.size();
}
@Override
public View getGroupView(int groupPosition, boolean isExpanded, View convertView, ViewGroup parent) {
View view = inflater.inflate(android.R.layout.simple_list_item_1, null);
TextView text = (TextView) view.findViewById(android.R.id.text1);
text.setText(getGroup(groupPosition) + "");
view.setBackgroundColor(Color.RED);
return view;
}
@Override
public Object getChild(int groupPosition, int childPosition) {
ArrayList<String> items = (ArrayList<String>) data.get(groupPosition).get(CHILD);
return items.get(childPosition);
}
@Override
public Object getGroup(int groupPosition) {
return data.get(groupPosition).get(GROUP);
}
}
}
MainActivity.java需要的布局文件activity_main.xml:
<RelativeLayout xmlns:android="http://schemas.android.com/apk/res/android"
xmlns:tools="http://schemas.android.com/tools"
android:layout_width="match_parent"
android:layout_height="match_parent"
tools:context="zhangphil.expandablelistview.MainActivity" >
<ExpandableListView
android:id="@+id/expandableListView"
android:layout_width="match_parent"
android:layout_height="match_parent" />
</RelativeLayout>
activity_main.xml其实为MainActivity.java布局一个ExpandableListView。另外说一点,在实际的开发中如果场景简单,可以考虑使用和Android ListActivity像类似的Android ExpandableListActivity,这样简单到连布局文件都省去写了。
运行结果如图:
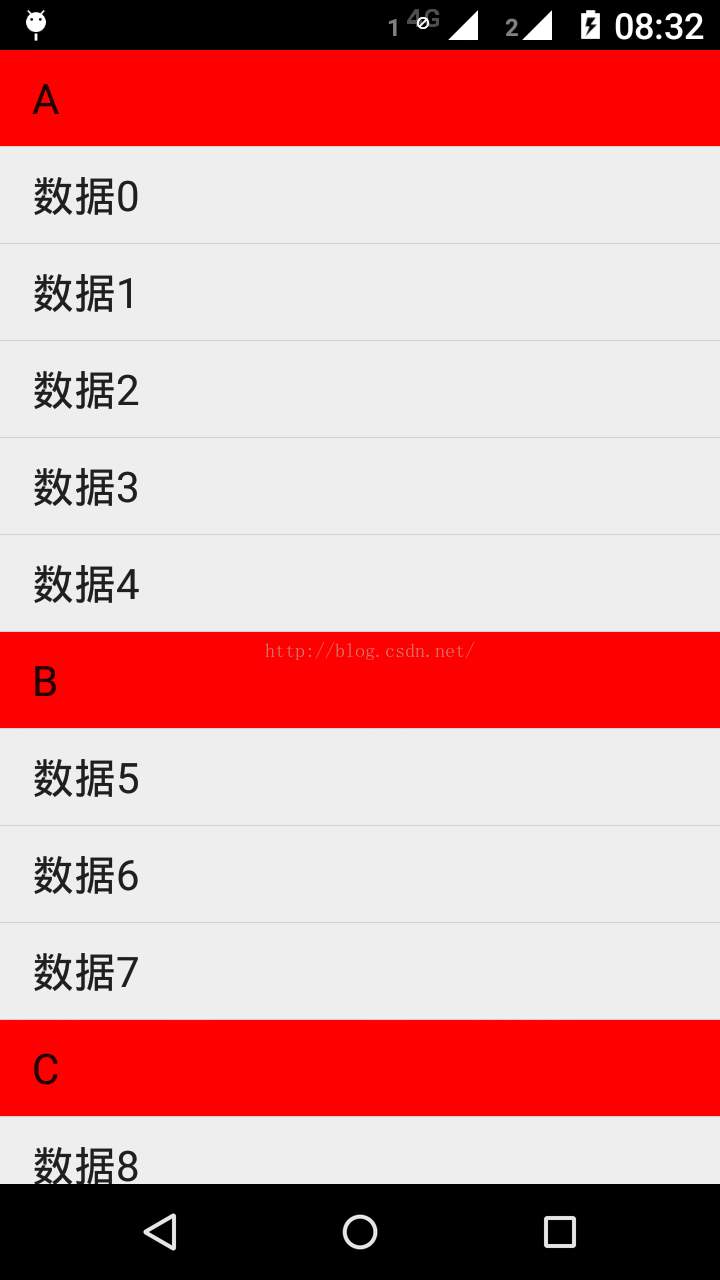

相关文章推荐
- Android Studio 设置
- Android: LinearLayout布局和其嵌套运用举例
- Android Api Demos登顶之路(109)View-->ExpanableLists-->Simple Adapter
- Android Api Demos登顶之路(108)View-->ExpanableLists-->Cursor
- [转]android中listview点击事件失效
- Android系列---JSON数据解析
- 使用RecyclerView CardView相关问题 解决The hierarchy of the type is inconsistent问题
- Android开机自启动应用
- 28.Android 十分方便的EasyRecyclerView
- 27.Android 拨号工具DialUtil
- AndroidManifest.xml中为啥android:name的值前面要加上点号
- 【Android效果集】下雨效果
- AndroidManifest.xml文件解析
- Android Studio常用快捷键(Ubuntu版)
- Android播放声音
- Intent 对象在 Android 开发中的应用
- where are the android default layouts' files?
- AndroidScreenSlide项目切换view动画效果
- Android带进度条文件上传
- android获取签名,兼容5.0