Android 高清加载巨图方案 拒绝压缩图片
2015-10-22 22:11
483 查看
Android 高清加载巨图方案 拒绝压缩图片
转载请标明出处:http://blog.csdn.net/lmj623565791/article/details/49300989;
本文出自:【张鸿洋的博客】
一、概述
距离上一篇博客有段时间没更新了,主要是最近有些私事导致的,那么就先来一篇简单一点的博客脉动回来。对于加载图片,大家都不陌生,一般为了尽可能避免OOM都会按照如下做法:对于图片显示:根据需要显示图片控件的大小对图片进行压缩显示。如果图片数量非常多:则会使用LruCache等缓存机制,将所有图片占据的内容维持在一个范围内。
其实对于图片加载还有种情况,就是单个图片非常巨大,并且还不允许压缩。比如显示:世界地图、清明上河图、微博长图等。那么对于这种需求,该如何做呢?首先不压缩,按照原图尺寸加载,那么屏幕肯定是不够大的,并且考虑到内存的情况,不可能一次性整图加载到内存中,所以肯定是局部加载,那么就需要用到一个类:
BitmapRegionDecoder
其次,既然屏幕显示不完,那么最起码要添加一个上下左右拖动的手势,让用户可以拖动查看。那么综上,本篇博文的目的就是去自定义一个显示巨图的View,支持用户去拖动查看,大概的效果图如下:
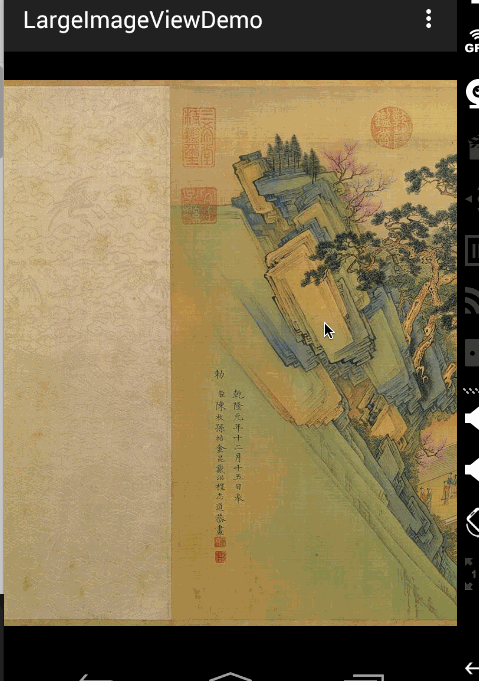
好吧,这清明上河图太长了,想要观看全图,文末下载,图片在assets目录。当然如果你的图,高度也很大,肯定也是可以上下拖动的。
二、初识BitmapRegionDecoder
BitmapRegionDecoder主要用于显示图片的某一块矩形区域,如果你需要显示某个图片的指定区域,那么这个类非常合适。对于该类的用法,非常简单,既然是显示图片的某一块区域,那么至少只需要一个方法去设置图片;一个方法传入显示的区域即可;详见:BitmapRegionDecoder提供了一系列的newInstance方法来构造对象,支持传入文件路径,文件描述符,文件的inputstrem等。例如:
BitmapRegionDecoder bitmapRegionDecoder =
BitmapRegionDecoder.newInstance(inputStream, false);
1
2
3
上述解决了传入我们需要处理的图片,那么接下来就是显示指定的区域。
bitmapRegionDecoder.decodeRegion(rect, options);1
参数一很明显是一个rect,参数二是BitmapFactory.Options,你可以控制图片的
inSampleSize,
inPreferredConfig等。
那么下面看一个超级简单的例子:
package com.zhy.blogcodes.largeImage;

import android.graphics.Bitmap;
import android.graphics.BitmapFactory;
import android.graphics.BitmapRegionDecoder;
import android.graphics.Rect;
import android.os.Bundle;
import android.support.v7.app.AppCompatActivity;
import android.widget.ImageView;

import com.zhy.blogcodes.R;

import java.io.IOException;
import java.io.InputStream;

public class LargeImageViewActivity extends AppCompatActivity
{
private ImageView mImageView;

@Override
protected void onCreate(Bundle savedInstanceState)
{
super.onCreate(savedInstanceState);
setContentView(R.layout.activity_large_image_view);

mImageView = (ImageView) findViewById(R.id.id_imageview);
try
{
InputStream inputStream = getAssets().open("tangyan.jpg");

//获得图片的宽、高
BitmapFactory.Options tmpOptions = new BitmapFactory.Options();
tmpOptions.inJustDecodeBounds = true;
BitmapFactory.decodeStream(inputStream, null, tmpOptions);
int width = tmpOptions.outWidth;
int height = tmpOptions.outHeight;

//设置显示图片的中心区域
BitmapRegionDecoder bitmapRegionDecoder = BitmapRegionDecoder.newInstance(inputStream, false);
BitmapFactory.Options options = new BitmapFactory.Options();
options.inPreferredConfig = Bitmap.Config.RGB_565;
Bitmap bitmap = bitmapRegionDecoder.decodeRegion(new Rect(width / 2 - 100, height / 2 - 100, width / 2 + 100, height / 2 + 100), options);
mImageView.setImageBitmap(bitmap);

} catch (IOException e)
{
e.printStackTrace();
}

}

}12
3
4
5
6
7
8
9
10
11
12
13
14
15
16
17
18
19
20
21
22
23
24
25
26
27
28
29
30
31
32
33
34
35
36
37
38
39
40
41
42
43
44
45
46
47
48
49
50
51
52
53
54
55
上述代码,就是使用BitmapRegionDecoder去加载assets中的图片,调用
bitmapRegionDecoder.decodeRegion解析图片的中间矩形区域,返回bitmap,最终显示在ImageView上。效果图:
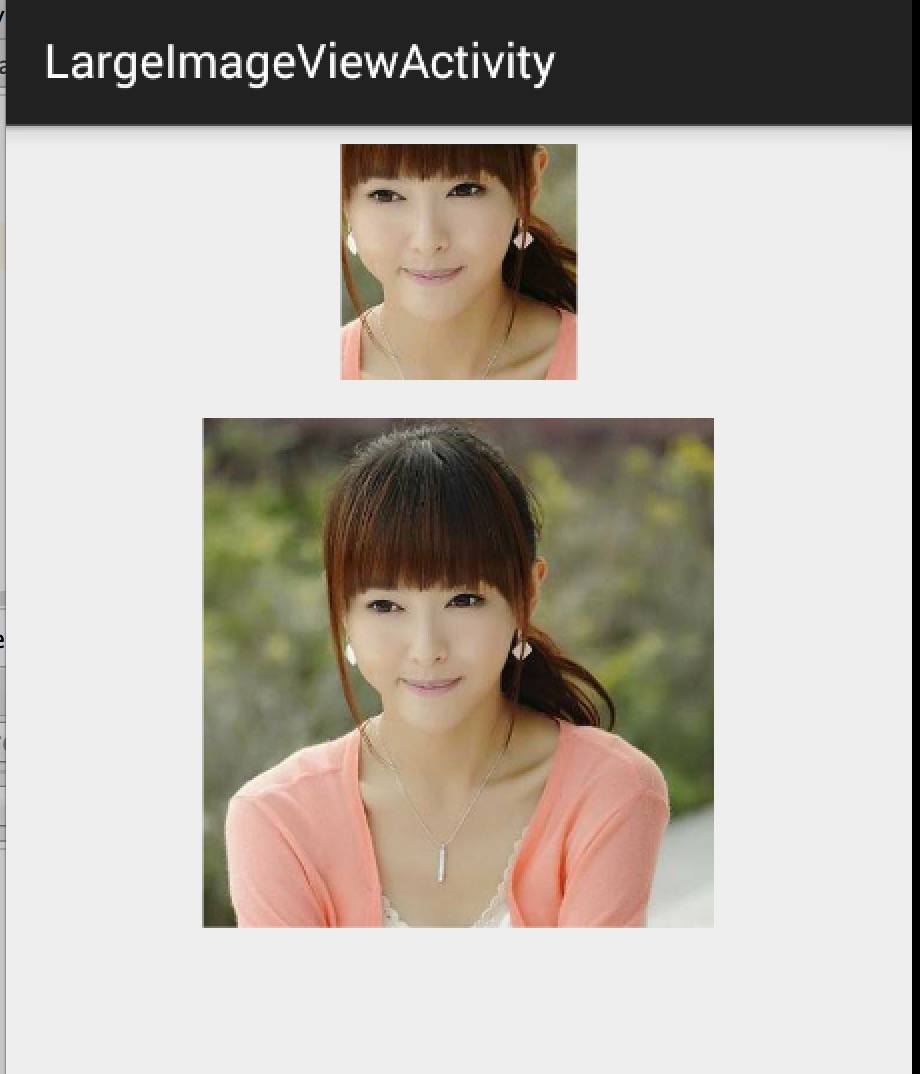
上面的小图显示的即为下面的大图的中间区域。ok,那么目前我们已经了解了
BitmapRegionDecoder的基本用户,那么往外扩散,我们需要自定义一个控件去显示巨图就很简单了,首先Rect的范围就是我们View的大小,然后根据用户的移动手势,不断去更新我们的Rect的参数即可。
三、自定义显示大图控件
根据上面的分析呢,我们这个自定义控件思路就非常清晰了:提供一个设置图片的入口重写onTouchEvent,在里面根据用户移动的手势,去更新显示区域的参数
每次更新区域参数后,调用invalidate,onDraw里面去regionDecoder.decodeRegion拿到bitmap,去draw
理清了,发现so easy,下面上代码:
package com.zhy.blogcodes.largeImage.view;

import android.content.Context;
import android.graphics.Bitmap;
import android.graphics.BitmapFactory;
import android.graphics.BitmapRegionDecoder;
import android.graphics.Canvas;
import android.graphics.Rect;
import android.util.AttributeSet;
import android.view.MotionEvent;
import android.view.View;

import java.io.IOException;
import java.io.InputStream;

/**
* Created by zhy on 15/5/16.
*/
public class LargeImageView extends View
{
private BitmapRegionDecoder mDecoder;
/**
* 图片的宽度和高度
*/
private int mImageWidth, mImageHeight;
/**
* 绘制的区域
*/
private volatile Rect mRect = new Rect();

private MoveGestureDetector mDetector;

private static final BitmapFactory.Options options = new BitmapFactory.Options();

static
{
options.inPreferredConfig = Bitmap.Config.RGB_565;
}

public void setInputStream(InputStream is)
{
try
{
mDecoder = BitmapRegionDecoder.newInstance(is, false);
BitmapFactory.Options tmpOptions = new BitmapFactory.Options();
// Grab the bounds for the scene dimensions
tmpOptions.inJustDecodeBounds = true;
BitmapFactory.decodeStream(is, null, tmpOptions);
mImageWidth = tmpOptions.outWidth;
mImageHeight = tmpOptions.outHeight;

requestLayout();
invalidate();
} catch (IOException e)
{
e.printStackTrace();
} finally
{

try
{
if (is != null) is.close();
} catch (Exception e)
{
}
}
}

public void init()
{
mDetector = new MoveGestureDetector(getContext(), new MoveGestureDetector.SimpleMoveGestureDetector()
{
@Override
public boolean onMove(MoveGestureDetector detector)
{
int moveX = (int) detector.getMoveX();
int moveY = (int) detector.getMoveY();

if (mImageWidth > getWidth())
{
mRect.offset(-moveX, 0);
checkWidth();
invalidate();
}
if (mImageHeight > getHeight())
{
mRect.offset(0, -moveY);
checkHeight();
invalidate();
}

return true;
}
});
}

private void checkWidth()
{

Rect rect = mRect;
int imageWidth = mImageWidth;
int imageHeight = mImageHeight;

if (rect.right > imageWidth)
{
rect.right = imageWidth;
rect.left = imageWidth - getWidth();
}

if (rect.left < 0)
{
rect.left = 0;
rect.right = getWidth();
}
}

private void checkHeight()
{

Rect rect = mRect;
int imageWidth = mImageWidth;
int imageHeight = mImageHeight;

if (rect.bottom > imageHeight)
{
rect.bottom = imageHeight;
rect.top = imageHeight - getHeight();
}

if (rect.top < 0)
{
rect.top = 0;
rect.bottom = getHeight();
}
}

public LargeImageView(Context context, AttributeSet attrs)
{
super(context, attrs);
init();
}

@Override
public boolean onTouchEvent(MotionEvent event)
{
mDetector.onToucEvent(event);
return true;
}

@Override
protected void onDraw(Canvas canvas)
{
Bitmap bm = mDecoder.decodeRegion(mRect, options);
canvas.drawBitmap(bm, 0, 0, null);
}

@Override
protected void onMeasure(int widthMeasureSpec, int heightMeasureSpec)
{
super.onMeasure(widthMeasureSpec, heightMeasureSpec);

int width = getMeasuredWidth();
int height = getMeasuredHeight();

int imageWidth = mImageWidth;
int imageHeight = mImageHeight;

//默认直接显示图片的中心区域,可以自己去调节
mRect.left = imageWidth / 2 - width / 2;
mRect.top = imageHeight / 2 - height / 2;
mRect.right = mRect.left + width;
mRect.bottom = mRect.top + height;

}

}12
3
4
5
6
7
8
9
10
11
12
13
14
15
16
17
18
19
20
21
22
23
24
25
26
27
28
29
30
31
32
33
34
35
36
37
38
39
40
41
42
43
44
45
46
47
48
49
50
51
52
53
54
55
56
57
58
59
60
61
62
63
64
65
66
67
68
69
70
71
72
73
74
75
76
77
78
79
80
81
82
83
84
85
86
87
88
89
90
91
92
93
94
95
96
97
98
99
100
101
102
103
104
105
106
107
108
109
110
111
112
113
114
115
116
117
118
119
120
121
122
123
124
125
126
127
128
129
130
131
132
133
134
135
136
137
138
139
140
141
142
143
144
145
146
147
148
149
150
151
152
153
154
155
156
157
158
159
160
161
162
163
164
165
166
167
168
169
170
171
172
173
174
175
176
177
178
179
180
181
182
183
184
根据上述源码:setInputStream里面去获得图片的真实的宽度和高度,以及初始化我们的mDecoder
onMeasure里面为我们的显示区域的rect赋值,大小为view的尺寸
onTouchEvent里面我们监听move的手势,在监听的回调里面去改变rect的参数,以及做边界检查,最后invalidate
在onDraw里面就是根据rect拿到bitmap,然后draw了
ok,上面并不复杂,不过大家有没有注意到,这个监听用户move手势的代码写的有点奇怪,恩,这里模仿了系统的
ScaleGestureDetector,编写了
MoveGestureDetector,代码如下:MoveGestureDetector
package com.zhy.blogcodes.largeImage.view;

import android.content.Context;
import android.graphics.PointF;
import android.view.MotionEvent;

public class MoveGestureDetector extends BaseGestureDetector
{

private PointF mCurrentPointer;
private PointF mPrePointer;
//仅仅为了减少创建内存
private PointF mDeltaPointer = new PointF();

//用于记录最终结果,并返回
private PointF mExtenalPointer = new PointF();

private OnMoveGestureListener mListenter;

public MoveGestureDetector(Context context, OnMoveGestureListener listener)
{
super(context);
mListenter = listener;
}

@Override
protected void handleInProgressEvent(MotionEvent event)
{
int actionCode = event.getAction() & MotionEvent.ACTION_MASK;
switch (actionCode)
{
case MotionEvent.ACTION_CANCEL:
case MotionEvent.ACTION_UP:
mListenter.onMoveEnd(this);
resetState();
break;
case MotionEvent.ACTION_MOVE:
updateStateByEvent(event);
boolean update = mListenter.onMove(this);
if (update)
{
mPreMotionEvent.recycle();
mPreMotionEvent = MotionEvent.obtain(event);
}
break;

}
}

@Override
protected void handleStartProgressEvent(MotionEvent event)
{
int actionCode = event.getAction() & MotionEvent.ACTION_MASK;
switch (actionCode)
{
case MotionEvent.ACTION_DOWN:
resetState();//防止没有接收到CANCEL or UP ,保险起见
mPreMotionEvent = MotionEvent.obtain(event);
updateStateByEvent(event);
break;
case MotionEvent.ACTION_MOVE:
mGestureInProgress = mListenter.onMoveBegin(this);
break;
}

}

protected void updateStateByEvent(MotionEvent event)
{
final MotionEvent prev = mPreMotionEvent;

mPrePointer = caculateFocalPointer(prev);
mCurrentPointer = caculateFocalPointer(event);

//Log.e("TAG", mPrePointer.toString() + " ,  " + mCurrentPointer);

boolean mSkipThisMoveEvent = prev.getPointerCount() != event.getPointerCount();

//Log.e("TAG", "mSkipThisMoveEvent = " + mSkipThisMoveEvent);
mExtenalPointer.x = mSkipThisMoveEvent ? 0 : mCurrentPointer.x - mPrePointer.x;
mExtenalPointer.y = mSkipThisMoveEvent ? 0 : mCurrentPointer.y - mPrePointer.y;

}

/**
* 根据event计算多指中心点
*
* @param event
* @return
*/
private PointF caculateFocalPointer(MotionEvent event)
{
final int count = event.getPointerCount();
float x = 0, y = 0;
for (int i = 0; i < count; i++)
{
x += event.getX(i);
y += event.getY(i);
}

x /= count;
y /= count;

return new PointF(x, y);
}

public float getMoveX()
{
return mExtenalPointer.x;

}

public float getMoveY()
{
return mExtenalPointer.y;
}

public interface OnMoveGestureListener
{
public boolean onMoveBegin(MoveGestureDetector detector);

public boolean onMove(MoveGestureDetector detector);

public void onMoveEnd(MoveGestureDetector detector);
}

public static class SimpleMoveGestureDetector implements OnMoveGestureListener
{

@Override
public boolean onMoveBegin(MoveGestureDetector detector)
{
return true;
}

@Override
public boolean onMove(MoveGestureDetector detector)
{
return false;
}

@Override
public void onMoveEnd(MoveGestureDetector detector)
{
}
}

}12
3
4
5
6
7
8
9
10
11
12
13
14
15
16
17
18
19
20
21
22
23
24
25
26
27
28
29
30
31
32
33
34
35
36
37
38
39
40
41
42
43
44
45
46
47
48
49
50
51
52
53
54
55
56
57
58
59
60
61
62
63
64
65
66
67
68
69
70
71
72
73
74
75
76
77
78
79
80
81
82
83
84
85
86
87
88
89
90
91
92
93
94
95
96
97
98
99
100
101
102
103
104
105
106
107
108
109
110
111
112
113
114
115
116
117
118
119
120
121
122
123
124
125
126
127
128
129
130
131
132
133
134
135
136
137
138
139
140
141
142
143
144
145
146
147
148
149
150
151
152
BaseGestureDetector
package com.zhy.blogcodes.largeImage.view;

import android.content.Context;
import android.view.MotionEvent;

public abstract class BaseGestureDetector
{

protected boolean mGestureInProgress;

protected MotionEvent mPreMotionEvent;
protected MotionEvent mCurrentMotionEvent;

protected Context mContext;

public BaseGestureDetector(Context context)
{
mContext = context;
}

public boolean onToucEvent(MotionEvent event)
{

if (!mGestureInProgress)
{
handleStartProgressEvent(event);
} else
{
handleInProgressEvent(event);
}

return true;

}

protected abstract void handleInProgressEvent(MotionEvent event);

protected abstract void handleStartProgressEvent(MotionEvent event);

protected abstract void updateStateByEvent(MotionEvent event);

protected void resetState()
{
if (mPreMotionEvent != null)
{
mPreMotionEvent.recycle();
mPreMotionEvent = null;
}
if (mCurrentMotionEvent != null)
{
mCurrentMotionEvent.recycle();
mCurrentMotionEvent = null;
}
mGestureInProgress = false;
}

}12
3
4
5
6
7
8
9
10
11
12
13
14
15
16
17
18
19
20
21
22
23
24
25
26
27
28
29
30
31
32
33
34
35
36
37
38
39
40
41
42
43
44
45
46
47
48
49
50
51
52
53
54
55
56
57
58
59
60
61
你可能会说,一个move手势搞这么多代码,太麻烦了。的确是的,move手势的检测非常简单,那么之所以这么写呢,主要是为了可以复用,比如现在有一堆的
XXXGestureDetector,当我们需要监听什么手势,就直接拿个detector来检测多方便。我相信大家肯定也郁闷过Google,为什么只有
ScaleGestureDetector而没有
RotateGestureDetector呢。
根据上述,大家应该理解了为什么要这么做,当时不强制,每个人都有个性。不过值得一提的是:上面这个手势检测的写法,不是我想的,而是一个开源的项目https://github.com/rharter/android-gesture-detectors,里面包含很多的手势检测。对应的博文是:http://code.almeros.com/android-multitouch-gesture-detectors#.VibzzhArJXg那面上面两个类就是我偷学了的~ 哈
四、测试
测试其实没撒好说的了,就是把我们的LargeImageView放入布局文件,然后Activity里面去设置inputstream了。<RelativeLayout xmlns:android="http://schemas.android.com/apk/res/android" xmlns:tools="http://schemas.android.com/tools" android:layout_width="match_parent" android:layout_height="match_parent"> <com.zhy.blogcodes.largeImage.view.LargeImageView android:id="@+id/id_largetImageview" android:layout_width="match_parent" android:layout_height="match_parent"/> </RelativeLayout>1
2
3
4
5
6
7
8
9
10
11
12
然后在Activity里面去设置图片:
package com.zhy.blogcodes.largeImage;

import android.os.Bundle;
import android.support.v7.app.AppCompatActivity;

import com.zhy.blogcodes.R;
import com.zhy.blogcodes.largeImage.view.LargeImageView;

import java.io.IOException;
import java.io.InputStream;

public class LargeImageViewActivity extends AppCompatActivity
{
private LargeImageView mLargeImageView;

@Override
protected void onCreate(Bundle savedInstanceState)
{
super.onCreate(savedInstanceState);
setContentView(R.layout.activity_large_image_view);

mLargeImageView = (LargeImageView) findViewById(R.id.id_largetImageview);
try
{
InputStream inputStream = getAssets().open("world.jpg");
mLargeImageView.setInputStream(inputStream);

} catch (IOException e)
{
e.printStackTrace();
}

}

}12
3
4
5
6
7
8
9
10
11
12
13
14
15
16
17
18
19
20
21
22
23
24
25
26
27
28
29
30
31
32
33
34
35
36
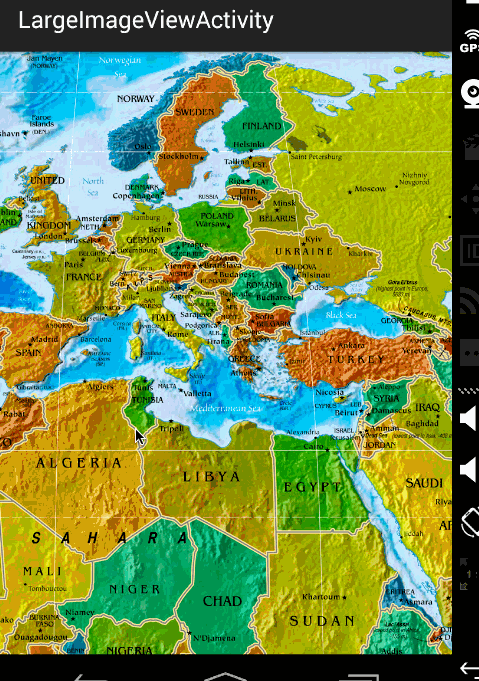
效果图:
ok,那么到此,显示巨图的方案以及详细的代码就描述完成了,总体还是非常简单的。
但是,在实际的项目中,可能会有更多的需求,比如增加放大、缩小;增加快滑手势等等,那么大家可以去参考这个库:https://github.com/johnnylambada/WorldMap,该库基本实现了绝大多数的需求,大家根据本文这个思路再去看这个库,也会简单很多,定制起来也容易。我这个地图的图就是该库里面提供的。哈,掌握了这个,以后面试过程中也可以悄悄的装一把了,当你优雅的答完android加载图片的方案以后,然后接一句,其实还有一种情况,就是高清显示巨图,那么我们应该…相信面试官对你的印象会好很多~ have a nice day ~源码点击下载

相关文章推荐
- Handler的原理-----源码剖析
- Android基础入门教程——8.3.4 Paint API之—— Xfermode与PorterDuff详解(一)
- android---(文件管理)
- android小问题:RadioButton设置文字在图片背景的下方
- Android listView 设置分割线问题
- Android APK反编译就这么简单 详解(附图)
- Android如何防止apk程序被反编译
- Android中的单任务模式
- 异步消息处理机制-Android中Handler原理(续)
- 异步消息处理机制-Android中Handler原理(续)
- android 开源项目
- 静态注册实现开机启动
- Android ActionBar的基本用法
- Android 生成含签名文件的apk安装包
- Android studio 一个项目中添加两个module遇到的bug
- mac下抓包
- Android 滑动菜单的实现
- Android下屏幕翻转 TextView和EditText保存内容
- Android四大基本组件介绍与生命周期
- 仿小米和iphone日历效果,基于Android week view