【转】Android 音量键+电源键 截屏代码小结
2015-10-21 18:28
531 查看
http://104zz.iteye.com/blog/1752961
原文地址:http://blog.csdn.net/hk_256/article/details/7306590 ,转载请注明出处
一、基本介绍
在Android 4.0 之前,Android手机上如果要使用截屏功能,只能通过Root手机,且使用第3方截图软件来实现截屏功能。
Android4.0中,系统自带了截屏功能,使用方法是音量下(VOLUME_DOWN)键+电源(Power)键。
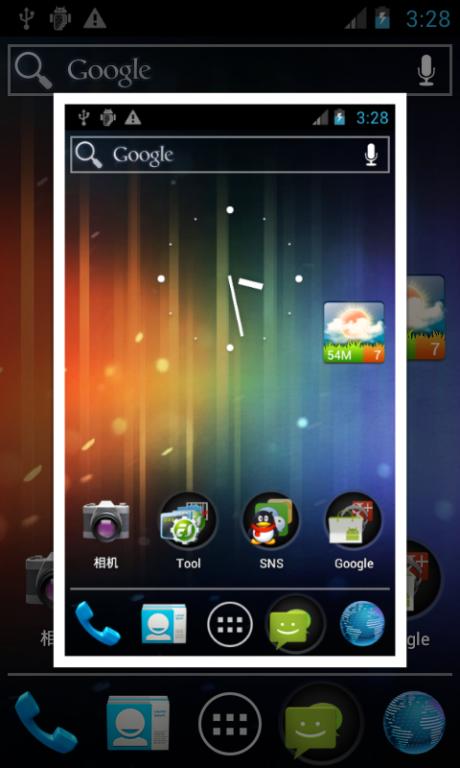
在同时按下2键并保持0.5s左右后,会听到咔嚓一声响声,并弹出如下的一个浮动动画,显示截图效果。
二、代码调用流程
以模块来划分的话,截图功能的代码会依次调用Policy,SystemUI,Surface相关的代码,具体流程如下流程图所示

Policy(PhoneWindowManager.java):在此处完成Key的捕获,当VOLUME_DOWN和Power键被几乎同时按下后,向SystemUI发送Message开始截图。
SystemUI(TakeScreenshotService.java和GlobalScreenshot.java):收到来自Client端的截屏请求后,开始调用Surface的API截屏,并将截取到的图片通过WindowManager以浮动窗口的形式显示给用户查看。
Surface(Surface.java和android_view_Surface.cpp):Framework层的Surface.java只是提供一个native方法,实际实现在JNI处的android_view_Surface.cpp中的doScreenshot(...)方法。
三、App端如何使用截屏功能
以目前代码情况看,Surface.java中的screenshot方法是有@hide标记的,即在默认的SDK中是没有此方法的,暂不支持App端直接使用。
因为只是@hide标记,如果App要使用,当然也是有方法的,但会和手机ROM有依赖性。我所使用的方法是,在Android源码环境下进行编译,为app赋予system的share uid和platform的签名,然后就可以在4.0的手机中使用App来截屏了。
关键步骤:
1) 在AndroidManifest.xml中加入android:sharedUserId="android.uid.system" 属性
2)在Android.mk中加入platform签名属性,并在源码环境下编译。或者将相关jar包引入到Eclipse中做第3方库引用,并将生成的apk重新打上platform签名
注:
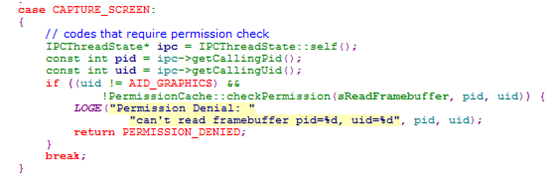
在SurfceFlinger.cpp的onTransact方法中,有对截屏的操作进行权限认证,所以需要为app使用system的shareUserId。
另:从此处代码看,使用android.permission.READ_FRAME_BUFFER的permission应该也可以使用,但测试时通过这种方式未实现,可能哪里操作不对,也有可能Google还只是预留给后续改进而已。

博客地址:http://blog.csdn.net/hk_256 ,转载请注明出处
附录:App的源代码文件:
1. Activity文件
[java] view plaincopyprint?
package com.arvinhe.testscreenshot;
import android.app.Activity;
import android.content.Context;
import android.graphics.Bitmap;
import android.graphics.Canvas;
import android.graphics.Matrix;
import android.os.Bundle;
import android.util.DisplayMetrics;
import android.view.Display;
import android.view.Surface;
import android.view.View;
import android.view.WindowManager;
import android.view.View.OnClickListener;
import android.widget.Button;
import android.widget.ImageView;
public class TestScreenShotActivity extends Activity implements OnClickListener{
private ImageView img_display;
private Button bt_screenshot;
private Display mDisplay;
private DisplayMetrics mDisplayMetrics;
private Matrix mDisplayMatrix;
private Bitmap mScreenBitmap;
private WindowManager mWindowManager;
@Override
public void onCreate(Bundle savedInstanceState) {
super.onCreate(savedInstanceState);
setContentView(R.layout.main);
bt_screenshot = (Button)findViewById(R.id.bt_screenshot);
img_display = (ImageView)findViewById(R.id.img_display);
bt_screenshot.setOnClickListener(this);
mDisplayMatrix = new Matrix();
mWindowManager = (WindowManager) this.getSystemService(Context.WINDOW_SERVICE);
mDisplay = mWindowManager.getDefaultDisplay();
mDisplayMetrics = new DisplayMetrics();
mDisplay.getRealMetrics(mDisplayMetrics);
}
@Override
public void onClick(View v) {
if(v.equals(bt_screenshot)){
mDisplay.getRealMetrics(mDisplayMetrics);
float[] dims = {mDisplayMetrics.widthPixels, mDisplayMetrics.heightPixels};
float degrees = getDegreesForRotation(mDisplay.getRotation());
boolean requiresRotation = (degrees > 0);
if (requiresRotation) {
// Get the dimensions of the device in its native orientation
mDisplayMatrix.reset();
mDisplayMatrix.preRotate(-degrees);
mDisplayMatrix.mapPoints(dims);
dims[0] = Math.abs(dims[0]);
dims[1] = Math.abs(dims[1]);
}
mScreenBitmap = Surface.screenshot((int) dims[0], (int) dims[1]);
if (requiresRotation) {
// Rotate the screenshot to the current orientation
Bitmap ss = Bitmap.createBitmap(mDisplayMetrics.widthPixels,
mDisplayMetrics.heightPixels, Bitmap.Config.ARGB_8888);
Canvas c = new Canvas(ss);
c.translate(ss.getWidth() / 2, ss.getHeight() / 2);
c.rotate(degrees);
c.translate(-dims[0] / 2, -dims[1] / 2);
c.drawBitmap(mScreenBitmap, 0, 0, null);
c.setBitmap(null);
mScreenBitmap = ss;
}
// If we couldn't take the screenshot, notify the user
if (mScreenBitmap == null) {
return;
}
// Optimizations
mScreenBitmap.setHasAlpha(false);
mScreenBitmap.prepareToDraw();
img_display.setImageBitmap(mScreenBitmap);
}
}
/**
* @return the current display rotation in degrees
*/
private float getDegreesForRotation(int value) {
switch (value) {
case Surface.ROTATION_90:
return 360f - 90f;
case Surface.ROTATION_180:
return 360f - 180f;
case Surface.ROTATION_270:
return 360f - 270f;
}
return 0f;
}
}
2. AndroidManifest.xml文件
[html] view plaincopyprint?
<?xml version="1.0" encoding="utf-8"?>
<manifest xmlns:android="http://schemas.android.com/apk/res/android"
package="com.arvinhe.testscreenshot"
android:versionCode="1"
android:versionName="1.0"
android:sharedUserId="android.uid.system">
<uses-sdk android:minSdkVersion="15" />
<application
android:icon="@drawable/ic_launcher"
android:label="@string/app_name" >
<activity
android:name=".TestScreenShotActivity"
android:label="@string/app_name" >
<intent-filter>
<action android:name="android.intent.action.MAIN" />
<category android:name="android.intent.category.LAUNCHER" />
</intent-filter>
</activity>
</application>
</manifest>
3. Layout文件
[html] view plaincopyprint?
<?xml version="1.0" encoding="utf-8"?>
<LinearLayout xmlns:android="http://schemas.android.com/apk/res/android"
android:layout_width="fill_parent"
android:layout_height="fill_parent"
android:orientation="vertical" >
<TextView
android:layout_width="fill_parent"
android:layout_height="wrap_content"
android:text="@string/hello" />
<Button
android:id="@+id/bt_screenshot"
android:layout_width="fill_parent"
android:layout_height="wrap_content"
android:text="Screen Shot"
/>
<ImageView
android:id="@+id/img_display"
android:layout_width="fill_parent"
android:layout_height="wrap_content"
android:src="@drawable/ic_launcher"/>
</LinearLayout>
附录:App运行效果截图


原文地址:http://blog.csdn.net/hk_256/article/details/7306590 ,转载请注明出处
一、基本介绍
在Android 4.0 之前,Android手机上如果要使用截屏功能,只能通过Root手机,且使用第3方截图软件来实现截屏功能。
Android4.0中,系统自带了截屏功能,使用方法是音量下(VOLUME_DOWN)键+电源(Power)键。
在同时按下2键并保持0.5s左右后,会听到咔嚓一声响声,并弹出如下的一个浮动动画,显示截图效果。
二、代码调用流程
以模块来划分的话,截图功能的代码会依次调用Policy,SystemUI,Surface相关的代码,具体流程如下流程图所示
Policy(PhoneWindowManager.java):在此处完成Key的捕获,当VOLUME_DOWN和Power键被几乎同时按下后,向SystemUI发送Message开始截图。
SystemUI(TakeScreenshotService.java和GlobalScreenshot.java):收到来自Client端的截屏请求后,开始调用Surface的API截屏,并将截取到的图片通过WindowManager以浮动窗口的形式显示给用户查看。
Surface(Surface.java和android_view_Surface.cpp):Framework层的Surface.java只是提供一个native方法,实际实现在JNI处的android_view_Surface.cpp中的doScreenshot(...)方法。
三、App端如何使用截屏功能
以目前代码情况看,Surface.java中的screenshot方法是有@hide标记的,即在默认的SDK中是没有此方法的,暂不支持App端直接使用。
因为只是@hide标记,如果App要使用,当然也是有方法的,但会和手机ROM有依赖性。我所使用的方法是,在Android源码环境下进行编译,为app赋予system的share uid和platform的签名,然后就可以在4.0的手机中使用App来截屏了。
关键步骤:
1) 在AndroidManifest.xml中加入android:sharedUserId="android.uid.system" 属性
2)在Android.mk中加入platform签名属性,并在源码环境下编译。或者将相关jar包引入到Eclipse中做第3方库引用,并将生成的apk重新打上platform签名
注:
在SurfceFlinger.cpp的onTransact方法中,有对截屏的操作进行权限认证,所以需要为app使用system的shareUserId。
另:从此处代码看,使用android.permission.READ_FRAME_BUFFER的permission应该也可以使用,但测试时通过这种方式未实现,可能哪里操作不对,也有可能Google还只是预留给后续改进而已。
博客地址:http://blog.csdn.net/hk_256 ,转载请注明出处
附录:App的源代码文件:
1. Activity文件
[java] view plaincopyprint?
package com.arvinhe.testscreenshot;
import android.app.Activity;
import android.content.Context;
import android.graphics.Bitmap;
import android.graphics.Canvas;
import android.graphics.Matrix;
import android.os.Bundle;
import android.util.DisplayMetrics;
import android.view.Display;
import android.view.Surface;
import android.view.View;
import android.view.WindowManager;
import android.view.View.OnClickListener;
import android.widget.Button;
import android.widget.ImageView;
public class TestScreenShotActivity extends Activity implements OnClickListener{
private ImageView img_display;
private Button bt_screenshot;
private Display mDisplay;
private DisplayMetrics mDisplayMetrics;
private Matrix mDisplayMatrix;
private Bitmap mScreenBitmap;
private WindowManager mWindowManager;
@Override
public void onCreate(Bundle savedInstanceState) {
super.onCreate(savedInstanceState);
setContentView(R.layout.main);
bt_screenshot = (Button)findViewById(R.id.bt_screenshot);
img_display = (ImageView)findViewById(R.id.img_display);
bt_screenshot.setOnClickListener(this);
mDisplayMatrix = new Matrix();
mWindowManager = (WindowManager) this.getSystemService(Context.WINDOW_SERVICE);
mDisplay = mWindowManager.getDefaultDisplay();
mDisplayMetrics = new DisplayMetrics();
mDisplay.getRealMetrics(mDisplayMetrics);
}
@Override
public void onClick(View v) {
if(v.equals(bt_screenshot)){
mDisplay.getRealMetrics(mDisplayMetrics);
float[] dims = {mDisplayMetrics.widthPixels, mDisplayMetrics.heightPixels};
float degrees = getDegreesForRotation(mDisplay.getRotation());
boolean requiresRotation = (degrees > 0);
if (requiresRotation) {
// Get the dimensions of the device in its native orientation
mDisplayMatrix.reset();
mDisplayMatrix.preRotate(-degrees);
mDisplayMatrix.mapPoints(dims);
dims[0] = Math.abs(dims[0]);
dims[1] = Math.abs(dims[1]);
}
mScreenBitmap = Surface.screenshot((int) dims[0], (int) dims[1]);
if (requiresRotation) {
// Rotate the screenshot to the current orientation
Bitmap ss = Bitmap.createBitmap(mDisplayMetrics.widthPixels,
mDisplayMetrics.heightPixels, Bitmap.Config.ARGB_8888);
Canvas c = new Canvas(ss);
c.translate(ss.getWidth() / 2, ss.getHeight() / 2);
c.rotate(degrees);
c.translate(-dims[0] / 2, -dims[1] / 2);
c.drawBitmap(mScreenBitmap, 0, 0, null);
c.setBitmap(null);
mScreenBitmap = ss;
}
// If we couldn't take the screenshot, notify the user
if (mScreenBitmap == null) {
return;
}
// Optimizations
mScreenBitmap.setHasAlpha(false);
mScreenBitmap.prepareToDraw();
img_display.setImageBitmap(mScreenBitmap);
}
}
/**
* @return the current display rotation in degrees
*/
private float getDegreesForRotation(int value) {
switch (value) {
case Surface.ROTATION_90:
return 360f - 90f;
case Surface.ROTATION_180:
return 360f - 180f;
case Surface.ROTATION_270:
return 360f - 270f;
}
return 0f;
}
}
2. AndroidManifest.xml文件
[html] view plaincopyprint?
<?xml version="1.0" encoding="utf-8"?>
<manifest xmlns:android="http://schemas.android.com/apk/res/android"
package="com.arvinhe.testscreenshot"
android:versionCode="1"
android:versionName="1.0"
android:sharedUserId="android.uid.system">
<uses-sdk android:minSdkVersion="15" />
<application
android:icon="@drawable/ic_launcher"
android:label="@string/app_name" >
<activity
android:name=".TestScreenShotActivity"
android:label="@string/app_name" >
<intent-filter>
<action android:name="android.intent.action.MAIN" />
<category android:name="android.intent.category.LAUNCHER" />
</intent-filter>
</activity>
</application>
</manifest>
3. Layout文件
[html] view plaincopyprint?
<?xml version="1.0" encoding="utf-8"?>
<LinearLayout xmlns:android="http://schemas.android.com/apk/res/android"
android:layout_width="fill_parent"
android:layout_height="fill_parent"
android:orientation="vertical" >
<TextView
android:layout_width="fill_parent"
android:layout_height="wrap_content"
android:text="@string/hello" />
<Button
android:id="@+id/bt_screenshot"
android:layout_width="fill_parent"
android:layout_height="wrap_content"
android:text="Screen Shot"
/>
<ImageView
android:id="@+id/img_display"
android:layout_width="fill_parent"
android:layout_height="wrap_content"
android:src="@drawable/ic_launcher"/>
</LinearLayout>
附录:App运行效果截图

相关文章推荐
- 【转】ANDROID LOLLIPOP SCREEN CAPTURE AND SHARING
- android之位置坐标
- [分享]4412开发板Android教程——Android开发环境搭建
- Android如何给无法更改继承关系的Activity更换ActionBar(setContentView方法实战)
- android studio moudle git 提交 没反应
- Android Camera HAL3中拍照Capture模式下多模块间的交互与帧Result与帧数据回调
- android EditText限制输入
- Android Fragment间对象传递
- Android studio 打jar包
- android 根据字母排序ListView item数据
- android textview省略号显示的方式
- Android Studio快捷键大全
- Android环境搭建
- Android 之屏幕适配
- Android View 的TouchMode
- Android 中 PopupWindow 响应返回键并关闭的问题
- Android不可用方法
- 每个Android开发者必须知道的内存管理知识
- Android中两个Activity之间数据传递及返回
- Android 5.0 android:elevation 如果给button设置效果