Extensions to DrawTools
2015-10-21 10:24
183 查看

Introduction
Alex Fr provided an excellent set of drawing tools in his DrawTools articleand these tools serve as a basis for this article, which expands on the original toolset in the following ways:
In addition to the basic Rectangle, Ellipse, Line and Scribble tools, this version adds PolyLine, Filled Ellipse, Filled Rectangle, Text and Image tools
Multiple drawing Layers
Zooming
Panning
Rotation
In this article, I will describe how Layerswere implemented, as well as the Text and Image tools.
Background
See the original DrawTools article for details on how the basic application isbuilt, class structure, etc.
It is also assumed that the reader has a working understanding of GDI+ fundamentals, including Matrices. For an excellent introduction to GDI+, see www.bobpowell.net.
Implementing Layers
Adding Layersto the application involved adding two classes, Layerand
Layers,
where
Layerdefines a single
Layerand
Layersdefines
the collection of
Layersin an
ArrayList.
Each
Layerexposes the following properties:
Hide Copy Code
private string _name;
private bool _isDirty;
private bool _visible;
private bool _active;
private GraphicsList _graphicsList;
Note that the
Layercontains the
GraphicsList-
this is the key to the whole thing - each
Layercontains its own list of drawing objects instead of
DrawArea.
DrawAreais
modified to declare a
Layerscollection instead of a
GraphicsListcollection:
Hide Copy Code
// Define the Layerscollection
private Layers_layers;
When
DrawAreais initialized, the
Layersare
initialized by creating the first
Layerand setting it
Activeand
Visible:
Hide Copy Code
public DrawArea()
{
// create list of Layers, with one default active visible layer
_layers = new Layers();
_layers.CreateNewLayer("Default");
_panning = false;
_panX = 0;
_panY = 0;
// This call is required by the Windows.Forms Form Designer.
InitializeComponent();
}
In the
Layersclass, the
CreateNewLayer()method
actually creates the new
Layer:
Hide Copy Code
/// <summary>
/// Create a new layer at the head of the layers list and set it
/// to Activeand Visible.
/// </summary>
/// <param name="theName">The name to assign to the new layer</param>
public void CreateNewLayer(string theName)
{
// Deactivate the currently active Layer
if(layerList.Count > 0)
((Layer)layerList[ActiveLayerIndex]).IsActive= false;
// Create new Layer, set it visible and active
Layerl = new Layer();
l.IsVisible = true;
l.IsActive= true;
l.LayerName = theName;
// Initialize empty GraphicsList for future objects
l.Graphics = new GraphicsList();
// Add to Layerscollection
this.Add(l);
}
Note that any one or all
Layerscan be visible at the same time, but only one
Layermay
be active at any time.
You can control the
Layersin the sample application by clicking on the Current
Layer:
name at the bottom of the application window - Click on the name ("
Default") to open the
Layersdialog:
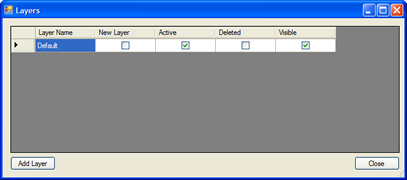
From this dialog, you can Add new
Layers, change the names of the
Layer(s),
and change the
Layer(s) visibility and which
Layeris
Active.
The "New Layer" column is checked whenever you click the "Add Layer" button. To delete Layer(s), simply check the "Deleted" column and close the dialog with the "Close" button. Remember only one Layermay be active at any one time. You will be reminded of
this if you attempt to have more than one
Layeractive. Also note the Active
Layermust
be
Visible.
When the application runs, each object that is drawn is added to the
GraphicsListmaintained by the active
Layer.
Note this relationship is preserved through saving and re-opening a drawing file.
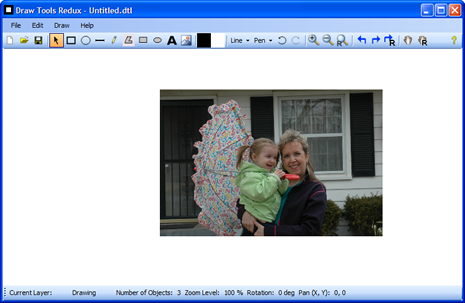
Layerscome in very handy when you want to draw "on top of" another image. For example, the image at the top of this article contains two layers. The following image shows the same picture with the Background Layerturned off:
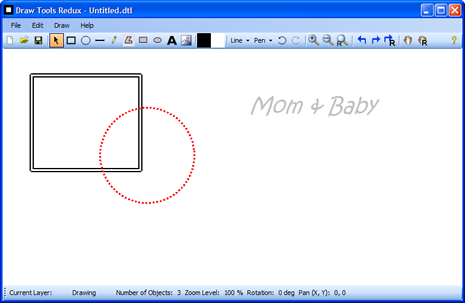
Here is the same drawing with the Drawing Layerinvisible and the Background Layervisible:
Objects on Layerswhich are visible but not active cannot be selected, moved, deleted, etc.
Each drawing object is added to the correct
Layerby the
AddNewObject()method
in the
ToolObjectclass:
Hide Copy Code
protected void AddNewObject(DrawAreadrawArea, DrawObject o)
{
int al = drawArea.TheLayers.ActiveLayerIndex;
drawArea.TheLayers[al].Graphics.UnselectAll();
o.Selected = true;
o.Dirty = true;
drawArea.TheLayers[al].Graphics.Add(o);
drawArea.Capture = true;
drawArea.Refresh();
}
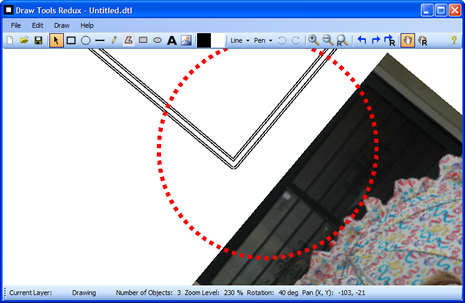
Implementing Zooming, Panning, and Rotation
Zooming, Panning, and Rotation are implemented by adding a few variables and some code to the MainFormand
DrawAreaclasses.
Zooming is controlled by buttons on the form, and also by the mouse wheel when Ctrl is held down.
Pan is controlled by the Hand button on the form, and can be cancelled by a right-click.
Rotation is controlled by buttons on the form - note Rotation affects the entire drawing.
Here is an example of all three in use:
The heart of this code is the
BackTrackMouse()method, which takes the "apparent" mouse position and converts it to
a valid point based on the current Zoom level, Pan position, and Rotation:
Hide Copy Code
/// <summary>
/// Back Track the Mouse to return accurate coordinates regardless of
/// zoom or pan effects.
/// Courtesy of BobPowell.net <seealso cref="http://www.bobpowell.net/backtrack.htm"/>
/// </summary>
/// <param name="p">Point to backtrack</param>
/// <returns>Backtracked point</returns>
public Point BackTrackMouse(Point p)
{
// Backtrack the mouse...
Point[] pts = new Point[] { p };
Matrix mx = new Matrix();
mx.Translate(-this.ClientSize.Width / 2, -this.ClientSize.Height / 2,
MatrixOrder.Append);
mx.Rotate(_rotation, MatrixOrder.Append);
mx.Translate(this.ClientSize.Width / 2 + _panX, this.ClientSize.Height / 2 +
_panY, MatrixOrder.Append);
mx.Scale(_zoom, _zoom, MatrixOrder.Append);
mx.Invert();
mx.TransformPoints(pts);
return pts[0];
}
This routine comes from Bob Powell's excellent website. Through the use of the
GDI+ Matrix class, the mouse point passed to this method is moved (Translate), Rotated, and Scaled based on the current PanX, PanY, Zoom, and Rotation values. The important thing to remember is that anytime you need to determine where the mouse pointer actually
is in your drawing, you must call this method. You will see this method used throughout the program in the
DrawAreaclass
as well as others. An example of its usage is shown here:
Hide Copy Code
private void DrawArea_MouseDown(object sender, System.Windows.Forms.MouseEventArgs e)
{
lastPoint = BackTrackMouse(e.Location);
if (e.Button == MouseButtons.Left)
tools[(int)activeTool].OnMouseDown(this, e);
else if (e.Button == MouseButtons.Right)
{
if (_panning == true)
_panning = false;
ActiveTool = DrawArea.DrawToolType.Pointer;
}
//OnContextMenu(e);
}
The current zoom level is controlled by the following simple routine:
Hide Copy Code
private void AdjustZoom(float _amount)
{
drawArea.Zoom += _amount;
if (drawArea.Zoom < .1f)
drawArea.Zoom = .1f;
if (drawArea.Zoom > 10)
drawArea.Zoom = 10f;
drawArea.Invalidate();
SetStateOfControls();
}
Then in the
DrawArea.Paint()method, the zoom, pan, and rotation values are used to alter the way the canvas is painted:
Hide Shrink
Copy
Code
private void DrawArea_Paint(object sender, System.Windows.Forms.PaintEventArgs e)
{
Matrix mx = new Matrix();
mx.Translate(-this.ClientSize.Width / 2, -this.ClientSize.Height / 2,
MatrixOrder.Append);
mx.Rotate(_rotation, MatrixOrder.Append);
mx.Translate(this.ClientSize.Width / 2 + _panX, this.ClientSize.Height / 2 +
_panY, MatrixOrder.Append);
mx.Scale(_zoom, _zoom, MatrixOrder.Append);
e.Graphics.Transform = mx;

SolidBrush brush = new SolidBrush(Color.FromArgb(255, 255, 255));
e.Graphics.FillRectangle(brush,
this.ClientRectangle);
// Draw objects on each layer, in succession so we get the correct layering.
// Only draw layers that are visible
if (_layers != null)
{
int lc = _layers.Count;
for (int i = 0; i < lc; i++)
{
if(_layers[i].IsVisible == true)
if(_layers[i].Graphics != null)
_layers[i].Graphics.Draw(e.Graphics);
}
}
DrawNetSelection(e.Graphics);
brush.Dispose();
}
Update - 8/25/2007 - Individual Object Rotation & Bug Fixes
The primary advancement in this update is the ability to rotate individual objects - when one or more objects are selected, clicking the Rotate tools will rotate those objects instead of the entire drawing surface.There is one caveat, however - the selection rectangle for the rotated object is not rotated - if someone can help with this, I would greatly appreciate it!
This update also includes several small bug fixes reported by users - thanks to all for reporting!

相关文章推荐
- hdu5452 最小割,图论
- CSS Modal—纯CSS实现模态窗口
- UIView 中常见的方法总结
- Net 项目构建基于Jenkins + Github + Mono 的持续集成环境
- phpstorm 配置xdebug
- 事务的隔离界别
- 老李分享:持续集成学好jenkins
- 老李分享:性能测试你不应该只知道loadrunner(1)
- NPOI导出模板样式
- Spring 整合 ibm mq
- 《从零开始学Swift》学习笔记(Day 25)——类和结构体定义
- Node入门训练【1】【创建http服务器并输出helloworld】
- 纯javascript实现自动发送邮件
- [Objective-C]OC中字典基本概念和常用方法(NSDictionary和NSMutableDictionary)
- 记录-C和指针-第十章-结构和联合
- Android中Font Awesome的使用
- linux中fork()函数详解(原创!!实例讲解)
- MAC下配置gradle用eclipse 打包android程序
- 交换、路由与防火墙手记(6)
- Android Activity总结