Linux下autoTools工具集使用介绍
2015-10-13 10:28
417 查看
Author : iStone
E-mail : liul.stone@gmail.com
Date : 2015-09-19 15:16:38
1.2
正如上文所言,
图 1-1
接下来用
0、安装autoTools
安装
1、创建目录
建立一个
2、创建源码文件
用编辑器在
接下来就要用autoTools为我们生成makefile文档:
3、autoscan
它会在给定目录及其子目录树中检查源文件,默认是在当前目录及其子目录树中进行检查。执行autoscan后会产生一个configure.scan的档案,我们可以用它做为configure.in文档的蓝本。但由上述结果可知autoscan会首先去读入configure.ac文件,但此时还没有创建该配置文件,于是它就自动生成了一个configure.scan文件。
4、autoconf
configure.in是autoconf的脚本配置文件,它的原型文件configure.scan改名为configure.in并把内容更改为如下所示:
接下来运行aclocal,生成一个“aclocal.m4”文件,该文件是处理本地的宏定义。
再接着运行autoconf,生成configure可执行文件。
5、autoheader
使用autoheader命令是为了成config.h.in文件。该工具通常会从acconfig.h文件中复制用户定义的符号,若此处没有自定义符号就不需创建acconfig.h文件。
6、automake
这一步是创建makefile很重要的一步,automake用的脚本配置文件是Makefile.am,需要自己创建相应的文件。再用automake工具将其转成Makefile.in文件。内容如下所示:
AUTOMAKE_OPTIONS:设置automake的选项。由于GNU对自己发布的软件有严格的规范,如必须附带许可证声明文件COPYING等,否则automake执行时会报错。automake提供了3 种软件等级:foreign、gnu、gnits,我们这里用foreign只检测必要文件。
bin_PROGRAMS:定义要产生的可执行文件名。如果要产生多个执行文件用空格隔开。
sayHello_SOURCES:定义sayHello这个可执行文件所需要的源文件。如sayHello这个程序是由多个原始文件所产生的,则须把它所用到的所有源文件都列出来,并用空格隔开。例如定义:sayHello _SOURCES=sayHello.c sayHello.h。注意:如果要定义多个执行文件,则对每个执行文件都要定义相应的_SOURCES。
接下来使用automake生成configure.in文件,在这里使用选项—adding-missing可以让automake自动添加有一些必需的脚本文件。如下所示:
7、configure
通过运行自动配置设置文件configure,把Makefile.in变成了最终的Makefile。
到此步makefile就已经自动生成了。
1、make
make默认执行make all命令,其执行情况如下所示:
如果之前makefile操作无误,那么执行make命令会出现上面这段执行内容,而且会在目录下生成hello可执行文件,运行sayHello程序:
2、make install
把sayHello程序安装到系统目录中去:
此时,若直接运行sayHello能出现如下结果就说明操作正确:
3、make clean
此命令是清除之前所编译的可执行文件及目标文件
4、make dist
当我们做好了一切工作,最后一步是压缩文档以供发布:
E-mail : liul.stone@gmail.com
Date : 2015-09-19 15:16:38
一 使用autoTools工具集
1.1 什么是autoTools
我们都了解make工程管理器的强大功能。但编写makefile 确实不是一件轻松的事,尤其对于一个较大的项目而言更是如此。那么,有没有一种轻松的手段生成makefile而同时又能让用户享受make 的优越性呢?本节要讲的autoTools系列工具正是为此而设的,它只需用户输入简单的目标文件、依赖文件、文件目录等就可以轻松地生成makefile了。另外,这些工具还可以完成系统配置信息的收集,从而可以方便地处理各种移植性的问题。也正是基于此,现在Linux上的软件开发一般都用autoTools 来生成makefile。1.2 autoTools
使用流程
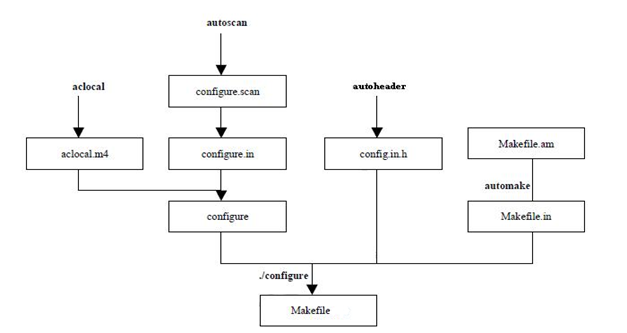
正如上文所言,autoTools是系列工具,它包含了
aclocal、autoscan、autoconf、autoheader、和automake这些工具,使用autoTools主要就是利用各个工具的脚本文件来生成最后的
makefile文件。其总体流程如下:
图 1-1
autoTools生成
makefile流程图
接下来用
/*sayHello.c*/来做为实例:
0、安装autoTools
安装
autoTools工具集,Centos下可以使用
yum install autoconf automake在线安装。
1、创建目录
建立一个
TestautoTools的目录,这个目录将作为存放
sayHello程序及其相关档案的地方。
2、创建源码文件
用编辑器在
TestautoTools目录下创建
sayHello.c源文件和
sayHello.h头文件,内容如下:
[root@localhost TestautoTools]# cat sayHello.c
#include <stdio.h>

#include "sayHello.h"

int main()
{
printf("Program say : %s\n" ,STR);
return 0;
}

[root@localhost TestautoTools]# cat sayHello.h
#ifndef SAYHELLO_H
#define SAYHELLO_H

#define STR "hello AutoTools"

#endif

[root@localhost TestautoTools]# ls
sayHello.c  sayHello.h
接下来就要用autoTools为我们生成makefile文档:
3、autoscan
[root@localhost TestautoTools]# autoscan
[root@localhost TestautoTools]# ls
autoscan.log  configure.scan  sayHello.c  sayHello.h
[root@localhost TestautoTools]#
它会在给定目录及其子目录树中检查源文件,默认是在当前目录及其子目录树中进行检查。执行autoscan后会产生一个configure.scan的档案,我们可以用它做为configure.in文档的蓝本。但由上述结果可知autoscan会首先去读入configure.ac文件,但此时还没有创建该配置文件,于是它就自动生成了一个configure.scan文件。
[root@localhost TestautoTools]# ls
autoscan.log  configure.scan  sayHello.c  sayHello.h
4、autoconf
configure.in是autoconf的脚本配置文件,它的原型文件configure.scan改名为configure.in并把内容更改为如下所示:
# -*- Autoconf -*-                    //以“#”号开始的行为注释。
AC_PREREQ(2.59)                         //本文件要求的autoconf版本。
AC_INIT(sayHello,1.0,liul.stone@gmail.com)                    // AC_INIT宏用来定义软件的名称和版本等信息。
AM_INIT_AUTOMAKE(sayHello,1.0)          //是automake所必备的宏,软件名称和版本号。
AC_CONFIG_SRCDIR([sayHello.c])    //用来侦测所指定的源码文件是否存在。
AC_CONFIG_HEADER([config.h])     //用于生成config.h文件,以便autoheader 使用。
AC_PROG_CC
AC_CONFIG_FILES([Makefile])          //用于生成相应的Makefile 文件。
AC_OUTPUT
接下来运行aclocal,生成一个“aclocal.m4”文件,该文件是处理本地的宏定义。
[root@localhost hello]# aclocal
再接着运行autoconf,生成configure可执行文件。
[root@localhost hello]# autoconf
[root@localhost hello]# ls
aclocal.m4  autom4te.cache  autoscan.log  configure  configure.in  sayHello.c  sayHello.h
5、autoheader
使用autoheader命令是为了成config.h.in文件。该工具通常会从acconfig.h文件中复制用户定义的符号,若此处没有自定义符号就不需创建acconfig.h文件。
[root@localhost TestautoTools]# autoheader
[root@localhost TestautoTools]# ls
aclocal.m4  autom4te.cache  autoscan.log  config.h.in  configure  configure.in  sayHello.c  sayHello.h
[root@localhost TestautoTools]#
6、automake
这一步是创建makefile很重要的一步,automake用的脚本配置文件是Makefile.am,需要自己创建相应的文件。再用automake工具将其转成Makefile.in文件。内容如下所示:
[root@localhost TestautoTools]# cat Makefile.am
AUTOMAKE_OPTIONS=foreign
bin_PROGRAMS= sayHello
sayHello_SOURCES= sayHello.c sayHello.h
[root@localhost TestautoTools]#
AUTOMAKE_OPTIONS:设置automake的选项。由于GNU对自己发布的软件有严格的规范,如必须附带许可证声明文件COPYING等,否则automake执行时会报错。automake提供了3 种软件等级:foreign、gnu、gnits,我们这里用foreign只检测必要文件。
bin_PROGRAMS:定义要产生的可执行文件名。如果要产生多个执行文件用空格隔开。
sayHello_SOURCES:定义sayHello这个可执行文件所需要的源文件。如sayHello这个程序是由多个原始文件所产生的,则须把它所用到的所有源文件都列出来,并用空格隔开。例如定义:sayHello _SOURCES=sayHello.c sayHello.h。注意:如果要定义多个执行文件,则对每个执行文件都要定义相应的_SOURCES。
接下来使用automake生成configure.in文件,在这里使用选项—adding-missing可以让automake自动添加有一些必需的脚本文件。如下所示:
[root@localhost TestautoTools]# automake --add-missing
configure.in:6: installing `./install-sh'
configure.in:6: installing `./missing'
Makefile.am: installing `./depcomp'
[root@localhost TestautoTools]# ls
aclocal.m4  autom4te.cache  autoscan.log  config.h.in  configure  configure.in  depcomp  install-sh  Makefile.am  Makefile.in  missing  sayHello.c  sayHello.h
[root@localhost TestautoTools]#
7、configure
通过运行自动配置设置文件configure,把Makefile.in变成了最终的Makefile。
[root@localhost TestautoTools]# ./configure
checking for a BSD-compatible install... /usr/bin/install -c
checking whether build environment is sane... yes
checking for a thread-safe mkdir -p... /bin/mkdir -p
checking for gawk... gawk
checking whether make sets $(MAKE)... yes
checking for gcc... gcc
checking for C compiler default output file name... a.out
checking whether the C compiler works... yes
checking whether we are cross compiling... no
checking for suffix of executables...
checking for suffix of object files... o
checking whether we are using the GNU C compiler... yes
checking whether gcc accepts -g... yes
checking for gcc option to accept ISO C89... none needed
checking for style of include used by make... GNU
checking dependency style of gcc... gcc3
configure: creating ./config.status
config.status: creating Makefile
config.status: creating config.h
config.status: executing depfiles commands
[root@localhost TestautoTools]#

[root@localhost TestautoTools]# ls
aclocal.m4      autoscan.log  config.h.in  config.status  configure.in  install-sh  Makefile.am  missing     sayHello.h
autom4te.cache  config.h      config.log   configure      depcomp       Makefile    Makefile.in  sayHello.c  stamp-h1
[root@localhost TestautoTools]#
到此步makefile就已经自动生成了。
1.3 使用make命令
产生了makefile后我们就要使用make工程管理器去实现makefile的制定。1、make
make默认执行make all命令,其执行情况如下所示:
[root@localhost TestautoTools]# make
make  all-am
make[1]: Entering directory `/home/liul/work_dir/TestautoTools'
gcc -DHAVE_CONFIG_H -I.     -g -O2 -MT sayHello.o -MD -MP -MF .deps/sayHello.Tpo -c -o sayHello.o sayHello.c
mv -f .deps/sayHello.Tpo .deps/sayHello.Po
gcc  -g -O2   -o sayHello sayHello.o
make[1]: Leaving directory `/home/liul/work_dir/TestautoTools'
[root@localhost TestautoTools]#
如果之前makefile操作无误,那么执行make命令会出现上面这段执行内容,而且会在目录下生成hello可执行文件,运行sayHello程序:
[root@localhost TestautoTools]# ./sayHello
Program say : hello AutoTools
[root@localhost TestautoTools]#
2、make install
把sayHello程序安装到系统目录中去:
[root@localhost TestautoTools]# make install
make[1]: Entering directory `/home/liul/work_dir/TestautoTools'
test -z "/usr/local/bin" || /bin/mkdir -p "/usr/local/bin"
/usr/bin/install -c sayHello '/usr/local/bin'
make[1]: Nothing to be done for `install-data-am'.
make[1]: Leaving directory `/home/liul/work_dir/TestautoTools'
[root@localhost TestautoTools]#
此时,若直接运行sayHello能出现如下结果就说明操作正确:
[root@localhost TestautoTools]# sayHello
Program say : hello AutoTools
[root@localhost TestautoTools]#
3、make clean
此命令是清除之前所编译的可执行文件及目标文件
(object file, *.o):
[root@localhost TestautoTools]# make clean
test -z "sayHello" || rm -f sayHello
rm -f *.o
[root@localhost TestautoTools]#
4、make dist
当我们做好了一切工作,最后一步是压缩文档以供发布:
[root@localhost TestautoTools]# make dist
cd . && /bin/sh /root/link2workdir/TestautoTools/missing --run automake-1.11 --foreign Makefile
cd . && /bin/sh ./config.status Makefile depfiles
config.status: creating Makefile
config.status: executing depfiles commands
{ test ! -d "sayHello-1.0" || { find "sayHello-1.0" -type d ! -perm -200 -exec chmod u+w {} ';' && rm -fr "sayHello-1.0"; }; }
test -d "sayHello-1.0" || mkdir "sayHello-1.0"
test -n "" \
|| find "sayHello-1.0" -type d ! -perm -755 \
-exec chmod u+rwx,go+rx {} \; -o \
! -type d ! -perm -444 -links 1 -exec chmod a+r {} \; -o \
! -type d ! -perm -400 -exec chmod a+r {} \; -o \
! -type d ! -perm -444 -exec /bin/sh /root/link2workdir/TestautoTools/install-sh -c -m a+r {} {} \; \
|| chmod -R a+r "sayHello-1.0"
tardir=sayHello-1.0 && /bin/sh /root/link2workdir/TestautoTools/missing --run tar chof - "$tardir" | GZIP=--best gzip -c >sayHello-1.0.tar.gz
{ test ! -d "sayHello-1.0" || { find "sayHello-1.0" -type d ! -perm -200 -exec chmod u+w {} ';' && rm -fr "sayHello-1.0"; }; }
[root@localhost TestautoTools]#
[root@localhost TestautoTools]# ls
aclocal.m4      autoscan.log  config.h.in  config.status  configure.in  install-sh  Makefile.am  missing              sayHello.c  stamp-h1
autom4te.cache  config.h      config.log   configure      depcomp       Makefile    Makefile.in  sayHello-1.0.tar.gz  sayHello.h
[root@localhost TestautoTools]#
[root@localhost TestautoTools]#
5、总结
sayHello-1.0.tar.gz就是我们最终要发布的压缩文件。autoTools的整个流程都介绍完毕,现实中更多会用到autoTools来为我们生成makefile文档。

相关文章推荐
- Ubuntu 默认壁纸历代记
- Ubuntu Remix Cinnamon 20.04 评测:Ubuntu 与 Cinnamon 的完美融合
- Linux socket 初步
- 关于Ubuntu 11.10启动提示waiting for the network configuration的问题
- 在 Ubuntu 桌面中使用文件和文件夹
- linux lsof详解
- linux 文件权限
- Linux 执行数学运算
- 10 篇对初学者和专家都有用的 Linux 命令教程
- Linux 与 Windows 对UNICODE 的处理方式
- Ubuntu12.04下QQ完美走起啊!走起啊!有木有啊!
- 解決Linux下Android开发真机调试设备不被识别问题
- ubuntu下chrome无法同步问题解决
- 运维入门
- 运维提升
- Linux 自检和 SystemTap
- Ubuntu Linux使用体验
- c语言实现hashmap(转载)