Install KVM (QEMU) on CentOS 7 / RHEL 7
2015-10-10 10:18
399 查看
http://www.itzgeek.com/how-tos/linux/centos-how-tos/install-kvm-qemu-on-centos-7-rhel-7.html
KVM stands for Kernel Based Virtual Machine, is a virtualization software which provides ability to run a multiple guest operating systems with the help of hardware virtualization extensions. It supports wide variety of guest operating system’s such as Linux,
Windows, Solaris, Haiku, REACT OS and much more.
KVM can be managed using command line or available graphical tools. Virt-Manager (Virtual Machine Manager) is the most widely used application for managing KVM based virtual machines, it supports creating, editing, starting, and stopping KVM-based virtual
machines, as well as live or cold migration of guest machines between hosts.
As said earlier, KVM will work only if the CPU has a support of hardware virtualization, either Intel VT or AMD-V. To find whether your cpu supports VT features, run the following command.

CentOS
7 – Intel VT Support
If the above commands returns with any output showing vmx or svm then your hardware supports VT else it does not.
Issue the following command to install latest qemu package and also virt-manager which provides graphical interface to manage virtual machines.
qemu-kvm =
QEMU emulator
qemu-img = QEMU disk image manager
virt-install = Command line tool to create virtual machines.
libvirt = Provides libvirtd daemon that manages virtual machines and controls hypervisor.
libvirt-client = provides client side API’s for accessing servers and also provides virsh utility which provides command
line tool to manage virtual machines.
virt-viewer – Graphical console
Once you have installed KVM and other tools, it is all set to start creating virtual machines. We will look be looking at creating virtual machines in both command line and graphical mode.
Command
Line Mode:
virt-install is used to create virtual machines using command line, this command needs multiple inputs from us to create a virtual machine such as CPU,Memory, disk, network, installation media location, os variant and more.
Note: The
above command uses bridged networking “br0” for allowing virtual machines to communicate with outside network, you can find a tutorial on creating bridged networking with Virt Manager.
–name
– Name of the Virtual machine
–ram –
Memory size in MB
–vcpus –
Virtal cpu’s in numbers
–cdrom –
Location of the ISO image
–os-type –
OS type like Linux, Windows and Unix
–os-variant
– OS variant like rhel 6, solaris
–network –
Networking
–graphics –
Guest display settings
–disk
path – Location of the disk with size of 4 GB
Once you’ve issued the above command, virt-install will create a virtual machine and starts virt viewer console for OS installation.
CentOS
7 – Guest Installation command Line Virt Viewer
Graphical
Mode:
Type the following command in terminal in GUI mode.
or
Application
–> System Tools –> Virtual Machine Manager.
You may be asked to enter password, if you don’t have root access.
Once it is opened, right-click on localhost(QEMU) and Click on New. Virtual Machine Manager will start a new wizard for creating virtual machine, you will find no difficulty in using this graphical mode.
Step 1: You would require to name your virtual machine, in the same window, you would be asked to choose how would you like to install the operating system. Here i chose to install it from ISO image or CD-ROM.
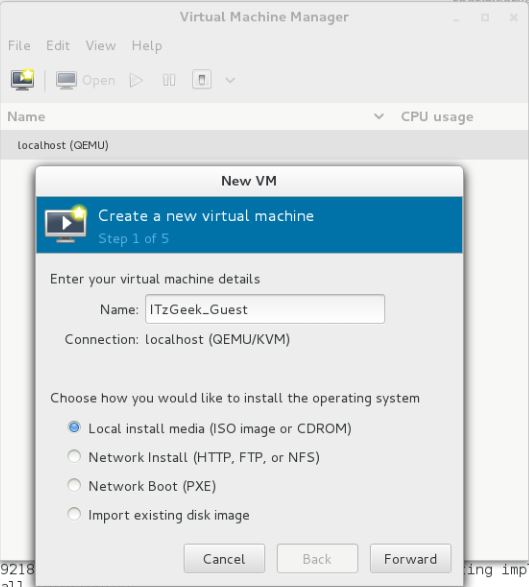
CentOS
7 – Virt Manager – Create VM
Step 2: Enter the location of ISO image as physical CD-ROM pass through is not supported by hypervisor, do not forget to choose operating system type and version.
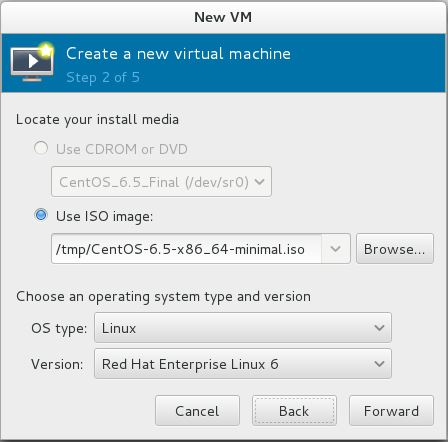
CentOS
7 – Virt Manager – Installation Media
Step 3: Configure CPU and memory for virtual machine.
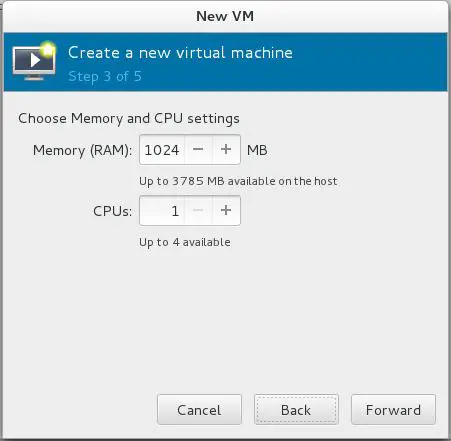
CentOS
7 – Virt Manager – Memory and CPU
Step 4: You have to mention the amount of storage that you want to assign to a virtual machine, Un check on “Allocate entire disk now”, this will prevent from allocating full disk at the VM creation. Disk size will be allocated dynamically depending on the
virtual machine usage.
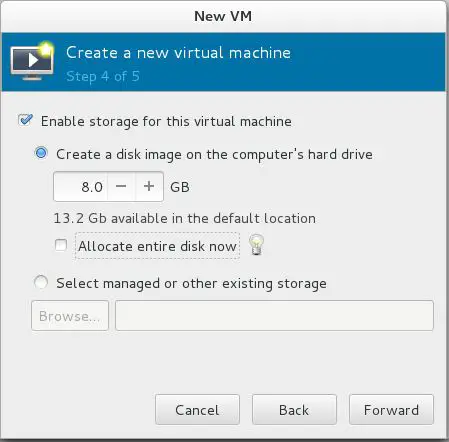
CentOS
7 – Virt Manager – Allocating Storage
Step 5: Summary of all the settings, click on advanced settings to select bridged networking in order to allow virtual machine to communicate outside network. Click on Finish.
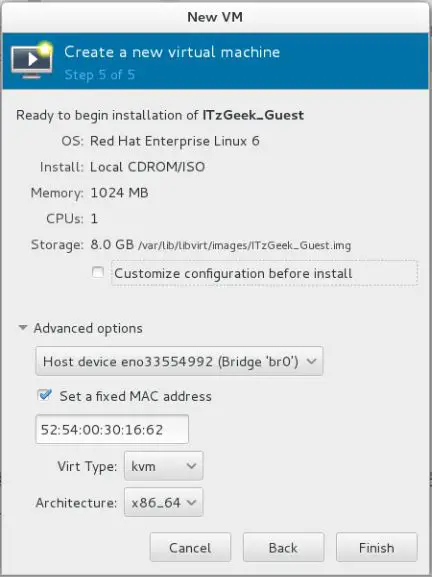
CentOS
7 – Virt Manager – Summary
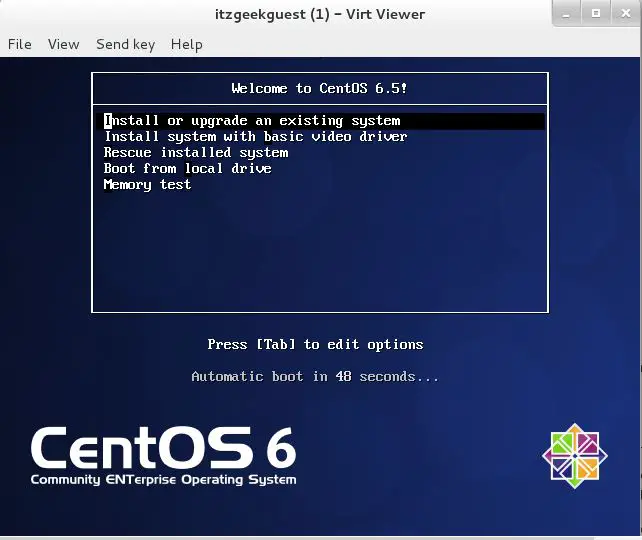
Step 6: KVM will start to create a virtual machine depends on our input, once vm is created. Virt manager will start a console for OS installation. The following screen shows the installation screen of CentOS 6.
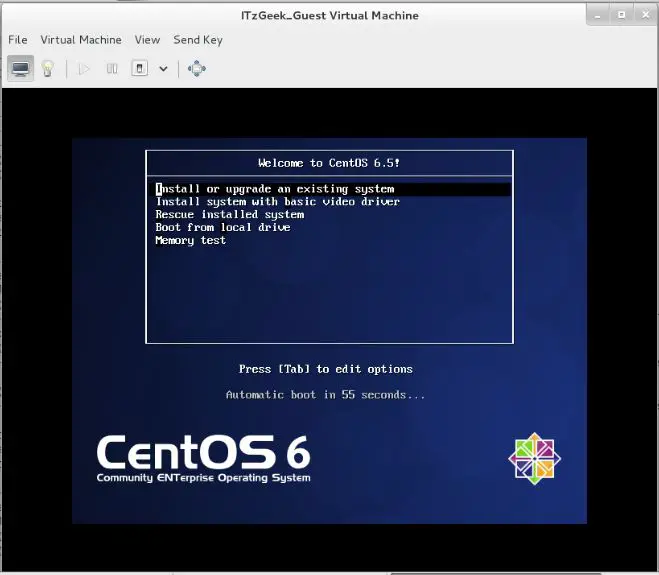
CentOS
7 – Virt Manager – VM Console
With the Virtual Machine Manger, you can perform vm’s life cylcle actions such as start, power off, reset, clone and migration by right clicking on selected virtual machine.
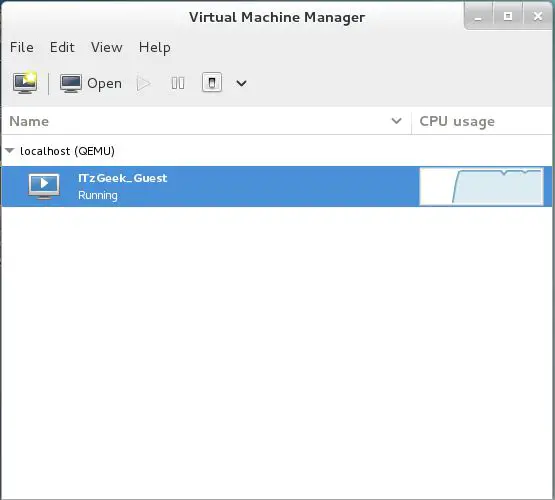
CentOS
7 – Virt Manager
Managing virtual machine using virt manager is very simple, you can just click on “bulp” icon in the vm console. Here you can add, modify and remove devices.
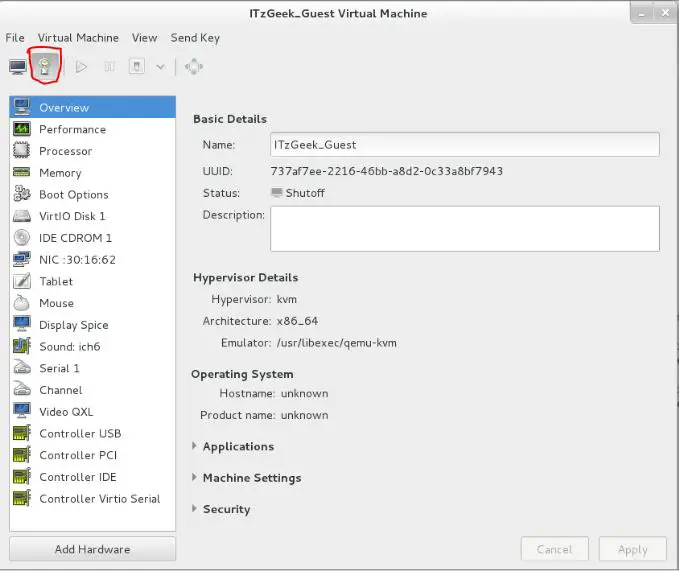
CentOS
7 – Virt Manager – Managing VM
That’s All.
KVM stands for Kernel Based Virtual Machine, is a virtualization software which provides ability to run a multiple guest operating systems with the help of hardware virtualization extensions. It supports wide variety of guest operating system’s such as Linux,
Windows, Solaris, Haiku, REACT OS and much more.
KVM can be managed using command line or available graphical tools. Virt-Manager (Virtual Machine Manager) is the most widely used application for managing KVM based virtual machines, it supports creating, editing, starting, and stopping KVM-based virtual
machines, as well as live or cold migration of guest machines between hosts.
Pre-requisites:
As said earlier, KVM will work only if the CPU has a support of hardware virtualization, either Intel VT or AMD-V. To find whether your cpu supports VT features, run the following command.# egrep '(vmx|svm)' /proc/cpuinfo |
CentOS
7 – Intel VT Support
If the above commands returns with any output showing vmx or svm then your hardware supports VT else it does not.
Installing
KVM:
Issue the following command to install latest qemu package and also virt-manager which provides graphical interface to manage virtual machines.# yum install qemu-kvm qemu-img virt-manager libvirt libvirt-python libvirt-client virt-install virt-viewer |
QEMU emulator
qemu-img = QEMU disk image manager
virt-install = Command line tool to create virtual machines.
libvirt = Provides libvirtd daemon that manages virtual machines and controls hypervisor.
libvirt-client = provides client side API’s for accessing servers and also provides virsh utility which provides command
line tool to manage virtual machines.
virt-viewer – Graphical console
Creating
Virtual Machine:
Once you have installed KVM and other tools, it is all set to start creating virtual machines. We will look be looking at creating virtual machines in both command line and graphical mode.Command
Line Mode:
virt-install is used to create virtual machines using command line, this command needs multiple inputs from us to create a virtual machine such as CPU,Memory, disk, network, installation media location, os variant and more.
# virt-install --name=itzgeekguest --ram=1024 --vcpus=1 --cdrom=/tmp/CentOS-6.5-x86_64-minimal.iso --os-type=linux --os-variant=rhel6 --network bridge=br0 --graphics=spice --disk path=/var/lib/libvirt/images/itzgeekguest.dsk,size=4 |
above command uses bridged networking “br0” for allowing virtual machines to communicate with outside network, you can find a tutorial on creating bridged networking with Virt Manager.
–name
– Name of the Virtual machine
–ram –
Memory size in MB
–vcpus –
Virtal cpu’s in numbers
–cdrom –
Location of the ISO image
–os-type –
OS type like Linux, Windows and Unix
–os-variant
– OS variant like rhel 6, solaris
–network –
Networking
–graphics –
Guest display settings
–disk
path – Location of the disk with size of 4 GB
Once you’ve issued the above command, virt-install will create a virtual machine and starts virt viewer console for OS installation.
CentOS
7 – Guest Installation command Line Virt Viewer
Graphical
Mode:
Type the following command in terminal in GUI mode.
# virt-manager |
Application
–> System Tools –> Virtual Machine Manager.
You may be asked to enter password, if you don’t have root access.
Once it is opened, right-click on localhost(QEMU) and Click on New. Virtual Machine Manager will start a new wizard for creating virtual machine, you will find no difficulty in using this graphical mode.
Step 1: You would require to name your virtual machine, in the same window, you would be asked to choose how would you like to install the operating system. Here i chose to install it from ISO image or CD-ROM.
CentOS
7 – Virt Manager – Create VM
Step 2: Enter the location of ISO image as physical CD-ROM pass through is not supported by hypervisor, do not forget to choose operating system type and version.
CentOS
7 – Virt Manager – Installation Media
Step 3: Configure CPU and memory for virtual machine.
CentOS
7 – Virt Manager – Memory and CPU
Step 4: You have to mention the amount of storage that you want to assign to a virtual machine, Un check on “Allocate entire disk now”, this will prevent from allocating full disk at the VM creation. Disk size will be allocated dynamically depending on the
virtual machine usage.
CentOS
7 – Virt Manager – Allocating Storage
Step 5: Summary of all the settings, click on advanced settings to select bridged networking in order to allow virtual machine to communicate outside network. Click on Finish.
CentOS
7 – Virt Manager – Summary
Step 6: KVM will start to create a virtual machine depends on our input, once vm is created. Virt manager will start a console for OS installation. The following screen shows the installation screen of CentOS 6.
CentOS
7 – Virt Manager – VM Console
Managing
Virtual Machine:
With the Virtual Machine Manger, you can perform vm’s life cylcle actions such as start, power off, reset, clone and migration by right clicking on selected virtual machine.CentOS
7 – Virt Manager
Managing virtual machine using virt manager is very simple, you can just click on “bulp” icon in the vm console. Here you can add, modify and remove devices.
CentOS
7 – Virt Manager – Managing VM
That’s All.

相关文章推荐
- linux 软连接方式实现上传文件存储目录的无缝迁移
- linux 软连接方式实现上传文件存储目录的无缝迁移
- Linux命令
- Linux查看硬盘使用情况
- LINUX中nagios客户端安装步骤及遇到问题
- linux下rsync+sersync实现自动备份数据
- Linux战地日记—压缩解压命令
- linux curl get 传参
- 查看Linux系统版本信息方法
- linux发行版i386i686x86-64的区别
- 深入理解 Linux 2.6 的 initramfs 機制(上)
- 升级CentOS6.6后Java新建线程抛出O…
- 在Linux中创建静态库.a和动态库.so
- Linux下scp的用法
- Linux初接触随笔02
- 每天一个linux命令(11):nl命令
- Linux5u3下编译安装MySQL Proxy Lua 0.8.1
- linux mount挂载命令详解
- Linux共享内存,打印系统IPC信息
- unix&Linux大学教程笔记