centos 6.5 nagios监控安装篇
2015-10-06 16:21
417 查看
一、Nagios服务端安装1、yum install –y httpd php mysql mysql-devel
2、服务器端安装nagios程序
wget http://sourceforge.net/projects/nagios/files/nagios-3.x/nagios-3.2.1/nagios-3.2.1.tar.gz/download
http://down1.chinaunix.net/distfiles/nagios-plugins-1.4.14.tar.gz
/usr/sbin/useraddnagios
tar zxvfnagios-3.2.1.tar.gz
cdnagios-3.2.1
./configure--prefix=/usr/local/nagios --with-command-group=nagios
make all
make install;makeinstall-init;make install-config;make install-commandmode ;make install-webconf
makeinstall //来安装主程序,CGI和HTML文件
makeinstall-init //在/etc/rc.d/init.d安装启动脚本
makeinstall-config //来安装示例配置文件,安装的路径是/usr/local/nagios/etc
makeinstall-commandmode //来配置目录权限
makeinstall-webconf // 配置nagios跟apache整合
3、安装Nagios-plugins插件,监控用tar zxvfnagios-plugins-1.4.14.tar.gz
cdnagios-plugins-1.4.14
./configure--prefix=/usr/local/nagios --with-nagios-user=nagios --with-nagios-group=nagios
make&& make install
4、服务器端安装nrpe,与客户端通信
tar -xzf nrpe-2.14.tar.gzcd nrpe-2.14 ./configure --enable-ssl --with-ssl-libmake all make install-plugin && make install-daemon&& make install-daemon-configchown -R nagios.nagios /usr/local/nagios5、nagios访问控制设置htpasswd -c /usr/local/nagios/etc/htpasswd.users nagiosadmin
输入两次密码即可,登录页面的时候会用到这个密码.
6、重启nagios、httpd服务
重启前
/usr/local/nagios/bin/nagios-v /usr/local/nagios/etc/nagios.cfg 检测是否正确
重启nagios,/etc/init.d/nagios restart ;/etc/init.d/httpd restart ;
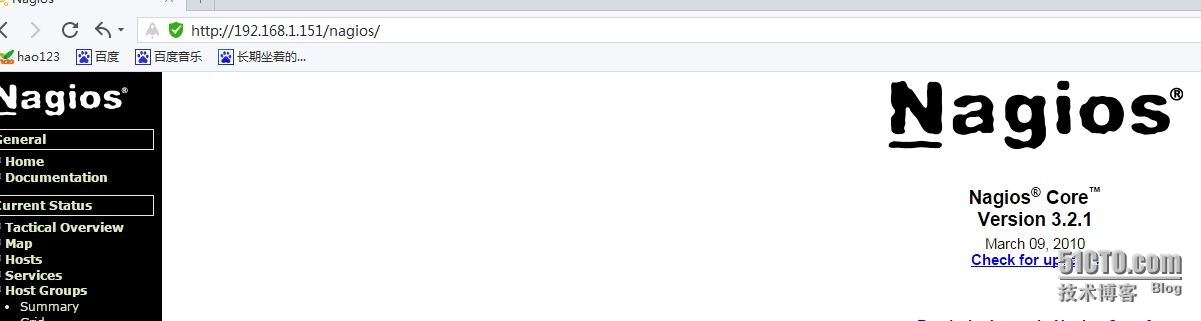
7、Nagios测试访问 用户名:nagiosadminhttp://localhost/nagios/ 如下图:
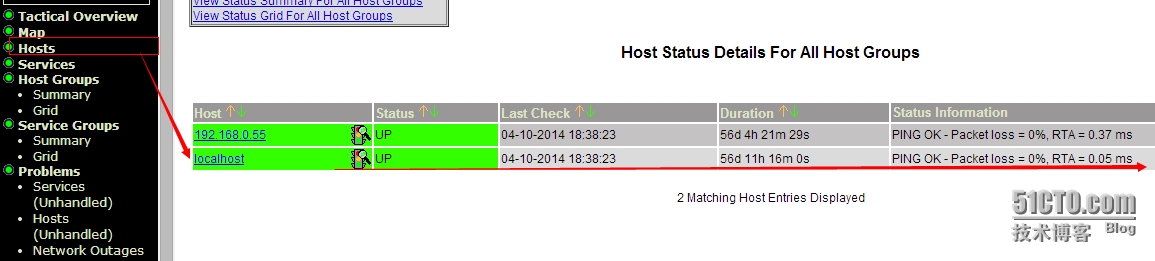
点击左侧的Hosts可以看到右侧默认localhost主机的监控,UP表示主机目前运行正常:
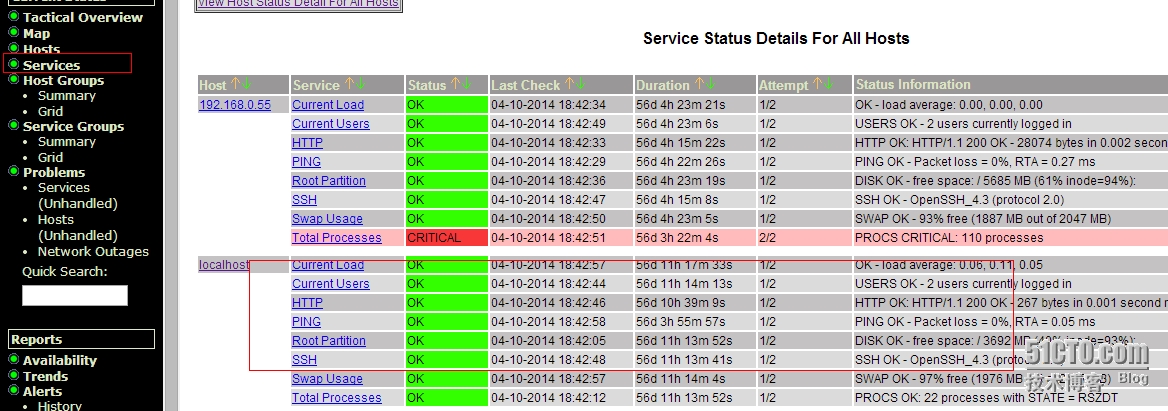
点击左侧的Services可以看到右侧默认localhost监控的各个服务的状态,绿色OK表示正常:
取消

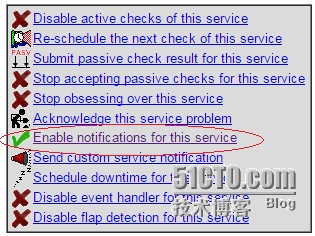
大喇叭,
点击大喇叭图标-- Enable notifications forthis service
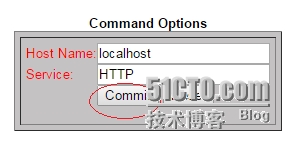
点commit
Error:Could not opencommand file '/usr/local/nagios/var/rw/nagiosNaNd' for update! 错误提示没有权限,
授权这个文件 chmod 777 /usr/local/nagios/var/rw/nagiosNaNd
出现错误:
HTTP WARNING:HTTP/1.1 403 Forbidden - 5159 bytes in 0.002 second response time(警告:HTTP HTTP / 1.1没有权限访问此网站-0.002秒的响应时间5159个字节)
新建网页index.html并授权
chmod o+w/var/www/html/index.html
二、Nagios监控客户端安装
1、安装nagios-plugins
useradd -s /sbin/nologin nagiostar -xzf nagios-plugins-1.4.14.tar.gzcd nagios-plugins-1.4.14 ./configure --prefix=/usr/local/nagios &&make &&make install2、客户端安装nrpe
tar -xzfnrpe-2.14.tar.gz && cd nrpe-2.14 &&
./configure--enable-ssl --with-ssl-lib &&
make all
makeinstall-plugin && make install-daemon && makeinstall-daemon-config
chown-R nagios:nagios /usr/local/nagios/ 启动nrpe客户端命令:/usr/local/nagios/bin/nrpe-c /usr/local/nagios/etc/nrpe.cfg -d3、客户端nrpe设置vi /usr/local/nagios/etc/nrpe.cfg在allowed_hosts=127.0.0.1 字段后面加上nagios服务器端的IP地址allowed_hosts=127.0.0.1,192.168.1.151或者allowed_hosts=127.0.0.1,192.168.1.0/24
2、服务器端安装nagios程序
wget http://sourceforge.net/projects/nagios/files/nagios-3.x/nagios-3.2.1/nagios-3.2.1.tar.gz/download
http://down1.chinaunix.net/distfiles/nagios-plugins-1.4.14.tar.gz
/usr/sbin/useraddnagios
tar zxvfnagios-3.2.1.tar.gz
cdnagios-3.2.1
./configure--prefix=/usr/local/nagios --with-command-group=nagios
make all
make install;makeinstall-init;make install-config;make install-commandmode ;make install-webconf
makeinstall //来安装主程序,CGI和HTML文件
makeinstall-init //在/etc/rc.d/init.d安装启动脚本
makeinstall-config //来安装示例配置文件,安装的路径是/usr/local/nagios/etc
makeinstall-commandmode //来配置目录权限
makeinstall-webconf // 配置nagios跟apache整合
3、安装Nagios-plugins插件,监控用tar zxvfnagios-plugins-1.4.14.tar.gz
cdnagios-plugins-1.4.14
./configure--prefix=/usr/local/nagios --with-nagios-user=nagios --with-nagios-group=nagios
make&& make install
4、服务器端安装nrpe,与客户端通信
tar -xzf nrpe-2.14.tar.gzcd nrpe-2.14 ./configure --enable-ssl --with-ssl-libmake all make install-plugin && make install-daemon&& make install-daemon-configchown -R nagios.nagios /usr/local/nagios5、nagios访问控制设置htpasswd -c /usr/local/nagios/etc/htpasswd.users nagiosadmin
输入两次密码即可,登录页面的时候会用到这个密码.
6、重启nagios、httpd服务
重启前
/usr/local/nagios/bin/nagios-v /usr/local/nagios/etc/nagios.cfg 检测是否正确
重启nagios,/etc/init.d/nagios restart ;/etc/init.d/httpd restart ;
7、Nagios测试访问 用户名:nagiosadminhttp://localhost/nagios/ 如下图:
点击左侧的Hosts可以看到右侧默认localhost主机的监控,UP表示主机目前运行正常:
点击左侧的Services可以看到右侧默认localhost监控的各个服务的状态,绿色OK表示正常:
取消
大喇叭,
点击大喇叭图标-- Enable notifications forthis service
点commit
Error:Could not opencommand file '/usr/local/nagios/var/rw/nagiosNaNd' for update! 错误提示没有权限,
授权这个文件 chmod 777 /usr/local/nagios/var/rw/nagiosNaNd
出现错误:
HTTP WARNING:HTTP/1.1 403 Forbidden - 5159 bytes in 0.002 second response time(警告:HTTP HTTP / 1.1没有权限访问此网站-0.002秒的响应时间5159个字节)
新建网页index.html并授权
chmod o+w/var/www/html/index.html
二、Nagios监控客户端安装
1、安装nagios-plugins
useradd -s /sbin/nologin nagiostar -xzf nagios-plugins-1.4.14.tar.gzcd nagios-plugins-1.4.14 ./configure --prefix=/usr/local/nagios &&make &&make install2、客户端安装nrpe
tar -xzfnrpe-2.14.tar.gz && cd nrpe-2.14 &&
./configure--enable-ssl --with-ssl-lib &&
make all
makeinstall-plugin && make install-daemon && makeinstall-daemon-config
chown-R nagios:nagios /usr/local/nagios/ 启动nrpe客户端命令:/usr/local/nagios/bin/nrpe-c /usr/local/nagios/etc/nrpe.cfg -d3、客户端nrpe设置vi /usr/local/nagios/etc/nrpe.cfg在allowed_hosts=127.0.0.1 字段后面加上nagios服务器端的IP地址allowed_hosts=127.0.0.1,192.168.1.151或者allowed_hosts=127.0.0.1,192.168.1.0/24

相关文章推荐
- 网络监控器Nagios全攻略
- 基于Nagios网络监控平台的实现--具体事例
- Nagios 笔记 Nagios服务端+客户端 + 短信报警 + 性能显示的图形插件
- FreeBSD下解决Nagios不发报警邮件的问题
- 收到新书两本
- nagios 分发文件实现代码
- Shell脚本编写Nagios插件监控程序资源占用
- Nagios监控Windows Server 2008配置方法
- Shell脚本实现批量生成nagios配置文件
- 基于Linux下Nagios的安装与配置说明介绍[图]
- shell脚本监控linux系统内存使用情况的方法(不使用nagios监控linux)
- Nagios远程监控安装与配置详解图文第1/3页
- 利用Nagios调用Python程序控制微信公众平台发布报警信息
- 运维网集成制作发布的Cacti+Nagios(中英文版全自动安装)
- memcached监控的几种方法(nagios等)
- nagios的安装,下载.
- Nagios安装与配置
- Nagios常见问题