【BLE】CC2541之indicate
2015-10-05 22:17
423 查看
本篇博文最后修改时间:2017年08月31日,17:00。
一、简介
本文以SimpleBLEPeripheral为例,讲述如何通过按五项按键的“center”键发送indicate数据给btool,用PC的串口工具打印出“indicate”的“发数据”和“应答”的过程。
二、实验平台
协议栈版本:BLE-CC254x-1.4.0
编译软件:IAR 8.20.2
硬件平台:Smart RF开发板(主芯片CC2541)
三、版权声明
博主:甜甜的大香瓜
声明:喝水不忘挖井人,转载请注明出处。
原文地址:http://blog.csdn.NET/feilusia
联系方式:897503845@qq.com
香瓜BLE之CC2541群:127442605
香瓜BLE之CC2640群:557278427
香瓜BLE之Android群:541462902
香瓜嵌入式之STM8/STM32群:164311667
香瓜嵌入式之Linux:512598061
香瓜嵌入式之职场交流:450154342
香瓜嵌入式之英语尬聊:169024332
opengua官方旗舰店:https://shop217632629.taobao.com/?spm=2013.1.1000126.d21.hd2o8i
四、实验前提
1、在进行本文步骤前,请先阅读以下博文:
暂无
2、在进行本文步骤前,请先实现以下博文:
1)《CC2541之按键》:http://blog.csdn.NET/feilusia/article/details/47336473
五、基础知识
1、什么是indicate?
答:indicate译为“指示”,它是服务器给客户端发送数据的方式。
2、它与notify有什么不同?
答:它在使用上比notify多一个应答的步骤,如下图:
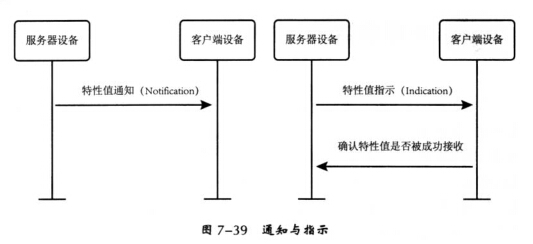
注:有应答的通信方式“indicate”,更适用于可靠的通信方式。
3、indicate的指示开关如何打开、关闭?
答:

也就是0x0002写到属性为“indicate”的特征值的CCC位,则开指示;如果写0x0000,则关指示。
注:如果写0x0001到属性为“indicate”的特征值的CCC位,无用。
六、实验步骤
1、添加属性为indicate的特征值char7([b]simpleGATTprofile.c中)[/b]
1)修改simpleGATTprofile.h 的宏定义
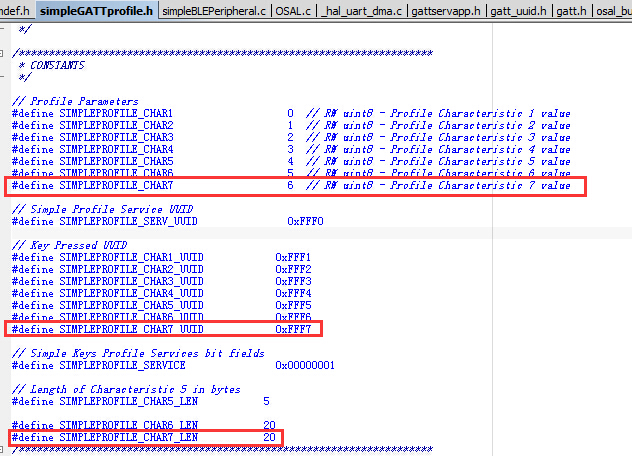
2)添加char7的UUID
3)添加char7的设置属性
4)属性表修改
①修改属性表的大小
②修改属性表
5)修改参数函数
①在SimpleProfile_SetParameter中添加
②在SimpleProfile_GetParameter中添加
6)修改读写特征值函数
①在simpleProfile_ReadAttrCB中添加
②在simpleProfile_WriteAttrCB中修改
③添加char7的CCC在属性表中偏移值的宏
7)修改SimpleProfile_AddService
8)修改simpleProfile_HandleConnStatusCB
9)修改应用层时初始化特征值的部分(simpleBLEPeripheral.c的SimpleBLEPeripheral_Init中)
2、添加indicate函数
1)添加char7的value在属性表中的偏移值的宏(simpleGATTprofile.c)
2)添加indicate指示函数(simpleGATTprofile.c)
3)声明函数(simpleGATTprofile.h)
3、在应用层使用indicate发送数据[b](simpleBLEPeripheral.c中)[/b]
1)按键处理处[b]simpleBLEPeripheral_HandleKeys添加[/b]
调用SimpleGATTprofile_Char7_Indicate函数时,最后一个参数simpleBLEPeripheral_TaskID就是indicate应答会返回的任务ID处,所以indicate应答才会返回应用层。
GATT_Indication函数说明有以下一段注释:
2)应用层事件处理函数添加GATT_MSG_EVENT事件
因此在这里添加一个indicate的消息处理函数。
3)定义一个indicate的消息处理函数
4)声明indicate的消息处理函数
七、注意事项
暂无
八、实验结果
1、btool与Smart RF连接后,按五向按键的“center”键
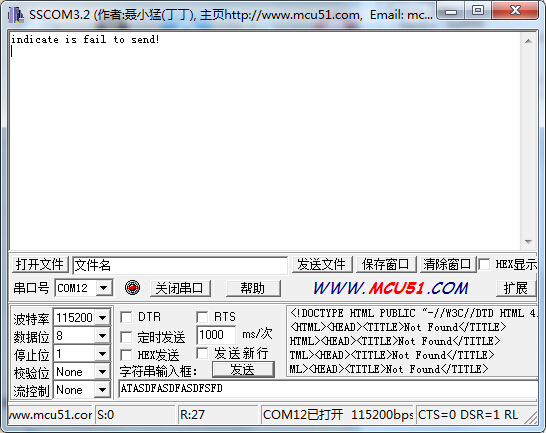
显示错误是正常,因为此时指示开关还没有打开。
2、打开指示开关
方法一(主机端打开指示开关):
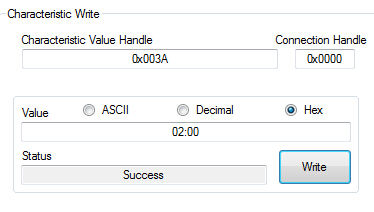
0x003A是char7的CCC的特征值句柄,往里写0x0002打开指示开关。
方法二(从机端打开指示开关):
3、再按五向按键的“center”键发送indicate数据

看串口工具:
“indicate is seccess to send!”代表Smart RF发送indicate数据发送成功。
“Indication_ProcessGattMsg”则代表btool返回的应答消息到达了应用层。
看btool:
收到了Smart RF发出的20个字节的数据。
因此,实验成功。
一、简介
本文以SimpleBLEPeripheral为例,讲述如何通过按五项按键的“center”键发送indicate数据给btool,用PC的串口工具打印出“indicate”的“发数据”和“应答”的过程。
二、实验平台
协议栈版本:BLE-CC254x-1.4.0
编译软件:IAR 8.20.2
硬件平台:Smart RF开发板(主芯片CC2541)
三、版权声明
博主:甜甜的大香瓜
声明:喝水不忘挖井人,转载请注明出处。
原文地址:http://blog.csdn.NET/feilusia
联系方式:897503845@qq.com
香瓜BLE之CC2541群:127442605
香瓜BLE之CC2640群:557278427
香瓜BLE之Android群:541462902
香瓜嵌入式之STM8/STM32群:164311667
香瓜嵌入式之Linux:512598061
香瓜嵌入式之职场交流:450154342
香瓜嵌入式之英语尬聊:169024332
opengua官方旗舰店:https://shop217632629.taobao.com/?spm=2013.1.1000126.d21.hd2o8i
四、实验前提
1、在进行本文步骤前,请先阅读以下博文:
暂无
2、在进行本文步骤前,请先实现以下博文:
1)《CC2541之按键》:http://blog.csdn.NET/feilusia/article/details/47336473
五、基础知识
1、什么是indicate?
答:indicate译为“指示”,它是服务器给客户端发送数据的方式。
2、它与notify有什么不同?
答:它在使用上比notify多一个应答的步骤,如下图:
注:有应答的通信方式“indicate”,更适用于可靠的通信方式。
3、indicate的指示开关如何打开、关闭?
答:
也就是0x0002写到属性为“indicate”的特征值的CCC位,则开指示;如果写0x0000,则关指示。
注:如果写0x0001到属性为“indicate”的特征值的CCC位,无用。
六、实验步骤
1、添加属性为indicate的特征值char7([b]simpleGATTprofile.c中)[/b]
1)修改simpleGATTprofile.h 的宏定义
2)添加char7的UUID
// Characteristic 7 UUID: 0xFFF7
CONST uint8 simpleProfilechar7UUID[ATT_BT_UUID_SIZE] =
{
LO_UINT16(SIMPLEPROFILE_CHAR7_UUID), HI_UINT16(SIMPLEPROFILE_CHAR7_UUID)
};
3)添加char7的设置属性
// Simple Profile Characteristic 7 Properties
static uint8 simpleProfileChar7Props = GATT_PROP_INDICATE;

// Characteristic 7 Value
static uint8 simpleProfileChar7[SIMPLEPROFILE_CHAR7_LEN] = {0};

// Simple Profile Characteristic 7 Configuration Each client has its own
// instantiation of the Client Characteristic Configuration. Reads of the
// Client Characteristic Configuration only shows the configuration for
// that client and writes only affect the configuration of that client.
static gattCharCfg_t simpleProfileChar7Config[GATT_MAX_NUM_CONN];

// Simple Profile Characteristic 7 User Description
static uint8 simpleProfileChar7UserDesp[17] = "Characteristic 7\0";
4)属性表修改
①修改属性表的大小
#define SERVAPP_NUM_ATTR_SUPPORTED 25具体要看属性表有多少个属性。
②修改属性表
// Characteristic 7 Declaration
{
{ ATT_BT_UUID_SIZE, characterUUID },
GATT_PERMIT_READ,
0,
&simpleProfileChar7Props
},

// Characteristic Value 7
{
{ ATT_BT_UUID_SIZE, simpleProfilechar7UUID },
0,
0,
simpleProfileChar7
},

// Characteristic 7 configuration
{
{ ATT_BT_UUID_SIZE, clientCharCfgUUID },
GATT_PERMIT_READ | GATT_PERMIT_WRITE,
0,
(uint8 *)simpleProfileChar7Config
},

// Characteristic 7 User Description
{
{ ATT_BT_UUID_SIZE, charUserDescUUID },
GATT_PERMIT_READ,
0,
simpleProfileChar7UserDesp
},
5)修改参数函数
①在SimpleProfile_SetParameter中添加
case SIMPLEPROFILE_CHAR7:
if ( len == SIMPLEPROFILE_CHAR7_LEN )
{
VOID osal_memcpy( simpleProfileChar7, value, SIMPLEPROFILE_CHAR7_LEN );
}
else
{
ret = bleInvalidRange;
}
break;
②在SimpleProfile_GetParameter中添加
case SIMPLEPROFILE_CHAR7:
VOID osal_memcpy( value, simpleProfileChar7, SIMPLEPROFILE_CHAR7_LEN );
break;
6)修改读写特征值函数
①在simpleProfile_ReadAttrCB中添加
case SIMPLEPROFILE_CHAR7_UUID:
*pLen = SIMPLEPROFILE_CHAR7_LEN;
VOID osal_memcpy( pValue, pAttr->pValue, SIMPLEPROFILE_CHAR7_LEN );
break;
以上的添加实际上没什么用,但是跟char4一样统一。
②在simpleProfile_WriteAttrCB中修改
case GATT_CLIENT_CHAR_CFG_UUID:
if ( pAttr->handle == simpleProfileAttrTbl[ATTRTBL_CHAR4_CCC_IDX].handle )//CHAR4 NOTIFY
{
// BloodPressure Notifications
status = GATTServApp_ProcessCCCWriteReq( connHandle, pAttr, pValue, len,
offset, GATT_CLIENT_CFG_NOTIFY );
}
else if ( pAttr->handle == simpleProfileAttrTbl[ATTRTBL_CHAR6_CCC_IDX].handle )//CHAR6 NOTIFY
{
// BloodPressure Notifications
status = GATTServApp_ProcessCCCWriteReq( connHandle, pAttr, pValue, len,
offset, GATT_CLIENT_CFG_NOTIFY );
}
else if ( pAttr->handle == simpleProfileAttrTbl[ATTRTBL_CHAR7_CCC_IDX].handle )//CHAR7 INDICATE
{
// BloodPressure Indications
status = GATTServApp_ProcessCCCWriteReq( connHandle, pAttr, pValue, len,
offset, GATT_CLIENT_CFG_INDICATE );
}
else
{
status = ATT_ERR_INVALID_HANDLE;
}

break;注意,这里每个具备notify和indicate属性的都需要添加一个对应的代码,否则CCC开关开不起来。③添加char7的CCC在属性表中偏移值的宏
#define ATTRTBL_CHAR7_CCC_IDX 23注:char4和char6等其他notify、indicate属性的自行添加。这里只添加char7的。
7)修改SimpleProfile_AddService
bStatus_t SimpleProfile_AddService( uint32 services )
{
uint8 status = SUCCESS;

// Initialize Client Characteristic Configuration attributes
GATTServApp_InitCharCfg( INVALID_CONNHANDLE, simpleProfileChar4Config );
GATTServApp_InitCharCfg( INVALID_CONNHANDLE, simpleProfileChar6Config );
GATTServApp_InitCharCfg( INVALID_CONNHANDLE, simpleProfileChar7Config );

// Register with Link DB to receive link status change callback
VOID linkDB_Register( simpleProfile_HandleConnStatusCB );

if ( services & SIMPLEPROFILE_SERVICE )
{
// Register GATT attribute list and CBs with GATT Server App
status = GATTServApp_RegisterService( simpleProfileAttrTbl,
GATT_NUM_ATTRS( simpleProfileAttrTbl ),
&simpleProfileCBs );
}

return ( status );
}
8)修改simpleProfile_HandleConnStatusCB
static void simpleProfile_HandleConnStatusCB( uint16 connHandle, uint8 changeType )
{
// Make sure this is not loopback connection
if ( connHandle != LOOPBACK_CONNHANDLE )
{
// Reset Client Char Config if connection has dropped
if ( ( changeType == LINKDB_STATUS_UPDATE_REMOVED )      ||
( ( changeType == LINKDB_STATUS_UPDATE_STATEFLAGS ) &&
( !linkDB_Up( connHandle ) ) ) )
{
GATTServApp_InitCharCfg( connHandle, simpleProfileChar4Config );
GATTServApp_InitCharCfg( connHandle, simpleProfileChar6Config );
GATTServApp_InitCharCfg( connHandle, simpleProfileChar7Config );
}
}
}
9)修改应用层时初始化特征值的部分(simpleBLEPeripheral.c的SimpleBLEPeripheral_Init中)
{
uint8 charValue1 = 1;
uint8 charValue2 = 2;
uint8 charValue3 = 3;
uint8 charValue4 = 4;
uint8 charValue5[SIMPLEPROFILE_CHAR5_LEN] = { 1, 2, 3, 4, 5 };
uint8 charValue6[SIMPLEPROFILE_CHAR6_LEN] = { 1, 2, 3, 4, 5 };
uint8 charValue7[SIMPLEPROFILE_CHAR7_LEN] = { 1, 2, 3, 4, 5, 1, 2, 3, 4, 5, 1, 2, 3, 4, 5, 1, 2, 3, 4, 5, };

SimpleProfile_SetParameter( SIMPLEPROFILE_CHAR1, sizeof ( uint8 ), &charValue1 );
SimpleProfile_SetParameter( SIMPLEPROFILE_CHAR2, sizeof ( uint8 ), &charValue2 );
SimpleProfile_SetParameter( SIMPLEPROFILE_CHAR3, sizeof ( uint8 ), &charValue3 );
SimpleProfile_SetParameter( SIMPLEPROFILE_CHAR4, sizeof ( uint8 ), &charValue4 );
SimpleProfile_SetParameter( SIMPLEPROFILE_CHAR5, SIMPLEPROFILE_CHAR5_LEN, charValue5 );
SimpleProfile_SetParameter( SIMPLEPROFILE_CHAR6, SIMPLEPROFILE_CHAR6_LEN, charValue6 );
SimpleProfile_SetParameter( SIMPLEPROFILE_CHAR7, SIMPLEPROFILE_CHAR7_LEN, charValue7 );
}
2、添加indicate函数
1)添加char7的value在属性表中的偏移值的宏(simpleGATTprofile.c)
#define ATTRTBL_CHAR7_VALUE_IDX 22
2)添加indicate指示函数(simpleGATTprofile.c)
//******************************************************************************
//name:         SimpleGATTprofile_Char7_Indicate
//introduce:    指示len长度的数据
//parameter:    connHandle:连接句柄
//              pValue:要通知的数据,范围为0~SIMPLEPROFILE_CHAR7_LEN,最多20个字节
//              len:要通知的数据的长度
//              taskId:应答时要返回到的那个任务的id
//return:       none
//******************************************************************************
bStatus_t SimpleGATTprofile_Char7_Indicate( uint16 connHandle, uint8 *pValue, uint8 len, uint8 taskId)
{
attHandleValueInd_t  indi;
uint16 value;

value  = GATTServApp_ReadCharCfg( connHandle, simpleProfileChar7Config );//读出CCC的值

if ( value & GATT_CLIENT_CFG_INDICATE ) //判断是否打开通知开关,打开了则发送数据
{
indi.handle = simpleProfileAttrTbl[ATTRTBL_CHAR7_VALUE_IDX].handle;
indi.len = len;
osal_memcpy( indi.value, pValue, len);       //数据
return(GATT_Indication( connHandle, &indi, FALSE, taskId ));
}

return(FAILURE);
}
3)声明函数(simpleGATTprofile.h)
//******************************************************************************
//name:         SimpleGATTprofile_Char7_Indicate
//introduce:    指示len长度的数据
//parameter:    connHandle:连接句柄
//              pValue:要通知的数据,范围为0~SIMPLEPROFILE_CHAR7_LEN,最多20个字节
//              len:要通知的数据的长度
//              taskId:应答时要返回到的那个任务的id
//return:       none
//******************************************************************************
bStatus_t SimpleGATTprofile_Char7_Indicate( uint16 connHandle, uint8 *pValue, uint8 len, uint8 taskId);
3、在应用层使用indicate发送数据[b](simpleBLEPeripheral.c中)[/b]
1)按键处理处[b]simpleBLEPeripheral_HandleKeys添加[/b]
if ( keys & HAL_KEY_SW_5 )
{
uint16 notify_Handle;
uint8 *p = buf[20];
uint8 status;

GAPRole_GetParameter( GAPROLE_CONNHANDLE, ¬ify_Handle);                //获取Connection Handle

for(uint8 i = 0; i < 20; i++)       //写一个20字节的测试缓冲区的数据
{
*(p+i) = i;
}

status = SimpleGATTprofile_Char7_Indicate(notify_Handle, p, 20, simpleBLEPeripheral_TaskID);

if(status == SUCCESS)
{
NPI_PrintString("indicate is seccess to send!\r\n");
}
else
{
NPI_PrintString("indicate is fail to send!\r\n");
}
}status为SUCCESS时,说明主机已经写了0x0002到char7的CCC中,打开了指示开关。没连接、没打开指示开关等原因,则status不为SUCCESS。调用SimpleGATTprofile_Char7_Indicate函数时,最后一个参数simpleBLEPeripheral_TaskID就是indicate应答会返回的任务ID处,所以indicate应答才会返回应用层。
GATT_Indication函数说明有以下一段注释:
*          If the return status from this function is SUCCESS, the calling
*          application task will receive an OSAL GATT_MSG_EVENT message.
*          The type of the message will be ATT_HANDLE_VALUE_CFM.
说明indicate的事件是GATT_MSG_EVENT(下面会用到),消息类型是ATT_HANDLE_VALUE_CFM。
2)应用层事件处理函数添加GATT_MSG_EVENT事件
/*********************************************************************
* @fn      simpleBLEPeripheral_ProcessOSALMsg
*
* @brief   Process an incoming task message.
*
* @param   pMsg - message to process
*
* @return  none
*/
static void simpleBLEPeripheral_ProcessOSALMsg( osal_event_hdr_t *pMsg )
{
switch ( pMsg->event )
{
//#if defined( CC2540_MINIDK )
case KEY_CHANGE:
simpleBLEPeripheral_HandleKeys( ((keyChange_t *)pMsg)->state, ((keyChange_t *)pMsg)->keys );
break;
//#endif // #if defined( CC2540_MINIDK )

case GATT_MSG_EVENT:
Indication_ProcessGattMsg( (gattMsgEvent_t *) pMsg );
break;

default:
// do nothing
break;
}
}由于这个事件是底层传上来的,所以会传到系统消息处理的地方。因此在这里添加一个indicate的消息处理函数。
3)定义一个indicate的消息处理函数
/*********************************************************************
* @fn      Indication_ProcessGattMsg
*
* @brief   Process GATT messages
*
* @return  none
*/
static void Indication_ProcessGattMsg( gattMsgEvent_t *pMsg )
{
NPI_PrintString("Indication_ProcessGattMsg\r\n");
}
4)声明indicate的消息处理函数
static void Indication_ProcessGattMsg( gattMsgEvent_t *pMsg );
七、注意事项
暂无
八、实验结果
1、btool与Smart RF连接后,按五向按键的“center”键
显示错误是正常,因为此时指示开关还没有打开。
2、打开指示开关
方法一(主机端打开指示开关):
0x003A是char7的CCC的特征值句柄,往里写0x0002打开指示开关。
方法二(从机端打开指示开关):
GATTServApp_WriteCharCfg(connHandle, simpleProfileChar7Config, 0x0002);不建议从机端自己打开此开关,应尽量保证主机来控制从机。
3、再按五向按键的“center”键发送indicate数据
看串口工具:
“indicate is seccess to send!”代表Smart RF发送indicate数据发送成功。
“Indication_ProcessGattMsg”则代表btool返回的应答消息到达了应用层。
看btool:
收到了Smart RF发出的20个字节的数据。
因此,实验成功。

相关文章推荐
- Allods IP
- 学习计划
- iOS开发分分钟搞定C语言 —— 进制
- QT5 学习之路25---画刷和画笔
- leetcode206 Reverse Linked List
- 第二次作业
- 解剖窗口程序
- 深入理解按位异或运算符
- Npoi导出word(Peanuts)
- 【动态域名解析工具】tunnel,国内版的ngrok,花生壳可以睡觉了
- android wear开发:为可穿戴设备创建一个通知 - Creating a Notification for Wearables
- [C++] c language 23 keywords
- java io 读写对象
- 将IP地址转换为整数
- Google Spanner和F1介绍
- Google Spanner和F1介绍
- [深入理解Java虚拟机]第三章 垃圾收集器及相关参数
- 例题8-2 联合国大楼 UVa 1605
- poj 1753
- 【PostgreSQL学习之旅】第一篇:Linux和Windows下安装PostgreSQL9.4