IOS-UI-基础开发
2015-09-22 12:22
651 查看
IOS之UI基础
2.1 增强版Hello World2.2 MVC设计模式
2.3 Cocoa MVC
2.4 视图控制器的方法
2.5 输出口和动作
2.6 键盘输入
2.7 使用AlertView
2.8 使用ActionSheet
2.8 等待有关控件
2.9 屏幕旋转
2.1 增强版Hello World
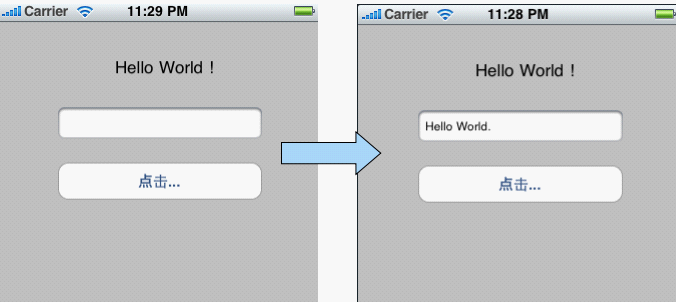
实现步骤
1.创建Hello World工程
在Xcode中创建Hello World工程,基于iPhone试图基础应用程序。
iPhone OS ->Application ->View-based Application
2.修改Hello_WorldViewController.h
需要UITextField控件接受文字和响应一个按钮点击事件,所以在h文件中我们要定义一个UITextField属性和一个响应事件方法
#import <UIKit/UIKit.h>

@interface Hello_WorldViewController : UIViewController {
UITextField *txtField;
}

@property (nonatomic, retain) IBOutlet UITextField *txtField;

-(IBAction)onClickButton:(id)sender;

@end
3.修改Hello_WorldViewController.m
实现txtField属性
实现-(IBAction)onClickButton:(id)sender 方法
#import "Hello_WorldViewController.h"

@implementation Hello_WorldViewController

@synthesize txtField;

-(IBAction)onClickButton:(id)sender {
txtField.text = @"Hello World.";
}

- (void)viewDidUnload {
self.txtField = nil;
}

- (void)dealloc {
[txtField dealloc];
[super dealloc];
}

@end
4.使用IB设计页面,摆放控件
Resources/Hello_WorldViewController.xib文件,打开Library将控件拖入设计窗口
5.连接输出口
为了将控件属性通过屏幕“输入”或“输出”,我们需要定义“输出口”,在控制器中我们已经定义了与这个数据对 应的属性:
@property (nonatomic, retain) IBOutlet
UITextField *txtField;
UITextField用于展示输出和输入数据。在iPhone(包括Mac)开发时候控件属性要通过定义输出口才能在屏幕中使用 的。

6.处理事件
为了响应控件的事件,我们需要在控制器中定义一个事件处理方法:
-(IBAction)onClickButton:(id)sender;
在iPhone(包括Mac)开发控件事件处理要自己编写对应方法,并在IB中将控件的事件与该方法连接起来。

2.2 MVC设计模式
MVC是一种设计模式,所谓设计模式就是解决某一特定问题的方案,MVC是解决具有UI的应用系统的成熟解决方案,在Cocoa应用系统中严格按照该模式实现。M-Model(模型)是应用系统中与视图对于部分的数据。V -View(视图)是应用系统中用户看到并与之交互的界面。C-Controller(控制器)是应用系统中起到控制器作用,接受用户事件,显示数据等等,与视图进行交互等。
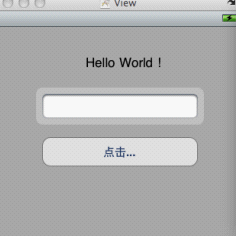
2.3 Cocoa MVC
采用MVC 设计模式意味着,Interface Builder 不需要编写或生成任何代码,您只需专注于应用程序的视图。Mac 的Cocoa 绑定消除了大部分的黏合代码,它就像连接在Xcode 编写的控制器和Interface Builder 设计的视图之间的一条线,用图形化的表示方法简化了二者之间的关系。Interface Builder 和Cocoa 可以快速开发地您的应用程序。
File's owner:
2.4 视图控制器的方法
- (id)initWithNibName:(NSString *)nibNameOrNil bundle:(NSBundle *)nibBundleOrNil如果视图使用NIB文件创建,在加载视图之前调用这个方法,做一些初始化工作。
- (void)loadView
视图加载的时候调用的方法一般不使用NIB文件创建视图的时候使用,而是使用代码创建视图对象。
- (void)viewDidLoad
视图加载之后调用的方法,我们常常在这个方法中做视图初始化出来。
- (void)didReceiveMemoryWarning
当系统内存警告的时候调用的方法,我们一般在该方法释放消耗资源的对象。
- (BOOL)shouldAutorotateToInterfaceOrientation:(UIInterfaceOrientation)interfaceOrientation
用于处理屏幕旋转的方法。
- (void)viewDidUnload
视图对象卸载的使用调用的方法,一般在把内存视图中的属性设置为nil值。
- (void)viewDidUnload {
self.txtField = nil;
}
- (void)dealloc
视图对象内存释放的时候调用的方法,在该方法中先要释放掉成员变量。
- (void)dealloc {
[txtField dealloc];
[super dealloc];
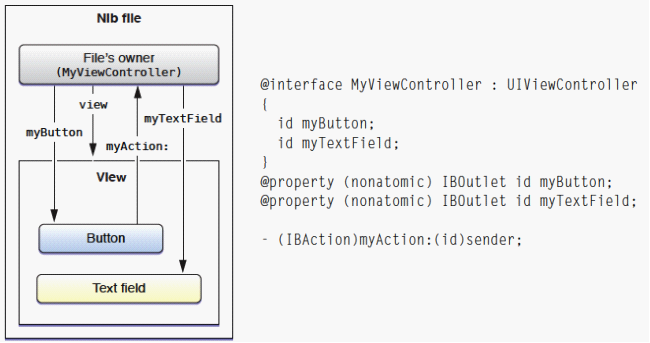
}2.5 输出口和动作
输出口(Outlet),为了实现控制器在视图上输入输出结果,需要定义输出口。定义输出口,是在ViewController定义一个控件属性,如下:
//h文件
@interface Hello_WorldViewController : UIViewController {
UITextField *txtField;
}

@property (nonatomic, retain) IBOutlet UITextField *txtField;

//m文件
@synthesize txtField;
动作(Action),为了实现视图控制器响应视图事件,需要定义动作。
定义动作,是在ViewController定义一个方法,如下:
//h文件
-(IBAction)onClickButton:(id)sender;

//m文件
-(IBAction)onClickButton:(id)sender {
txtField.text = @"Hello World.";
}
动作(Action)是在控件器中的方法,但它的返回类型必须是IBAction声明的,该关键字告诉IB,此方法是个Action,可以被某个事件触发。
2.6 键盘输入
在iPhone应用程序中,键盘输入处理比较麻烦。在输入完成后我们需要自己关闭键盘。在iPhone中我们还可以指定键盘输入类型,可以是Email、电话和数字等类型。
输入完成关闭键盘:
Phone中文本框输入后,键盘是不会关闭的,必须编写代码。
1 为关闭键盘添加事件处理方法:
//h file
-(IBAction)textFieldDoneEditing:(id)sender;
//m file
-(IBAction)textFieldDoneEditing:(id)sender {
[sender resignFirstResponder];
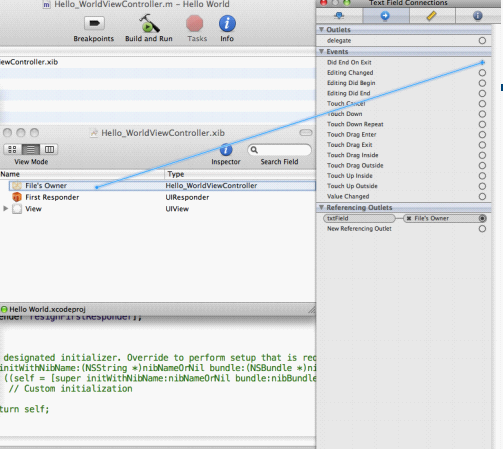
}2 链接事件
文本框对象的Did End On Exit事件链接到File’s Owner。

3 小结
点击键盘中的“换行”或“return”键关闭键盘。 第一响应者是当前与用户交互的控件,在这个例子中,点击TextField控件,它就变成第一响应者键盘就会自动出现。
[sender resignFirstResponder];
是使TextField控件放弃第一响应者状态。
4 通过触摸背景关闭键盘
点击关闭键盘中的“return”关闭键盘比较麻烦,我们可以通过触摸背景关闭键盘。
//h
-(IBAction)backgroundTap:(id)sender;

//m
-(IBAction)backgroundTap:(id)sender {
[txtField resignFirstResponder];
}
5 连接动作和事件
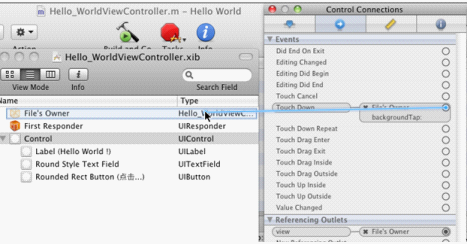
为了使背景控件能够响应事件,我们需要背景View的父类(UIView)修改成为UIControl,UIControl是能够触发actionɼ所有控件都是UIControl的子类。而UIControl是UIView子类,也具有View基本特征。
从Touch Down事件拖到File’s Owner图标,然后选择backgroundTap:动作。这样触摸视图中没有活动的控件的任何位置就可以触发backgroundTap:动作,关闭键盘。
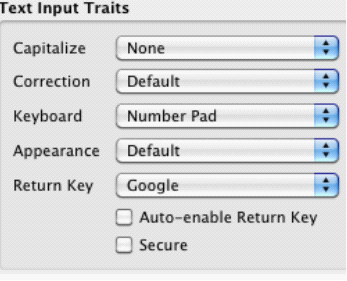
6 键盘输入类型
在iPhone中我们还可以指定键盘输入类型,可以是Email、电话和数字等类型。
Email键盘 数字键盘 电话键盘
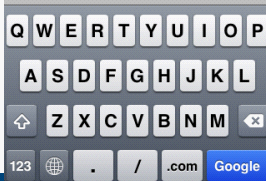


7 Return Key设定
在键盘输入属性框中我们可以定义Return Key,可以有Google等等。但是这些并没有实际的含义,只是代表它可以触发输入完成事件(Did End On Exit)。
2.7 使用AlertView
修改Hello World项目代码,添加AlertView:修改Hello-.m代码
-(IBAction)onClickButton:(id)sender {
//txtField.text = @"Hello World.";
NSString *str = [[NSString alloc] initWithFormat:@"Hello. %@", txtField.text];
UIAlertView *alert = [[UIAlertView alloc] initWithTitle:@"Hello!"
message:str delegate:self
cancelButtonTitle:@"Done"
otherButtonTitles:nil];
[alert show];
[alert release];
[str release];
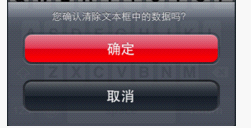
}2.8 使用ActionSheet
ActionSheet和AlertView比较相似都是给用户一个提示信息。它是从底部弹出。它通常用于确认潜在的危险或不能撤消的操作,如删除一个数据。 为了使用ActionSheet我们需要在h文件中实现UIActionSheetDelegate协议。其中,我们常常需要实现: actionSheet:didDismissWithButtonIndex:
该方法是ActionSheet消失的时候调用。
修改Hello-.h文件
在Hello_WorldViewController.h文件中添加协议UIActionSheetDelegate:
//h
#import <UIKit/UIKit.h>

@interface Hello_WorldViewController : UIViewController
<UIActionSheetDelegate> {
UITextField *txtField;
}

@property (nonatomic, retain) IBOutlet UITextField *txtField;

-(IBAction)onClickButton:(id)sender;

@end
//m
#import "Hello_WorldViewController.h"
@implementation Hello_WorldViewController
@synthesize txtField;
-(IBAction)onClickButton:(id)sender {
//txtField.text = @"Hello World.";
UIActionSheet *actionSheet = [[UIActionSheet alloc]
initWithTitle:@"您确认清除文本框中的数据吗?"
delegate:self
cancelButtonTitle:@"取消"
destructiveButtonTitle:@"确定"
otherButtonTitles:nil];
// NSArray *array = [[NSArray alloc] initWithObjects:
// [NSString stringWithString:@"1st Button"],
// [NSString stringWithString:@"2nd Button"],
// [NSString stringWithString:@"3rd Button"],
// [NSString stringWithString:@"4th Button"],
// nil];
//
// UIActionSheet *actionSheet = [[UIActionSheet alloc] initWithTitle:@"Title Here"
// delegate:self
// cancelButtonTitle:nil
// destructiveButtonTitle:nil
// otherButtonTitles:nil];
//
// for (int i = 0; i < 3; i++) {
//
// [actionSheet addButtonWithTitle:[array objectAtIndex:i]];
//
// }
//
// [actionSheet addButtonWithTitle:@"Cancel"];
// actionSheet.cancelButtonIndex = 4;
[actionSheet showInView:self.view];
[actionSheet release];
}
-(void)actionSheet:(UIActionSheet *)actionSheet
didDismissWithButtonIndex:(NSInteger)buttonIndex {
if (buttonIndex == [actionSheet destructiveButtonIndex]) {
txtField.text = @"";
}
}
- (void)viewDidUnload { self.txtField = nil; }
- (void)dealloc { [txtField dealloc]; [super dealloc]; }
@end
2.8 等待有关控件
对于一些费时的处理,需要使用一些等待控件消除用户心里等待的时间。等待有关的控件有:
" UIActivityIndicatorView
" UIProgressView
UIActivityIndicatorView:

UIActivity-.h
@interface UIActivityIndicatorViewController : UIViewController {
UIActivityIndicatorView * myActivityView;
}

@property (nonatomic, retain) IBOutlet UIActivityIndicatorView * myActivityView;

-(IBAction)onClickButton: (id)sender;

@end
UIActivity-.m
#import "UIActivityIndicatorViewController.h"

@implementation UIActivityIndicatorViewController

@synthesize myActivityView;

-(IBAction)onClickButton: (id)sender {
if ([myActivityView isAnimating]) {
[myActivityView stopAnimating];
} else {
[myActivityView startAnimating];
}
}

- (void)dealloc {
[myActivityView release];
[super dealloc];
}

@end
UIProgressView

Progress-.h
@interface ProgressViewViewController : UIViewController {
IBOutlet UIProgressView *Progress;
NSTimer *timer;
}

@property (nonatomic, retain) IBOutlet UIProgressView *Progress;
@property (nonatomic, assign) NSTimer *timer;

-(IBAction)start;

@end
Progress-.m
@synthesize  Progress;
@synthesize timer;

- (void)viewDidLoad {
[super viewDidLoad];
}

-(IBAction)start{
Progress.progress = 0.0;
timer = [NSTimer
scheduledTimerWithTimeInterval:1.0
target:self
selector:@selector(update)
userInfo:nil repeats:YES];
}
NSTimer是可以隐式地启动一个线程,scheduledTimerWithTimeInterval指定线程要休眠多少时间调用一次,selector所指定的方法update
Progress-.m
-(void)update{
Progress.progress = Progress.progress + 0.1;
if (Progress.progress == 1.0) {
[timer invalidate];
UIAlertView *alert = [[UIAlertView alloc]
initWithTitle:@"任务通知"
message:@"硬盘格式化完成!"
delegate:self
cancelButtonTitle:@"OK"
otherButtonTitles:nil];
[alert show];
[alert release];
}
}

- (void)viewDidUnload {
self.Progress = nil;
}

- (void)dealloc {
[Progress release];
[super dealloc];
}
UIProgressView控件的progress属性是0.0~1.0烦范围。0.0时候在开始的位置,1.0时候是进度到了100%。
2.9 屏幕旋转
iPhone中有重力感应我们可以通过旋转手机使屏幕旋转。但是屏幕旋转后页面的布局需要注意。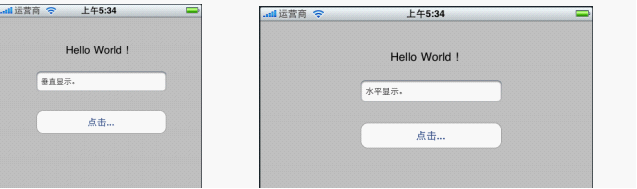
屏幕旋转的类型
UIInterfaceOrientationPortrait,垂直向上
UIInterfaceOrientationPortraitUpsideDown,垂直倒放。
UIInterfaceOrientationLandscapeLeft,水平向左。
UIInterfaceOrientationLandscapeRight,水平向右。
注意:以手机屏幕为参照物的向左、向右。
开启旋转 :可以通过shouldAutorotateToInterfaceOrientation:方法开启或禁止旋转。
允许任何方向的旋转:
- (BOOL)shouldAutorotateToInterfaceOrientation:(UIInterfaceOrientation)interfaceOrientation {
return YES;
}
垂直向上和水平向右:
- (void)willAnimateRotationToInterfaceOrientation: (UIInterfaceOrientation) interfaceOrientation duration: (NSTimeInterval) duration {
if (interfaceOrientation == UIInterfaceOrientationPortrait || interfaceOrientation == UIInterfaceOrientationPortraitUpsideDown) {

} else {

}
}
触发旋转事件 :
我们可以在屏幕旋转的时候触发很多事件,其中willAnimateRotationToInterfaceOrientation是我们常用的事件,这个事件是在即将开始屏幕旋转动画的时候触发。
- (void)willAnimateRotationToInterfaceOrientation: (UIInterfaceOrientation) interfaceOrientation duration: (NSTimeInterval) duration {
if (interfaceOrientation == UIInterfaceOrientationPortrait || interfaceOrientation == UIInterfaceOrientationPortraitUpsideDown) {
txtField.text = @"垂直显示。";
} else {
txtField.text = @"水平显示。";
}
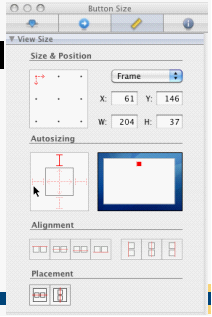
}自动调整屏幕控件
由于屏幕旋转后,控件的位置会发生变化,我们要让这些控件能够摆放相对比较合理。我们可以通过“Control Size”调整。 其中红色实线代表绝对位置, 红色虚线代表相对位置。
横屏竖屏切换不同视图

新建工程Swap
SwapViewController.h文件
#import <UIKit/UIKit.h>
#define degreesToRadians(x) (M_PI * (x) / 180.0)

@interface SwapViewController : UIViewController {
UIView *landscape;
UIView *portrait;

UIButton *landscapeFooButton;//Foo
UIButton *portraitFooButton;

UIButton *landscapeBarButton;//Bar
UIButton *portraitBarButton;
}

@property (nonatomic, retain) IBOutlet UIView *landscape;
@property (nonatomic, retain) IBOutlet UIView *portrait;
@property (nonatomic, retain) IBOutlet UIButton *landscapeFooButton;
@property (nonatomic, retain) IBOutlet UIButton *portraitFooButton;
@property (nonatomic, retain) IBOutlet UIButton *landscapeBarButton;
@property (nonatomic, retain) IBOutlet UIButton *portraitBarButton;

-(IBAction) buttonPressed:(id)sender;

@end
#define degreesToRadians(X) (M_PI * (x) / 180.0)这是一个宏,用于在度数和弧度之间的转换。
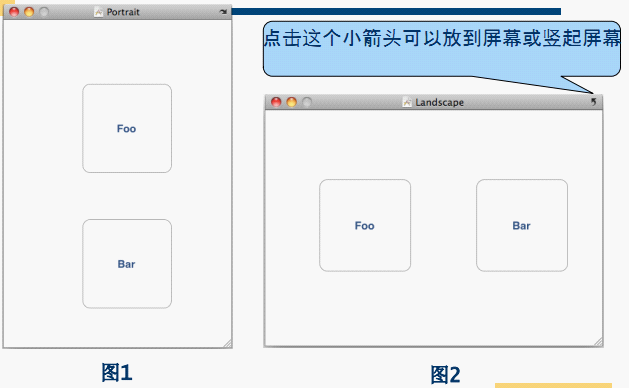
landscape水平视图,portrait垂直视图;
landscapeFooButton水平视图中Foo按钮;
portraitFooButton垂直视图中Foo按钮;
landscapeBarButton水平视图中Bar按钮;
portraitBarButton垂直视图中Bar按钮。
视图设计
输出口和事件

编写m实现文件
#import "SwapViewController.h"

@implementation SwapViewController

@synthesize landscape;
@synthesize portrait;
@synthesize landscapeFooButton;
@synthesize portraitFooButton;
@synthesize landscapeBarButton;
@synthesize portraitBarButton;

-(IBAction) buttonPressed:(id)sender {
if (sender == portraitFooButton) {
NSLog(@"portraitFooButton press.");
} else if (sender == landscapeFooButton) {
NSLog(@"landscapeFooButton press.");
} else if (sender == landscapeBarButton) {
NSLog(@"landscapeBarButton press.");
} else {
NSLog(@"portraitBarButton press.");
}
}

// Override to allow orientations other than the default portrait orientation.
- (BOOL)shouldAutorotateToInterfaceOrientation:(UIInterfaceOrientation)interfaceOrientation {
// Return YES for supported orientations
//return (interfaceOrientation == UIInterfaceOrientationPortrait);
return YES;
}

-(void) willAnimateRotationToInterfaceOrientation: (UIInterfaceOrientation)interfaceOrientation duration: (NSTimeInterval)duration{

if (interfaceOrientation == UIInterfaceOrientationPortrait) {
self.view = self.portrait;
self.view.transform = CGAffineTransformIdentity;
self.view.transform = CGAffineTransformMakeRotation(degreesToRadians(0));
self.view.bounds = CGRectMake(0.0, 0.0, 320.0, 460.0);
} else if (interfaceOrientation == UIInterfaceOrientationLandscapeLeft) {
self.view = self.landscape;
self.view.transform = CGAffineTransformIdentity;
self.view.transform = CGAffineTransformMakeRotation(degreesToRadians(-90));
self.view.bounds = CGRectMake(0.0, 0.0, 480.0, 300.0);
} else if (interfaceOrientation == UIInterfaceOrientationPortraitUpsideDown) {
self.view = self.portrait;
self.view.transform = CGAffineTransformIdentity;
self.view.transform = CGAffineTransformMakeRotation(degreesToRadians(180));
self.view.bounds = CGRectMake(0.0, 0.0, 320.0, 460.0);
} else if (interfaceOrientation == UIInterfaceOrientationLandscapeRight) {
self.view = self.landscape;
self.view.transform = CGAffineTransformIdentity;
self.view.transform = CGAffineTransformMakeRotation(degreesToRadians(90));
self.view.bounds = CGRectMake(0.0, 0.0, 480.0, 300.0);
}

}

- (void)didReceiveMemoryWarning {
// Releases the view if it doesn't have a superview.
[super didReceiveMemoryWarning];

// Release any cached data, images, etc that aren't in use.
}

- (void)viewDidUnload {
// Release any retained subviews of the main view.
self.landscape = nil;
self.portrait = nil;
self.landscapeFooButton = nil;
self.portraitFooButton = nil;
self.landscapeBarButton = nil;
self.portraitBarButton = nil;
}

- (void)dealloc {
[landscape release];
[portrait release];
[landscapeFooButton release];
[portraitFooButton release];
[landscapeBarButton release];
[portraitBarButton release];
[super dealloc];
}

@end
willAnimateRotationToInterfaceOrientationduration:这个方法来自我们重写的一个父类,这个方法在旋转开始之后与旋转实际发生之前被调用。
CGAffineTransformIdentity,重置变换属性。
CGAffineTransformMakeRotation来创建一个旋转变换。

相关文章推荐
- Sending redirect to another servlet/JSP without loosing the request parameters
- [blabla]a quick code about linear regression using gradient descent
- response.sendRedirect()与request.getRequestDispatcher().forward()区别
- UEditor 自定义上传 远程服务器 Jsp Java
- 错误:Access restriction: The type 'OperatingSystemMXBean' is not API (restriction on required library
- easyui的弹出浮层(加载中...)的效果。
- guid 在线生成
- java离request获取当前从访问完成url至
- Android UI开发第二十四篇——Action Bar
- 取消UITableViewCell的选中状态
- Use procexp.exe in sysinernalssuite to analyze process runing info
- BZOJ 2079 [Poi2010]Guilds 图
- Thrift的required和optional源码分析
- 修改UISearchBar的Cancel按钮为中文等本地化问题
- Ant编译打jar包 build.xml
- Xcode Build Search Paths设置
- UITableViewCell 中的单选控制 UITableViewCellAccessoryCheckmark
- 对文本框内容进行实时判断
- request.getRemoteAddr()获取的值为0:0:0:0:0:0:0:1
- 自学IOS(一)UI之Hello World与加法计算器