Linux的加密工具以及ssh
2015-09-16 18:50
537 查看
linux下加密算法大概可分为
对称加密
特点:加密、解密需要使用相同的密钥的加密算法,常见有DES,AES。算法公开,计算量小,加密速度块,加密效率高,其安全性,不久取决于加密算法本身,更依赖密钥的安全管理。
非对称加密
特点:公私密钥是成对出现,相互加密,相互解密。公钥可公开给所有人,私钥,自己保留。用公钥加密的数据,只能使用与之配对儿的私钥解密;反之亦然。主要作用是验证身份。
单向加密
特点:对数据提取特征码,只能加密,不能解密,主要作用是保证数据完整性。
ssl加密过程
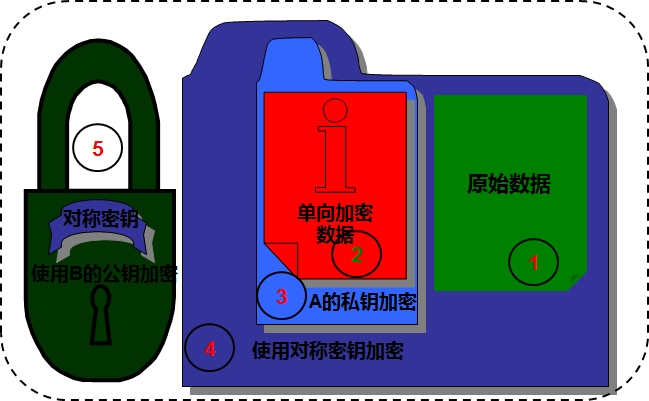
1.先使用单向加密算法抽取原数据的特征码(保证数据完整性)2.再用私钥加密特征码(保证身份验证)3.对称加密4.用对方的公钥加密ssl解密过程1.先用自己的私钥解密5,得到对方的对称加密的密钥 2.用上面得到的对称加密密钥进行解密,可得到明文的数据内容3.用对方的公钥解密3,得到单向加密特征码4.用相同的单向加密算法抽取原数据的特征码,对比与上面得到的特征码
1.linux下加密工具有很多,但是最常用的还是openssl
openssl 三个组件:
openssl 多用途命令行工具
libcrypto 加密解密库
libssl ssl协议实现
openssl enc, ca, req, ...
对称加密
enc命令:#手动给文件加密一个文件。
加密:openssl enc -e -des3 -a -salt -in fstab -out fstab.ciphertext
解密:openssl enc -d -des3 -a -salt -in fstab.ciphertext -out fstab
单向加密
openssl dgst -md5 fstab 与md5sum fstab等成的结果相同
openssl passwd -1(使用md5) -salt "SALT"
openssl genrsa -out /PATH/TO/PRIVATEKEY.FILE num_bits(加密多少位)
# (umask 077; openssl genrsa -out key.pri 2048) #权限很重要。
提取公钥
openssl rsa -in /PATH/FROM/PRIVATEKEY.FILE -pubout
# openssl rsa -in key.pri -pubout
PKI Pubilc Key Infrastructure
创建私有CA(模拟证书颁发机构给证书签名)
openssl的配置文件:/etc/pki/tls/openssl.cnf
1.创建所需的文件
2. CA自签证书
(umask 077;openssl genrsa -out /etc/pki/CA/private/cakey.pem 2048)
openssl req -new -x509 -key /etc/pki/CA/private/cakey.pem -days 365 -out /etc/pki/CA/cacert.pem
-new 生成新证书签署请求
-x509 专用于CA生成自签证书
-key 生成请求时用到的私钥文件
-days # 证书的有效期限
-out /path/to/file 证书的保存路径
1.用到证书的主机生成证书请求
(umask 077;openssl genrsa -out /etc/httpd/ssl/httpd.key 2048)
openssl req -new -key /etc/httpd/ssl/httpd.key -days 365 -out /etc/httpd/ssl/httpd.csr
2.把请求文件传输给CA
3.CA签署证书,并把证书返回给请求者
openssl ca -in /tmp/httpd.csr -out /etc/pki/CA/certs/httpd.crt -days 365
查看证书中的信息
openssl x509 -in /path/from/cert_file -noout -text|-subject|-serial
4.吊销证书
1.客户端,获取要吊销的证书的serial
openssl x509 -in /path/from/cert_file -noout -serial -subject
2.CA 先根据客户提交的serial与subject信息,对比检验是否与index.txt文件中的信息一致
openssl ca -revoke /etcpki/CA/newcerts/serial.pem
3.生成吊销证书的编号(第一次吊销一个证书)
echo 01 > /etc/pki/CA/crlnumber
4.更新证书吊销列表
openssl ca -gencrl -out thisca.crl
查看crl文件
openssl crl -in /path/from/crl_file.crl -noout -text
模拟为web服务器创建证书然后找CA签名
##先在www主机上创建一个证书请求
2.远程连接主机有好几类,常用的是telnet,和ssh,由于telnet是明文传输,十分容易被抓包获取帐号,密码。
所以我们常用加密方式登录远程主机,SSH是运维必备工具。本文谈论的是sshv2。
ssh 客户端:
window:putty,xshell,securecrt等
linux:ssh 配置文件为/etc/ssh/ssh_config
远程主机方式: ssh host
#ssh后直接ip,使用当前用户登录到远程主机,或当前用户在远程主机上不存在时,会拒绝登录
ssh user@host #user为用户名,host为主机名或IP
ssh user@host command #在远程主机上执行某条命令后,把结果返回给当前用户,然后退出远程主机连接。
ssh -p22 #使用固定端口22连接远程主机
全局ssh配置文件/etc/ssh/ssh_config 常用参数介绍
Host * #表示可以连接所有主机,后面加上固定网段,则只能远程固定网段主机
Port 22 #设置远程主机时,默认端口号
Protocol 2,1 #设置ssh使用哪个版本,默认是第2版
Cipher 3des #对称加密方式默认方式
下面客户端基于密钥认证,每次远程主机不用输入口令,在集群中常用。
前提条件:1.先在客户端生成一对密钥
2.把公钥复制到需要远程主机的对应用户帐号的家目录下一个隐藏目录(由服务端配置文件指明#AuthorizedKeysFile,使用默认就好)
工具--新建用户密钥生成向导--参数设定--生成密钥对--设置密钥名称--把公钥复制到对应用户家目录下.ssh/authorized_keys #注意权限应为600--登录是需要输入帐号,然后选择密钥登录。
scp
PULL:scp [options] [user@]host:/PATH/FROM/FILE /PATH/TO/FILE #以当前用户身份把远程主机user权限的文件复制到本地
PUSH: scp [options] /PATH/FROM/FILE [user@]host:/PATH/TO/FILE #当前用户把本地文件以远程主机user权限复制到远程主机
常用选项
-r:递归复制
-p:保留原文件属性信息
-q:静默模式,复制过程不显示
-P port 指明remote host 监听的端口
sftp
sftp user@host
ssh服务端:
linux下的服务端为sshd, 其配置文件为/etc/ssh/sshd_config
Port 22 #设置远程主机时,默认端口号
ListenAddress 内网IP #监听ip地址
PermitRootLogin no #是否root用户直接登录
Subsystem sftp/usr/libexec/openssh/sftp-server #支持客户端使用sftp,来连接
限制用户登录,白名单,黑名单
allowusers denyusers
allowgroups denygroups
SSH服务实践总结
1.不要使用默认端口
2.禁止使用version 1;
3.限制可登录用户
4.设置空闲回话超时时长
5.利用防火墙设置ssh访问策略
6.仅监听特定IP地址
7.使用口令认证时,使用强密码策略
8.使用基于密钥的认证
9.禁止使用空密码
10.禁止root用户直接登录
11.限制ssh的访问频度和并发在线数
12.做好日志,进行分析
对称加密
特点:加密、解密需要使用相同的密钥的加密算法,常见有DES,AES。算法公开,计算量小,加密速度块,加密效率高,其安全性,不久取决于加密算法本身,更依赖密钥的安全管理。
非对称加密
特点:公私密钥是成对出现,相互加密,相互解密。公钥可公开给所有人,私钥,自己保留。用公钥加密的数据,只能使用与之配对儿的私钥解密;反之亦然。主要作用是验证身份。
单向加密
特点:对数据提取特征码,只能加密,不能解密,主要作用是保证数据完整性。
ssl加密过程
1.先使用单向加密算法抽取原数据的特征码(保证数据完整性)2.再用私钥加密特征码(保证身份验证)3.对称加密4.用对方的公钥加密ssl解密过程1.先用自己的私钥解密5,得到对方的对称加密的密钥 2.用上面得到的对称加密密钥进行解密,可得到明文的数据内容3.用对方的公钥解密3,得到单向加密特征码4.用相同的单向加密算法抽取原数据的特征码,对比与上面得到的特征码
1.linux下加密工具有很多,但是最常用的还是openssl
openssl 三个组件:
openssl 多用途命令行工具
libcrypto 加密解密库
libssl ssl协议实现
openssl enc, ca, req, ...
对称加密
enc命令:#手动给文件加密一个文件。
加密:openssl enc -e -des3 -a -salt -in fstab -out fstab.ciphertext
解密:openssl enc -d -des3 -a -salt -in fstab.ciphertext -out fstab
单向加密
openssl dgst -md5 fstab 与md5sum fstab等成的结果相同
[root@test ~]# md5sum /etc/fstab
4a41f19e70ebe54b257b4296dc304205  /etc/fstab
[root@test ~]# openssl dgst -md5 /etc/fstab
MD5(/etc/fstab)= 4a41f19e70ebe54b257b4296dc304205
passwd #生成用户密码
openssl passwd -1(使用md5) -salt "SALT"
[root@test ~]# openssl passwd -1 -salt 12345678
Password:
$1$12345678$oLKzx5glaFMv7/gw4IIXD.
生成密钥对
openssl genrsa -out /PATH/TO/PRIVATEKEY.FILE num_bits(加密多少位)
# (umask 077; openssl genrsa -out key.pri 2048) #权限很重要。
提取公钥
openssl rsa -in /PATH/FROM/PRIVATEKEY.FILE -pubout
# openssl rsa -in key.pri -pubout
PKI Pubilc Key Infrastructure
创建私有CA(模拟证书颁发机构给证书签名)
openssl的配置文件:/etc/pki/tls/openssl.cnf
1.创建所需的文件
[root@test ~]# cd /etc/pki/CA/
[root@test CA]# touch index.txt
[root@test CA]# echo 01 >serial
[root@test CA]# ls
certs  crl  index.txt  newcerts  private  serial
2. CA自签证书
(umask 077;openssl genrsa -out /etc/pki/CA/private/cakey.pem 2048)
openssl req -new -x509 -key /etc/pki/CA/private/cakey.pem -days 365 -out /etc/pki/CA/cacert.pem
-new 生成新证书签署请求
-x509 专用于CA生成自签证书
-key 生成请求时用到的私钥文件
-days # 证书的有效期限
-out /path/to/file 证书的保存路径
[root@test CA]# (umask 077;openssl genrsa -out /etc/pki/CA/private/cakey.pem 2048)
Generating RSA private key, 2048 bit long modulus
...................+++
........+++
e is 65537 (0x10001)
[root@test CA]# openssl req -new -x509 -key /etc/pki/CA/private/cakey.pem -days 365 -out /etc/pki/CA/cacert.pem
You are about to be asked to enter information that will be incorporated
into your certificate request.
What you are about to enter is what is called a Distinguished Name or a DN.
There are quite a few fields but you can leave some blank
For some fields there will be a default value,
If you enter '.', the field will be left blank.
-----
Country Name (2 letter code) [XX]:CN
State or Province Name (full name) []:Beijing
Locality Name (eg, city) [Default City]:Beijing
Organization Name (eg, company) [Default Company Ltd]:magedu  #公司
Organizational Unit Name (eg, section) []:ops         #部门
Common Name (eg, your name or your server's hostname) []:ca.magedu.com  #必须跟DNS解析的名称保持一致
Email Address []:caadmin@magedu.com   #邮箱
[root@test CA]# ll private/
total 4
-rw------- 1 root root 1679 Sep 16 02:24 cakey.pem
3.发证
1.用到证书的主机生成证书请求
(umask 077;openssl genrsa -out /etc/httpd/ssl/httpd.key 2048)
openssl req -new -key /etc/httpd/ssl/httpd.key -days 365 -out /etc/httpd/ssl/httpd.csr
2.把请求文件传输给CA
3.CA签署证书,并把证书返回给请求者
openssl ca -in /tmp/httpd.csr -out /etc/pki/CA/certs/httpd.crt -days 365
查看证书中的信息
openssl x509 -in /path/from/cert_file -noout -text|-subject|-serial
4.吊销证书
1.客户端,获取要吊销的证书的serial
openssl x509 -in /path/from/cert_file -noout -serial -subject
2.CA 先根据客户提交的serial与subject信息,对比检验是否与index.txt文件中的信息一致
openssl ca -revoke /etcpki/CA/newcerts/serial.pem
3.生成吊销证书的编号(第一次吊销一个证书)
echo 01 > /etc/pki/CA/crlnumber
4.更新证书吊销列表
openssl ca -gencrl -out thisca.crl
查看crl文件
openssl crl -in /path/from/crl_file.crl -noout -text
模拟为web服务器创建证书然后找CA签名
##先在www主机上创建一个证书请求
[root@www ~]# cd /etc/httpd/
[root@www httpd]# mkdir ssl
[root@www httpd]# ls
conf  conf.d  logs  modules  run  ssl
[root@www httpd]# (umask 077;openssl genrsa -out /etc/httpd/ssl/httpd.key 2048)
Generating RSA private key, 2048 bit long modulus
..+++
...................+++
e is 65537 (0x10001)
[root@www httpd]# openssl req -new -key /etc/httpd/ssl/httpd.key -days 365 -out /etc/httpd/ssl/httpd.csr
You are about to be asked to enter information that will be incorporated
into your certificate request.
What you are about to enter is what is called a Distinguished Name or a DN.
There are quite a few fields but you can leave some blank
For some fields there will be a default value,
If you enter '.', the field will be left blank.
-----
Country Name (2 letter code) [XX]:CN
State or Province Name (full name) []:Beijing
Locality Name (eg, city) [Default City]:Beijing
Organization Name (eg, company) [Default Company Ltd]:magedu
Organizational Unit Name (eg, section) []:ops
Common Name (eg, your name or your server's hostname) []:www.magedu.com  #再三强调,此处为DNS解析到的名称
Email Address []:webadmin@magedu.com

Please enter the following 'extra' attributes
to be sent with your certificate request
A challenge password []:
An optional company name []:
[root@www httpd]# cd ssl
[root@www ssl]# ls
httpd.csr  httpd.key
##然后把www主机生成的私有证书找CA签名
[root@www ssl]# scp httpd.csr root@172.16.249.49:/root/  #把www主机生成的证书请求cp到CA证书颁发机构签名
The authenticity of host '172.16.249.49 (172.16.249.49)' can't be established.
RSA key fingerprint is 92:02:cd:96:37:0a:59:ae:a7:49:a1:d0:85:8c:0a:51.
Are you sure you want to continue connecting (yes/no)? yes
Warning: Permanently added '172.16.249.49' (RSA) to the list of known hosts.
root@172.16.249.49's password:
httpd.csr
[root@test CA]# openssl ca -in /root/httpd.csr -out /etc/pki/CA/certs/httpd.crt -days 365  #给www主机签名认证
Using configuration from /etc/pki/tls/openssl.cnf
Check that the request matches the signature
Signature ok
Certificate Details:
Serial Number: 1 (0x1)
Validity
Not Before: Sep 15 18:51:42 2015 GMT
Not After : Sep 14 18:51:42 2016 GMT
Subject:
countryName               = CN
stateOrProvinceName       = Beijing
organizationName          = magedu
organizationalUnitName    = ops
commonName                = www.magedu.com
emailAddress              = webadmin@magedu.com
X509v3 extensions:
X509v3 Basic Constraints:
CA:FALSE
Netscape Comment:
OpenSSL Generated Certificate
X509v3 Subject Key Identifier:
E4:29:9D:5E:87:8D:93:50:5E:01:5C:71:AF:A9:9E:79:31:C2:0E:85
X509v3 Authority Key Identifier:
keyid:D7:87:8A:D4:6B:C3:62:91:76:A5:8B:D4:00:41:86:65:DC:28:CB:B1

Certificate is to be certified until Sep 14 18:51:42 2016 GMT (365 days)
Sign the certificate? [y/n]:y

1 out of 1 certificate requests certified, commit? [y/n]y
Write out database with 1 new entries
Data Base Updated
[root@test CA]# cat index.txt  #这时,index.txt 生成一条记录
V	160914185142Z		01	unknown	/C=CN/ST=Beijing/O=magedu/OU=ops/CN=www.magedu.com/emailAddress=webadmin@magedu.com
[root@test CA]# ls certs/   #同时也生成一个
httpd.crt
[root@test CA]# ls newcerts/
01.pem
[root@test CA]# scp certs/httpd.crt root@172.16.249.61:/etc/httd/ssl/
[root@www ssl]# ls   #httpd.crt证书已经生成
httpd.crt  httpd.csr  httpd.key
2.远程连接主机有好几类,常用的是telnet,和ssh,由于telnet是明文传输,十分容易被抓包获取帐号,密码。
所以我们常用加密方式登录远程主机,SSH是运维必备工具。本文谈论的是sshv2。
ssh 客户端:
window:putty,xshell,securecrt等
linux:ssh 配置文件为/etc/ssh/ssh_config
远程主机方式: ssh host
#ssh后直接ip,使用当前用户登录到远程主机,或当前用户在远程主机上不存在时,会拒绝登录
ssh user@host #user为用户名,host为主机名或IP
ssh user@host command #在远程主机上执行某条命令后,把结果返回给当前用户,然后退出远程主机连接。
ssh -p22 #使用固定端口22连接远程主机
[root@test ~]# ssh 10.0.0.7
The authenticity of host '10.0.0.7 (10.0.0.7)' can't be established.
RSA key fingerprint is 63:67:ff:b2:74:45:2b:f9:36:33:9a:18:7f:03:e7:0e.
Are you sure you want to continue connecting (yes/no)? yes
Warning: Permanently added '10.0.0.7' (RSA) to the list of known hosts.
root@10.0.0.7's password:
Last login: Tue Sep 15 20:14:07 2015 from 192.168.0.101
[root@test-2 ~]# ip addr
1: lo: <LOOPBACK,UP,LOWER_UP> mtu 65536 qdisc noqueue state UNKNOWN
link/loopback 00:00:00:00:00:00 brd 00:00:00:00:00:00
inet 127.0.0.1/8 scope host lo
inet6 ::1/128 scope host
valid_lft forever preferred_lft forever
2: eth0: <BROADCAST,MULTICAST,UP,LOWER_UP> mtu 1500 qdisc pfifo_fast state UP qlen 1000
link/ether 00:0c:29:83:0b:16 brd ff:ff:ff:ff:ff:ff
inet 192.168.0.106/24 brd 192.168.0.255 scope global eth0
inet6 fe80::20c:29ff:fe83:b16/64 scope link
valid_lft forever preferred_lft forever
3: eth1: <BROADCAST,MULTICAST,UP,LOWER_UP> mtu 1500 qdisc pfifo_fast state UP qlen 1000
link/ether 00:0c:29:83:0b:2a brd ff:ff:ff:ff:ff:ff
inet 10.0.0.7/24 brd 10.0.0.255 scope global eth1
inet6 fe80::20c:29ff:fe83:b2a/64 scope link
valid_lft forever preferred_lft forever
[root@test-2 ~]# logout
Connection to 10.0.0.7 closed.
[root@test ~]# ssh -p22 root@10.0.0.7
root@10.0.0.7's password:
Last login: Tue Sep 15 23:21:58 2015 from 10.0.0.11
[root@test-2 ~]#
注意:第1次远程主机时,远程主机会传送给当前用户一个隐藏的密钥文件(~.ssh/known_hosts)。让你确认是否接受密钥,不确认则无法连接远程主机。其文件在当前用户家目录下面.ssh目录下。
全局ssh配置文件/etc/ssh/ssh_config 常用参数介绍
Host * #表示可以连接所有主机,后面加上固定网段,则只能远程固定网段主机
Port 22 #设置远程主机时,默认端口号
Protocol 2,1 #设置ssh使用哪个版本,默认是第2版
Cipher 3des #对称加密方式默认方式
下面客户端基于密钥认证,每次远程主机不用输入口令,在集群中常用。
前提条件:1.先在客户端生成一对密钥
2.把公钥复制到需要远程主机的对应用户帐号的家目录下一个隐藏目录(由服务端配置文件指明#AuthorizedKeysFile,使用默认就好)
[root@test ~]# ssh-keygen -t rsa  #免交互式生成密钥[-P ''#密码为空 -f "~/.ssh/id_rsa"]
Generating public/private rsa key pair.
Enter file in which to save the key (/root/.ssh/id_rsa):   #默认把私钥文件保存在当前用户家目录生成.ssh/id_rsa
Enter passphrase (empty for no passphrase):
#是否对密钥加密,加密后,每次使用密钥还的输入密码,达不到我们想要的免输入效果,所以直接回车
Enter same passphrase again:
Your identification has been saved in /root/.ssh/id_rsa.
Your public key has been saved in /root/.ssh/id_rsa.pub.
The key fingerprint is:
1e:c0:ce:3b:d2:2f:a7:93:88:d4:a5:c1:b7:95:2a:e9 root@test
The key's randomart image is:
+--[ RSA 2048]----+
|                 |
|     .           |
|   .  o  .       |
|    ooo.o        |
|   . *o+S        |
|  . =.oo .       |
| . o.o+..        |
|  . E.+o.        |
|      .=.        |
+-----------------+
[root@test ~]# ls .ssh/
id_rsa  id_rsa.pub #公钥 known_hosts
[root@test ~]# ssh-copy-id  -i .ssh/id_rsa.pub root@10.0.0.7  #这里指定远程时要登录的用户,
root@10.0.0.7's password:
Permission denied, please try again.
root@10.0.0.7's password:
Now try logging into the machine, with "ssh 'root@10.0.0.7'", and check in:

.ssh/authorized_keys  #服务端默认保存至这里

to make sure we haven't added extra keys that you weren't expecting.
[root@test ~]# ssh root@10.0.0.7  #测试登录是否需要密码
Last login: Tue Sep 15 23:40:26 2015 from 10.0.0.11
[root@test-2 ~]#
window下xshell现实该功能
工具--新建用户密钥生成向导--参数设定--生成密钥对--设置密钥名称--把公钥复制到对应用户家目录下.ssh/authorized_keys #注意权限应为600--登录是需要输入帐号,然后选择密钥登录。
[root@test-2 ~]# cat .ssh/authorized_keys
ssh-rsa AAAAB3NzaC1yc2EAAAABIwAAAQEA1cdTJizX7v2sASlLg3sCAuPDKROjFgkQm3VKX3Cxbbd2gJnqM8JQ1QV7qFbqSu0/e3SbWCAtiHNhI7wqkQYWx7OJXAw7tkMF94v+OP2Eg88p6ys8YKH9irhakZ5c5YrpyXyml138KzuAe/WfofkuKmS+7BzZt8RYystwblMIHRtIZMc8CTN4PZi0sDrNG/XjIRUxQeM1vHbcPBIlUkONEVK4Q4zWvhC/gsDeUrmjCjSVq8oSs9taKhiaSRUXT7ZG6pPNEqMMGUp0XOc8IQqziIily7tOWH7FokAdcm6vv8kBBPmAj8RX0bleUR8o+0UA5VKtZWZkoKIgmTjyn3rKbQ==    #表示可远程登录任意用户,登录时需要指明用户
scp
PULL:scp [options] [user@]host:/PATH/FROM/FILE /PATH/TO/FILE #以当前用户身份把远程主机user权限的文件复制到本地
PUSH: scp [options] /PATH/FROM/FILE [user@]host:/PATH/TO/FILE #当前用户把本地文件以远程主机user权限复制到远程主机
常用选项
-r:递归复制
-p:保留原文件属性信息
-q:静默模式,复制过程不显示
-P port 指明remote host 监听的端口
sftp
sftp user@host
ssh服务端:
linux下的服务端为sshd, 其配置文件为/etc/ssh/sshd_config
Port 22 #设置远程主机时,默认端口号
ListenAddress 内网IP #监听ip地址
PermitRootLogin no #是否root用户直接登录
Subsystem sftp/usr/libexec/openssh/sftp-server #支持客户端使用sftp,来连接
限制用户登录,白名单,黑名单
allowusers denyusers
allowgroups denygroups
SSH服务实践总结
1.不要使用默认端口
2.禁止使用version 1;
3.限制可登录用户
4.设置空闲回话超时时长
5.利用防火墙设置ssh访问策略
6.仅监听特定IP地址
7.使用口令认证时,使用强密码策略
8.使用基于密钥的认证
9.禁止使用空密码
10.禁止root用户直接登录
11.限制ssh的访问频度和并发在线数
12.做好日志,进行分析

相关文章推荐
- Linux中jsoncpp的安装和使用
- Linux下,telnet命令如何退出
- CentOS postgresql9.4
- 在Linux执行命令报错”Arg list too long”的原因分析
- Linux之定时器与时间管理 【转】
- linux下使用AES cbc加解密文件源码,支持所有类型文件
- Linux内核驱动之延时 【转】
- centos 文本排序
- Linux 编程学习笔记----动笔makefile档
- linux下文件夹的创建、复制、剪切、重命名、清空和删除命令
- linux内存管理解析
- 关于在Linux的堆栈段执行代码的实践和思考
- Linux命令大全
- Linux最基础(第一篇)——用户权限
- Linux系统平均负载3个数字的含义
- CentOS NTP服务器
- linux sort 命令详解
- maven 安装配置
- VMware Workstation 7.x 安装CentOS 5.6
- Centos中压缩(zip)和解压(unzip)命令