如何使用七牛Python SDK写一个同步脚本及使用教程
七牛云存储的 Python 语言版本 SDK(本文以下称 Python-SDK)是对七牛云存储API协议的一层封装,以提供一套对于 Python 开发者而言简单易用的开发工具。Python 开发者在对接 Python-SDK 时无需理解七牛云存储 API 协议的细节,原则上也不需要对 HTTP 协议和原理做非常深入的了解,但如果拥有基础的 HTTP 知识,对于出错场景的处理可以更加高效。
最近刚搭了个markdown静态博客,想把图片放到云存储中。
经过调研觉得七牛可以满足我个人的需求,就选它了。
要引用图片就要先将图片上传到云上。
虽然七牛网站后台可以上传文件,但每次上传都需要先登录,然后选择图片,设置连接地址,才能上传。
这个过程有些繁琐,所以我便想用七牛云提供的SDK写个一同步工具,方便增量同步文件。
有了这个想法,就马上行动。花了大概一个上午的时间,总算把这个工具给写出来,并放到GitOSC和github上。
#!/usr/bin/env python
#-*- coding:utf-8 -*-
#
# AUTHOR = "heqingpan"
# AUTHOR_EMAIL = "heqingpan@126.com"
# URL = "http://git.oschina.net/hqp/qiniu_sync"
import qiniu
from qiniu import Auth
from qiniu import BucketManager
import os
import reaccess_key = ''
secret_key = ''
bucket_name = ''
bucket_domain = ''
q = Auth(access_key, secret_key)
bucket = BucketManager(q)
basedir=os.path.realpath(os.path.dirname(__file__))
filename=__file__
ignore_paths=[filename,"{0}c".format(filename)]
ignore_names=[".DS_Store",".git",".gitignore"]
charset="utf8"
diff_time=2*60
def list_all(bucket_name, bucket=None, prefix="", limit=100):
rlist=[]
if bucket is None:
bucket = BucketManager(q)
marker = None
eof = False
while eof is False:
ret, eof, info = bucket.list(bucket_name, prefix=prefix, marker=marker, limit=limit)
marker = ret.get('marker', None)
for item in ret['items']:
rlist.append(item["key"])
if eof is not True:
# 错误处理
#print "error"
pass
return rlist
def get_files(basedir="",fix="",rlist=None,ignore_paths=[],ignore_names=[]):
if rlist is None:
rlist=[]
for subfile in os.listdir(basedir):
temp_path=os.path.join(basedir,subfile)
tp=os.path.join(fix,subfile)
if tp in ignore_names:
continue
if tp in ignore_paths:
continue
if os.path.isfile(temp_path):
rlist.append(tp)
elif os.path.isdir(temp_path):
get_files(temp_path,tp,rlist,ignore_paths,ignore_names)
return rlist
def get_valid_key_files(subdir=""):
basedir=subdir or basedir
files = get_files(basedir=basedir,ignore_paths=ignore_paths,ignore_names=ignore_names)
return map(lambda f:(f.replace("\\","/"),f),files)
def sync():
qn_keys=list_all(bucket_name,bucket)
qn_set=set(qn_keys)
l_key_files=get_valid_key_files(basedir)
k2f={}
update_keys=[]
u_count=500
u_index=0
for k,f in l_key_files:
k2f[k]=f
str_k=k
if isinstance(k,str):
k=k.decode(charset)
if k in qn_set:
update_keys.append(str_k)
u_index+=1
if u_index > u_count:
u_index-=u_count
update_file(k2f,update_keys)
update_keys=[]
else:
# upload
upload_file(k,os.path.join(basedir,f))
if update_keys:
update_file(k2f,update_keys)
print "sync end"
def update_file(k2f,ulist):
ops=qiniu.build_batch_stat(bucket_name,ulist)
rets,infos = bucket.batch(ops)
for i in xrange(len(ulist)):
k=ulist[i]
f=k2f.get(k)
ret=rets[i]["data"]
size=ret.get("fsize",None)
put_time = int(ret.get("putTime")/10000000)
local_size=os.path.getsize(f)
local_time=int(os.path.getatime(f))
if local_size==size:
continue
if put_time >= local_time - diff_time:
# is new
continue
# update
upload_file(k,os.path.join(basedir,f))
def upload_file(key,localfile):
print "upload_file:"
print key
token = q.upload_token(bucket_name, key)
mime_type = get_mime_type(localfile)
params = {'x:a': 'a'}
progress_handler = lambda progress, total: progress
ret, info = qiniu.put_file(token, key, localfile, params, mime_type, progress_handler=progress_handler)
def get_mime_type(path):
mime_type = "text/plain"
return mime_type
def main():
sync()
if __name__=="__main__":
main()
这个同步脚本支持批量比较文件,差异增量更新、批量更新。
使用方式
安装七牛Python SDK
pip install qiniu
填写脚本文件(qiniusync.py)的配置信息
access_key = ''
secret_key = ''
bucket_name = ''
注册后可以拿到对应的信息
将脚本文件(qiniusync.py)拷贝到待同步根目录
运行脚本
python qiniusync.py
后记
写完提交之后才发现,七牛已经提供相应的工具,我这个算是重复造轮子吧。
既然已经写,就发出来,当做熟悉一下七牛的SDK也不错,说不定以后还能用的上。
七牛云存储Python SDK使用教程
本教程旨在介绍如何使用七牛的Python SDK来快速地进行文件上传,下载,处理,管理等工作。
安装
首先,要使用Python的SDK必须要先安装。七牛的Python SDK是开源的,托管在Github上面,项目地址为 https://github.com/qiniu/python-sdk 。
安装的方式可以如项目的说明上所说,用 pip install qiniu 。当然也可以直接 clone 一份源代码下来直接使用。我一般喜欢直接 clone 源代码,这样的话,如果要对SDK做一些改动也是十分容易的。
最新版本的Python SDK需要依赖 requests 库,所以要提前安装好。安装方式当然也可以用 pip install requests 。
开发环境
Python的开发环境有很多种选择,如果喜欢文本的方式,比如vim,emacs,sublime text等都是很好的选择,如果你喜欢IDE,那么最流行的莫过于 PyCharm 了。 PyCharm 的最新版本到 这里下载。
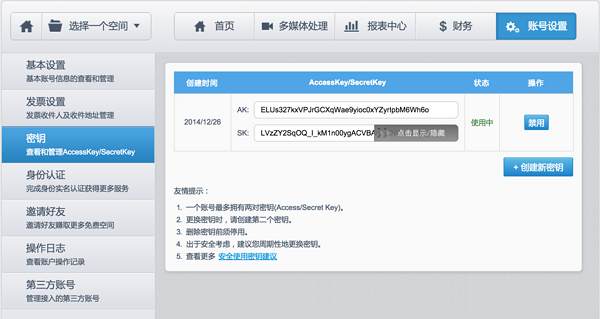
Access Key和Secret Key
我们知道七牛云存储的权限校验机制基于一对密钥,分别称为 Access Key 和 Secret Key 。其中 Access Key 是公钥, Secret Key 是私钥。这一对密钥可以从七牛的后台获取。
小试牛刀
好了,做了上面的这些准备工作,我们就去上传一个简单的文件,练练手。
python
#coding=utf-8
__author__ = 'jemy'
'''
本例演示了一个简单的文件上传。
这个例子里面,sdk根据文件的大小选择是Form方式上传还是分片上传。
'''
import qiniu
accessKey = "<Your Access Key>"
secretKey = "<Your Secret Key>"
#解析结果
def parseRet(retData, respInfo):
if retData != None:
print("Upload file success!")
print("Hash: " + retData["hash"])
print("Key: " + retData["key"])
#检查扩展参数
for k, v in retData.items():
if k[:2] == "x:":
print(k + ":" + v)
#检查其他参数
for k, v in retData.items():
if k[:2] == "x:" or k == "hash" or k == "key":
continue
else:
print(k + ":" + str(v))
else:
print("Upload file failed!")
print("Error: " + respInfo.text_body)
#无key上传,http请求中不指定key参数
def upload_without_key(bucket, filePath):
#生成上传凭证
auth = qiniu.Auth(accessKey, secretKey)
upToken = auth.upload_token(bucket, key=None)
#上传文件
retData, respInfo = qiniu.put_file(upToken, None, filePath)
#解析结果
parseRet(retData, respInfo)
def main():
bucket = "if-pbl"
filePath = "/Users/jemy/Documents/jemy.png"
upload_without_key(bucket, filePath)
if __name__ == "__main__":
main()
运行结果为:
Upload file success!
Hash: Fp0XR6tM4yZmeiKXw7eZzmeyYsq8
Key: Fp0XR6tM4yZmeiKXw7eZzmeyYsq8
从上面我们可以看到,使用七牛的Python SDK上传文件的最基本的步骤是:
1.生成上传凭证
2.上传文件
3.解析回复结果
小结
综上所述,其实使用七牛的SDK来上传文件还是很简单的,接下来的教程,我们将在这个例子的基础上逐步了解更多关于文件上传的知识。
您可能感兴趣的文章:

- Python动态类型的学习---引用的理解
- Python3写爬虫(四)多线程实现数据爬取
- 垃圾邮件过滤器 python简单实现
- 下载并遍历 names.txt 文件,输出长度最长的回文人名。
- install and upgrade scrapy
- Scrapy的架构介绍
- Centos6 编译安装Python
- 使用Python生成Excel格式的图片
- 让Python文件也可以当bat文件运行
- [Python]推算数独
- Python中zip()函数用法举例
- Python中map()函数浅析
- Python将excel导入到mysql中
- Android ADT 23.0.0无法更新到23.0.2问题解决方案
- Python在CAM软件Genesis2000中的应用
- 使用Shiboken为C++和Qt库创建Python绑定
- FREEBASIC 编译可被python调用的dll函数示例