[Android] 输入系统(二)
2015-08-22 15:27
477 查看
在上一篇文章的最后,我们发现InputDispatcher是调用了InputChannel->sendMessage把键值发送出去,那么相应的,也有接收键值的地方。接收函数是InputChannel->receiveMessage。
在InputConsumer::consume内找到了receiveMessage,从类名能看出来发送端与接收端相当于生产者与消费者的关系。
receiveMessage内调用的是socket的接收函数recv
在NativeInputEventReceiver内有个事件处理函数handleEvent,该函数是looperCallback的虚函数,NativeInputEventReceiver作为looperCallback的子类,自然有义务实现handleEvent这个函数。handleEvent就可以监听I/O事件。一旦有I/O事件,如上述的socket send事件,handleEvent就会被启动,进行后续的处理。
既然有LooperCallback(NativeInputEventReceiver),必然会有Looper。虽然Looper不是本篇文章的研究对象,但是我们有必要理清下面的问题:
究竟与NativeInputEventReceiver对应的这个Looper是什么?
这个Looper是怎样与LooperCallback关联起来的呢?
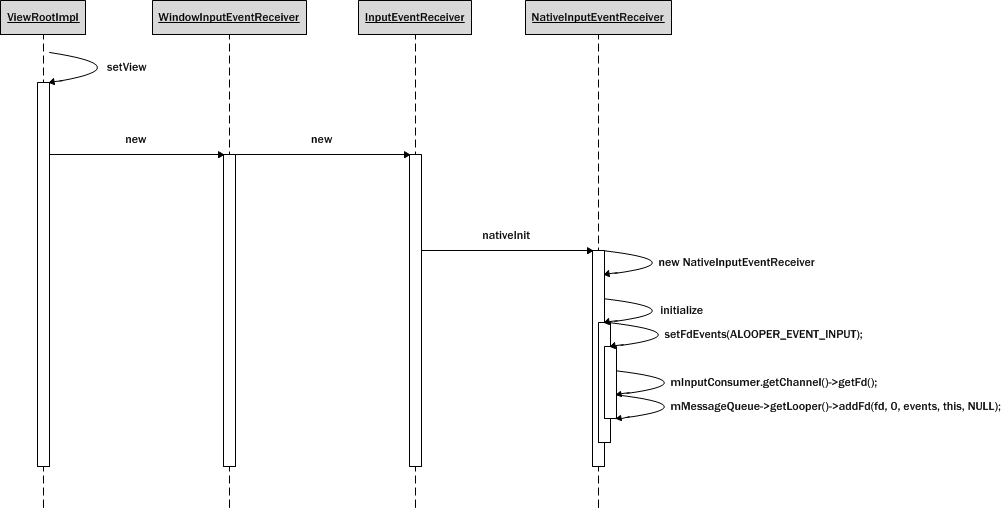
实际上,一切起始于ViewRootImpl的setView方法:
InputEventReceiver作为WindowInputEventReceiver的子类,会一起被创建出来。在InputEventReceiver的构造方法中,会调用native方法nativeInit
在NativeInputEventReceiver的nativeInit方法中,创建了NativeInputEventReceiver对象,并调用它的initialize方法
initialize方法只做了一件事,就是把NativeInputEventReceiver与Looper关联起来
Looper的方法addFd实现了关联Looper与LooperCallback(NativeInputEventReceiver)的功能,我们先来分析一下传给addFd的参数
fd,fd即inputChannel的socket fd,Looper会侦测该fd的状态
events,即传入的ALOOPER_EVENT_INPUT,只有fd的状态是INPUT的时候才会触发调用LooperCallback中的handleEvent方法
this,即NativeInputEventReceiver,当fd状态为Input时,NativeInputEventReceiver中的handleEvent方法会被调用
在consumeEvents内,我们能看到调用了InputConsume::consume来接收InputDispatcher发送过来的事件
输入事件在consumeEvents内将会被处理完成,其中包含了四个主要步骤:
获取输入事件
把输入事件转换成java也能处理的格式
输入事件分发到相应窗口去处理
处理结果反馈
还记得上面InputEventReceiver初始化时的流程吗?是通过setView--->new WindowInputEventReceiver--->new InputEventReceiver--->new NativeInputEventReceiver这样一步一步创建的。
通过上述的JNI调用,会调用到WindowInputEventReceiver的dispatchInputEvent方法,不过由于WindowInputEventReceiver并没有自己实现这个方法,因此会调用父类InputEventReceiver::dispatchInputEvent,内部会真正调用到WindowInputEventReceiver::onInputEvent
在onInputEvent内,转到了ViewRootImpl这边进行处理
由于事件队列内会包含多个事件,因此在doProcessInputEvent时,需要分别对所有的事件都进行分发
deliverInputEvent会调用到InputState的deliver方法
由于一开始我们的事件还没有完成,因此不会带上FLAG_FINISHED,而且我们的事件时一般事件,并不会被丢弃,因此会走apply分支。
首先会调用onProcess处理事件
以Key为例,我们会调用到processKeyEvent
然后调用了View类的dispatchKeyEvent方法,最终会调用到onKey这个回调函数
mReceiver.finishInputEvent就是NativeInputEvent的finishInputEvent
最后也是调用sendMessage把消息反馈给InputDispatcher。
到这里,上层的处理已经完成,接下来就是InputDispatcher的反馈处理。
接收反馈消息
处理反馈消息
postCommandLocked其实也是发送消息给InputDispatcherThread,那么在分发线程下一次处理消息的时候会首先处理doDispatchCycleFinishedLockedInterruptible。
doDispatchCycleFinishedLockedInterruptible是实际上反馈进行处理的地方,其中包含了下面几个处理步骤:
从waitQueue中取出所反馈的事件
事件是否处理超时,如果是则做超时处理
从waitQueue中删除所反馈的事件
立刻展开下一次的outboundQueue事件监听

在InputConsumer::consume内找到了receiveMessage,从类名能看出来发送端与接收端相当于生产者与消费者的关系。
status_t InputConsumer::consume(InputEventFactoryInterface* factory,
bool consumeBatches, nsecs_t frameTime, uint32_t* outSeq, InputEvent** outEvent) {
// Receive a fresh message.
status_t result = mChannel->receiveMessage(&mMsg);
}
receiveMessage内调用的是socket的接收函数recv
status_t InputChannel::receiveMessage(InputMessage* msg) {
do {
nRead = ::recv(mFd, msg, sizeof(InputMessage), MSG_DONTWAIT);
} while (nRead == -1 && errno == EINTR);
}
事件接收端NativeInputEventReceiver
那么究竟是谁来消费这些事件呢,我们在NativeInputEventReceiver里面找到了答案。在NativeInputEventReceiver内有个事件处理函数handleEvent,该函数是looperCallback的虚函数,NativeInputEventReceiver作为looperCallback的子类,自然有义务实现handleEvent这个函数。handleEvent就可以监听I/O事件。一旦有I/O事件,如上述的socket send事件,handleEvent就会被启动,进行后续的处理。
int NativeInputEventReceiver::handleEvent(int receiveFd, int events, void* data) {
status_t status = consumeEvents(env, false /*consumeBatches*/, -1, NULL);
}
既然有LooperCallback(NativeInputEventReceiver),必然会有Looper。虽然Looper不是本篇文章的研究对象,但是我们有必要理清下面的问题:
究竟与NativeInputEventReceiver对应的这个Looper是什么?
这个Looper是怎样与LooperCallback关联起来的呢?
实际上,一切起始于ViewRootImpl的setView方法:
public void setView(View view, WindowManager.LayoutParams attrs, View panelParentView) {
...
//在这里传入了当前线程的Looper
new WindowInputEventReceiver(mInputChannel, Looper.myLooper());
...
}
InputEventReceiver作为WindowInputEventReceiver的子类,会一起被创建出来。在InputEventReceiver的构造方法中,会调用native方法nativeInit
public InputEventReceiver(InputChannel inputChannel, Looper looper) {
mInputChannel = inputChannel;
mMessageQueue = looper.getQueue();
mReceiverPtr = nativeInit(new WeakReference<InputEventReceiver>(this),inputChannel, mMessageQueue);
}
在NativeInputEventReceiver的nativeInit方法中,创建了NativeInputEventReceiver对象,并调用它的initialize方法
static jint nativeInit(JNIEnv* env, jclass clazz, jobject receiverWeak,
jobject inputChannelObj, jobject messageQueueObj) {
...
sp<NativeInputEventReceiver> receiver = new NativeInputEventReceiver(env,
receiverWeak, inputChannel, messageQueue);
status_t status = receiver->initialize();
...
}
initialize方法只做了一件事,就是把NativeInputEventReceiver与Looper关联起来
status_t NativeInputEventReceiver::initialize() {
setFdEvents(ALOOPER_EVENT_INPUT);
return OK;
}

void NativeInputEventReceiver::setFdEvents(int events) {
if (mFdEvents != events) {
mFdEvents = events;
int fd = mInputConsumer.getChannel()->getFd();
if (events) {
mMessageQueue->getLooper()->addFd(fd, 0, events, this, NULL);
} else {
mMessageQueue->getLooper()->removeFd(fd);
}
}
}
Looper的方法addFd实现了关联Looper与LooperCallback(NativeInputEventReceiver)的功能,我们先来分析一下传给addFd的参数
fd,fd即inputChannel的socket fd,Looper会侦测该fd的状态
events,即传入的ALOOPER_EVENT_INPUT,只有fd的状态是INPUT的时候才会触发调用LooperCallback中的handleEvent方法
this,即NativeInputEventReceiver,当fd状态为Input时,NativeInputEventReceiver中的handleEvent方法会被调用
在consumeEvents内,我们能看到调用了InputConsume::consume来接收InputDispatcher发送过来的事件
status_t NativeInputEventReceiver::consumeEvents(JNIEnv* env,
bool consumeBatches, nsecs_t frameTime, bool* outConsumedBatch) {
for (;;) {
status_t status = mInputConsumer.consume(&mInputEventFactory,
consumeBatches, frameTime, &seq, &inputEvent);
}
}
输入事件在consumeEvents内将会被处理完成,其中包含了四个主要步骤:
获取输入事件
把输入事件转换成java也能处理的格式
输入事件分发到相应窗口去处理
处理结果反馈
1. 获取输入事件已在上面阐述过
2. 输入事件转换
以Key为例,输入事件只是把事件内部的成员拆分,然后通过JNI调用java的构造函数来生成相应的java event对象,后面的事件处理都在java层jobject inputEventObj;
switch (inputEvent->getType()) {
case AINPUT_EVENT_TYPE_KEY:
inputEventObj = android_view_KeyEvent_fromNative(env,
static_cast<KeyEvent*>(inputEvent));
break;
// ----------------------------------------------------------------------------
jobject android_view_KeyEvent_fromNative(JNIEnv* env, const KeyEvent* event) {
jobject eventObj = env->CallStaticObjectMethod(gKeyEventClassInfo.clazz,
gKeyEventClassInfo.obtain,
nanoseconds_to_milliseconds(event->getDownTime()),
nanoseconds_to_milliseconds(event->getEventTime()),
event->getAction(),
event->getKeyCode(),
event->getRepeatCount(),
event->getMetaState(),
event->getDeviceId(),
event->getScanCode(),
event->getFlags(),
event->getSource(),
NULL);
if (env->ExceptionCheck()) {
ALOGE("An exception occurred while obtaining a key event.");
LOGE_EX(env);
env->ExceptionClear();
return NULL;
}
return eventObj;
}
public static KeyEvent obtain(long downTime, long eventTime, int action,
int code, int repeat, int metaState,
int deviceId, int scancode, int flags, int source, String characters) {
KeyEvent ev = obtain();
ev.mDownTime = downTime;
ev.mEventTime = eventTime;
ev.mAction = action;
ev.mKeyCode = code;
ev.mRepeatCount = repeat;
ev.mMetaState = metaState;
ev.mDeviceId = deviceId;
ev.mScanCode = scancode;
ev.mFlags = flags;
ev.mSource = source;
ev.mCharacters = characters;
return ev;
}3.输入事件分发
这里是在java层的事件分发,最终目的是为了调用到窗口的onTouch这类回调函数。env->CallVoidMethod(receiverObj.get(), gInputEventReceiverClassInfo.dispatchInputEvent, seq, inputEventObj);
还记得上面InputEventReceiver初始化时的流程吗?是通过setView--->new WindowInputEventReceiver--->new InputEventReceiver--->new NativeInputEventReceiver这样一步一步创建的。
通过上述的JNI调用,会调用到WindowInputEventReceiver的dispatchInputEvent方法,不过由于WindowInputEventReceiver并没有自己实现这个方法,因此会调用父类InputEventReceiver::dispatchInputEvent,内部会真正调用到WindowInputEventReceiver::onInputEvent
public void dispatchInputEvent(InputEvent event) {
onInputEvent(event);
}
在onInputEvent内,转到了ViewRootImpl这边进行处理
public void onInputEvent(InputEvent event) {
enqueueInputEvent(event, this, 0, true);
}

void enqueueInputEvent(InputEvent event,
InputEventReceiver receiver, int flags, boolean processImmediately) {
doProcessInputEvents();
}
由于事件队列内会包含多个事件,因此在doProcessInputEvent时,需要分别对所有的事件都进行分发
void doProcessInputEvents() {
// Deliver all pending input events in the queue.
while (mPendingInputEventHead != null) {
QueuedInputEvent q = mPendingInputEventHead;
mPendingInputEventHead = q.mNext;
if (mPendingInputEventHead == null) {
mPendingInputEventTail = null;
}
q.mNext = null;

mPendingInputEventCount -= 1;

deliverInputEvent(q);
}
}
deliverInputEvent会调用到InputState的deliver方法
public final void deliver(QueuedInputEvent q) {
if ((q.mFlags & QueuedInputEvent.FLAG_FINISHED) != 0) {
forward(q);
} else if (shouldDropInputEvent(q)) {
finish(q, false);
} else {
apply(q, onProcess(q));
}
}
由于一开始我们的事件还没有完成,因此不会带上FLAG_FINISHED,而且我们的事件时一般事件,并不会被丢弃,因此会走apply分支。
首先会调用onProcess处理事件
protected int onProcess(QueuedInputEvent q) {
if (q.mEvent instanceof KeyEvent) {
return processKeyEvent(q);
} else {
// If delivering a new non-key event, make sure the window is
// now allowed to start updating.
handleDispatchDoneAnimating();
final int source = q.mEvent.getSource();
if ((source & InputDevice.SOURCE_CLASS_POINTER) != 0) {
return processPointerEvent(q);
} else if ((source & InputDevice.SOURCE_CLASS_TRACKBALL) != 0) {
return processTrackballEvent(q);
} else {
return processGenericMotionEvent(q);
}
}
}
以Key为例,我们会调用到processKeyEvent
private int processKeyEvent(QueuedInputEvent q) {

// Deliver the key to the view hierarchy.
if (mView.dispatchKeyEvent(event)) {
return FINISH_HANDLED;
}
}
然后调用了View类的dispatchKeyEvent方法,最终会调用到onKey这个回调函数
public boolean dispatchKeyEvent(KeyEvent event) {

// Give any attached key listener a first crack at the event.
//noinspection SimplifiableIfStatement
ListenerInfo li = mListenerInfo;
if (li != null && li.mOnKeyListener != null && (mViewFlags & ENABLED_MASK) == ENABLED
&& li.mOnKeyListener.onKey(this, event.getKeyCode(), event)) {
return true;
}
}
4. 处理结果反馈
然后还剩下apply这个方法需要分析。如果onProcess正常处理完成后,会返回FINISH_HANDLED,否则返回FINISHED_NOT_NHANDLED。protected void apply(QueuedInputEvent q, int result) {
if (result == FORWARD) {
forward(q);
} else if (result == FINISH_HANDLED) {
finish(q, true);
} else if (result == FINISH_NOT_HANDLED) {
finish(q, false);
} else {
throw new IllegalArgumentException("Invalid result: " + result);
}
}
protected void finish(QueuedInputEvent q, boolean handled) {
q.mFlags |= QueuedInputEvent.FLAG_FINISHED;
if (handled) {
q.mFlags |= QueuedInputEvent.FLAG_FINISHED_HANDLED;
}
forward(q);
}
protected void forward(QueuedInputEvent q) {
onDeliverToNext(q);
}
protected void onDeliverToNext(QueuedInputEvent q) {
if (mNext != null) {
mNext.deliver(q);
} else {
finishInputEvent(q);
}
}
private void finishInputEvent(QueuedInputEvent q) {
if (q.mReceiver != null) {
boolean handled = (q.mFlags & QueuedInputEvent.FLAG_FINISHED_HANDLED) != 0;
q.mReceiver.finishInputEvent(q.mEvent, handled);
} else {
q.mEvent.recycleIfNeededAfterDispatch();
}
recycleQueuedInputEvent(q);
}mReceiver.finishInputEvent就是NativeInputEvent的finishInputEvent
status_t NativeInputEventReceiver::finishInputEvent(uint32_t seq, bool handled) {

status_t status = mInputConsumer.sendFinishedSignal(seq, handled);
}

status_t InputConsumer::sendFinishedSignal(uint32_t seq, bool handled) {
while (!status && chainIndex-- > 0) {
status = sendUnchainedFinishedSignal(chainSeqs[chainIndex], handled);
}
}

status_t InputConsumer::sendUnchainedFinishedSignal(uint32_t seq, bool handled) {
InputMessage msg;
msg.header.type = InputMessage::TYPE_FINISHED;
msg.body.finished.seq = seq;
msg.body.finished.handled = handled;
return mChannel->sendMessage(&msg);
}
最后也是调用sendMessage把消息反馈给InputDispatcher。
到这里,上层的处理已经完成,接下来就是InputDispatcher的反馈处理。
InputDispatcher反馈处理
反馈处理在handleReceiveCallback中进行,其中包含两个部分:接收反馈消息
处理反馈消息
int InputDispatcher::handleReceiveCallback(int fd, int events, void* data) {
for (;;) {
uint32_t seq;
bool handled;
status = connection->inputPublisher.receiveFinishedSignal(&seq, &handled);
if (status) {
break;
}
d->finishDispatchCycleLocked(currentTime, connection, seq, handled);
gotOne = true;
}
}
1. 接收反馈消息
接收反馈消息是调用的inputPublisher的receiveFinishedSignal方法,内部还是调用了mChannel->receiveMessagestatus_t InputPublisher::receiveFinishedSignal(uint32_t* outSeq, bool* outHandled) {
status_t result = mChannel->receiveMessage(&msg);
}2. 处理反馈消息
处理反馈消息是调用了finishDispatchCycleLocked。void InputDispatcher::finishDispatchCycleLocked(nsecs_t currentTime,
const sp<Connection>& connection, uint32_t seq, bool handled) {
// Notify other system components and prepare to start the next dispatch cycle.
onDispatchCycleFinishedLocked(currentTime, connection, seq, handled);
}void InputDispatcher::onDispatchCycleFinishedLocked(
nsecs_t currentTime, const sp<Connection>& connection, uint32_t seq, bool handled) {
CommandEntry* commandEntry = postCommandLocked(
& InputDispatcher::doDispatchCycleFinishedLockedInterruptible);
}postCommandLocked其实也是发送消息给InputDispatcherThread,那么在分发线程下一次处理消息的时候会首先处理doDispatchCycleFinishedLockedInterruptible。
doDispatchCycleFinishedLockedInterruptible是实际上反馈进行处理的地方,其中包含了下面几个处理步骤:
从waitQueue中取出所反馈的事件
事件是否处理超时,如果是则做超时处理
从waitQueue中删除所反馈的事件
立刻展开下一次的outboundQueue事件监听
void InputDispatcher::doDispatchCycleFinishedLockedInterruptible(
CommandEntry* commandEntry) {

// Handle post-event policy actions.
DispatchEntry* dispatchEntry = connection->findWaitQueueEntry(seq);

if (eventDuration > SLOW_EVENT_PROCESSING_WARNING_TIMEOUT) {
String8 msg;
msg.appendFormat("Window '%s' spent %0.1fms processing the last input event: ",
connection->getWindowName(), eventDuration * 0.000001f);
dispatchEntry->eventEntry->appendDescription(msg);
ALOGI("%s", msg.string());
}

if (dispatchEntry == connection->findWaitQueueEntry(seq)) {
connection->waitQueue.dequeue(dispatchEntry);
}

// Start the next dispatch cycle for this connection.
startDispatchCycleLocked(now(), connection);
}
}

相关文章推荐
- Android Studio 'The same input jar is specified twice'
- 加速Android Studio/Gradle构建
- ViewPager内嵌ViewPager以及与SwipeRefreshLayout冲突的问题
- Android(java)学习笔记186:对ListView等列表组件中数据进行增、删、改操作
- 【android ndk】macos环境下Android Studio中利用gradle编译jni模块及配置
- android中的window
- andoid 测试logcat的使用
- Android快速开发,十个最常用的框架
- IM项目,使用openfire服务,Smack的android端概述
- Android笔记一
- (三)android中Toast的使用
- [Android]在ListView嵌套GridView中出现的点击事件处理以及gridview显示不全的问题
- android sqlite使用
- Android中Java与web通信
- android之interpolator的用法详解
- Android dialog无标题栏样式style(for 自定义dialog)
- Android资源,国内镜像站点,博客文章等
- android源码学习规划
- [Java][Android][Process] 分享 Process 运行命令行封装类型
- android Dialog和EditText