7.Android内核 创建窗口的过程(二)
2015-08-19 23:25
579 查看
创建应用窗口
1.每个应用类窗口都对应一个Activity对象,所以,创建应用类窗口首先需要创建一个Activity对象。当AmS决定启动某个Activity时,会通知客户端进程,而每个客户端进程都对应一个ActivityThread
类,任何Activity都必须隶属于一个应用程序,因此,启动Activity的任务最终由ActivityThread 完成。
启动某个Activity的代码本质是构造一个Activity对象,看看ActivityThread里的
performLaunchActivity()方法源码:
private Activity performLaunchActivity(ActivityClientRecord r, Intent customIntent) {
// System.out.println("##### [" + System.currentTimeMillis() + "] ActivityThread.performLaunchActivity(" + r + ")");

ActivityInfo aInfo = r.activityInfo;
if (r.packageInfo == null) {
r.packageInfo = getPackageInfo(aInfo.applicationInfo, r.compatInfo,
Context.CONTEXT_INCLUDE_CODE);
}

ComponentName component = r.intent.getComponent();
if (component == null) {
component = r.intent.resolveActivity(
mInitialApplication.getPackageManager());
r.intent.setComponent(component);
}

if (r.activityInfo.targetActivity != null) {
component = new ComponentName(r.activityInfo.packageName,
r.activityInfo.targetActivity);
}

Activity activity = null;
try {
java.lang.ClassLoader cl = r.packageInfo.getClassLoader();
activity = mInstrumentation.newActivity(
cl, component.getClassName(), r.intent);
StrictMode.incrementExpectedActivityCount(activity.getClass());
r.intent.setExtrasClassLoader(cl);
r.intent.prepareToEnterProcess();
if (r.state != null) {
r.state.setClassLoader(cl);
}
} catch (Exception e) {
if (!mInstrumentation.onException(activity, e)) {
throw new RuntimeException(
"Unable to instantiate activity " + component
+ ": " + e.toString(), e);
}
}

try {
Application app = r.packageInfo.makeApplication(false, mInstrumentation);

if (localLOGV) Slog.v(TAG, "Performing launch of " + r);
if (localLOGV) Slog.v(
TAG, r + ": app=" + app
+ ", appName=" + app.getPackageName()
+ ", pkg=" + r.packageInfo.getPackageName()
+ ", comp=" + r.intent.getComponent().toShortString()
+ ", dir=" + r.packageInfo.getAppDir());

if (activity != null) {
Context appContext = createBaseContextForActivity(r, activity);
CharSequence title = r.activityInfo.loadLabel(appContext.getPackageManager());
Configuration config = new Configuration(mCompatConfiguration);
if (DEBUG_CONFIGURATION) Slog.v(TAG, "Launching activity "
+ r.activityInfo.name + " with config " + config);
activity.attach(appContext, this, getInstrumentation(), r.token,
r.ident, app, r.intent, r.activityInfo, title, r.parent,
r.embeddedID, r.lastNonConfigurationInstances, config,
r.voiceInteractor);

if (customIntent != null) {
activity.mIntent = customIntent;
}
r.lastNonConfigurationInstances = null;
activity.mStartedActivity = false;
int theme = r.activityInfo.getThemeResource();
if (theme != 0) {
activity.setTheme(theme);
}

activity.mCalled = false;
if (r.isPersistable()) {
mInstrumentation.callActivityOnCreate(activity, r.state, r.persistentState);
} else {
mInstrumentation.callActivityOnCreate(activity, r.state);
}
if (!activity.mCalled) {
throw new SuperNotCalledException(
"Activity " + r.intent.getComponent().toShortString() +
" did not call through to super.onCreate()");
}
r.activity = activity;
r.stopped = true;
if (!r.activity.mFinished) {
activity.performStart();
r.stopped = false;
}
if (!r.activity.mFinished) {
if (r.isPersistable()) {
if (r.state != null || r.persistentState != null) {
mInstrumentation.callActivityOnRestoreInstanceState(activity, r.state,
r.persistentState);
}
} else if (r.state != null) {
mInstrumentation.callActivityOnRestoreInstanceState(activity, r.state);
}
}
if (!r.activity.mFinished) {
activity.mCalled = false;
if (r.isPersistable()) {
mInstrumentation.callActivityOnPostCreate(activity, r.state,
r.persistentState);
} else {
mInstrumentation.callActivityOnPostCreate(activity, r.state);
}
if (!activity.mCalled) {
throw new SuperNotCalledException(
"Activity " + r.intent.getComponent().toShortString() +
" did not call through to super.onPostCreate()");
}
}
}
r.paused = true;

mActivities.put(r.token, r);

} catch (SuperNotCalledException e) {
throw e;

} catch (Exception e) {
if (!mInstrumentation.onException(activity, e)) {
throw new RuntimeException(
"Unable to start activity " + component
+ ": " + e.toString(), e);
}
}

return activity;
}以上,使用了ClassLoader从程序文件中装载指定的Activity对应的class文件。
2.构造好指定的Activity对象后,接着调用Activity的attach()方法:
attach()的作用是为刚刚构造好的Activity设置内部变量,这些变量是以后进行Activity调度所必
须的。这些重要的变量包含:
appContext:该对象将作为Activity的BaseContext。Activity的本质就是一个Context,而同时Activity
有时继承于ContextWrapper,该类需要一个真正的Context对象,而这就是appContext,该对象使用
new ContextImpl()方法创建。
this:这就是指的是当前的ActivityThread对象,Activity对象内部可能会需要主程序的引用。
r.token:r是一个ActivityRecord对象,其内部变量token的含义是AmS中的一个HistoryRecord对象。
r.parent:一个Activity可以有一个父Activity,这种理念是为了允许把一个Activity嵌入到另一个Activity内部
执行。在应用程序使用时,常用ActivityGroup类,而ActivityGroup功能的内部支持的正是该变量。
3.在attach()方法内部,除了进行重要变量赋值外,另一件重要的事情就是为该Activity创建Window对
象,这是通过调用PolicyManager的静态方法makeNewWindow()完成的。
PolicyManager会根据com.android.intemal.policy.impLPolicy的配置创建不同产品类型的窗口。这仅
仅是一种程序设计的灵活性,其代码归根到底是创建了一个PhoneWindow对象而已。当前的Framework
中仅仅定义有两种Window的具体实现,一种是MidWindow类,另一种是PhoneWindow类,而前者基本
上没有使用。从名称不难看出,Android的设计之初所设想的两种应用,其中一种是手机,另一种是便携上
网设备(Mobile Internet Device)。
***创建好Window对象后,将其赋值给Activity的内部变量mWindow,并设置该Window的
Callback接口为当前的Activity对象,这就是为什么用户消息能够传递到Activity中的原因。那么
我们来看一看Activity中的attach()方法源码:
final void attach(Context context, ActivityThread aThread,
Instrumentation instr, IBinder token, int ident,
Application application, Intent intent, ActivityInfo info,
CharSequence title, Activity parent, String id,
NonConfigurationInstances lastNonConfigurationInstances,
Configuration config, IVoiceInteractor voiceInteractor) {
attachBaseContext(context);

mFragments.attachActivity(this, mContainer, null);

mWindow = PolicyManager.makeNewWindow(this);
mWindow.setCallback(this);
mWindow.setOnWindowDismissedCallback(this);
mWindow.getLayoutInflater().setPrivateFactory(this);
if (info.softInputMode != WindowManager.LayoutParams.SOFT_INPUT_STATE_UNSPECIFIED) {
mWindow.setSoftInputMode(info.softInputMode);
}
if (info.uiOptions != 0) {
mWindow.setUiOptions(info.uiOptions);
}
mUiThread = Thread.currentThread();

mMainThread = aThread;
mInstrumentation = instr;
mToken = token;
mIdent = ident;
mApplication = application;
mIntent = intent;
mComponent = intent.getComponent();
mActivityInfo = info;
mTitle = title;
mParent = parent;
mEmbeddedID = id;
mLastNonConfigurationInstances = lastNonConfigurationInstances;
if (voiceInteractor != null) {
if (lastNonConfigurationInstances != null) {
mVoiceInteractor = lastNonConfigurationInstances.voiceInteractor;
} else {
mVoiceInteractor = new VoiceInteractor(voiceInteractor, this, this,
Looper.myLooper());
}
}

mWindow.setWindowManager(
(WindowManager)context.getSystemService(Context.WINDOW_SERVICE),
mToken, mComponent.flattenToString(),
(info.flags & ActivityInfo.FLAG_HARDWARE_ACCELERATED) != 0);
if (mParent != null) {
mWindow.setContainer(mParent.getWindow());
}
mWindowManager = mWindow.getWindowManager();
mCurrentConfig = config;
}4.创建好Window对象后,需要给Window对象中的mWindowMananger变量赋值,该变量的类型
是WindowManager类。每一个Window内部都有一个WindowManager对象,WindowManager
类是一个重量级的类,如果每一个Window中都包含一个WindowManager的引用会不会是一种浪费?
但是实际上,WindowManager类仅仅是一个interface类而已,真正实现该接口的有两个类,一个是
Window.LocalWindowManager子类,另一个是WindowManagerImpl类。LocalWindowManager
仅仅是一个壳而已,这就跟ContextWrapper类似,本身虽然提供了WindowManager接口的全部功
能,然而真正实现这些功能的却是壳里面的WindowManager对象,这就是WindowManagerImpl类。
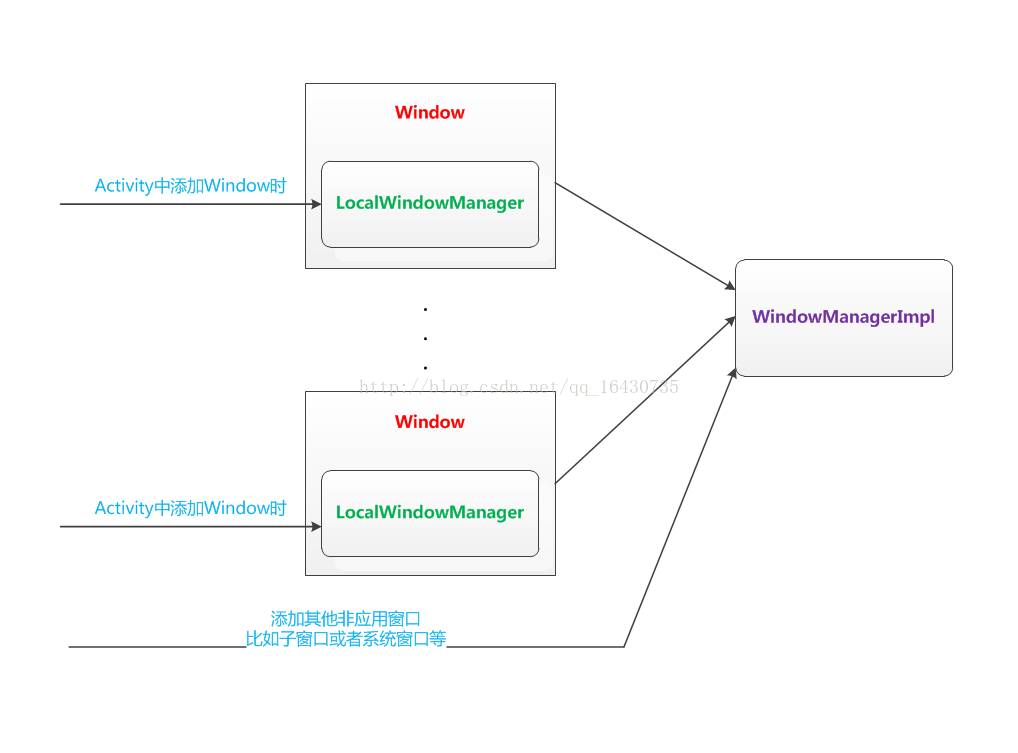
也正是因为以上关系,所以,每个Window内部才包含一个WindowManager的壳以便进行其他操
作,在Activity里的attach()给mWindowManager赋值了:
mWindow.setWindowManager(
(WindowManager)context.getSystemService(Context.WINDOW_SERVICE),
mToken, mComponent.flattenToString(),
(info.flags & ActivityInfo.FLAG_HARDWARE_ACCELERATED) != 0);
if (mParent != null) {
mWindow.setContainer(mParent.getWindow());
}
mWindowManager = mWindow.getWindowManager();
这里调用了Window.setWindowManager方法去设置该Activity对应的WindowManager,那我们
接着来看看Window.setWindowManager的源代码:
/**
* Set the window manager for use by this Window to, for example,
* display panels.  This is <em>not</em> used for displaying the
* Window itself -- that must be done by the client.
*
* @param wm The window manager for adding new windows.
*/
public void setWindowManager(WindowManager wm, IBinder appToken, String appName,
boolean hardwareAccelerated) {
mAppToken = appToken;
mAppName = appName;
mHardwareAccelerated = hardwareAccelerated
|| SystemProperties.getBoolean(PROPERTY_HARDWARE_UI, false);
if (wm == null) {
wm = (WindowManager)mContext.getSystemService(Context.WINDOW_SERVICE);
}
mWindowManager = ((WindowManagerImpl)wm).createLocalWindowManager(this);
}结合以上两段源代码来分析,setWindowManager()方法的第一个参数为
(WindowManager)context.getSystemService(Context.WINDOW_SERVICE),显而易见的
是,这里直接通过Context.getSystemService(String systemName)的方式取得了
WindowManager;第二个参数是mToken,这正是AmS中Activity里对应的HistoryRecord的
Binder引用,该变量将会作为Window中的mAppToken的值被保存下来。
到了Window.setWindowManager中,还进行了一次if(wm==null)的判断,如果为空,则
继续用Context.getSystemService(String systemName)的方式再取一次WindowManager
但是通过mWindowManager = ((WindowManagerImpl)wm).createLocalWindowManager(this)
可以知道,传进来的无论是否是null的WindowManager引用,其实都是备胎,都会转换成
WindowManagerImpl然后再去构造一个LocalWindowManager对象,最后保存在
mWindowManager中。
*** 所以每一个Activity内部都有一个mWindowManager对象,这就是LocalWindowManager,和
Window类中的同名变量相同。
5.配置好了Activity和Window对象后,接下来就需要给该窗口添加真正的显示元素View或者
ViewGroup。这是从Activity.performLaunchActivity()内部调用callActivityOnCreate()开始的
并会辗转到我们熟悉的Activity.onCreate()中。
我们都可以知道给Activity添加界面是在onCreate()方法中调用setContentView()方法,而该方
法实际上却又调用到了其所对应的Window对象的setContentView方法,对此我们可以看看
Activity.setContentView()的源代码:
/**
* Set the activity content from a layout resource.  The resource will be
* inflated, adding all top-level views to the activity.
*
* @param layoutResID Resource ID to be inflated.
*
* @see #setContentView(android.view.View)
* @see #setContentView(android.view.View, android.view.ViewGroup.LayoutParams)
*/
public void setContentView(int layoutResID) {
getWindow().setContentView(layoutResID);
initWindowDecorActionBar();
}
这里,可以看到我们传进去的Layout对应的Id又被对应的Window拿去执行了setContentView了。
6.PhoneWindow.setContentView()源代码:
@Override
public void setContentView(int layoutResID) {
if (mContentParent == null) {
installDecor();
} else {
mContentParent.removeAllViews();
}
mLayoutInflater.inflate(layoutResID, mContentParent);
final Callback cb = getCallback();
if (cb != null) {
cb.onContentChanged();
}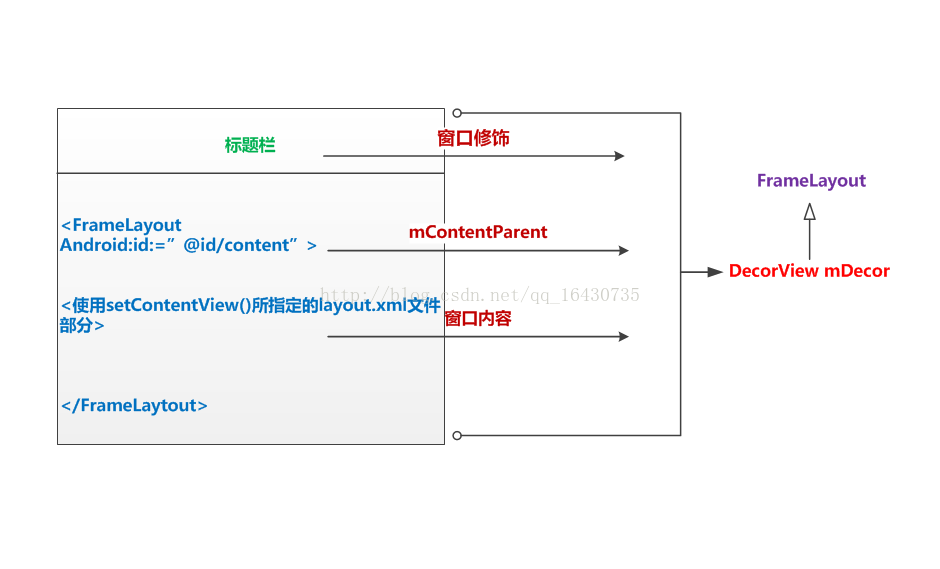
}首先调用installDecor()方法为Window类安装一个窗口装饰,所谓的窗口修饰就是界面上常见的
标题栏,程序中指定的layout.xml界面将被包含在窗口修饰中,称为窗口内容。窗口修饰也是一个
ViewGroup,窗口修饰及其内部的窗口内容就是我们所说的窗口,或者叫做Window的界面。
Framework中定义了多种窗口装饰,installDecor()源代码:
private void installDecor() {
if (mDecor == null) {
mDecor = generateDecor();
mDecor.setIsRootNamespace(true);
}
if (mContentParent == null) {
mContentParent = generateLayout(mDecor);

mTitleView = (TextView)findViewById(com.android.internal.R.id.title);
if (mTitleView != null) {
if ((getLocalFeatures() & (1 << FEATURE_NO_TITLE)) != 0) {
View titleContainer = findViewById(com.android.internal.R.id.title_container);
if (titleContainer != null) {
titleContainer.setVisibility(View.GONE);
} else {
mTitleView.setVisibility(View.GONE);
}
if (mContentParent instanceof FrameLayout) {
((FrameLayout)mContentParent).setForeground(null);
}
} else {
mTitleView.setText(mTitle);
}
}
}
}
使用generateDecor()创建一个DecorView对象,并赋值给mDecor变量。该变量并不完全等同于窗口
修饰,窗口修饰是mDecor内部的唯一一个子视图。
根据用户指定的参数选择不同的窗口修饰,并把窗口修饰作为mDecor的子窗口,这是在
generateLayout()中调用mDecor.addView()完成的。
不同窗口的修饰的区别不大,比如是否有标题栏,是否显示左右进度条等,这些修饰窗口共同的
特点是其内部必须包含一个id=content的FrameLayout,因为内容窗口正是被包含在该FrameLayout
之中。常见的窗口修饰对应的XML文件如下,其路径为frameworks/base/core/res/res/layout。
R.layout.dialog_title_icons
R.layout.screen_title_icons
R.layout.screen_progress
R.layout.dialog_custom_title
R.layout.screen_custom_title
R.layout.dialog_title
R.layout.screen_title
R.layout.screen_simple
安装完窗口修饰后,就可以把用户界面layout.xml文件添加到窗口修饰中,这是通过在
setContentView()中调用inflate()方法完成的,该方法的第二个参数正是mContentParent
即id=content的FrameLayout。
我们再看一看PhoneWindow.setContentView()源代码:
@Override
public void setContentView(int layoutResID) {
if (mContentParent == null) {
installDecor();
} else {
mContentParent.removeAllViews();
}
mLayoutInflater.inflate(layoutResID, mContentParent);
final Callback cb = getCallback();
if (cb != null) {
cb.onContentChanged();
}
}
最后,回调cb.onContentChanged()方法,通知应用程序窗口内容发生了改变,因为从无到
有了。
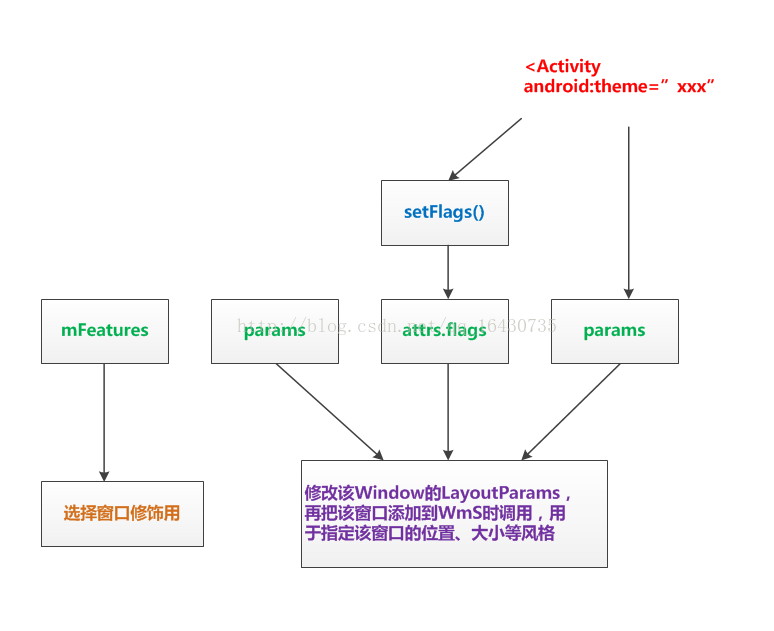
再来特别说明一点,所谓的“根据用户指定的参数”中“用户指定”有两个地方可以指定:
第一个地方是在Activity的onCreate()方法中调用得到当前Window,然后调用requestFeature()指
定。generateLayout()方法中使用getLocalFeature()获取feature值,并根据这些值选择不同的窗口
修饰。
另一个地方是在AndroidMainfest.xml中Activity元素内部使用android:theme="XXX"指定。
generateLayout()方法中使用getWindowStyle()方法获取这些值,调用流程如下:
getWindowStyle():PhoneWindow中generateLayout()
->obtainStyleAttributes():Window中
->getTheme.obtainStyledAttributes():Context中
流程中的最后一个是调用getTheme(),而这正是使用android:theme赋值的结果。
"用户指定"及generateLayout()方法内部的流程可以总结如下:

相关文章推荐
- android从应用到驱动之—camera(2)---cameraHAL的实现
- Android NDK 配置和实现
- Android中View类setTag()和getTag()的理解
- android从应用到驱动之—camera(1)---程序调用流程
- 值得阅读的android技术文章
- Android View的绘制流程
- Android中View的绘制过程 onMeasure方法简述
- win下xamarin和64位Android Studio共存
- Android TextView 横向滚动(跑马灯效果)
- Android动画学习--帧动画,补间动画,属性动画的基本用法
- android ListView之——BaseAdapter使用
- ubuntu14.04下Android源代码的下载与编译,以及将源代码导入到Intellij(针对只需要看android源代码)
- 深入学习Android异步任务-AsyncTask
- Android学习笔记(十三)
- 配置使用Android数据库开源框架GreenDao
- Android学习0819<三>(Activity的操作)
- Android Api Demos登顶之路(三十九)Fragment-->show hide
- Android高手速成1--第一部分 个性化控件(View) - Aways.Online
- android ListView 及adapterView的使用
- mediarecorder学习,android4.0后mediarecorder start failed的原因