线上服务器应用--文件同步方案Rsync+sersync
2015-08-17 12:48
543 查看
前言:需求:3台服务器,其中1主2备,实现主服务器实时推送文件至2台备份服务器一、为什么要用Rsync+sersync架构?1、sersync是基于Inotify开发的,类似于Inotify-tools的工具2、sersync可以记录下被监听目录中发生变化的(包括增加、删除、修改)具体某一个文件或某一个目录的名字,然后使用rsync同步的时候,只同步发生变化的这个文件或者这个目录。二、Rsync+Inotify-tools与Rsync+sersync这两种架构有什么区别?1、Rsync+Inotify-tools(1):Inotify-tools只能记录下被监听的目录发生了变化(包括增加、删除、修改),并没有把具体是哪个文件或者哪个目录发生了变化记录下来;(2):rsync在同步的时候,并不知道具体是哪个文件或者哪个目录发生了变化,每次都是对整个目录进行同步,当数据量很大时,整个目录同步非常耗时(rsync要对整个目录遍历查找对比文件),因此,效率很低。2、Rsync+sersync(1):sersync可以记录下被监听目录中发生变化的(包括增加、删除、修改)具体某一个文件或某一个目录的名字;(2):rsync在同步的时候,只同步发生变化的这个文件或者这个目录(每次发生变化的数据相对整个同步目录数据来说是很小的,rsync在遍历查找比对文件时,速度很快),因此,效率很高。小结:当同步的目录数据量不大时,建议使用Rsync+Inotify-tools;当数据量很大(几百G甚至1T以上)、文件很多时,建议使用Rsync+sersync。三、sersync安装配置3.1sersync同步逻辑图 当前版本的sersync依赖于rsync进行数据同步;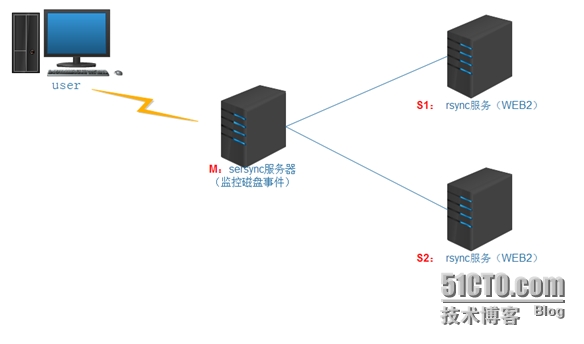 原理步骤:在同步服务器(主服务器Master)上开启sersync服务,sersync负载监控配置路径中的文件系统事件变化;调用rsync命令把更新的文件同步到目标服务器(S1 和 S2);需要在主服务器配置sersync,在同步目标服务器配置rsync server(注意:是rsync服务)同步原理:1. 用户实时的往sersync服务器(M)上写入更新文件数据;2. 此时需要在同步主服务器(M)上配置sersync服务;3. 在S1 和S2上开启rsync守护进程服务,以同步拉取来自sersync服务器(M)上的数据;通过rsync的守护进程服务后可以发现,实际上sersync就是监控本地的数据写入或更新事件;然后,在调用rsync客户端的命令,将写入或更新事件对应的文件通过rsync推送到目标服务器(S1 和S2),如此简单;3.2 安装环境准备1.系统资源列表
2.系统环境 64位centos 6.5[b]3.3 配置同步服务器[/b]1.slave上(备机)部署rsync服务 yum -y install rsync 多台目标服务器要求版本一样 3.0.62.部署rsync服务确定S1和S2服务器版本一致,(S1,S2)上配置如下,yum安装完没有配置文件,需要添加如下:
原理步骤:在同步服务器(主服务器Master)上开启sersync服务,sersync负载监控配置路径中的文件系统事件变化;调用rsync命令把更新的文件同步到目标服务器(S1 和 S2);需要在主服务器配置sersync,在同步目标服务器配置rsync server(注意:是rsync服务)同步原理:1. 用户实时的往sersync服务器(M)上写入更新文件数据;2. 此时需要在同步主服务器(M)上配置sersync服务;3. 在S1 和S2上开启rsync守护进程服务,以同步拉取来自sersync服务器(M)上的数据;通过rsync的守护进程服务后可以发现,实际上sersync就是监控本地的数据写入或更新事件;然后,在调用rsync客户端的命令,将写入或更新事件对应的文件通过rsync推送到目标服务器(S1 和S2),如此简单;3.2 安装环境准备1.系统资源列表| 角色 | 服务器配置 | 操作系统版本 | IP | 机器名 |
| sersync服务(M) | VM | CentOS6.6 | 172.16.1.28 | sersync |
| rsync服务(S1) | VM | CentOS6.6 | 172.16.1.25 | WEB1 |
| rsync服务(S2) | VM | CentOS6.6 | 172.16.1.26 | WEB2 |
vim /etc/rsyncd.conf
#Rsync server
uid = root
gid = root
use chroot = no                         # 安全相关
max connections = 2000                  # 并发连接数
timeout = 600                           # 超时时间(秒)
pid file =/var/run/rsyncd.pid           # 指定rsync的pid目录
lock file =/var/run/rsync.lock          # 指定rsync的锁文件【重要】
log file = /var/log/rsyncd.log          # 指定rsync的日志目录
ignore errors
read only = false
list = false
hosts allow = 223.1.1.84
hosts deny = 0.0.0.0/32
auth users = rsync_backup
secrets file =/etc/rsync.password
#################################################
[mofiweb]                                   # 模块
comment = mofiweb
path = /wqdata/mofibak
#################################################
#[bbs]
#comment = bbs
#path = /data/bbs/
#################################################
#[blog]
#comment = blog
#path = /data/blog/
#rsync_config____________end
特别提示: S1,S2的机器 同时部署上述服务;上面rsync服务的配置文件,表面允许sersync主服务器(ip:223.1.1.84)访问rsync同步模块名为[mofiweb] ,将同步过来的文件分别放入对应的path指定的目录/wqdata/mofibak 下面;如果有多台目标服务器,则每一台都需要进行类似的rsync服务配置,上面的uid、gid要换成您服务器的相应的同步用户;注意,rsync服务账户(本文用的是root)要有对被同步目录(/data/)的写入更新权限;3.创建rsync同步密码文件,并设置权限为600
echo "rsync_backup:lntz">/etc/rsync.passwordcat /etc/rsync.passwordchmod 600 /etc/rsync.password4.启动守护进程,并写入开机自启动
[root@web1 ~]# rsync --daemon[root@web1 ~]# lsof -i:873COMMAND PID USER FD TYPE DEVICE SIZE/OFF NODE NAMErsync 1070 root 4u IPv4 17190189 0t0 TCP *:rsync (LISTEN)[root@web1 ~]#[root@web1 ~]# netstat -nulpt| grep rsynctcp 0 0 0.0.0.0:873 0.0.0.0:* LISTEN 1070/rsync设置开机自启动【写入到/etc/rc.local里面】[root@web1 ~]# vim /etc/rc.local# rsync server progress/usr/bin/rsync --daemon5. 创建相关待同步的目录
mkdir -p /wqdata/mofibak提示: 此步骤在S1,S2都要执行,否则rsync服务会因为没有PATH路径而无法启动3.4 Master(主服务器)上配置rsync客户端在master上配置rsync客户端相关权限认证:
echo "lntz">/etc/rsync.passwordchmod 600 /etc/rsync.passwordll /etc/rsync.password3.4.1 master[b](主服务器)上 手工测试rsync同步情况[/b]特别提示:此步非常关键,如果测试不成功,后面的sersync配好了也不会同步数据;1)分别创建待同步数据
mkdir -p /wqdata/mofi里面随便建点文件或文件夹2)执行同步命令
rsync -avzP /wqdata/mofi/ rsync_backup@218.24.71.26::mofiweb/ --password-file=/etc/rsync.passwordsending incremental file listwelcome_重命名_2015-4-7-16-20-49.html345 100% 0.00kB/s 0:00:00 (xfer#1, to-check=1075/1110)sent 1877487 bytes received 555 bytes 751216.80 bytes/sectotal size is 3215058996 speedup is 1711.92提示:在后面进行部署sersync之前,sersync主服务器上必须要确保手工可以把文件推送到S1,S2上,这样后续sersync才能调用这些命令来自动推送在推送前关闭iptables或打开873端口3)推送的命令是在 master端(也就是 sersync服务器上)操作的,同步后查看S1,S2进备份服务器S1备份文件夹查看,或用du 命令对比大小 ,或者直观点用xftp看列表3.5Mster上开始部署sersync服务1、下载sersync
sersync2
.5.4_64bit_binary_stable_final.
tar
.gz百度或wget http://dd.jb51.net:81/201111/tools/sersync_64bit_binary_stable_final.tar.gz 2、配置sersync tar包解压并改名放到/usr/local/sersync更改优化sersync配置文件:a) 修改24--28行
24 <localpathwatch="/opt/tongbu"> # 定义本地要同步的目录25 <remote ip="127.0.0.1"name="tongbu1"/>26 <!--<remoteip="192.168.8.39" name="tongbu"/>--> # 同步到哪台机器上 tongbu模块rsync端模块名字27 <!--<remoteip="192.168.8.40" name="tongbu"/>--> # 同步到哪台机器上 tongbu模块28 </localpath>b)修改31--34行,认证部分【rsync密码认证】修改后的内容如下:
<rsync> <commonParamsparams="-artuz"/><auth start="true"users="rsync_backup" passwordfile="/etc/rsync.password"/><userDefinedPortstart="false" port="874"/><!-- port=874 --><timeout start="true" time="100"/><!--timeout=100 --><sshstart="false"/></rsync># ***这块注意,密码文件和几个true开关,否则后面同步不了。修改内容为 rsync的密码文件以及 同步所使用的账号类似:rsync -avzP /data/www/rsync_backup@172.16.1.25::www/ --password-file=/etc/rsync.passwordc)修改37行修改后如下:
<failLog path="/usr/local/sersync/logs/rsync_fail_log.sh"timeToExecute="60"/><!--default every 60mins execute once-->#当同步失败后,日志记录到/usr/local/sersync/logs/rsync_fail_log.sh文件中,并且每60分钟对失败的log进行重新同步修改后的配置文件为:所有修改部分
<sersync><localpath watch="/wqdata/mofi"><remote ip="218.24.71.26" name="mofiweb"/><!--<remote ip="192.168.8.39" name="tongbu"/>--><!--<remote ip="192.168.8.40" name="tongbu"/>--></localpath><rsync><commonParams params="-artuz"/><auth start="true" users="rsync_backup" passwordfile="/etc/rsync.password"/><userDefinedPort start="false" port="874"/><!-- port=874 --><timeout start="true" time="100"/><!-- timeout=100 --><ssh start="false"/></rsync><failLog path="/tmp/rsync_fail_log.sh" timeToExecute="60"/><!--default every 60mins execute once--><crontab start="false" schedule="600"><!--600mins--><crontabfilter start="false"><exclude expression="*.php"></exclude><exclude expression="info/*"></exclude></crontabfilter></crontab><plugin start="false" name="command"/></sersync>3、开启sersync守护进程同步数据启动命令
/usr/local/sersync/sersync2 -d -r -o /usr/local/sersync/confxml.xmlecho"PATH=$PATH:/usr/local/sersync/" >> /etc/profilesource /etc/profilesersync2 如果执行不了进目录里执行启动命令后返回结果如下为正常:
[root@localhost sersync]# sersync2set the system paramexecute:echo 50000000 > /proc/sys/fs/inotify/max_user_watchesexecute:echo 327679 > /proc/sys/fs/inotify/max_queued_eventsparse the command paramdaemon thread num: 10parse xml config filehost ip : localhost host port: 8008use rsync password-file :user is rsync_backuppasswordfile is /etc/rsync.passwordconfig xml parse successplease set /etc/rsyncd.conf max connections=0 Manuallysersync working thread 12 = 1(primary thread) + 1(fail retry thread) + 10(daemon sub threads)Max threads numbers is: 22 = 12(Thread pool nums) + 10(Sub threads)please according your cpu ,use -n param to adjust the cpu raterun the sersync:watch path is: /wqdata/mofi补充: 多实例情况1、配置多个confxml.xml文件(比如:www、bbs、blog....等等)2、根据不同的需求同步对应的实例文件优化与监控脚本 见 http://www.osyunwei.com/archives/7447.html本文主要参考 http://liubao0312.blog.51cto.com/2213529/1677586

相关文章推荐
- 如何在使用 scp 命令时递归地排除文件
- rsync ssh 数据同步分析
- rsync详解之exclude排除文件
- rsync结合find技巧分享
- rsync 数据同步使用详解
- 用rsync实现windows与linux文件同步的方法
- rsync命令排除文件和文件夹(exclude-from)
- Windows rsync服务器备份配置实例
- window系统的Rsync同步实战分析第1/2页
- 使用RSYNC在服务器间镜像或者备份目录和文件
- 利用rsync自动备份 完全配置方法 增加了ip限制
- Linux 用cp和rsync同步文件时跳过指定目录的方法
- sersync2 完全安装配置说明(二) 可选功能与xml高级配置
- rsync 同步错误 cwrsync rsync error rsync error: some files/attrs were not transferred 解决方法
- 用rsync对网站进行镜像备份实现步骤
- rsync中文手册之使用rsync实现网站镜像和备份linux第1/3页
- 使用rsync同步网路备份第1/2页
- 使用rsync来实现文件同步
- rsync相对于其他同步工具的优缺点介绍
- Rsync 服务器文件同步的搭建以及使用