android开发(3) 可滚动的录入表单演示
2015-08-14 10:20
471 查看
软件开发很多工作就是收集表单,展示一个表单等待用户录入表单数据。那么我们就做个这样的的布局演示吧。
本文使用的控件有:
RelativeLayout 相对布局
ScrollView 滚动视图
TableLayout 表格布局
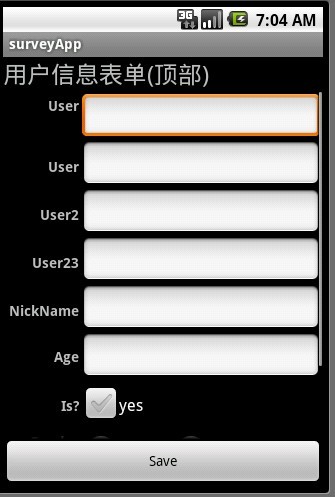
如上图所示,界面(或者说窗体)分为三个部分:
顶部:信息提示,标题(Title)

中间:表单内容
底部:操作按钮

实现这样的布局一定要用到RelativeLayout 相对布局,我们这样指定我的布局。
1.根控件(视图)放置一个RelativeLayout 作为根控件。指示它填充满整个窗口,fill_parent。
2.在根控件里放置三个子控件,对应刚刚提到三个部分(顶部,中间。底部)等。
3.分别设定上面三个控件的布局属性(或者说设置布局,对齐样式)。
我们设定顶部控件的相对属性为:android:layout_alignParentTop="true",这个属性意思是对齐到父控件的顶部
然后设定底部控件的属性为:android:layout_alignParentBottom="true",指定它对齐到父控件的底部
再指定中间的控件属性为:
android:layout_below ="@id/toppanel" ,指示它位于某个控件下方。在这里肯定是上面提到的 顶部控件 了。
android:layout_above="@id/panelBottom",指示它位于某个控件上方。在这里肯定是上面提到的 底控件 了。
布局初步完成。贴代码
<?xml version="1.0" encoding="utf-8"?>
<RelativeLayout xmlns:android="http://schemas.android.com/apk/res/android"
android:orientation="vertical"
android:gravity="center_horizontal"
android:layout_width="fill_parent"
android:layout_height="fill_parent"
>
<RelativeLayout android:layout_width="fill_parent"
android:layout_height="wrap_content"
android:layout_alignParentTop="true"
android:id="@+id/toppanel"
>
<TextView
android:layout_width="fill_parent"
android:layout_height="wrap_content"
android:text="用户信息表单(顶部)"
android:textSize="11pt"
/>
</RelativeLayout>
<RelativeLayout android:id="@+id/panelBottom"
android:layout_width="wrap_content"
android:layout_alignParentBottom="true"
android:layout_height="wrap_content">
<Button android:text="Save(底部控件)" android:id="@+id/button1"
android:layout_height="wrap_content" android:layout_width="fill_parent"></Button>
</RelativeLayout>
<ScrollView
android:layout_below ="@id/toppanel"
android:layout_above="@id/panelBottom"
android:layout_width="wrap_content" android:layout_height="wrap_content"
>
<...............这里将写中间部分的控件....>
</ScrollView>
</RelativeLayout>
阅读上面的代码,可以看到
顶部控件使用一个RelativeLayout 名字是:toppanel
底部控件使用一个RelativeLayout 名字是:panelBottom
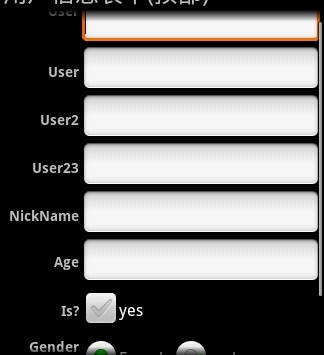
中间控件使用一个ScrollView,滚动视图控件。该控件的好处是当它的子控件太长时,会自动出现滚动条。
下面我们为ScrollView下添加一个TableLayout,这个一个表格布局控件,使得布局非常整齐。
<TableLayout android:padding="3dip"
android:id="@+id/tableLayout1"
android:layout_width="fill_parent"
android:stretchColumns="1"
android:layout_height="fill_parent">
<TableRow >
<TextView android:layout_width="wrap_content"
android:layout_height="fill_parent"
android:gravity="right"
android:textStyle="bold"
android:padding="3dip"
android:text="User">
</TextView>
<EditText android:id="@+id/editText1"
android:padding="3dip"
android:layout_width="wrap_content"
android:layout_height="wrap_content"></EditText>
</TableRow>
</TableLayout>
TableLayout下可以有多行TableRow,每个TableRow里可以有多个子控件,每个控件相当于一个cell(单元格)。这很类似html里的table标签。
至此全部完成。
代码下载
本文使用的控件有:
RelativeLayout 相对布局
ScrollView 滚动视图
TableLayout 表格布局
如上图所示,界面(或者说窗体)分为三个部分:
顶部:信息提示,标题(Title)
中间:表单内容
底部:操作按钮
实现这样的布局一定要用到RelativeLayout 相对布局,我们这样指定我的布局。
1.根控件(视图)放置一个RelativeLayout 作为根控件。指示它填充满整个窗口,fill_parent。
2.在根控件里放置三个子控件,对应刚刚提到三个部分(顶部,中间。底部)等。
3.分别设定上面三个控件的布局属性(或者说设置布局,对齐样式)。
我们设定顶部控件的相对属性为:android:layout_alignParentTop="true",这个属性意思是对齐到父控件的顶部
然后设定底部控件的属性为:android:layout_alignParentBottom="true",指定它对齐到父控件的底部
再指定中间的控件属性为:
android:layout_below ="@id/toppanel" ,指示它位于某个控件下方。在这里肯定是上面提到的 顶部控件 了。
android:layout_above="@id/panelBottom",指示它位于某个控件上方。在这里肯定是上面提到的 底控件 了。
布局初步完成。贴代码
<?xml version="1.0" encoding="utf-8"?>
<RelativeLayout xmlns:android="http://schemas.android.com/apk/res/android"
android:orientation="vertical"
android:gravity="center_horizontal"
android:layout_width="fill_parent"
android:layout_height="fill_parent"
>
<RelativeLayout android:layout_width="fill_parent"
android:layout_height="wrap_content"
android:layout_alignParentTop="true"
android:id="@+id/toppanel"
>
<TextView
android:layout_width="fill_parent"
android:layout_height="wrap_content"
android:text="用户信息表单(顶部)"
android:textSize="11pt"
/>
</RelativeLayout>
<RelativeLayout android:id="@+id/panelBottom"
android:layout_width="wrap_content"
android:layout_alignParentBottom="true"
android:layout_height="wrap_content">
<Button android:text="Save(底部控件)" android:id="@+id/button1"
android:layout_height="wrap_content" android:layout_width="fill_parent"></Button>
</RelativeLayout>
<ScrollView
android:layout_below ="@id/toppanel"
android:layout_above="@id/panelBottom"
android:layout_width="wrap_content" android:layout_height="wrap_content"
>
<...............这里将写中间部分的控件....>
</ScrollView>
</RelativeLayout>
阅读上面的代码,可以看到
顶部控件使用一个RelativeLayout 名字是:toppanel
底部控件使用一个RelativeLayout 名字是:panelBottom
中间控件使用一个ScrollView,滚动视图控件。该控件的好处是当它的子控件太长时,会自动出现滚动条。
下面我们为ScrollView下添加一个TableLayout,这个一个表格布局控件,使得布局非常整齐。
<TableLayout android:padding="3dip"
android:id="@+id/tableLayout1"
android:layout_width="fill_parent"
android:stretchColumns="1"
android:layout_height="fill_parent">
<TableRow >
<TextView android:layout_width="wrap_content"
android:layout_height="fill_parent"
android:gravity="right"
android:textStyle="bold"
android:padding="3dip"
android:text="User">
</TextView>
<EditText android:id="@+id/editText1"
android:padding="3dip"
android:layout_width="wrap_content"
android:layout_height="wrap_content"></EditText>
</TableRow>
</TableLayout>
TableLayout下可以有多行TableRow,每个TableRow里可以有多个子控件,每个控件相当于一个cell(单元格)。这很类似html里的table标签。
至此全部完成。
代码下载

相关文章推荐
- android 使用SharedPreferences保存list数据
- Android性能优化典范 - 第3季
- Android开发大全
- Android 计算控件尺寸
- androidの布局控件居于最底部实现
- Android中自定义checkbox样式
- Android中相机拍照
- Mac Android Studio Java8 lambda RxAndroid 配置
- Android使用gradle不同配置多项目打包
- 安装android sdk的package的时候,安装不上怎么办?
- Android平台免Root无侵入AOP框架Dexposed使用详解
- Android:30分钟弄明白Touch事件分发机制
- Android -- AudioPlayer
- Xamarin Android Player
- android oom
- GitHub上史上最全的Android开源项目分类汇总
- Android 下面资源的一些介绍
- SEAndroid安全机制中的进程安全上下文关联分析
- 飞行熊猫游戏源码android版
- SEAndroid安全机制简要介绍和学习计划