安卓设置自定义字体的解决方案
2015-08-13 14:05
471 查看
2015-08-13日更新
发现了一个开源的第三方项目!!!真的屌炸天了
可以快速的全局设置!!!!
简直不敢详细,而且还事存在了好久的项目了!!
方法很简单,就是使用github上的一个开源库Calligraphy,使用步骤只需要以下几步
在AndroidStudio中添加依赖,搜索calligraphy点击添加即可(如果还没有使用AndroidStudio,推荐切换到此google官方开发工具)
自定义Application,在onCreate里面配置默认字体
CalligraphyConfig.initDefault(new CalligraphyConfig.Builder().setDefaultFontPath("fonts/Roboto-Bold.ttf").setFontAttrId(R.attr.fontPath).build());在Activity中重写attachBaseContext方法(推荐使用一个BaseActivity,app中的所有Activity继承自BaseActivity)
super.attachBaseContext(CalligraphyContextWrapper.wrap(newBase));
这样,TextView的默认字体就成了你设置的Roboto-Bold字体,如果要单独对TextView设置其他字体,可以直接在xml中或style中使用fontPath,多种使用方法请参考github上Calligraphy的Readme文档和Sample示例程序。
----------
如果只是单独设置一两个,使用这个代码就可以了.别的方法不用考虑了,性能不怎么样, https://docs.gradle.org/current/userguide/userguide_single.html
下面介绍了三种方案..但你可以不用看了,还是直接看下我写的这个总结吧
Typeface customFont = Typeface.createFromAsset(this.getAssets(), "fonts/YourCustomFont.ttf");
TextView view = (TextView) findViewById(R.id.activity_main_header);
view.setTypeface(customFont);
如果只是单独设置一两个,使用这个代码就可以了.别的方法不用考虑了,性能不怎么样,
如果你是在Listview中使用.推荐下面的做法.
if(someTextView.getTypeface() !=null && !someTextView.getTypeface().equals(Typefaces.get(somecontext,someassetpath))
someTextView.setTypeface(Typefaces.get(somecontext,someassetpath);
public class Typefaces{

private static final Hashtable<String, Typeface> cache = new Hashtable<String, Typeface>();

public static Typeface get(Context c, String name){
synchronized(cache){
if(!cache.containsKey(name)){
Typeface t = Typeface.createFromAsset(
c.getAssets(),
String.format("fonts/%s.ttf", name)
);
cache.put(name, t);
}
return cache.get(name);
}
}

}
为何要这么写呢,因为不这么做,会导致频繁的GC!!然后你的程序就卡顿卡顿的.做得很流畅的是"澎湃",他的字体很美,而且很流畅.
参考来源: http://code.google.com/p/android/issues/detail?id=9904#c7 http://stackoverflow.com/questions/2973270/using-a-custom-typeface-in-android
---------------------------------
解决方案
1)Android默认方法 #1
你可以通过ID查找到View,然后挨个为它们设置字体。在单个View的情况下,它看起来也没有那么可怕。Typeface customFont = Typeface.createFromAsset(this.getAssets(), "fonts/YourCustomFont.ttf"); TextView view = (TextView) findViewById(R.id.activity_main_header); view.setTypeface(customFont);
但是在很多TextView、Button等文本组件的情况下,我敢肯定你不会喜欢这个方法的。:D
2)Android默认方法 #2
你可以为每个文本组件创建一个子类,如TextView、Button等,然后在构造函数中加载自定义字体。public class BrandTextView extends TextView {
public BrandTextView(Context context, AttributeSet attrs, int defStyle) {
super(context, attrs, defStyle);
}
public BrandTextView(Context context, AttributeSet attrs) {
super(context, attrs);
}
public BrandTextView(Context context) {
super(context);
}
public void setTypeface(Typeface tf, int style) {
if (style == Typeface.BOLD) {
super.setTypeface(Typeface.createFromAsset(getContext().getAssets(), "fonts/YourCustomFont_Bold.ttf"));
} else {
super.setTypeface(Typeface.createFromAsset(getContext().getAssets(), "fonts/YourCustomFont.ttf"));
}
}
}然后只需要将标准的文本控件替换成你自定义的就可以了(例如BrandTextView替换TextView)。
<com.your.package.BrandTextView
android:layout_width="wrap_content"
android:layout_height="wrap_content"
android:text="View with custom font"/>
<com.your.package.BrandTextView
android:layout_width="wrap_content"
android:layout_height="wrap_content"
android:textStyle="bold"
android:text="View with custom font and bold typeface"/>
还有,你甚至可以直接在XML中添加自定义的字体属性。要实现这个,你需要定义你自己的
declare-styleable属性,然后在组件的构造函数中解析它们。
为了不占篇幅介绍这么基础的东西,这里有一篇不错的文章告诉你怎么自定义控件属性。
http://kevindion.com/2011/01/custom-xml-attributes-for-android-widgets/
在大多数情况下,这个方法还不赖,并且有一些优点(例如,切换字体粗细等等,字体可以在组件xml文件的typeface属性中定义)。但是我认为这个实现方法还是太重量级了,并且依赖大量的模板代码,为了一个替换字体的简单任务,有点儿得不偿失。
3)小调整的递归解决方案
理想的解决方案是自定义主题,然后应用到全局或者某个Activity。但不幸的是,Android的
android:typeface属性只能用来设置系统内嵌的字体,而非用户自定义字体(例如assets文件中的字体)。这就是为什么我们无法避免在Java代码中加载并设置字体。
所以我决定创建一个帮助类,使得这个操作尽可能的简单。使用方法:
FontHelper.applyFont(context, findViewById(R.id.activity_root), "fonts/YourCustomFont.ttf");
并且这行代码会用来加载所有的基于TextView的文本组件(TextView、Button、RadioButton、ToggleButton等等),而无需考虑界面的布局层级如何。
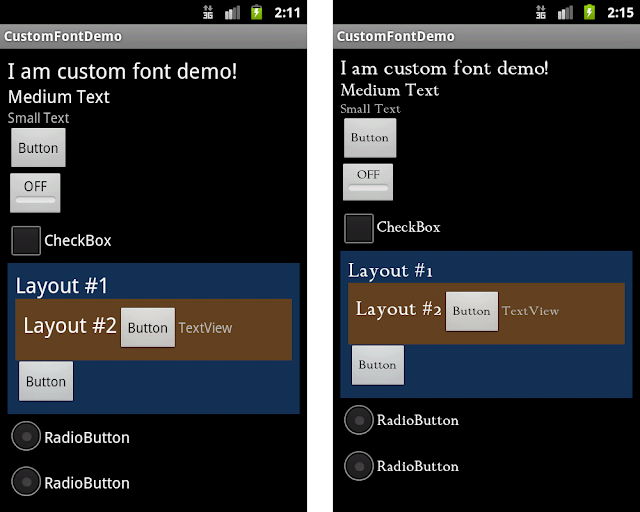
标准(左)与自定义(右)字体的用法。
这是怎么做到的?非常简单:
public static void applyFont(final Context context, final View root, final String fontName) {
try {
if (root instanceof ViewGroup) {
ViewGroup viewGroup = (ViewGroup) root;
for (int i = 0; i < viewGroup.getChildCount(); i++)
applyFont(context, viewGroup.getChildAt(i), fontName);
} else if (root instanceof TextView)
((TextView) root).setTypeface(Typeface.createFromAsset(context.getAssets(), fontName));
} catch (Exception e) {
Log.e(TAG, String.format("Error occured when trying to apply %s font for %s view", fontName, root));
e.printStackTrace();
}
}
正如你所看到的,所需要做的仅仅是将基于TextView的文本组件从布局中遍历出来而已。
你可以在这里下载到示例代码,里面有
FontHelper的具体用法。
一些想法
在多个项目中,我都碰到过类似的需求,早期采用的是第二种实现方法,但是缺点在于对于第三方组件,你需要去修改别人的代码,才能实现自定义字体,这恰恰违反了OC(Open & Close)原则,对扩展开放,对修改封闭。刚看到第三种的时候,也是惊为天人,姑且不说结果,我觉得这种活跃的思路非常重要,很值得学习参考。
但是最后被team里的人否决了,理由是违背组件设计原则,实现方式略嫌粗暴。后来我仔细想想,一个是要做好内存管理(似乎会引起内存问题),视图状态改变,也要重复加载(横竖屏、onResume等),也绝对不是简单的活儿。
所以暂定使用第一种方法,typeface使用单例,需要时设置字体。
我个人觉得第一种还是个体力活,而且到后来,这个代码重复率还是非常高的,这又违背了DRY原则。在地铁上的时候,突然想到DI(Dependency Inject)。已经有一些DI的框架,如ButterKnife,那写出来应该是这样:
@CustomFont(R.id.textView) TextView textView
or
@InjectView(id=R.id.textView, customFont=true) View anyView
@InjectView(id=R.id.textView, customFont=true, customFont="fonts/ltfz.ttf") View anyView
这样写出来代码相比重复写setTypeface要好一些。不过谷歌官方表示不推荐用这种注入,应为影响效率,小的demo快速开发可以考虑。

相关文章推荐
- 使用C++实现JNI接口需要注意的事项
- Android IPC进程间通讯机制
- Android Manifest 用法
- [转载]Activity中ConfigChanges属性的用法
- Android之获取手机上的图片和视频缩略图thumbnails
- Android之使用Http协议实现文件上传功能
- Android学习笔记(二九):嵌入浏览器
- android string.xml文件中的整型和string型代替
- i-jetty环境搭配与编译
- android之定时器AlarmManager
- android wifi 无线调试
- Android Native 绘图方法
- Android java 与 javascript互访(相互调用)的方法例子
- android 代码实现控件之间的间距
- android FragmentPagerAdapter的“标准”配置
- Android"解决"onTouch和onClick的冲突问题
- android:installLocation简析
- android searchView的关闭事件
- SourceProvider.getJniDirectories