Android Day12-Fragment+Menu+AutoCompleteTextView+Notificationt
2015-08-01 23:15
696 查看
一、Fragment
fragment,英文的意思是片断。
Fragment是Android3.0(API11)出现的新特性,如果不采用兼容性的写法,新建工程的时候最小兼
容版本的API应该为11以上。
在Android中,Fragment代表一个行为或者是Activity中用户界面的一部分。可以将其理解为
Activity模块化的片断。可以由多个Fragment组成activity,或者一个Fragment可以被多个
Activity所共用。
1)Fragment的生命周期
Fragment有自己的生命周期,除了onRestart方法之后,Activity有的生命周期方法它全有。
而且Fragment的生命周期方法也是两两呼应的。
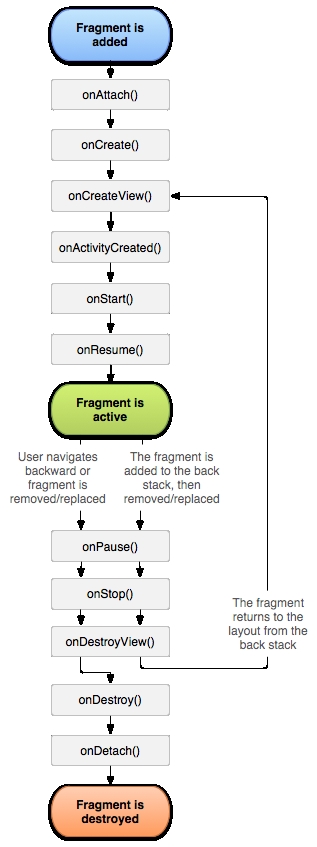
虽然有这么多的生命周期方法,在实际开发中经常用的只有2种:onCreateView和onDestroy
■onCreateView必需是要复写的,因为它要返回View对象。
■onDestroy方法中,主要是来做一些擦屁股的操作。
2)Fragment怎么添加到Activity当中去
2-1:在layout中定义Fragment的XML布局文件
2-2:定义Fragment中的用户类,复写onCreateView方法。
2-3:将Fragment添加到Activity中,有2种方式。
实现步骤:
2-1:在layout中定义Fragment的XML布局文件
2-2:定义Fragment中的用户类,复写onCreateView方法。
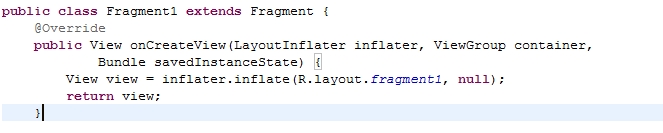
2-3:添加Fragment到Activity当中
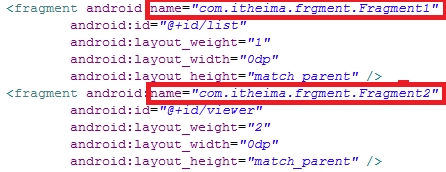
■第1种方式:在Activity布局文件里添加Fragment,通过fragment标签(首字母小写)
通过name属性来关联Fragment的用户类
■第2种方式:通过Java代码来实现
☆兼容低版本的写法:
(1)定义的fragment必须使用v4包中的fragment
(2)在获取fragment的管理者的activity必须继承FragmentActivity
(3)获取Fragment的管理者的方式和之前不一样,其它的代码都一样。
3)Fragment的通讯
假如Activity中有2两个Fragment,LeftFragment和RightFragment。假如LeftFragment有
一个Button按钮,点击它改变RightFragment中的TextView的内容。应该做2件事情:
●第一步:在Activity中添加要被另外一个Fragment对象操作的Fragment时,为其指定一个
tag。
二、菜单(menu)
1.创建菜单,要复写onCreateOptionsMenu方法
创建菜单的方式有2种
●第1种:
在res/menu下创建菜单的XML文件,格式如下:
4个参数的意义
int groupId, int itemId, int order, CharSequence title
分组、id、显示顺序、标题,其中id就是在onOptionsItemSelected里使用。
这个控件就像是加强版的EditText,可以定义适配器,当用户输入数据,如果适配器中有匹配的
数据就会显示到一个下拉的菜单中。用法如下:
四、通知栏
就是像短信发送到手机时,在屏幕上方提示的信息条。

通知一般会有2种展现方式,上面这个就是一般的显示方式Normal View,它的UI构成如下:
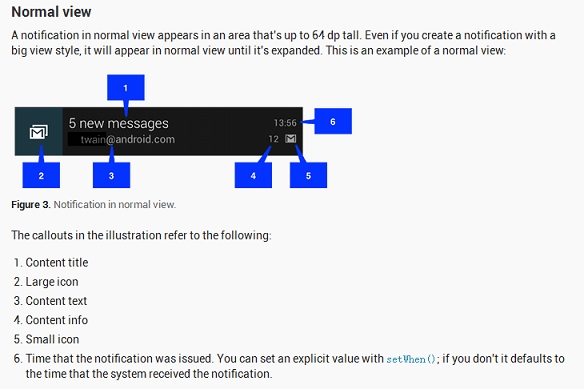
通知栏不仅可以提示信息,还能给它添加点击事件.如点击短信通知,就会跳转到短信页面.
1.通知栏高版本的写法
关于版本的通知栏的写法,官方API说得十分清楚:
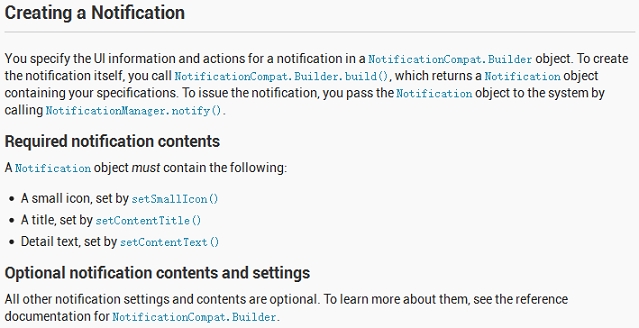
第一段是这么说的:
在Notification.Builder对象里为Notification指定UI信息和动作,Noti
fication.Builder.build()得到Notification对象,通过NotificationManager.notify()方
法来发送通知给系统。
下面就按照这个思路来写Java代码
2.通知栏低版本的写法与高版本的写法不同,低版本的Notification是直接new出来的,不需要用Builder。
fragment,英文的意思是片断。
Fragment是Android3.0(API11)出现的新特性,如果不采用兼容性的写法,新建工程的时候最小兼
容版本的API应该为11以上。
在Android中,Fragment代表一个行为或者是Activity中用户界面的一部分。可以将其理解为
Activity模块化的片断。可以由多个Fragment组成activity,或者一个Fragment可以被多个
Activity所共用。
1)Fragment的生命周期
Fragment有自己的生命周期,除了onRestart方法之后,Activity有的生命周期方法它全有。
而且Fragment的生命周期方法也是两两呼应的。
虽然有这么多的生命周期方法,在实际开发中经常用的只有2种:onCreateView和onDestroy
■onCreateView必需是要复写的,因为它要返回View对象。
■onDestroy方法中,主要是来做一些擦屁股的操作。
2)Fragment怎么添加到Activity当中去
2-1:在layout中定义Fragment的XML布局文件
2-2:定义Fragment中的用户类,复写onCreateView方法。
2-3:将Fragment添加到Activity中,有2种方式。
实现步骤:
2-1:在layout中定义Fragment的XML布局文件
2-2:定义Fragment中的用户类,复写onCreateView方法。
2-3:添加Fragment到Activity当中
■第1种方式:在Activity布局文件里添加Fragment,通过fragment标签(首字母小写)
通过name属性来关联Fragment的用户类
■第2种方式:通过Java代码来实现
//第1步:得到FragmentManager对象
FragmentManager fragmentManager = getFragmentManager();
//第2步:开启事务,并返回Fragment事物。
FragmentTransaction fragmentTransaction = fragmentManager.beginTransaction();
//第3步:用事物为ViewGroup对象添加Fragment或者将ViewGroup替换成Fragment。
ExampleFragment fragment = new ExampleFragment();
fragmentTransaction.add(R.id.fragment_container, fragment); //或者replace
//第4步:提交事务
fragmentTransaction.commit();
☆兼容低版本的写法:
(1)定义的fragment必须使用v4包中的fragment
(2)在获取fragment的管理者的activity必须继承FragmentActivity
(3)获取Fragment的管理者的方式和之前不一样,其它的代码都一样。
3)Fragment的通讯
假如Activity中有2两个Fragment,LeftFragment和RightFragment。假如LeftFragment有
一个Button按钮,点击它改变RightFragment中的TextView的内容。应该做2件事情:
●第一步:在Activity中添加要被另外一个Fragment对象操作的Fragment时,为其指定一个
tag。
transaction.replace(R.id.ll_right, new RightFragment(),"right");●第二步:在作为调用者的Button事件中,利用Activity这个桥梁找到要操作的Fragment。
RightFragment findFragmentRight = (RightFragment) getActivity().getFragmentManager().findFragmentByTag("right");
findFragmentRight.setText("我被左边的Fragment操作了!");
二、菜单(menu)
1.创建菜单,要复写onCreateOptionsMenu方法
创建菜单的方式有2种
●第1种:
在res/menu下创建菜单的XML文件,格式如下:
<menu xmlns:android="http://schemas.android.com/apk/res/android" >
<!-- orderInCategory这个属性决定了item的显示的前后位置 -->
<item
android:id="@+id/item_1"
android:orderInCategory="10"
android:title="选项1"/>

<item
android:id="@+id/item_2"
android:orderInCategory="5"
android:title="选项2"/>
</menu>
在onCreateOptionsMenu中,得到菜单的打气筒inflater来将布局填充到menu。
getMenuInflater().inflate(R.menu.main, menu);●第2种:直接用代码来动态的创建菜单
4个参数的意义
int groupId, int itemId, int order, CharSequence title
分组、id、显示顺序、标题,其中id就是在onOptionsItemSelected里使用。
menu.addSubMenu(0, 1, 5, "选项111111"); //各个参数与xml中的属性是一一对应的。
menu.addSubMenu(0, 2, 3, "选项2222222");
2.想找到具体点击的是哪个菜单的item,要实现onOptionsItemSelected方法。
@Override
public boolean onOptionsItemSelected(MenuItem item) {
/*Toast.makeText(this, item.getTitle(), 0).show();得到选项item的名称*/
/*Toast.makeText(this, item.getItemId()+"", 0).show();得到选项item的id*/
System.out.println(item.getItemId());
switch (item.getItemId()) {
case R.id.item_1:
Toast.makeText(this, item.getTitle() + "--5555555", 0).show();
break;
case R.id.item_2:
Toast.makeText(this, item.getTitle()+ "--10101010",0).show();
break;
default:
break;
}
return super.onOptionsItemSelected(item);
}三、AutoCompleteTextView这个控件就像是加强版的EditText,可以定义适配器,当用户输入数据,如果适配器中有匹配的
数据就会显示到一个下拉的菜单中。用法如下:
public class CountriesActivity extends Activity {
protected void onCreate(Bundle icicle) {
super.onCreate(icicle);
setContentView(R.layout.countries);

ArrayAdapter<String> adapter = new ArrayAdapter<String>(this,
android.R.layout.simple_dropdown_item_1line, COUNTRIES);
AutoCompleteTextView textView = (AutoCompleteTextView)
findViewById(R.id.countries_list);
textView.setAdapter(adapter);
}

private static final String[] COUNTRIES = new String[] {
"Belgium", "France", "Italy", "Germany", "Spain"
};
}
四、通知栏
就是像短信发送到手机时,在屏幕上方提示的信息条。
通知一般会有2种展现方式,上面这个就是一般的显示方式Normal View,它的UI构成如下:
通知栏不仅可以提示信息,还能给它添加点击事件.如点击短信通知,就会跳转到短信页面.
1.通知栏高版本的写法
关于版本的通知栏的写法,官方API说得十分清楚:
第一段是这么说的:
在Notification.Builder对象里为Notification指定UI信息和动作,Noti
fication.Builder.build()得到Notification对象,通过NotificationManager.notify()方
法来发送通知给系统。
下面就按照这个思路来写Java代码
//链式写法
Notification notification = new NotificationCompat.Builder(this)
.setContentTitle("小芳")
.setSmallIcon(R.drawable.ic_launcher)
.setContentText("晚上老地方见").build();

//给通知栏设置一个点击事件,假如点击之后开始打电话。
Intent intent = new Intent();
intent.setAction(Intent.ACTION_CALL);
intent.setData(Uri.parse("tel:" + 110));
PendingIntent pendingIntent = PendingIntent.getActivity(this, 10, intent,Intent.FLAG_ACTIVITY_NEW_TASK);

//这个设置点击事件的方法会覆盖之前的标题和内容的设置
notification.setLatestEventInfo(this, "小芳", "晚上吃个饭吧", pendingIntent);

//得到NotificationManager对象
NotificationManager notificationManager = (NotificationManager) getSystemService(NOTIFICATION_SERVICE);
notificationManager.notify(0, notification);2.通知栏低版本的写法与高版本的写法不同,低版本的Notification是直接new出来的,不需要用Builder。
//构造方法3个参数:小图标、小图标文字、时间
Notification notification = new Notification(R.drawable.ic_launcher,"小芳",System.currentTimeMillis());

//给通知栏设置一个点击事件
Intent intent = new Intent();
intent.setAction(Intent.ACTION_CALL);
intent.setData(Uri.parse("tel:" + 110));
PendingIntent pendingIntent = PendingIntent.getActivity(this, 10, intent,Intent.FLAG_ACTIVITY_NEW_TASK);
notification.setLatestEventInfo(this, "小芳", "晚上吃个饭吧", pendingIntent);

//得到NotificationManager对象
NotificationManager notificationManager = (NotificationManager) getSystemService(NOTIFICATION_SERVICE);
notificationManager.notify(0, notification);

相关文章推荐
- Android Day01-DDMS和ADB的使用
- Android开发常见错误总结
- Day04-SmartImageView
- Android Day01-布局详解
- Android中dip、dp、sp、pt和px的区别详解
- Android四大组件及意图和意图过滤器
- Android企业级最佳实践高手之路
- Android软硬整合设计与框架揭秘: HAL&Framework &Native Service &App&Browser架构设计与实战开发
- Android应用开发企业级最佳实践
- Android Day02-文件操作-登陆示例
- Android Day02-linux下的文件权限
- Android Day02-Android中单元测试(junit测试)&monkey测试
- Android Day01-电话拨号器案例&Android开发流程
- Android Day01-Android按钮点击事件的4种写法
- Android Day01-Android与Java的区别总结
- Android******Context******
- Android Day03-SQLite数据库操作及ListView详解
- Android Day04-网络编程
- Android Day05-网络编程之提交数据
- Android Day05-网络编程之文件上传