android底部弹出菜单
2015-07-27 14:03
423 查看
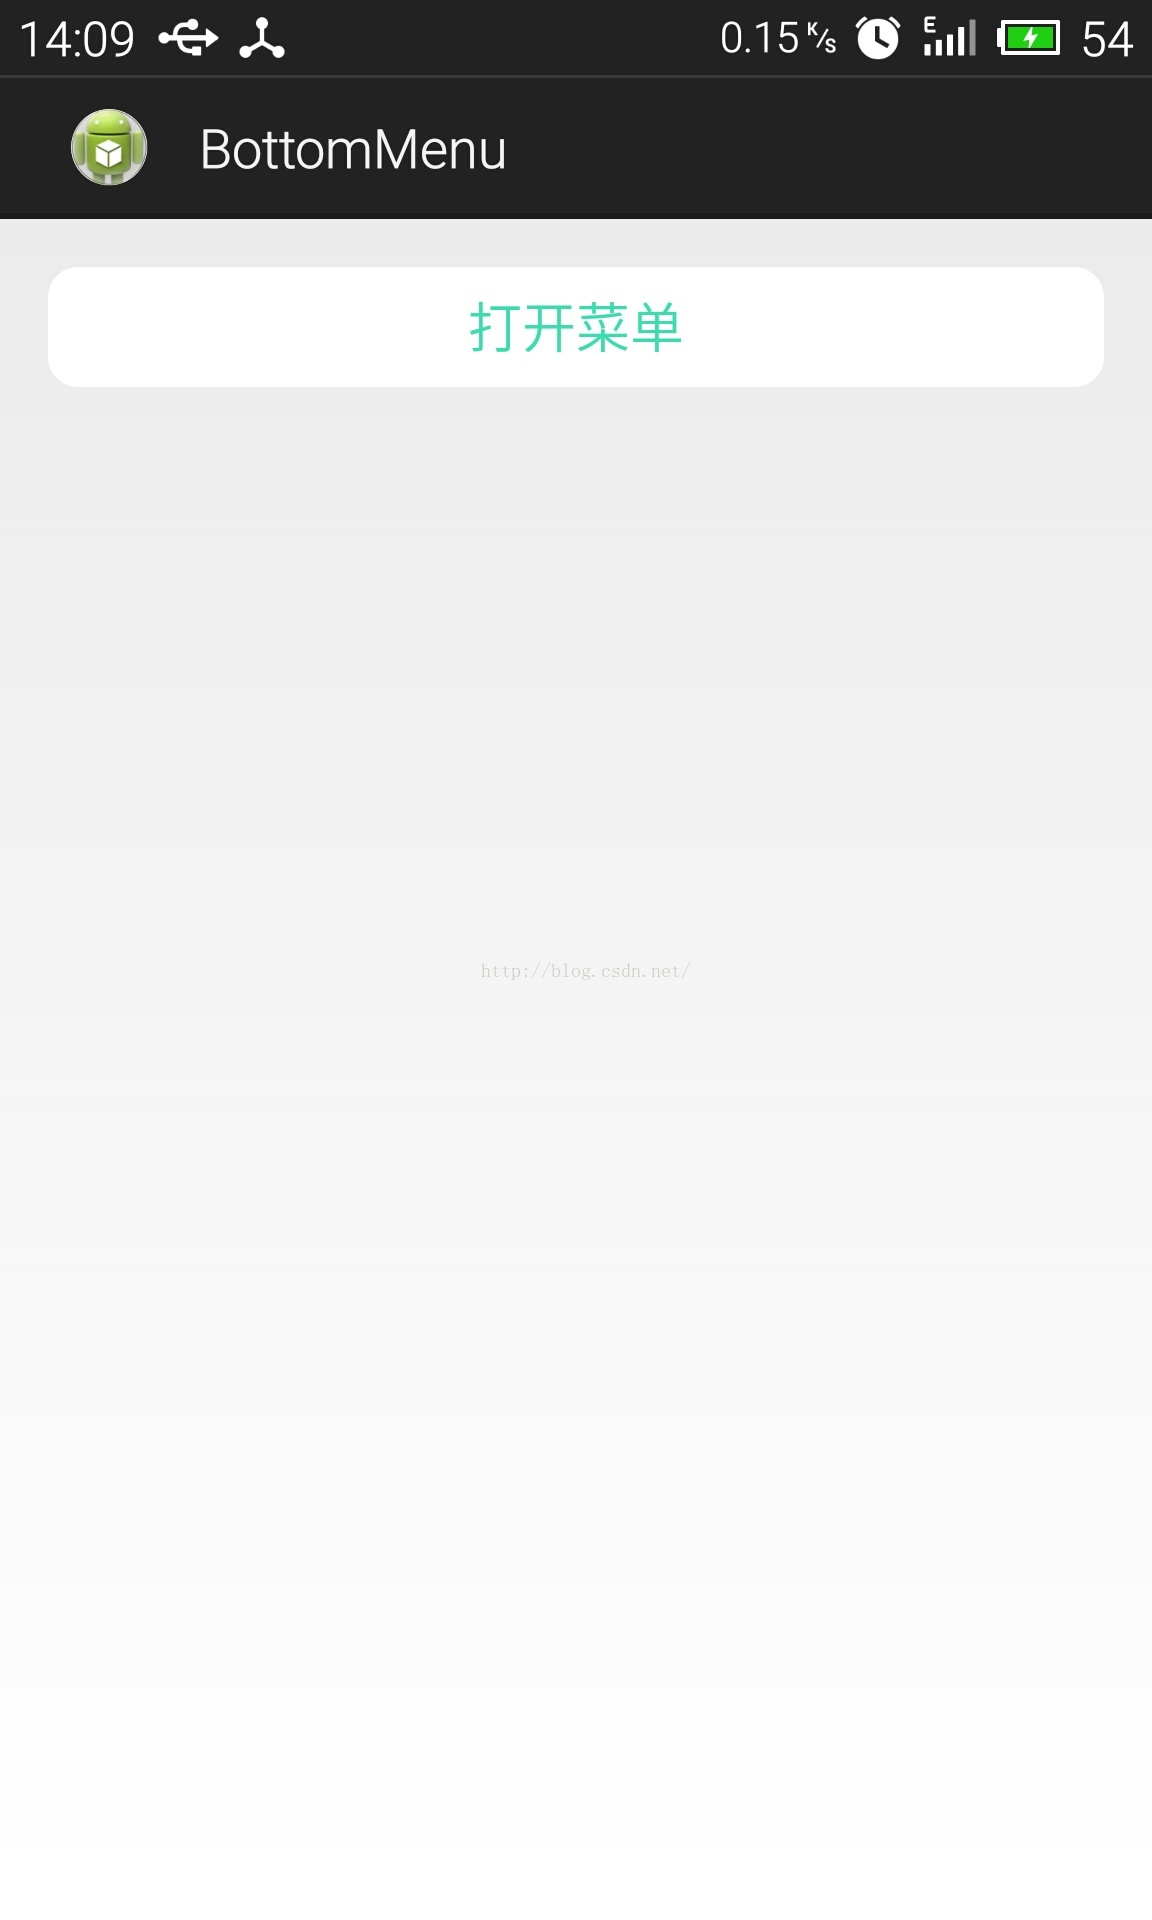
现在越来越多的项目用到底部弹出样式的菜单,为了方便使用,现将该控件封装成一通用控件。话不多说,先来效果图:
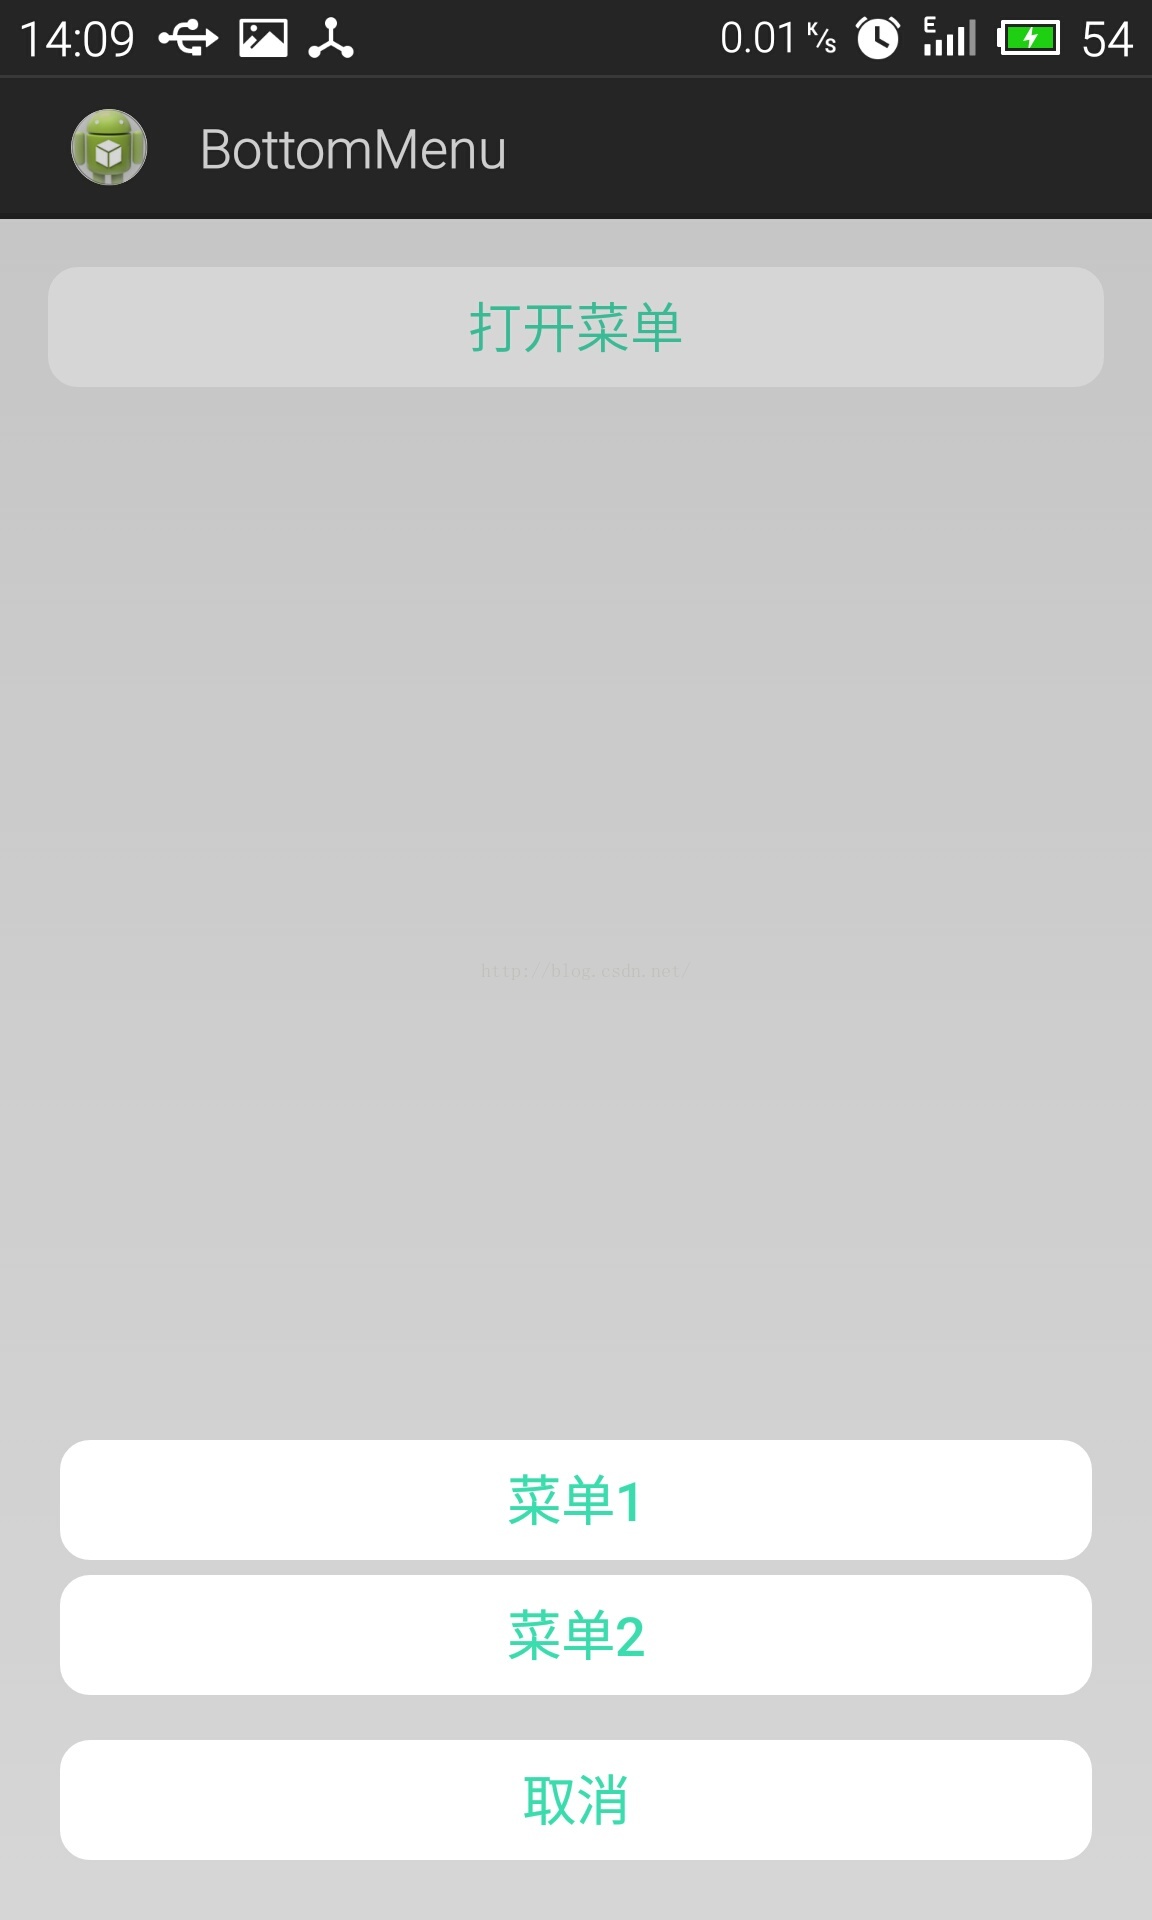
下面是具体实现:1.编写菜单布局,界面布局主要是页面底部三个菜单按钮,当然可以根据需要增减。这里我只写了三个按钮用于测试用。最下面的是取消按钮。下面是代码
2.编写菜单的具体实现,这里我采用PopupWindow实现,把PopupWindow当做类的成员变量。代码如下:
这段代码也没什么好说的,就是new一个PopupWindow,设置视图的一些常用属性。需要注意的是,因为PopupWindow里面的view是不能设置动画的,所以要设置动画必须用到PopupWindow的setAnimationStyle(int style)方法,该方法需要一个样式文件资源id,内容如下:
这里的style里面有两个标签,标签名字分别为android:windowEnterAnimation,android:windowExitAnimation,前者是PopupWindow显示的动画,后者是消失的动画。这里引用了两个资源文件,内容如下:
下面这段代码是用于显示菜单的方法实现,首先得到传入的activity的最底层的父容器,然后将PopupWindow显示在容器的最底部居中。
3.编写测试代码,在MainActivity布局里面加个布局,包含一个按钮,点击这切换菜单显示隐藏。使用菜单的时候直接new一个BottomMenu的实例,传入当前activity和点击事件回调。直接调用show()方法就可以了。
下面是代码中按钮所用到的主资源文件,用于定义按钮不同状态的背景
到这里,基本上,底部弹出菜单可以说是完成了,以后要用的时候直接使用这一个类就好,使用的时候完全不用改动使用者(当前activity)的布局,完全解耦和。当然代码中可能还有一些不完善或者错误的地方,希望大家多多指正。最后,附上源码。
下面是具体实现:1.编写菜单布局,界面布局主要是页面底部三个菜单按钮,当然可以根据需要增减。这里我只写了三个按钮用于测试用。最下面的是取消按钮。下面是代码
<?xml version="1.0" encoding="utf-8"?>
<RelativeLayout xmlns:android="http://schemas.android.com/apk/res/android"
android:layout_width="fill_parent"
android:layout_height="wrap_content"
android:gravity="center_horizontal"
android:orientation="vertical" >

<LinearLayout
android:id="@+id/pop_layout"
android:layout_width="fill_parent"
android:layout_height="wrap_content"
android:layout_alignParentBottom="true"
android:gravity="center_horizontal"
android:layout_marginLeft="20dp"
android:layout_marginRight="20dp"
android:orientation="vertical" >

<Button
android:id="@+id/btn1"
android:layout_width="match_parent"
android:layout_height="40dp"
android:text="菜单1"
android:textColor="#3dddb0"
android:background="@drawable/selector_btn"
android:textStyle="bold" />

<Button
android:id="@+id/btn2"
android:layout_width="match_parent"
android:layout_height="40dp"
android:text="菜单2"
android:layout_marginTop="5dp"
android:textColor="#3dddb0"
android:background="@drawable/selector_btn"
android:textStyle="bold" />

<Button
android:id="@+id/btn_cancel"
android:layout_width="match_parent"
android:layout_height="40dp"
android:text="取消"
android:layout_marginBottom="20dp"
android:layout_marginTop="15dp"
android:background="@drawable/selector_btn"
android:textColor="#3dddb0"
android:textStyle="bold" />
</LinearLayout>

</RelativeLayout>
2.编写菜单的具体实现,这里我采用PopupWindow实现,把PopupWindow当做类的成员变量。代码如下:
package com.lyq.bottommenu;

import android.app.Activity;
import android.graphics.drawable.ColorDrawable;
import android.view.Gravity;
import android.view.LayoutInflater;
import android.view.MotionEvent;
import android.view.View;
import android.view.View.OnClickListener;
import android.view.View.OnTouchListener;
import android.view.ViewGroup;
import android.view.ViewGroup.LayoutParams;
import android.widget.Button;
import android.widget.PopupWindow;

public class BottomMenu implements OnClickListener,OnTouchListener{

private PopupWindow popupWindow;
private Button btn1, btn2, btnCancel;
private View mMenuView;
private Activity mContext;
private OnClickListener clickListener;

public BottomMenu(Activity context,OnClickListener clickListener) {
LayoutInflater inflater = LayoutInflater.from(context);
this.clickListener=clickListener;
mContext=context;
mMenuView = inflater.inflate(R.layout.layout_popwindow, null);
btn1 = (Button) mMenuView.findViewById(R.id.btn1);
btn2 = (Button) mMenuView.findViewById(R.id.btn2);
btnCancel = (Button) mMenuView.findViewById(R.id.btn_cancel);
btnCancel.setOnClickListener(this);
btn1.setOnClickListener(this);
btn2.setOnClickListener(this);
popupWindow=new PopupWindow(mMenuView,LayoutParams.MATCH_PARENT,LayoutParams.WRAP_CONTENT,true);
popupWindow.setAnimationStyle(R.style.popwin_anim_style);
ColorDrawable dw = new ColorDrawable(context.getResources().getColor(R.color.ccc));
popupWindow.setBackgroundDrawable(dw);
mMenuView.setOnTouchListener(this);
}

/**
* 显示菜单
*/
public void show(){
//得到当前activity的rootView
View rootView=((ViewGroup)mContext.findViewById(android.R.id.content)).getChildAt(0);
popupWindow.showAtLocation(rootView, Gravity.BOTTOM|Gravity.CENTER_HORIZONTAL, 0, 0);
}

@Override
public void onClick(View view) {
popupWindow.dismiss();
switch (view.getId()) {
case R.id.btn_cancel:
break;
default:
clickListener.onClick(view);
break;
}
}

@Override
public boolean onTouch(View arg0, MotionEvent event) {
int height = mMenuView.findViewById(R.id.pop_layout).getTop();
int y=(int) event.getY();
if(event.getAction()==MotionEvent.ACTION_UP){
if(y<height){
popupWindow. dismiss();
}
}
return true;
}

}
这段代码也没什么好说的,就是new一个PopupWindow,设置视图的一些常用属性。需要注意的是,因为PopupWindow里面的view是不能设置动画的,所以要设置动画必须用到PopupWindow的setAnimationStyle(int style)方法,该方法需要一个样式文件资源id,内容如下:
<style name="popwin_anim_style">
<item name="android:windowEnterAnimation">@anim/ppwindow_show_anim</item>
<item name="android:windowExitAnimation">@anim/ppwindow_hide_anim</item>
</style>
这里的style里面有两个标签,标签名字分别为android:windowEnterAnimation,android:windowExitAnimation,前者是PopupWindow显示的动画,后者是消失的动画。这里引用了两个资源文件,内容如下:
<?xml version="1.0" encoding="utf-8"?>
<set xmlns:android="http://schemas.android.com/apk/res/android" >

<translate
android:duration="300"
android:fromXDelta="0"
android:toXDelta="0"
android:fromYDelta="200"
android:toYDelta="0"
/>
<alpha
android:duration="300"
android:fromAlpha="0"
android:toAlpha="1"
/>
</set>
<?xml version="1.0" encoding="utf-8"?>
<set xmlns:android="http://schemas.android.com/apk/res/android" >

<translate
android:duration="300"
android:fromXDelta="0"
android:toXDelta="0"
android:fromYDelta="0"
android:toYDelta="200"
/>
<alpha
android:duration="300"
android:fromAlpha="1"
android:toAlpha="0"
/>

</set>
下面这段代码是用于显示菜单的方法实现,首先得到传入的activity的最底层的父容器,然后将PopupWindow显示在容器的最底部居中。
/**
* 显示菜单
*/
public void show(){
//得到当前activity的rootView
View rootView=((ViewGroup)mContext.findViewById(android.R.id.content)).getChildAt(0);
popupWindow.showAtLocation(rootView, Gravity.BOTTOM|Gravity.CENTER_HORIZONTAL, 0, 0);
}
3.编写测试代码,在MainActivity布局里面加个布局,包含一个按钮,点击这切换菜单显示隐藏。使用菜单的时候直接new一个BottomMenu的实例,传入当前activity和点击事件回调。直接调用show()方法就可以了。
package com.lyq.bottommenu;

import android.app.Activity;
import android.os.Bundle;
import android.view.View;
import android.view.View.OnClickListener;
import android.widget.Toast;

public class MainActivity extends Activity implements OnClickListener{

private BottomMenu menuWindow;

@Override
public void onCreate(Bundle savedInstanceState) {
super.onCreate(savedInstanceState);
setContentView(R.layout.activity_main);
findViewById(R.id.btn_open).setOnClickListener(this);
}

@Override
public void onClick(View view) {
menuWindow = new BottomMenu(MainActivity.this, clickListener);
menuWindow.show();
}

private OnClickListener  clickListener = new OnClickListener(){

public void onClick(View v) {
switch (v.getId()) {
case R.id.btn1:
Toast.makeText(MainActivity.this, "menu1", Toast.LENGTH_SHORT).show();
break;
case R.id.btn2:
Toast.makeText(MainActivity.this, "menu2", Toast.LENGTH_SHORT).show();
break;
default:
break;
}
}
};
}
下面是代码中按钮所用到的主资源文件,用于定义按钮不同状态的背景
<?xml version="1.0" encoding="utf-8"?>
<selector xmlns:android="http://schemas.android.com/apk/res/android" >
<item android:state_pressed="true" >
<shape>
<solid android:color="@color/ccc"/>
<corners android:radius="10dp" />
</shape>
</item>
<item  >
<shape>
<solid android:color="@android:color/white"/>
<corners android:radius="10dp"></corners>
</shape>
</item>
</selector>
到这里,基本上,底部弹出菜单可以说是完成了,以后要用的时候直接使用这一个类就好,使用的时候完全不用改动使用者(当前activity)的布局,完全解耦和。当然代码中可能还有一些不完善或者错误的地方,希望大家多多指正。最后,附上源码。

相关文章推荐
- android listView点击item,高亮显示
- Android完全退出程序
- android service(二)
- 通过html页面打开Android本地的app
- Android ServiceManager启动
- android4.4修改设置界面里,蓝牙默认名称
- 最新百度地图android sdk自定义覆盖物
- 基于Monkey的Android自动化测试
- Android 防止快速 点击 多次
- 【Android4.4蓝牙代码分析】- 蓝牙Enable过程
- Android 多分辨率自适应总结
- Android RIL
- Android屏幕适配方案
- AccessibilityService辅助类用法(Android 中的另类钩子)
- android反编译
- Android的在线解析Json
- 试用友盟SDK实现Android第三方登录(以QQ登录为例)
- Android的本地Json解析
- Android 项目利用 Android Studio 和 Gradle 打包多版本APK
- android:layout_gravity与android:gravity