(转)android surfaceflinger研究----显示系统
2015-07-26 14:34
465 查看
这周抽空研究了一下SurfaceFlinger,发现真正复杂的并不是SurfaceFlinger本身,而是android的display显示系统,网上关于这部分的介绍有不少,本不打算写的,但是发现还是记录一下研究代码的过程比较好,一是能够帮助自己理清思路,另一个原因就是以后当这块内容忘记的时候,能快速的通过这个记录捡起来。
我们看SurfaceFlinger的定义就知道,它其实是一个Thread, 因此SurfaceFlinger的初始化工作就理所当然的放在了SurfaceFlinger线程中,详见readyToRun()@SurfaceFlinger.cpp
SurfaceFlinger对于显示的管理是通过一个或多个GraphicPlane对象(目前android只实现了一个)来管理的,
@SurfaceFlinger.h
GraphicPlane mGraphicPlanes[1];
GraphicPlane mGraphicPlanes[1];
其实,GraphicPlane类只是一个wrapper层,目的是当android支持多个显示系统时,通过该类来管里各自的图形系统,显示系统真正的初始化工作是通过DisplayHardware类来初始化底层图形系统的管理与显示的。真正的图形显示系统的初始化在init()@DisplayHardware.cpp
目前,android支持一个图形系统,这个图形系统是全局的,surfaceflinger可以访问,其他不通过surfaceflinger进行图形处理的application也可以对其进行操作。

android的framebuffer并没有被SurfaceFlinger直接使用,而是在framebuffer外做了一层包装,这个包装就是FramebufferNativeWindow,我们来看一下FramebufferNativeWindow的创建过程。
我们的framebuffer是由一个设备符fbDev来表示的,它是FramebufferNativeWindow的一个成员,我们来分析一下对fbDev的处理过程。
framebuffer的初始化需要通过HAL gralloc.msm7x30.so 来完成与底层硬件驱动的适配,但是gralloc library并不是平台无关的,不同的vendor可能会实现自己的gralloc library,因此为了保证在创建framebuffer时能够平台无关,android只能是动态的判断并使用当前的gralloc library,android通过从gralloc library中再抽象出一个hw_module_t结构来供使用,它为framebuffer的初始化提供了需要的gralloc.msm7x30.so业务。因此通过这个hw_module_t结构我们就不需要知道当前系统使用的到底是哪个gralloc
library。按规定,所有gralloc library中的这个结构体被命名为HAL_MODULE_INFO_SYM(HMI)。当前分析的系统中,HAL_MODULE_INFO_SYM在hardware/msm7k/libgralloc-qsd8k/galloc.cpp。
int fb_device_open(hw_module_t const*
module, const char*
name,
hw_device_t** device)
{
int status
= -EINVAL;
if (!strcmp(name,
GRALLOC_HARDWARE_FB0)) {
alloc_device_t* gralloc_device;
status = gralloc_open(module, &gralloc_device);
/* initialize
our state here */
fb_context_t *dev = (fb_context_t*)malloc(sizeof(*dev));
memset(dev, 0, sizeof(*dev));
/* initialize
the procs */
dev->device.common.tag = HARDWARE_DEVICE_TAG;
private_module_t* m = (private_module_t*)module;
status = mapFrameBuffer(m);
}
int fb_device_open(hw_module_t const* module, const char* name,
hw_device_t** device)
{
int status = -EINVAL;
if (!strcmp(name, GRALLOC_HARDWARE_FB0)) {
alloc_device_t* gralloc_device;
status = gralloc_open(module, &gralloc_device);
/* initialize our state here */
fb_context_t *dev = (fb_context_t*)malloc(sizeof(*dev));
memset(dev, 0, sizeof(*dev));
/* initialize the procs */
dev->device.common.tag = HARDWARE_DEVICE_TAG;
private_module_t* m = (private_module_t*)module;
status = mapFrameBuffer(m);
}
在这个函数中,主要为fbDev设备符指定一个fb_context_t实例,并通过函数mapFrameBuffer()对设备节点/dev/graphics/fb0进行操作,操作的目的有:
1.获得屏幕设备的信息,并将屏幕信息保存在HAL_MODULE_INFO_SYM(上面代码中的module)中。
2. 向/dev/graphics/fb0请求page flip模式,page
flip模式需要至少2个屏幕大小的buffer,page flip模式在后面介绍。目前android系统中设置为2个屏幕大小的buffer。当然屏幕设备可能不支持page flip模式。
mapFrameBufferLocked()@hardware/msm7k/libgralloc-qsd8k/framebuffer.cpp
/*
* Request NUM_BUFFERS
screens (at lest 2 for page flipping)
*/
info.yres_virtual = info.yres * NUM_BUFFERS;
uint32_t flags = PAGE_FLIP;
if (ioctl(fd,
FBIOPUT_VSCREENINFO, &info) == -1) {
info.yres_virtual = info.yres;
flags &= ~PAGE_FLIP;
LOGW("FBIOPUT_VSCREENINFO
failed, page flipping not supported");
}
/*
* Request NUM_BUFFERS screens (at lest 2 for page flipping)
*/
info.yres_virtual = info.yres * NUM_BUFFERS;
uint32_t flags = PAGE_FLIP;
if (ioctl(fd, FBIOPUT_VSCREENINFO, &info) == -1) {
info.yres_virtual = info.yres;
flags &= ~PAGE_FLIP;
LOGW("FBIOPUT_VSCREENINFO failed, page flipping not supported");
}
3. 映射屏幕设备缓存区给fbDev设备符。
mapFrameBufferLocked()@hardware/msm7k/libgralloc-qsd8k/framebuffer.cpp
/*
* map the framebuffer
*/
int err;
size_t fbSize
= roundUpToPageSize(finfo.line_length * info.yres_virtual);
module->framebuffer = new private_handle_t(dup(fd),
fbSize,
private_handle_t::PRIV_FLAGS_USES_PMEM);
module->numBuffers = info.yres_virtual / info.yres;
module->bufferMask = 0;
void*
vaddr = mmap(0, fbSize, PROT_READ|PROT_WRITE, MAP_SHARED, fd, 0);
if (vaddr
== MAP_FAILED) {
LOGE("Error mapping
the framebuffer (%s)", strerror(errno));
return -errno;
}
module->framebuffer->base = intptr_t(vaddr);
memset(vaddr, 0, fbSize);
/*
* map the framebuffer
*/
int err;
size_t fbSize = roundUpToPageSize(finfo.line_length * info.yres_virtual);
module->framebuffer = new private_handle_t(dup(fd), fbSize,
private_handle_t::PRIV_FLAGS_USES_PMEM);
module->numBuffers = info.yres_virtual / info.yres;
module->bufferMask = 0;
void* vaddr = mmap(0, fbSize, PROT_READ|PROT_WRITE, MAP_SHARED, fd, 0);
if (vaddr == MAP_FAILED) {
LOGE("Error mapping the framebuffer (%s)", strerror(errno));
return -errno;
}
module->framebuffer->base = intptr_t(vaddr);
memset(vaddr, 0, fbSize);
sp<NativeBuffer> buffers[2];
sp<NativeBuffer> buffers[2];
// create a "fake"
handles for it
intptr_t vaddr
= intptr_t(m->framebuffer->base);
private_handle_t* hnd = new private_handle_t(dup(m->framebuffer->fd),
size,
private_handle_t::PRIV_FLAGS_USES_PMEM |
private_handle_t::PRIV_FLAGS_FRAMEBUFFER);
// find a free
slot
for (uint32_t
i=0 ; i<numBuffers ; i++) {
if ((bufferMask
& (1LU<<i)) == 0) {
m->bufferMask |= (1LU<<i);
break;
}
vaddr += bufferSize;
}
hnd->base = vaddr;
hnd->offset = vaddr - intptr_t(m->framebuffer->base);
*pHandle = hnd;
// create a "fake" handles for it
intptr_t vaddr = intptr_t(m->framebuffer->base);
private_handle_t* hnd = new private_handle_t(dup(m->framebuffer->fd), size,
private_handle_t::PRIV_FLAGS_USES_PMEM |
private_handle_t::PRIV_FLAGS_FRAMEBUFFER);
// find a free slot
for (uint32_t i=0 ; i<numBuffers ; i++) {
if ((bufferMask & (1LU<<i)) == 0) {
m->bufferMask |= (1LU<<i);
break;
}
vaddr += bufferSize;
}
hnd->base = vaddr;
hnd->offset = vaddr - intptr_t(m->framebuffer->base);
*pHandle = hnd;
gralloc_alloc_framebuffer_locked()@hardware/msm7k/libgralloc-qsd8k/gpu.cpp
const uint32_t
bufferMask = m->bufferMask;
const uint32_t
numBuffers = m->numBuffers;
const size_t bufferSize
= m->finfo.line_length * m->info.yres;
if (numBuffers
== 1) {
// If we
have only one buffer, we never use page-flipping. Instead,
// we return
a regular buffer which will be memcpy'ed to the main
// screen
when post is called.
int newUsage
= (usage & ~GRALLOC_USAGE_HW_FB) | GRALLOC_USAGE_HW_2D;
return gralloc_alloc_buffer(bufferSize,
newUsage, pHandle);
}
const uint32_t bufferMask = m->bufferMask;
const uint32_t numBuffers = m->numBuffers;
const size_t bufferSize = m->finfo.line_length * m->info.yres;
if (numBuffers == 1) {
// If we have only one buffer, we never use page-flipping. Instead,
// we return a regular buffer which will be memcpy'ed to the main
// screen when post is called.
int newUsage = (usage & ~GRALLOC_USAGE_HW_FB) | GRALLOC_USAGE_HW_2D;
return gralloc_alloc_buffer(bufferSize, newUsage, pHandle);
}
if (hw_get_module(OVERLAY_HARDWARE_MODULE_ID,
&module) == 0) {
overlay_control_open(module, &mOverlayEngine);
}
if (hw_get_module(OVERLAY_HARDWARE_MODULE_ID, &module) == 0) {
overlay_control_open(module, &mOverlayEngine);
}
used to draw complex three-dimensional scenes from simple primitives. OpenGL was developed by Silicon Graphics Inc. (SGI) in 1992[4] and is widely used in CAD, virtual reality, scientific visualization, information visualization, flight simulation, and video
games. OpenGL is managed by the non-profit technology consortium Khronos Group.。
android是默认支持OpenGL ES软件加速的,library为libGLES_android,源码路径为frameworks\base\opengl\libagl;如果手机设备支持硬件加速的话,那么复杂的图像处理工作将交由GPU去处理,那么效率将大大提高。但是如果系统真的存在硬件加速,它是如何选择何时用软件加速?何时用硬件加速的呢?
如何查看是否有GPU来实现硬件加速,很容易查看/system/lib/egl/egl.cfg文件内容
0 0 android
0 1 adreno200
0 0 android
0 1 adreno200
因此只要我们的移动设备芯片集成了GPU,并提供了对应的GL图形库,那么我们就可以在我们的工程中device目录下的egl.cfg文件中加入类似上面的配置,那么我们的系统就会支持硬件加速。
如adreno200 GPU提供的GL图形库:
libGLESv1_CM_adreno200.so
libGLESv2_adreno200.so
libEGL_adreno200.so
libGLESv1_CM_adreno200.so
libGLESv2_adreno200.so
libEGL_adreno200.so
那么假如我们的系统中软硬件加速都支持了,那么我们从代码来看能不能让用户自由的选择加速类型,我们带着问题来研究一下代码。
软硬两种模式的OpenGL api被分别指定到了一个全局数组的对应位置。
frameworks/base/opengl/libs/EGL/egl.cpp
static egl_connection_t
gEGLImpl[IMPL_NUM_IMPLEMENTATIONS];
static egl_connection_t gEGLImpl[IMPL_NUM_IMPLEMENTATIONS];
enum {
IMPL_HARDWARE = 0,
IMPL_SOFTWARE,
IMPL_NUM_IMPLEMENTATIONS
};
enum {
IMPL_HARDWARE = 0,
IMPL_SOFTWARE,
IMPL_NUM_IMPLEMENTATIONS
};
gEGLImpl[IMPL_HARDWARE]中保存着硬件图形设备的OpenGL api地址,从
libGLESv1_CM_adreno200.so
libGLESv2_adreno200.so
libEGL_adreno200.so
libGLESv1_CM_adreno200.so
libGLESv2_adreno200.so
libEGL_adreno200.so
这3个库中获得;gEGLImpl[IMPL_SOFTWARE]中保存着软件的OpenGL api地址,从libGLES_android.so中获取。
这部分代码在egl_init_drivers_locked()@frameworks/base/opengl/libs/EGL/egl.cpp
@frameworks\base\opengl\libs\EGL\Loader.h
enum {
EGL = 0x01,
GLESv1_CM = 0x02,
GLESv2 = 0x04
};
enum {
EGL = 0x01,
GLESv1_CM = 0x02,
GLESv2 = 0x04
};
load_driver()@frameworks\base\opengl\libs\EGL\Loader.cpp
上面枚举的EGL表示ELG api;GLESvq1_CM表示OpenGL ES 1.0的api;GLESv2表示OpenGL ES 2.0的api。
EGL api地址最终被存储在gEGLImpl[].egl中;
GLESvq1_CM api地址最终被存储在gEGLImpl[].hooks[GLESv1_INDEX]->gl中;
GLESv2 api地址最终被存储在gEGLImpl[].hooks[GLESv2_INDEX]->gl中;
3.2.1 EGL api
EGL is an interface between Khronos rendering APIs such as OpenGL ES or OpenVG and the underlying native platform window system. It handles graphics context management, surface/buffer binding, and rendering synchronization and enables high-performance,
accelerated, mixed-mode 2D and 3D rendering using other Khronos APIs.
上面引用了官方的定义,可以看出,EGL是系统和OPENGL ES之间的接口,它的声明在文件frameworks\base\opengl\libs\EGL\egl_entries.in。

3.2.2 GLES
GLES才是真正的OpenGL ES的api,它的声明我们可以在frameworks\base\opengl\libs\entries.in找到。目前的android系统不但将EGL提供给系统使用,同时将GLES也提供给了系统使用,这个我们可以在最开始的显示系统的结构图中可以看到,surfacefliger和framework的opengl模块均可以访问EGL和GLES接口。
if(info.bits_per_pixel
== 32) {
/*
* Explicitly request
RGBA_8888
*/
/* Note: the GL
driver does not have a r=8 g=8 b=8 a=0 config, so if we do
* not use the MDP
for composition (i.e. hw composition == 0), ask for
* RGBA instead
of RGBX. */
if (property_get("debug.sf.hw",
property, NULL) > 0 && atoi(property) == 0)
module->fbFormat = HAL_PIXEL_FORMAT_RGBX_8888;
else if(property_get("debug.composition.type",
property, NULL) > 0 && (strncmp(property, "mdp",
3) == 0))
module->fbFormat = HAL_PIXEL_FORMAT_RGBX_8888;
else
module->fbFormat = HAL_PIXEL_FORMAT_RGBA_8888;
} else {
/*
* Explicitly request
5/6/5
*/
module->fbFormat = HAL_PIXEL_FORMAT_RGB_565;
}
if(info.bits_per_pixel == 32) {
/*
* Explicitly request RGBA_8888
*/
/* Note: the GL driver does not have a r=8 g=8 b=8 a=0 config, so if we do
* not use the MDP for composition (i.e. hw composition == 0), ask for
* RGBA instead of RGBX. */
if (property_get("debug.sf.hw", property, NULL) > 0 && atoi(property) == 0)
module->fbFormat = HAL_PIXEL_FORMAT_RGBX_8888;
else if(property_get("debug.composition.type", property, NULL) > 0 && (strncmp(property, "mdp", 3) == 0))
module->fbFormat = HAL_PIXEL_FORMAT_RGBX_8888;
else
module->fbFormat = HAL_PIXEL_FORMAT_RGBA_8888;
} else {
/*
* Explicitly request 5/6/5
*/
module->fbFormat = HAL_PIXEL_FORMAT_RGB_565;
}
目前的移动设备都是真彩色,所以这里我们认为我们的屏幕设备支持的是HAL_PIXEL_FORMAT_RGBA_8888。
static egl_display_t
gDisplay[NUM_DISPLAYS];
static egl_display_t gDisplay[NUM_DISPLAYS];
// EGLDisplay
are global, not attached to a given thread
const unsigned int NUM_DISPLAYS
= 1;
// EGLDisplay are global, not attached to a given thread
const unsigned int NUM_DISPLAYS = 1;
中,不同于gEGLImpl分开保存软硬件api,所有的config,不论软硬件的,均保存在gDisplay[0],因为所有的config是以屏幕区分的,同一块屏幕应该保存同一份config信息。
在提取出的openGL的config时,会保存到gDisplay[0].config中,在这儿有一个很tricky的实现,它保证了硬件加速器的优先使用!
<strong> </strong> //
sort our configurations so we can do binary-searches
qsort( dp->configs,
dp->numTotalConfigs,
sizeof(egl_config_t),
cmp_configs);<strong>
</strong>
<strong> </strong> // sort our configurations so we can do binary-searches
qsort( dp->configs,
dp->numTotalConfigs,
sizeof(egl_config_t), cmp_configs);<strong>
</strong>
最终,上述代码会将gDisplay[0].config中的配置按照先硬件的,后软件的规则做一个总体的排序。
代码在eglInitialize()@frameworks/base/opengl/libs/EGL/egl.cpp
init()@DisplayHardware.cpp
// initialize EGL
EGLint attribs[] = {
EGL_SURFACE_TYPE, EGL_WINDOW_BIT,
EGL_NONE, 0,
EGL_NONE
};
// initialize EGL
EGLint attribs[] = {
EGL_SURFACE_TYPE, EGL_WINDOW_BIT,
EGL_NONE, 0,
EGL_NONE
};
system/core/libpixelflinger/format.cpp
static GGLFormat const gPixelFormatInfos[]
=
{ //
Alpha Red Green Blue
{ 0, 0, {{ 0, 0, 0, 0, 0, 0, 0, 0 }}, 0 }, //
PIXEL_FORMAT_NONE
{ 4, 32, {{32,24, 8, 0, 16, 8, 24,16 }}, GGL_RGBA }, //
PIXEL_FORMAT_RGBA_8888
static GGLFormat const gPixelFormatInfos[] =
{ // Alpha Red Green Blue
{ 0, 0, {{ 0, 0, 0, 0, 0, 0, 0, 0 }}, 0 }, // PIXEL_FORMAT_NONE
{ 4, 32, {{32,24, 8, 0, 16, 8, 24,16 }}, GGL_RGBA }, // PIXEL_FORMAT_RGBA_8888
android会根据pixelflinger的pixel
format信息,去和openGL的config比较,得到想要的config。
selectConfigForPixelFormat()@frameworks/base/libs/ui/EGLUtils.cpp
EGLConfig* const configs
= (EGLConfig*)malloc(sizeof(EGLConfig)*numConfigs);
if (eglChooseConfig(dpy,
attrs, configs, numConfigs, &n) == EGL_FALSE) {
free(configs);
return BAD_VALUE;
}
const int fbSzA
= fbFormatInfo.getSize(PixelFormatInfo::INDEX_ALPHA);
const int fbSzR
= fbFormatInfo.getSize(PixelFormatInfo::INDEX_RED);
const int fbSzG
= fbFormatInfo.getSize(PixelFormatInfo::INDEX_GREEN);
const int fbSzB
= fbFormatInfo.getSize(PixelFormatInfo::INDEX_BLUE);
int i;
EGLConfig config = NULL;
for (i=0
; i<n ; i++) {
EGLint r,g,b,a;
EGLConfig curr = configs[i];
eglGetConfigAttrib(dpy, curr, EGL_RED_SIZE, &r);
eglGetConfigAttrib(dpy, curr, EGL_GREEN_SIZE, &g);
eglGetConfigAttrib(dpy, curr, EGL_BLUE_SIZE, &b);
eglGetConfigAttrib(dpy, curr, EGL_ALPHA_SIZE, &a);
if (fbSzA
<= a && fbSzR <= r && fbSzG <= g && fbSzB <= b) {
config = curr;
break;
}
}
EGLConfig* const configs = (EGLConfig*)malloc(sizeof(EGLConfig)*numConfigs);
if (eglChooseConfig(dpy, attrs, configs, numConfigs, &n) == EGL_FALSE) {
free(configs);
return BAD_VALUE;
}
const int fbSzA = fbFormatInfo.getSize(PixelFormatInfo::INDEX_ALPHA);
const int fbSzR = fbFormatInfo.getSize(PixelFormatInfo::INDEX_RED);
const int fbSzG = fbFormatInfo.getSize(PixelFormatInfo::INDEX_GREEN);
const int fbSzB = fbFormatInfo.getSize(PixelFormatInfo::INDEX_BLUE);
int i;
EGLConfig config = NULL;
for (i=0 ; i<n ; i++) {
EGLint r,g,b,a;
EGLConfig curr = configs[i];
eglGetConfigAttrib(dpy, curr, EGL_RED_SIZE, &r);
eglGetConfigAttrib(dpy, curr, EGL_GREEN_SIZE, &g);
eglGetConfigAttrib(dpy, curr, EGL_BLUE_SIZE, &b);
eglGetConfigAttrib(dpy, curr, EGL_ALPHA_SIZE, &a);
if (fbSzA <= a && fbSzR <= r && fbSzG <= g && fbSzB <= b) {
config = curr;
break;
}
}
调用当前的config所处的openGL库的api来创建surface。通过validate_display_config()方法来获取当前config的openGL api。
创建的surface会和FramebufferNativeWindow关联到一起。
of OpenGL. It represents the (potentially visible) default framebufferthat rendering commands will draw to when
not drawing to a framebuffer object. Think of a context as an object that holds all of OpenGL; when a context is
destroyed, OpenGL is destroyed.
http://www.opengl.org/wiki/OpenGL_context
具体的创建过程专业术语太多,也没有仔细研究不再介绍。
eglMakeCurrent()@frameworks/base/opengl/libs/EGL/egl.cpp
1. 一个Context只能被一个线程使用,不能存在多个线程使用同一个context。因此在多线层操作中使用到了TLS技术,即Thread-local storage,来保证context被唯一使用。
makeCurrent()@frameworks/base/opengl/libs/libagl/egl.cpp
ogles_context_t* current = (ogles_context_t*)getGlThreadSpecific();
if (gl)
{
egl_context_t* c = egl_context_t::context(gl);
if (c->flags
& egl_context_t::IS_CURRENT) {
if (current
!= gl) {
//
it is an error to set a context current, if it's already
//
current to another thread
return -1;
}
} else {
if (current)
{
//
mark the current context as not current, and flush
glFlush();
egl_context_t::context(current)->flags &= ~egl_context_t::IS_CURRENT;
}
}
if (!(c->flags
& egl_context_t::IS_CURRENT)) {
//
The context is not current, make it current!
setGlThreadSpecific(gl);
c->flags |= egl_context_t::IS_CURRENT;
}
ogles_context_t* current = (ogles_context_t*)getGlThreadSpecific();
if (gl) {
egl_context_t* c = egl_context_t::context(gl);
if (c->flags & egl_context_t::IS_CURRENT) {
if (current != gl) {
// it is an error to set a context current, if it's already
// current to another thread
return -1;
}
} else {
if (current) {
// mark the current context as not current, and flush
glFlush();
egl_context_t::context(current)->flags &= ~egl_context_t::IS_CURRENT;
}
}
if (!(c->flags & egl_context_t::IS_CURRENT)) {
// The context is not current, make it current!
setGlThreadSpecific(gl);
c->flags |= egl_context_t::IS_CURRENT;
}
2. 在同一进程中,对于不同的线程对OpenGL库的访问,可能使用的GLES api version不同,同样可以使用TLS技术来保证多线程过程中,不同线程调用各自的GLES api。
前面我们介绍过GLES api地址被存放在gEGLImpl[].hooks[VERSION]->gl中,因此为保证多线程支持,android将gEGLImpl[].hooks[VERSION]保存到了TLS中,这样就实现了不同线程各自调用各自版本的GLES
api。
eglMakeCurrent()@frameworks/base/opengl/libs/EGL/egl.cpp
// cur_c has to
be valid here (but could be terminated)
if (ctx
!= EGL_NO_CONTEXT) {
setGlThreadSpecific(c->cnx->hooks[c->version]);
setContext(ctx);
_c.acquire();
} else {
setGlThreadSpecific(&gHooksNoContext);
setContext(EGL_NO_CONTEXT);
}
// cur_c has to be valid here (but could be terminated)
if (ctx != EGL_NO_CONTEXT) {
setGlThreadSpecific(c->cnx->hooks[c->version]);
setContext(ctx);
_c.acquire();
} else {
setGlThreadSpecific(&gHooksNoContext);
setContext(EGL_NO_CONTEXT);
}
尽管openGL 实现了多线程的支持,目前我从代码中别没有找到多线程的使用。
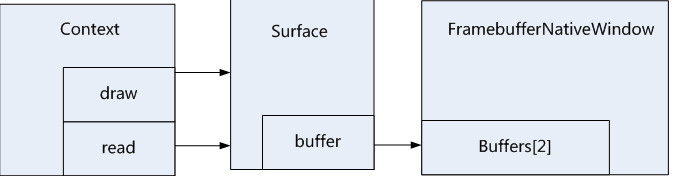
contex中保存着两个surface,read和draw,多少情况下这两个surface为同一个surface。
设置FramebufferNativeWindow中Buffers[2]之一为surface的数据区, 通过connect()和bindDrawSurface()。最终的形态如下图所示:
在init()@DisplayHardware.cpp中,在绑定surface和context之后,马上在当前线程中unbind了context,通过
// Unbind the context
from this thread
eglMakeCurrent(display, EGL_NO_SURFACE, EGL_NO_SURFACE, EGL_NO_CONTEXT);
// Unbind the context from this thread
eglMakeCurrent(display, EGL_NO_SURFACE, EGL_NO_SURFACE, EGL_NO_CONTEXT);
这么做的目的应该是支持多display系统中的特殊处理,目的是当系统有多个display系统的话,那么surfaceflinger就会去定义多个DisplayHardware对象,那么为了保证下一个DisplayHardware对象的创建不受影响,在当前的DisplayHardware创建完成后,将context从当前的进程中unbind掉。
不过没关系,在所有的DisplayHardware创建完成之后,surfaceflinger会重新bind 主Display系统的context和surface。
readyToRun()@SurfaceFlinger.cpp
// initialize primary
screen
// (other display
should be initialized in the same manner, but
// asynchronously,
as they could come and go. None of this is supported
// yet).
const GraphicPlane&
plane(graphicPlane(dpy));
const DisplayHardware&
hw = plane.displayHardware();
const uint32_t
w = hw.getWidth();
const uint32_t
h = hw.getHeight();
const uint32_t
f = hw.getFormat();
hw.makeCurrent();
// initialize primary screen
// (other display should be initialized in the same manner, but
// asynchronously, as they could come and go. None of this is supported
// yet).
const GraphicPlane& plane(graphicPlane(dpy));
const DisplayHardware& hw = plane.displayHardware();
const uint32_t w = hw.getWidth();
const uint32_t h = hw.getHeight();
const uint32_t f = hw.getFormat();
hw.makeCurrent();
转自:http://www.cnblogs.com/armlinux/archive/2012/02/29/2396756.html
一. android显示系统的建立
我们看SurfaceFlinger的定义就知道,它其实是一个Thread, 因此SurfaceFlinger的初始化工作就理所当然的放在了SurfaceFlinger线程中,详见readyToRun()@SurfaceFlinger.cppSurfaceFlinger对于显示的管理是通过一个或多个GraphicPlane对象(目前android只实现了一个)来管理的,
@SurfaceFlinger.h
GraphicPlane mGraphicPlanes[1];
GraphicPlane mGraphicPlanes[1];
其实,GraphicPlane类只是一个wrapper层,目的是当android支持多个显示系统时,通过该类来管里各自的图形系统,显示系统真正的初始化工作是通过DisplayHardware类来初始化底层图形系统的管理与显示的。真正的图形显示系统的初始化在init()@DisplayHardware.cpp
目前,android支持一个图形系统,这个图形系统是全局的,surfaceflinger可以访问,其他不通过surfaceflinger进行图形处理的application也可以对其进行操作。
1. FrameBuffer的建立
framebuffer,确切的是说是linux下的framebuffer,,它是linux图形显示系统中一个与图形硬件无关的抽象层,user完全不用考虑我们的硬件设备,而仅仅使用framebuffer就可以实现对屏幕的操作。android的framebuffer并没有被SurfaceFlinger直接使用,而是在framebuffer外做了一层包装,这个包装就是FramebufferNativeWindow,我们来看一下FramebufferNativeWindow的创建过程。
我们的framebuffer是由一个设备符fbDev来表示的,它是FramebufferNativeWindow的一个成员,我们来分析一下对fbDev的处理过程。
1.1. fbDev设备符
1.1.1 gralloc library
在这之前,先介绍一下gralloc library,它的形态如grallocBOARDPLATFORM.so, BOARDPLATFORM可以从属性ro.board.platform中获得,这篇文章中我们以Qualcommmsmx7x30为例,也就是gralloc.msm7x30.so中,它的源路径在hardware/msm7k/libgralloc-qsd8k。framebuffer的初始化需要通过HAL gralloc.msm7x30.so 来完成与底层硬件驱动的适配,但是gralloc library并不是平台无关的,不同的vendor可能会实现自己的gralloc library,因此为了保证在创建framebuffer时能够平台无关,android只能是动态的判断并使用当前的gralloc library,android通过从gralloc library中再抽象出一个hw_module_t结构来供使用,它为framebuffer的初始化提供了需要的gralloc.msm7x30.so业务。因此通过这个hw_module_t结构我们就不需要知道当前系统使用的到底是哪个gralloc
library。按规定,所有gralloc library中的这个结构体被命名为HAL_MODULE_INFO_SYM(HMI)。当前分析的系统中,HAL_MODULE_INFO_SYM在hardware/msm7k/libgralloc-qsd8k/galloc.cpp。
1.1.2 打开fbDev设备符
下面看如何打开 打开fbDev设备符。通过HAL_MODULE_INFO_SYM提供的gralloc.msm7x30.so的接口我们调用到了fb_device_open()@hardware/msm7k/libgralloc-qsd8kframebuffer.cpp。int fb_device_open(hw_module_t const*
module, const char*
name,
hw_device_t** device)
{
int status
= -EINVAL;
if (!strcmp(name,
GRALLOC_HARDWARE_FB0)) {
alloc_device_t* gralloc_device;
status = gralloc_open(module, &gralloc_device);
/* initialize
our state here */
fb_context_t *dev = (fb_context_t*)malloc(sizeof(*dev));
memset(dev, 0, sizeof(*dev));
/* initialize
the procs */
dev->device.common.tag = HARDWARE_DEVICE_TAG;
private_module_t* m = (private_module_t*)module;
status = mapFrameBuffer(m);
}
int fb_device_open(hw_module_t const* module, const char* name,
hw_device_t** device)
{
int status = -EINVAL;
if (!strcmp(name, GRALLOC_HARDWARE_FB0)) {
alloc_device_t* gralloc_device;
status = gralloc_open(module, &gralloc_device);
/* initialize our state here */
fb_context_t *dev = (fb_context_t*)malloc(sizeof(*dev));
memset(dev, 0, sizeof(*dev));
/* initialize the procs */
dev->device.common.tag = HARDWARE_DEVICE_TAG;
private_module_t* m = (private_module_t*)module;
status = mapFrameBuffer(m);
}
在这个函数中,主要为fbDev设备符指定一个fb_context_t实例,并通过函数mapFrameBuffer()对设备节点/dev/graphics/fb0进行操作,操作的目的有:
1.获得屏幕设备的信息,并将屏幕信息保存在HAL_MODULE_INFO_SYM(上面代码中的module)中。
2. 向/dev/graphics/fb0请求page flip模式,page
flip模式需要至少2个屏幕大小的buffer,page flip模式在后面介绍。目前android系统中设置为2个屏幕大小的buffer。当然屏幕设备可能不支持page flip模式。
mapFrameBufferLocked()@hardware/msm7k/libgralloc-qsd8k/framebuffer.cpp
/*
* Request NUM_BUFFERS
screens (at lest 2 for page flipping)
*/
info.yres_virtual = info.yres * NUM_BUFFERS;
uint32_t flags = PAGE_FLIP;
if (ioctl(fd,
FBIOPUT_VSCREENINFO, &info) == -1) {
info.yres_virtual = info.yres;
flags &= ~PAGE_FLIP;
LOGW("FBIOPUT_VSCREENINFO
failed, page flipping not supported");
}
/*
* Request NUM_BUFFERS screens (at lest 2 for page flipping)
*/
info.yres_virtual = info.yres * NUM_BUFFERS;
uint32_t flags = PAGE_FLIP;
if (ioctl(fd, FBIOPUT_VSCREENINFO, &info) == -1) {
info.yres_virtual = info.yres;
flags &= ~PAGE_FLIP;
LOGW("FBIOPUT_VSCREENINFO failed, page flipping not supported");
}
3. 映射屏幕设备缓存区给fbDev设备符。
mapFrameBufferLocked()@hardware/msm7k/libgralloc-qsd8k/framebuffer.cpp
/*
* map the framebuffer
*/
int err;
size_t fbSize
= roundUpToPageSize(finfo.line_length * info.yres_virtual);
module->framebuffer = new private_handle_t(dup(fd),
fbSize,
private_handle_t::PRIV_FLAGS_USES_PMEM);
module->numBuffers = info.yres_virtual / info.yres;
module->bufferMask = 0;
void*
vaddr = mmap(0, fbSize, PROT_READ|PROT_WRITE, MAP_SHARED, fd, 0);
if (vaddr
== MAP_FAILED) {
LOGE("Error mapping
the framebuffer (%s)", strerror(errno));
return -errno;
}
module->framebuffer->base = intptr_t(vaddr);
memset(vaddr, 0, fbSize);
/*
* map the framebuffer
*/
int err;
size_t fbSize = roundUpToPageSize(finfo.line_length * info.yres_virtual);
module->framebuffer = new private_handle_t(dup(fd), fbSize,
private_handle_t::PRIV_FLAGS_USES_PMEM);
module->numBuffers = info.yres_virtual / info.yres;
module->bufferMask = 0;
void* vaddr = mmap(0, fbSize, PROT_READ|PROT_WRITE, MAP_SHARED, fd, 0);
if (vaddr == MAP_FAILED) {
LOGE("Error mapping the framebuffer (%s)", strerror(errno));
return -errno;
}
module->framebuffer->base = intptr_t(vaddr);
memset(vaddr, 0, fbSize);
1.2 grDev设备符
在为framebuffer,也就是FramebufferNativeWindow申请内存之前,我们还要介绍一个概念,就是grDev设备符。它虽然也叫设备符,但是它和具体的设备没有直接关系,我们看它的类型就是知道了alloc_device_t,没错,grDev设备符就是为了FramebufferNativeWindow管理内存使用的。为FramebufferNativeWindow提供了申请/释放内存的接口。1.3 FramebufferNativeWindow内存管理
FramebufferNativeWindow维护了2个buffer,sp<NativeBuffer> buffers[2];
sp<NativeBuffer> buffers[2];
1.3.1 屏幕设备支持page filp模式
目前的android系统默认要求屏幕设备给系统映射2个屏幕大小的缓存区,以便支持page flip模式,如果屏幕设备支持page flip模式,那么FramebufferNativeWindow中buffers将分别指向一个屏幕大小的屏幕设备缓存区。// create a "fake"
handles for it
intptr_t vaddr
= intptr_t(m->framebuffer->base);
private_handle_t* hnd = new private_handle_t(dup(m->framebuffer->fd),
size,
private_handle_t::PRIV_FLAGS_USES_PMEM |
private_handle_t::PRIV_FLAGS_FRAMEBUFFER);
// find a free
slot
for (uint32_t
i=0 ; i<numBuffers ; i++) {
if ((bufferMask
& (1LU<<i)) == 0) {
m->bufferMask |= (1LU<<i);
break;
}
vaddr += bufferSize;
}
hnd->base = vaddr;
hnd->offset = vaddr - intptr_t(m->framebuffer->base);
*pHandle = hnd;
// create a "fake" handles for it
intptr_t vaddr = intptr_t(m->framebuffer->base);
private_handle_t* hnd = new private_handle_t(dup(m->framebuffer->fd), size,
private_handle_t::PRIV_FLAGS_USES_PMEM |
private_handle_t::PRIV_FLAGS_FRAMEBUFFER);
// find a free slot
for (uint32_t i=0 ; i<numBuffers ; i++) {
if ((bufferMask & (1LU<<i)) == 0) {
m->bufferMask |= (1LU<<i);
break;
}
vaddr += bufferSize;
}
hnd->base = vaddr;
hnd->offset = vaddr - intptr_t(m->framebuffer->base);
*pHandle = hnd;
1.3.2 屏幕设备不支持page flip模式
在mapFrameBufferLocked()@hardware/msm7k/libgralloc-qsd8k/framebuffer.cpp中可以得知,如果屏幕设备不支持page flip模式,那么numBuffer值将为1而不是2,那么映射过来的屏幕缓存区将只有一个屏幕大小,不够支持page flip模式,那么此时将不使用这一个屏幕大小的屏幕缓存区,而改为去dev/pmem设备去申请。gralloc_alloc_framebuffer_locked()@hardware/msm7k/libgralloc-qsd8k/gpu.cpp
const uint32_t
bufferMask = m->bufferMask;
const uint32_t
numBuffers = m->numBuffers;
const size_t bufferSize
= m->finfo.line_length * m->info.yres;
if (numBuffers
== 1) {
// If we
have only one buffer, we never use page-flipping. Instead,
// we return
a regular buffer which will be memcpy'ed to the main
// screen
when post is called.
int newUsage
= (usage & ~GRALLOC_USAGE_HW_FB) | GRALLOC_USAGE_HW_2D;
return gralloc_alloc_buffer(bufferSize,
newUsage, pHandle);
}
const uint32_t bufferMask = m->bufferMask;
const uint32_t numBuffers = m->numBuffers;
const size_t bufferSize = m->finfo.line_length * m->info.yres;
if (numBuffers == 1) {
// If we have only one buffer, we never use page-flipping. Instead,
// we return a regular buffer which will be memcpy'ed to the main
// screen when post is called.
int newUsage = (usage & ~GRALLOC_USAGE_HW_FB) | GRALLOC_USAGE_HW_2D;
return gralloc_alloc_buffer(bufferSize, newUsage, pHandle);
}
2. 打开Overlay
同选择gralloc library相似,根据属性值来选择何时的overlay库,如果vendor厂商没有提供overlay库的话,那么系统将使用默认的overlay库overlay.default.so。同样的我们获得overlay库的HAL_MODULE_INFO_SYM结构体,作为系统调用overlay的接口。if (hw_get_module(OVERLAY_HARDWARE_MODULE_ID,
&module) == 0) {
overlay_control_open(module, &mOverlayEngine);
}
if (hw_get_module(OVERLAY_HARDWARE_MODULE_ID, &module) == 0) {
overlay_control_open(module, &mOverlayEngine);
}
3. 选择OpenGL ES library(也即软/硬件加速)
OpenGL (Open Graphics Library)[3] is a standard specification defining a cross-language, cross-platform API for writing applications that produce 2D and 3D computer graphics. The interface consists of over 250 different function calls which can beused to draw complex three-dimensional scenes from simple primitives. OpenGL was developed by Silicon Graphics Inc. (SGI) in 1992[4] and is widely used in CAD, virtual reality, scientific visualization, information visualization, flight simulation, and video
games. OpenGL is managed by the non-profit technology consortium Khronos Group.。
android是默认支持OpenGL ES软件加速的,library为libGLES_android,源码路径为frameworks\base\opengl\libagl;如果手机设备支持硬件加速的话,那么复杂的图像处理工作将交由GPU去处理,那么效率将大大提高。但是如果系统真的存在硬件加速,它是如何选择何时用软件加速?何时用硬件加速的呢?
如何查看是否有GPU来实现硬件加速,很容易查看/system/lib/egl/egl.cfg文件内容
0 0 android
0 1 adreno200
0 0 android
0 1 adreno200
因此只要我们的移动设备芯片集成了GPU,并提供了对应的GL图形库,那么我们就可以在我们的工程中device目录下的egl.cfg文件中加入类似上面的配置,那么我们的系统就会支持硬件加速。
如adreno200 GPU提供的GL图形库:
libGLESv1_CM_adreno200.so
libGLESv2_adreno200.so
libEGL_adreno200.so
libGLESv1_CM_adreno200.so
libGLESv2_adreno200.so
libEGL_adreno200.so
那么假如我们的系统中软硬件加速都支持了,那么我们从代码来看能不能让用户自由的选择加速类型,我们带着问题来研究一下代码。
3.1 OpenGL初始化
在调用不管是软件加速的还是硬件加速的OpenGL api之前,我们都需要把软硬两种模式的各自的OpenGL api提取出来,抽象出一个interface来供系统使用,这个过程我称之为OpenGL初始化过程。软硬两种模式的OpenGL api被分别指定到了一个全局数组的对应位置。
frameworks/base/opengl/libs/EGL/egl.cpp
static egl_connection_t
gEGLImpl[IMPL_NUM_IMPLEMENTATIONS];
static egl_connection_t gEGLImpl[IMPL_NUM_IMPLEMENTATIONS];
enum {
IMPL_HARDWARE = 0,
IMPL_SOFTWARE,
IMPL_NUM_IMPLEMENTATIONS
};
enum {
IMPL_HARDWARE = 0,
IMPL_SOFTWARE,
IMPL_NUM_IMPLEMENTATIONS
};
gEGLImpl[IMPL_HARDWARE]中保存着硬件图形设备的OpenGL api地址,从
libGLESv1_CM_adreno200.so
libGLESv2_adreno200.so
libEGL_adreno200.so
libGLESv1_CM_adreno200.so
libGLESv2_adreno200.so
libEGL_adreno200.so
这3个库中获得;gEGLImpl[IMPL_SOFTWARE]中保存着软件的OpenGL api地址,从libGLES_android.so中获取。
这部分代码在egl_init_drivers_locked()@frameworks/base/opengl/libs/EGL/egl.cpp
3.2 EGL和GLES api
在OpenGL的初始化过程中,OpenGL提供了两套api,分别称为EGL和GLES。android在OPENGL初始化过程中,会将两种不同的接口分开管理,从下面代码中我们可以看到EGL和GLES api地址被存储到了不同的位置。@frameworks\base\opengl\libs\EGL\Loader.h
enum {
EGL = 0x01,
GLESv1_CM = 0x02,
GLESv2 = 0x04
};
enum {
EGL = 0x01,
GLESv1_CM = 0x02,
GLESv2 = 0x04
};
load_driver()@frameworks\base\opengl\libs\EGL\Loader.cpp
上面枚举的EGL表示ELG api;GLESvq1_CM表示OpenGL ES 1.0的api;GLESv2表示OpenGL ES 2.0的api。
EGL api地址最终被存储在gEGLImpl[].egl中;
GLESvq1_CM api地址最终被存储在gEGLImpl[].hooks[GLESv1_INDEX]->gl中;
GLESv2 api地址最终被存储在gEGLImpl[].hooks[GLESv2_INDEX]->gl中;
3.2.1 EGL api
EGL is an interface between Khronos rendering APIs such as OpenGL ES or OpenVG and the underlying native platform window system. It handles graphics context management, surface/buffer binding, and rendering synchronization and enables high-performance,
accelerated, mixed-mode 2D and 3D rendering using other Khronos APIs.
上面引用了官方的定义,可以看出,EGL是系统和OPENGL ES之间的接口,它的声明在文件frameworks\base\opengl\libs\EGL\egl_entries.in。
3.2.2 GLES
GLES才是真正的OpenGL ES的api,它的声明我们可以在frameworks\base\opengl\libs\entries.in找到。目前的android系统不但将EGL提供给系统使用,同时将GLES也提供给了系统使用,这个我们可以在最开始的显示系统的结构图中可以看到,surfacefliger和framework的opengl模块均可以访问EGL和GLES接口。
3.3 OpenGL config
每个OpenGL库都根据不同的像素格式(pixel format)提供了一系统的config,android根据framebuffer中设置的像素格式来选择合适的config,android根据中各config中的属性信息来创建main surface和openGL上下文。3.3.1 系统默认pixel format
当前的代码分析是基于gingerbread的,在mapFrameBufferLocked()@hardware/msm7k/libgralloc-qsd8k/framebuffer.cpp中我们可以找到framebuffer的pixel format的类型if(info.bits_per_pixel
== 32) {
/*
* Explicitly request
RGBA_8888
*/
/* Note: the GL
driver does not have a r=8 g=8 b=8 a=0 config, so if we do
* not use the MDP
for composition (i.e. hw composition == 0), ask for
* RGBA instead
of RGBX. */
if (property_get("debug.sf.hw",
property, NULL) > 0 && atoi(property) == 0)
module->fbFormat = HAL_PIXEL_FORMAT_RGBX_8888;
else if(property_get("debug.composition.type",
property, NULL) > 0 && (strncmp(property, "mdp",
3) == 0))
module->fbFormat = HAL_PIXEL_FORMAT_RGBX_8888;
else
module->fbFormat = HAL_PIXEL_FORMAT_RGBA_8888;
} else {
/*
* Explicitly request
5/6/5
*/
module->fbFormat = HAL_PIXEL_FORMAT_RGB_565;
}
if(info.bits_per_pixel == 32) {
/*
* Explicitly request RGBA_8888
*/
/* Note: the GL driver does not have a r=8 g=8 b=8 a=0 config, so if we do
* not use the MDP for composition (i.e. hw composition == 0), ask for
* RGBA instead of RGBX. */
if (property_get("debug.sf.hw", property, NULL) > 0 && atoi(property) == 0)
module->fbFormat = HAL_PIXEL_FORMAT_RGBX_8888;
else if(property_get("debug.composition.type", property, NULL) > 0 && (strncmp(property, "mdp", 3) == 0))
module->fbFormat = HAL_PIXEL_FORMAT_RGBX_8888;
else
module->fbFormat = HAL_PIXEL_FORMAT_RGBA_8888;
} else {
/*
* Explicitly request 5/6/5
*/
module->fbFormat = HAL_PIXEL_FORMAT_RGB_565;
}
目前的移动设备都是真彩色,所以这里我们认为我们的屏幕设备支持的是HAL_PIXEL_FORMAT_RGBA_8888。
3.3.2 config初始化
所有的OpenGL库提供的config,同样需要将软硬两种模式的各自的OpenGL config提取出来供系统使用,如同OpenGL api地址一样。OpenGL config提取出来后保存在另外一个全局变量static egl_display_t
gDisplay[NUM_DISPLAYS];
static egl_display_t gDisplay[NUM_DISPLAYS];
// EGLDisplay
are global, not attached to a given thread
const unsigned int NUM_DISPLAYS
= 1;
// EGLDisplay are global, not attached to a given thread
const unsigned int NUM_DISPLAYS = 1;
中,不同于gEGLImpl分开保存软硬件api,所有的config,不论软硬件的,均保存在gDisplay[0],因为所有的config是以屏幕区分的,同一块屏幕应该保存同一份config信息。
在提取出的openGL的config时,会保存到gDisplay[0].config中,在这儿有一个很tricky的实现,它保证了硬件加速器的优先使用!
<strong> </strong> //
sort our configurations so we can do binary-searches
qsort( dp->configs,
dp->numTotalConfigs,
sizeof(egl_config_t),
cmp_configs);<strong>
</strong>
<strong> </strong> // sort our configurations so we can do binary-searches
qsort( dp->configs,
dp->numTotalConfigs,
sizeof(egl_config_t), cmp_configs);<strong>
</strong>
最终,上述代码会将gDisplay[0].config中的配置按照先硬件的,后软件的规则做一个总体的排序。
代码在eglInitialize()@frameworks/base/opengl/libs/EGL/egl.cpp
3.3.3 config选择
上文说到,android会根据framebuffer的pixel format信息来获取对应的config,这个过程只选择一个合适的config,选到为止。3.3.3.1 满足属性要求
并不是所有的config都可以被选择,首先这个config的属性需要满足init()@DisplayHardware.cpp
// initialize EGL
EGLint attribs[] = {
EGL_SURFACE_TYPE, EGL_WINDOW_BIT,
EGL_NONE, 0,
EGL_NONE
};
// initialize EGL
EGLint attribs[] = {
EGL_SURFACE_TYPE, EGL_WINDOW_BIT,
EGL_NONE, 0,
EGL_NONE
};
3.3.3.2 满足RGBA要求
在pixelflinger中,为系统提供了各个pixel format的基本信息,RGBA值,字节数/pixel,位数/pixel。system/core/libpixelflinger/format.cpp
static GGLFormat const gPixelFormatInfos[]
=
{ //
Alpha Red Green Blue
{ 0, 0, {{ 0, 0, 0, 0, 0, 0, 0, 0 }}, 0 }, //
PIXEL_FORMAT_NONE
{ 4, 32, {{32,24, 8, 0, 16, 8, 24,16 }}, GGL_RGBA }, //
PIXEL_FORMAT_RGBA_8888
static GGLFormat const gPixelFormatInfos[] =
{ // Alpha Red Green Blue
{ 0, 0, {{ 0, 0, 0, 0, 0, 0, 0, 0 }}, 0 }, // PIXEL_FORMAT_NONE
{ 4, 32, {{32,24, 8, 0, 16, 8, 24,16 }}, GGL_RGBA }, // PIXEL_FORMAT_RGBA_8888
android会根据pixelflinger的pixel
format信息,去和openGL的config比较,得到想要的config。
selectConfigForPixelFormat()@frameworks/base/libs/ui/EGLUtils.cpp
EGLConfig* const configs
= (EGLConfig*)malloc(sizeof(EGLConfig)*numConfigs);
if (eglChooseConfig(dpy,
attrs, configs, numConfigs, &n) == EGL_FALSE) {
free(configs);
return BAD_VALUE;
}
const int fbSzA
= fbFormatInfo.getSize(PixelFormatInfo::INDEX_ALPHA);
const int fbSzR
= fbFormatInfo.getSize(PixelFormatInfo::INDEX_RED);
const int fbSzG
= fbFormatInfo.getSize(PixelFormatInfo::INDEX_GREEN);
const int fbSzB
= fbFormatInfo.getSize(PixelFormatInfo::INDEX_BLUE);
int i;
EGLConfig config = NULL;
for (i=0
; i<n ; i++) {
EGLint r,g,b,a;
EGLConfig curr = configs[i];
eglGetConfigAttrib(dpy, curr, EGL_RED_SIZE, &r);
eglGetConfigAttrib(dpy, curr, EGL_GREEN_SIZE, &g);
eglGetConfigAttrib(dpy, curr, EGL_BLUE_SIZE, &b);
eglGetConfigAttrib(dpy, curr, EGL_ALPHA_SIZE, &a);
if (fbSzA
<= a && fbSzR <= r && fbSzG <= g && fbSzB <= b) {
config = curr;
break;
}
}
EGLConfig* const configs = (EGLConfig*)malloc(sizeof(EGLConfig)*numConfigs);
if (eglChooseConfig(dpy, attrs, configs, numConfigs, &n) == EGL_FALSE) {
free(configs);
return BAD_VALUE;
}
const int fbSzA = fbFormatInfo.getSize(PixelFormatInfo::INDEX_ALPHA);
const int fbSzR = fbFormatInfo.getSize(PixelFormatInfo::INDEX_RED);
const int fbSzG = fbFormatInfo.getSize(PixelFormatInfo::INDEX_GREEN);
const int fbSzB = fbFormatInfo.getSize(PixelFormatInfo::INDEX_BLUE);
int i;
EGLConfig config = NULL;
for (i=0 ; i<n ; i++) {
EGLint r,g,b,a;
EGLConfig curr = configs[i];
eglGetConfigAttrib(dpy, curr, EGL_RED_SIZE, &r);
eglGetConfigAttrib(dpy, curr, EGL_GREEN_SIZE, &g);
eglGetConfigAttrib(dpy, curr, EGL_BLUE_SIZE, &b);
eglGetConfigAttrib(dpy, curr, EGL_ALPHA_SIZE, &a);
if (fbSzA <= a && fbSzR <= r && fbSzG <= g && fbSzB <= b) {
config = curr;
break;
}
}
4. 创建main surface
要让OpenGL进行图形处理,那么需要在OpenGL中创建一个openGL surface。代码在eglCreateWindowSurface()@frameworks/base/opengl/libs/EGL/egl.cpp调用当前的config所处的openGL库的api来创建surface。通过validate_display_config()方法来获取当前config的openGL api。
创建的surface会和FramebufferNativeWindow关联到一起。
5. 创建 OpenGL ES 上下文
An OpenGL context represents many things. A context stores all of the state associated with this instanceof OpenGL. It represents the (potentially visible) default framebufferthat rendering commands will draw to when
not drawing to a framebuffer object. Think of a context as an object that holds all of OpenGL; when a context is
destroyed, OpenGL is destroyed.
http://www.opengl.org/wiki/OpenGL_context
具体的创建过程专业术语太多,也没有仔细研究不再介绍。
6. 绑定context和surface
有了surface,有了FramebufferNativeWindow,有了context,基本上与图形系统相关的概念都有了,下一步就是把这几个概念关联起来,在创建surface时已经将surface和FramebufferNativeWindow关联了起来。eglMakeCurrent()@frameworks/base/opengl/libs/EGL/egl.cpp
6.1 多线程支持
OpenGL 提供了多线程的支持,有以下2点的支持:1. 一个Context只能被一个线程使用,不能存在多个线程使用同一个context。因此在多线层操作中使用到了TLS技术,即Thread-local storage,来保证context被唯一使用。
makeCurrent()@frameworks/base/opengl/libs/libagl/egl.cpp
ogles_context_t* current = (ogles_context_t*)getGlThreadSpecific();
if (gl)
{
egl_context_t* c = egl_context_t::context(gl);
if (c->flags
& egl_context_t::IS_CURRENT) {
if (current
!= gl) {
//
it is an error to set a context current, if it's already
//
current to another thread
return -1;
}
} else {
if (current)
{
//
mark the current context as not current, and flush
glFlush();
egl_context_t::context(current)->flags &= ~egl_context_t::IS_CURRENT;
}
}
if (!(c->flags
& egl_context_t::IS_CURRENT)) {
//
The context is not current, make it current!
setGlThreadSpecific(gl);
c->flags |= egl_context_t::IS_CURRENT;
}
ogles_context_t* current = (ogles_context_t*)getGlThreadSpecific();
if (gl) {
egl_context_t* c = egl_context_t::context(gl);
if (c->flags & egl_context_t::IS_CURRENT) {
if (current != gl) {
// it is an error to set a context current, if it's already
// current to another thread
return -1;
}
} else {
if (current) {
// mark the current context as not current, and flush
glFlush();
egl_context_t::context(current)->flags &= ~egl_context_t::IS_CURRENT;
}
}
if (!(c->flags & egl_context_t::IS_CURRENT)) {
// The context is not current, make it current!
setGlThreadSpecific(gl);
c->flags |= egl_context_t::IS_CURRENT;
}
2. 在同一进程中,对于不同的线程对OpenGL库的访问,可能使用的GLES api version不同,同样可以使用TLS技术来保证多线程过程中,不同线程调用各自的GLES api。
前面我们介绍过GLES api地址被存放在gEGLImpl[].hooks[VERSION]->gl中,因此为保证多线程支持,android将gEGLImpl[].hooks[VERSION]保存到了TLS中,这样就实现了不同线程各自调用各自版本的GLES
api。
eglMakeCurrent()@frameworks/base/opengl/libs/EGL/egl.cpp
// cur_c has to
be valid here (but could be terminated)
if (ctx
!= EGL_NO_CONTEXT) {
setGlThreadSpecific(c->cnx->hooks[c->version]);
setContext(ctx);
_c.acquire();
} else {
setGlThreadSpecific(&gHooksNoContext);
setContext(EGL_NO_CONTEXT);
}
// cur_c has to be valid here (but could be terminated)
if (ctx != EGL_NO_CONTEXT) {
setGlThreadSpecific(c->cnx->hooks[c->version]);
setContext(ctx);
_c.acquire();
} else {
setGlThreadSpecific(&gHooksNoContext);
setContext(EGL_NO_CONTEXT);
}
尽管openGL 实现了多线程的支持,目前我从代码中别没有找到多线程的使用。
6.2 设置surface和context之间的关系
由于vendor厂商提供的GPU的GLES库是不可见的,因此以libGLES_android.so软件加速为例来说明这个过程。contex中保存着两个surface,read和draw,多少情况下这两个surface为同一个surface。
设置FramebufferNativeWindow中Buffers[2]之一为surface的数据区, 通过connect()和bindDrawSurface()。最终的形态如下图所示:
在init()@DisplayHardware.cpp中,在绑定surface和context之后,马上在当前线程中unbind了context,通过
// Unbind the context
from this thread
eglMakeCurrent(display, EGL_NO_SURFACE, EGL_NO_SURFACE, EGL_NO_CONTEXT);
// Unbind the context from this thread
eglMakeCurrent(display, EGL_NO_SURFACE, EGL_NO_SURFACE, EGL_NO_CONTEXT);
这么做的目的应该是支持多display系统中的特殊处理,目的是当系统有多个display系统的话,那么surfaceflinger就会去定义多个DisplayHardware对象,那么为了保证下一个DisplayHardware对象的创建不受影响,在当前的DisplayHardware创建完成后,将context从当前的进程中unbind掉。
不过没关系,在所有的DisplayHardware创建完成之后,surfaceflinger会重新bind 主Display系统的context和surface。
readyToRun()@SurfaceFlinger.cpp
// initialize primary
screen
// (other display
should be initialized in the same manner, but
// asynchronously,
as they could come and go. None of this is supported
// yet).
const GraphicPlane&
plane(graphicPlane(dpy));
const DisplayHardware&
hw = plane.displayHardware();
const uint32_t
w = hw.getWidth();
const uint32_t
h = hw.getHeight();
const uint32_t
f = hw.getFormat();
hw.makeCurrent();
// initialize primary screen
// (other display should be initialized in the same manner, but
// asynchronously, as they could come and go. None of this is supported
// yet).
const GraphicPlane& plane(graphicPlane(dpy));
const DisplayHardware& hw = plane.displayHardware();
const uint32_t w = hw.getWidth();
const uint32_t h = hw.getHeight();
const uint32_t f = hw.getFormat();
hw.makeCurrent();
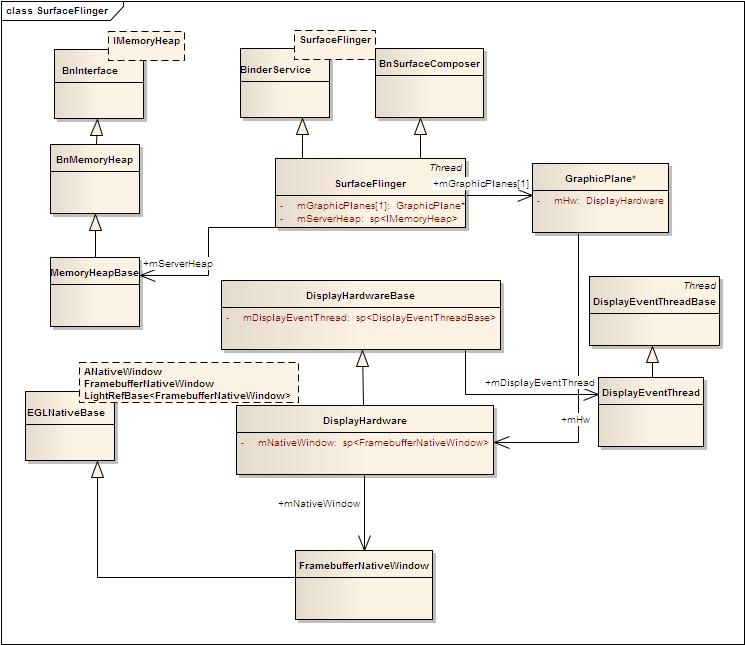
下图为这个图形系统的类图结构。
转自:http://www.cnblogs.com/armlinux/archive/2012/02/29/2396756.html

相关文章推荐
- 动画插值器
- View事件传递 touch事件分发
- 最全面的Android Studio使用教程
- Android studio grandle信息
- Android项目文件结构
- Android控件之SwipeRefreshLayout(下拉刷新组件)
- ksoap2传参是数组、自定义类型、自定义数组的实例
- Android基础入门教程——3.8 Gestures(手势)
- Android工程测试
- Android 设计模式学习之工厂模式
- android.app.PendingIntent
- Android清除缓存功能来实现
- Android百分比布局支持库 com.android.support:percent
- Android+NDK+OpenGLES开发环境配置
- ubuntu android studio ADB问题
- 深入浅出RxJava四-在Android中使用响应式编程
- Android常用Uri
- Android中的消息通知Toast和Notification
- Android Studio导入项目
- android学习笔记-读取手机联系人