图像特效------三角几何应用 分类: 视频图像处理 2015-07-24 10:06 37人阅读 评论(0) 收藏
2015-07-24 10:06
399 查看
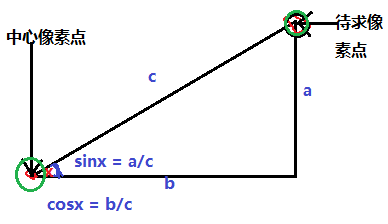
一:基本的三角函数知识

同样根据a, b的值可以计算出角度θ值,称之为反三角函数,角度θ=atan2(a, b)
图像处理中应用三角函数常常把中心点设置为A点,任意像素点B到A的距离可以根据三
角函数来计算得出,常见的计算模型如下:
对待求像素点加以一定三角函数变化,可以实现很多意想不到的图形特效,中心像素点可以
通过以下计算获得
int centerX = width/2;
int centerY = height/2;
扫描到的像素点p(x, y)可以基于 中心像素点,角度θ,两点之间距离Radius可以通过如
下计算获得:
int trueX = col -centerX;
int trueY = row -centerY;
theta = Math.atan2((trueY),(trueX));
radius = Math.sqrt(trueX*trueX + trueY*trueY);
二:特效原理
实现的特效很简单,上述的三角几何中计算结果中,有两个可以改变其值再重新计算坐标
P(x,y)。一个是角度,另外一个是半径距离,分别对角度与距离加以一定权重值计算,得到
如下两种特效:
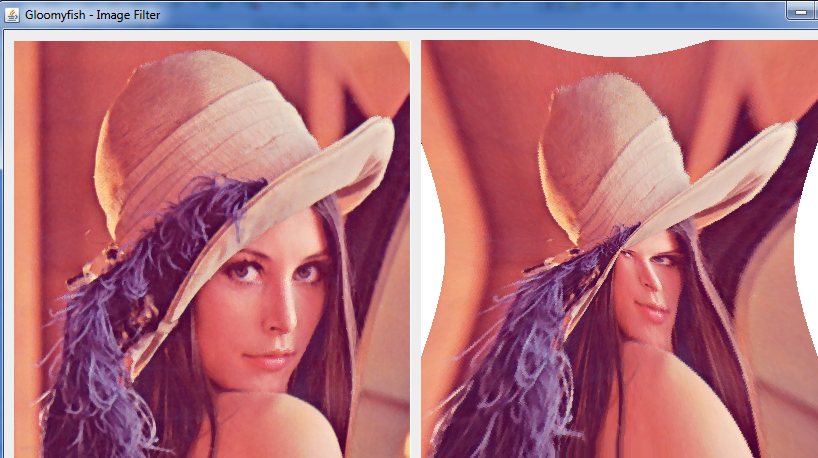
1. 哈哈镜效果,主要是改变半径值,计算方法如下:
double newRadius = Math.sqrt(radius) * factor;
newX = centerX + (newRadius * Math.cos(theta));
newY = centerY + (newRadius * Math.sin(theta));
其中factor为输入参数
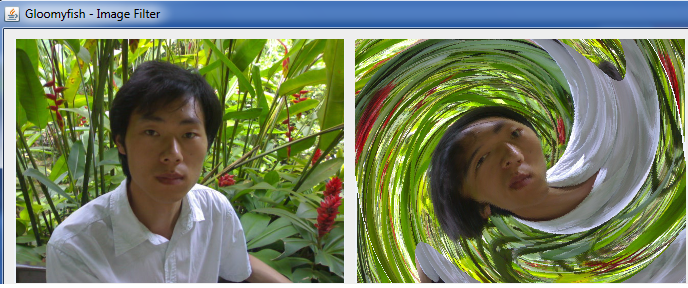
2. 中心螺旋效果,主要是改变角度θ的值,计算方法如下:
newX = centerX + (radius * Math.cos(theta+degree * radius));
newY = centerY + (radius * Math.sin(theta+degree * radius));
其中degree为输入参数.
三:程序效果
哈哈镜效果:
螺旋效果
两个滤镜程序的源代码如下:1. Magic Mirror
[java] view plaincopypackage com.process.blur.study;
import java.awt.image.BufferedImage;
public class MagicMirrorFilter extends AbstractBufferedImageOp {
private double factor = 15.0d; // default value
public MagicMirrorFilter() {
}
public MagicMirrorFilter(double factor) {
this.factor = factor;
}
public double getFactor() {
return factor;
}
public void setFactor(double factor) {
this.factor = factor;
}
@Override
public BufferedImage filter(BufferedImage src, BufferedImage dest) {
int width = src.getWidth();
int height = src.getHeight();
if ( dest == null )
dest = createCompatibleDestImage( src, null );
int[] inPixels = new int[width*height];
int[] outPixels = new int[width*height];
getRGB( src, 0, 0, width, height, inPixels );
int index = 0, outIndex = 0;
int centerX = width/2;
int centerY = height/2;
double theta, radius;
double newX, newY;
int offsetX = 0, offsetY = 0;
for(int row=0; row<height; row++) {
int ta = 0, tr = 0, tg = 0, tb = 0;
for(int col=0; col<width; col++) {
int trueX = col - centerX;
int trueY = row - centerY;
theta = Math.atan2((trueY),(trueX));
radius = Math.sqrt(trueX*trueX + trueY*trueY);
double newRadius = Math.sqrt(radius) * factor;
newX = centerX + (newRadius * Math.cos(theta));
newY = centerY + (newRadius * Math.sin(theta));
if (newX > 0 && newX < width) {
offsetX = (int)newX;
} else {
newX = 0;
}
if (newY > 0 && newY < height) {
offsetY = (int)newY;
} else {
newY = 0;
}
index = offsetY * width + offsetX;
ta = (inPixels[index] >> 24) & 0xff;
tr = (inPixels[index] >> 16) & 0xff;
tg = (inPixels[index] >> 8) & 0xff;
tb = inPixels[index] & 0xff;
// use newX, newY and fill the pixel data now...
outIndex = row * width + col;
outPixels[outIndex] = (ta << 24) | (tr << 16) | (tg << 8) | tb;
}
}
setRGB( dest, 0, 0, width, height, outPixels );
return dest;
}
}
2. Swirl
[java] view plaincopypackage com.process.blur.study;
import java.awt.image.BufferedImage;
public class SwirlFilter extends AbstractBufferedImageOp{
// recommended scope is [0.1 ~ 0.001]
private double degree = 0.02d; // default value,
public SwirlFilter() {
}
public double getDegree() {
return degree;
}
public void setDegree(double degree) {
this.degree = degree;
}
@Override
public BufferedImage filter(BufferedImage src, BufferedImage dest) {
int width = src.getWidth();
int height = src.getHeight();
if ( dest == null )
dest = createCompatibleDestImage( src, null );
int[] inPixels = new int[width*height];
int[] outPixels = new int[width*height];
getRGB( src, 0, 0, width, height, inPixels );
int index = 0, outIndex = 0;
int centerX = width/2;
int centerY = height/2;
double theta, radius;
double newX, newY;
int offsetX = 0, offsetY = 0;
for(int row=0; row<height; row++) {
int ta = 0, tr = 0, tg = 0, tb = 0;
for(int col=0; col<width; col++) {
int trueX = col - centerX;
int trueY = row - centerY;
theta = Math.atan2((trueY),(trueX));
radius = Math.sqrt(trueX*trueX + trueY*trueY);
// the top trick is to add (degree * radius), generate the swirl effect...
newX = centerX + (radius * Math.cos(theta + degree * radius));
newY = centerY + (radius * Math.sin(theta + degree * radius));
if (newX > 0 && newX < width) {
offsetX = (int)newX;
} else {
offsetX = col;
}
if (newY > 0 && newY < height) {
offsetY = (int)newY;
} else {
offsetY = row;
}
index = offsetY * width + offsetX;
ta = (inPixels[index] >> 24) & 0xff;
tr = (inPixels[index] >> 16) & 0xff;
tg = (inPixels[index] >> 8) & 0xff;
tb = inPixels[index] & 0xff;
// use newX, newY and fill the pixel data now...
outIndex = row * width + col;
outPixels[outIndex] = (ta << 24) | (tr << 16) | (tg << 8) | tb;
}
}
setRGB( dest, 0, 0, width, height, outPixels );
return dest;
}
}
同样根据a, b的值可以计算出角度θ值,称之为反三角函数,角度θ=atan2(a, b)
图像处理中应用三角函数常常把中心点设置为A点,任意像素点B到A的距离可以根据三
角函数来计算得出,常见的计算模型如下:
对待求像素点加以一定三角函数变化,可以实现很多意想不到的图形特效,中心像素点可以
通过以下计算获得
int centerX = width/2;
int centerY = height/2;
扫描到的像素点p(x, y)可以基于 中心像素点,角度θ,两点之间距离Radius可以通过如
下计算获得:
int trueX = col -centerX;
int trueY = row -centerY;
theta = Math.atan2((trueY),(trueX));
radius = Math.sqrt(trueX*trueX + trueY*trueY);
二:特效原理
实现的特效很简单,上述的三角几何中计算结果中,有两个可以改变其值再重新计算坐标
P(x,y)。一个是角度,另外一个是半径距离,分别对角度与距离加以一定权重值计算,得到
如下两种特效:
1. 哈哈镜效果,主要是改变半径值,计算方法如下:
double newRadius = Math.sqrt(radius) * factor;
newX = centerX + (newRadius * Math.cos(theta));
newY = centerY + (newRadius * Math.sin(theta));
其中factor为输入参数
2. 中心螺旋效果,主要是改变角度θ的值,计算方法如下:
newX = centerX + (radius * Math.cos(theta+degree * radius));
newY = centerY + (radius * Math.sin(theta+degree * radius));
其中degree为输入参数.
三:程序效果
哈哈镜效果:
螺旋效果
两个滤镜程序的源代码如下:1. Magic Mirror
[java] view plaincopypackage com.process.blur.study;
import java.awt.image.BufferedImage;
public class MagicMirrorFilter extends AbstractBufferedImageOp {
private double factor = 15.0d; // default value
public MagicMirrorFilter() {
}
public MagicMirrorFilter(double factor) {
this.factor = factor;
}
public double getFactor() {
return factor;
}
public void setFactor(double factor) {
this.factor = factor;
}
@Override
public BufferedImage filter(BufferedImage src, BufferedImage dest) {
int width = src.getWidth();
int height = src.getHeight();
if ( dest == null )
dest = createCompatibleDestImage( src, null );
int[] inPixels = new int[width*height];
int[] outPixels = new int[width*height];
getRGB( src, 0, 0, width, height, inPixels );
int index = 0, outIndex = 0;
int centerX = width/2;
int centerY = height/2;
double theta, radius;
double newX, newY;
int offsetX = 0, offsetY = 0;
for(int row=0; row<height; row++) {
int ta = 0, tr = 0, tg = 0, tb = 0;
for(int col=0; col<width; col++) {
int trueX = col - centerX;
int trueY = row - centerY;
theta = Math.atan2((trueY),(trueX));
radius = Math.sqrt(trueX*trueX + trueY*trueY);
double newRadius = Math.sqrt(radius) * factor;
newX = centerX + (newRadius * Math.cos(theta));
newY = centerY + (newRadius * Math.sin(theta));
if (newX > 0 && newX < width) {
offsetX = (int)newX;
} else {
newX = 0;
}
if (newY > 0 && newY < height) {
offsetY = (int)newY;
} else {
newY = 0;
}
index = offsetY * width + offsetX;
ta = (inPixels[index] >> 24) & 0xff;
tr = (inPixels[index] >> 16) & 0xff;
tg = (inPixels[index] >> 8) & 0xff;
tb = inPixels[index] & 0xff;
// use newX, newY and fill the pixel data now...
outIndex = row * width + col;
outPixels[outIndex] = (ta << 24) | (tr << 16) | (tg << 8) | tb;
}
}
setRGB( dest, 0, 0, width, height, outPixels );
return dest;
}
}
2. Swirl
[java] view plaincopypackage com.process.blur.study;
import java.awt.image.BufferedImage;
public class SwirlFilter extends AbstractBufferedImageOp{
// recommended scope is [0.1 ~ 0.001]
private double degree = 0.02d; // default value,
public SwirlFilter() {
}
public double getDegree() {
return degree;
}
public void setDegree(double degree) {
this.degree = degree;
}
@Override
public BufferedImage filter(BufferedImage src, BufferedImage dest) {
int width = src.getWidth();
int height = src.getHeight();
if ( dest == null )
dest = createCompatibleDestImage( src, null );
int[] inPixels = new int[width*height];
int[] outPixels = new int[width*height];
getRGB( src, 0, 0, width, height, inPixels );
int index = 0, outIndex = 0;
int centerX = width/2;
int centerY = height/2;
double theta, radius;
double newX, newY;
int offsetX = 0, offsetY = 0;
for(int row=0; row<height; row++) {
int ta = 0, tr = 0, tg = 0, tb = 0;
for(int col=0; col<width; col++) {
int trueX = col - centerX;
int trueY = row - centerY;
theta = Math.atan2((trueY),(trueX));
radius = Math.sqrt(trueX*trueX + trueY*trueY);
// the top trick is to add (degree * radius), generate the swirl effect...
newX = centerX + (radius * Math.cos(theta + degree * radius));
newY = centerY + (radius * Math.sin(theta + degree * radius));
if (newX > 0 && newX < width) {
offsetX = (int)newX;
} else {
offsetX = col;
}
if (newY > 0 && newY < height) {
offsetY = (int)newY;
} else {
offsetY = row;
}
index = offsetY * width + offsetX;
ta = (inPixels[index] >> 24) & 0xff;
tr = (inPixels[index] >> 16) & 0xff;
tg = (inPixels[index] >> 8) & 0xff;
tb = inPixels[index] & 0xff;
// use newX, newY and fill the pixel data now...
outIndex = row * width + col;
outPixels[outIndex] = (ta << 24) | (tr << 16) | (tg << 8) | tb;
}
}
setRGB( dest, 0, 0, width, height, outPixels );
return dest;
}
}

相关文章推荐
- 【ubuntu操作系统入门】Ubuntu常用命令大全二
- rest api和webservice 的区别比较
- 推导公式 hdu2298 Toxophily
- 在WORD文档中,怎样使页码“1”从第二页开始?
- 新公式:互联网+脑科学=互联网神经学
- 一步一步上手IntelliJ IDEA - JFinal最简增删改查系统(之一)
- c++map容器介绍
- rest 理解
- 快速幂取模函数 迭代模板
- Pascal's Triangle II
- uitextfield的常用属性
- MYSQL---INSERT...SET...
- UVA-10726 Coco Monkey(递推)
- Genymotion出现错误INSTALL_FAILED_CPU_ABI_INCOMPATIBLE解决办法
- Linux-sed-1
- Hive 内建操作符与函数开发
- Unity 鼠标拖动场景内的物体
- iOS app获取后台权限
- Linux 的账号与群组
- 关于jquery全选和取消全选遇到的只能选一次问题记录