图像处理--------应用卷积– 轧花与边缘检测
2015-07-24 09:50
519 查看
一:轧花
轧花算子(embossfilter)
对一幅数字图像一阶微分结果即可得到轧花效果,根据不同的算子,轧花又
可以分为凹效果与凸效果两种。两个个最简单的轧花算子为:

轧花算子又称为双极性算子,1对图像的贡献意味着平滑,-1对图像的贡献
意味着突出细节,于是最终就得出了双极性的轧花效果。
处理过程:
a. 读取图像像素
b. 使用轧花算子完成对像素数组的卷积操作
c. 整体亮度提升效果– 高斯亮度/基于阈值/直接常量提升
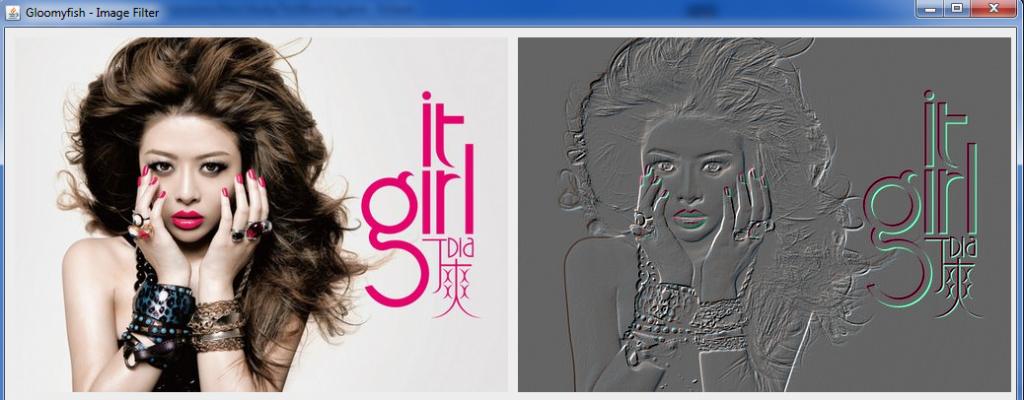
轧花滤镜效果:左边为原图, 右边为轧花处理以后效果
二:边缘提取
Edge detection是图像处理中非常重要而且也是十分常用的图像处理手段之一,边缘提取是
图像二值化的基本步骤之一。边缘提取从本质上来说是高通滤波,从数字信号的角度看,就
是要保留高频信号,去掉低频信号,因此边缘提取有很多频率域算子,将图像完成FFT之后
在频率域完成高通滤波再转到空间域。显然计算量比较大,空间域最经典的边缘提取算法之
一Candy Edge Detection有着非常好的效果。
这里只是抛砖引玉,完成一个最简单基于卷积的空间域边缘提取算子,算子为:

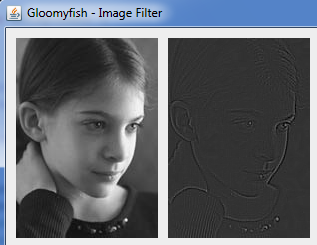
完成卷积以后的效果如下:

对于灰度图完成边缘提取以后效果如下:
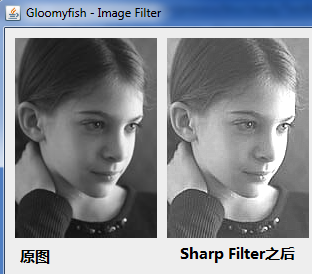
基于卷积还可以完成图像的锐化(Sharp Filter),让图像上的差异更加明显。
一个简单的Sharp Filter可以为

得到的效果如下:
完成轧花卷积的代码如下:
[java] view plaincopy@Override
public BufferedImage filter(BufferedImage src, BufferedImage dest) {
int width = src.getWidth();
int height = src.getHeight();
if ( dest == null )
dest = createCompatibleDestImage( src, null );
int[] inPixels = new int[width*height];
int[] outPixels = new int[width*height];
src.getRGB( 0, 0, width, height, inPixels, 0, width );
int index = 0;
int index2 = 0;
int r=0, g=0, b=0;
for ( int y = 0; y < height; y++ ) {
for ( int x = 0; x < width; x++ ) {
int ta = 255, tr = 0, tg = 0, tb = 0;
for(int fr = 0; fr < filterRow; fr++) {
int rowoffset = y + fr;
if(rowoffset < 0 || rowoffset >=height) {
rowoffset = y;
}
for(int fc = 0; fc < filterCol; fc++) {
int coloffset = fc + x;
if(coloffset < 0 || coloffset >= width) {
coloffset = x;
}
index2 = rowoffset * width + coloffset;
int rgb1 = inPixels[index2];
int r1 = (rgb1 >> 16) & 0xff;
int g1 = (rgb1 >> 8) & 0xff;
int b1 = rgb1 & 0xff;
if(isOUT) {
tr += r1 * outfilter[fr][fc];
tg += g1 * outfilter[fr][fc];
tb += b1 * outfilter[fr][fc];
} else {
tr += r1 * infilter[fr][fc];
tg += g1 * infilter[fr][fc];
tb += b1 * infilter[fr][fc];
}
}
}
tr += COLORCONSTANTS;
tg += COLORCONSTANTS;
tb += COLORCONSTANTS;
r = PixelUtils.clamp(tr);
g = PixelUtils.clamp(tg);
b = PixelUtils.clamp(tb);
outPixels[index] = (ta << 24) | (r << 16) | (g << 8) | b;
index++;
}
}
dest.setRGB( 0, 0, width, height, outPixels, 0, width );
return dest;
}
完成简单边缘检测的代码如下:
[java] view plaincopyprivate void filter(int[] inPixels, int[] outPixels, int height, int width, double[][] filterKernel) {
int index = 0;
int index2 = 0;
int r=0, g=0, b=0;
int semiColumn = filterKernel.length/2;
int semiRow = filterKernel[0].length/2;
for ( int y = 0; y < height; y++ ) {
for ( int x = 0; x < width; x++ ) {
int ta = 255, tr = 0, tg = 0, tb = 0;
for(int fr = -semiRow; fr <= semiRow; fr++) {
int rowoffset = y + fr;
if(rowoffset < 0 || rowoffset >=height) {
rowoffset = y;
}
for(int fc = -semiColumn; fc <= semiColumn; fc++) {
int coloffset = fc + x;
if(coloffset < 0 || coloffset >= width) {
coloffset = x;
}
index2 = rowoffset * width + coloffset;
int rgb1 = inPixels[index2];
int r1 = (rgb1 >> 16) & 0xff;
int g1 = (rgb1 >> 8) & 0xff;
int b1 = rgb1 & 0xff;
tr += ((double)r1 * filterKernel[fr + semiRow][fc + semiColumn]);
tg += ((double)g1 * filterKernel[fr + semiRow][fc + semiColumn]);
tb += ((double)b1 * filterKernel[fr + semiRow][fc + semiColumn]);
}
}
if(enhanceBrightness) {
tr += COLORCONSTANTS;
tg += COLORCONSTANTS;
tb += COLORCONSTANTS;
}
r = PixelUtils.clamp(tr);
g = PixelUtils.clamp(tg);
b = PixelUtils.clamp(tb);
outPixels[index] = (ta << 24) | (r << 16) | (g << 8) | b;
index++;
}
}
}
轧花算子(embossfilter)
对一幅数字图像一阶微分结果即可得到轧花效果,根据不同的算子,轧花又
可以分为凹效果与凸效果两种。两个个最简单的轧花算子为:
轧花算子又称为双极性算子,1对图像的贡献意味着平滑,-1对图像的贡献
意味着突出细节,于是最终就得出了双极性的轧花效果。
处理过程:
a. 读取图像像素
b. 使用轧花算子完成对像素数组的卷积操作
c. 整体亮度提升效果– 高斯亮度/基于阈值/直接常量提升
轧花滤镜效果:左边为原图, 右边为轧花处理以后效果
二:边缘提取
Edge detection是图像处理中非常重要而且也是十分常用的图像处理手段之一,边缘提取是
图像二值化的基本步骤之一。边缘提取从本质上来说是高通滤波,从数字信号的角度看,就
是要保留高频信号,去掉低频信号,因此边缘提取有很多频率域算子,将图像完成FFT之后
在频率域完成高通滤波再转到空间域。显然计算量比较大,空间域最经典的边缘提取算法之
一Candy Edge Detection有着非常好的效果。
这里只是抛砖引玉,完成一个最简单基于卷积的空间域边缘提取算子,算子为:
完成卷积以后的效果如下:
对于灰度图完成边缘提取以后效果如下:
基于卷积还可以完成图像的锐化(Sharp Filter),让图像上的差异更加明显。
一个简单的Sharp Filter可以为
得到的效果如下:
完成轧花卷积的代码如下:
[java] view plaincopy@Override
public BufferedImage filter(BufferedImage src, BufferedImage dest) {
int width = src.getWidth();
int height = src.getHeight();
if ( dest == null )
dest = createCompatibleDestImage( src, null );
int[] inPixels = new int[width*height];
int[] outPixels = new int[width*height];
src.getRGB( 0, 0, width, height, inPixels, 0, width );
int index = 0;
int index2 = 0;
int r=0, g=0, b=0;
for ( int y = 0; y < height; y++ ) {
for ( int x = 0; x < width; x++ ) {
int ta = 255, tr = 0, tg = 0, tb = 0;
for(int fr = 0; fr < filterRow; fr++) {
int rowoffset = y + fr;
if(rowoffset < 0 || rowoffset >=height) {
rowoffset = y;
}
for(int fc = 0; fc < filterCol; fc++) {
int coloffset = fc + x;
if(coloffset < 0 || coloffset >= width) {
coloffset = x;
}
index2 = rowoffset * width + coloffset;
int rgb1 = inPixels[index2];
int r1 = (rgb1 >> 16) & 0xff;
int g1 = (rgb1 >> 8) & 0xff;
int b1 = rgb1 & 0xff;
if(isOUT) {
tr += r1 * outfilter[fr][fc];
tg += g1 * outfilter[fr][fc];
tb += b1 * outfilter[fr][fc];
} else {
tr += r1 * infilter[fr][fc];
tg += g1 * infilter[fr][fc];
tb += b1 * infilter[fr][fc];
}
}
}
tr += COLORCONSTANTS;
tg += COLORCONSTANTS;
tb += COLORCONSTANTS;
r = PixelUtils.clamp(tr);
g = PixelUtils.clamp(tg);
b = PixelUtils.clamp(tb);
outPixels[index] = (ta << 24) | (r << 16) | (g << 8) | b;
index++;
}
}
dest.setRGB( 0, 0, width, height, outPixels, 0, width );
return dest;
}
完成简单边缘检测的代码如下:
[java] view plaincopyprivate void filter(int[] inPixels, int[] outPixels, int height, int width, double[][] filterKernel) {
int index = 0;
int index2 = 0;
int r=0, g=0, b=0;
int semiColumn = filterKernel.length/2;
int semiRow = filterKernel[0].length/2;
for ( int y = 0; y < height; y++ ) {
for ( int x = 0; x < width; x++ ) {
int ta = 255, tr = 0, tg = 0, tb = 0;
for(int fr = -semiRow; fr <= semiRow; fr++) {
int rowoffset = y + fr;
if(rowoffset < 0 || rowoffset >=height) {
rowoffset = y;
}
for(int fc = -semiColumn; fc <= semiColumn; fc++) {
int coloffset = fc + x;
if(coloffset < 0 || coloffset >= width) {
coloffset = x;
}
index2 = rowoffset * width + coloffset;
int rgb1 = inPixels[index2];
int r1 = (rgb1 >> 16) & 0xff;
int g1 = (rgb1 >> 8) & 0xff;
int b1 = rgb1 & 0xff;
tr += ((double)r1 * filterKernel[fr + semiRow][fc + semiColumn]);
tg += ((double)g1 * filterKernel[fr + semiRow][fc + semiColumn]);
tb += ((double)b1 * filterKernel[fr + semiRow][fc + semiColumn]);
}
}
if(enhanceBrightness) {
tr += COLORCONSTANTS;
tg += COLORCONSTANTS;
tb += COLORCONSTANTS;
}
r = PixelUtils.clamp(tr);
g = PixelUtils.clamp(tg);
b = PixelUtils.clamp(tb);
outPixels[index] = (ta << 24) | (r << 16) | (g << 8) | b;
index++;
}
}
}

相关文章推荐
- Sum Root to Leaf Numbers
- KDB+性能分析:内存篇
- java回调
- 图像处理--------应用卷积– 轧花与边缘检测
- Symantec SEP控制台密码忘了的恢复方法
- J2EE
- Shortcut key for CodeBlocks
- 图像处理--------应用卷积– 轧花与边缘检测 分类: 视频图像处理 2015-07-24 09:50 24人阅读 评论(0) 收藏
- Leetcode 3 Longest Substring Without Repeating Characters
- 10种滤波算法ADC软件滤波方法及程序
- tomcat访问
- ios Objective-C Runtime运行时类与对象的编译处理(写的很好,值得阅读)
- opencv中常用的图像匹配
- OpenGL状态查询
- Q 语言初学者系列:(3)Lists 初级
- Q 语言初学者系列:(2)基本数据类型
- hdu 5288 OO’s Sequence
- 3.构造函数
- 在QListWidgetItem中添加控件
- DIY服务器相关资料