solr安装mmseg4j 分词器
2015-07-15 15:16
295 查看
1.下载资料
https://github.com/chenlb/mmseg4j-solr
注意版本:
mmseg4j-solr-2.0.0.jar 要求 lucene/solr >= 4.3.0。在 lucene/solr [4.3.0, 4.7.1] 测试过兼容可用。
mmseg4j-solr-2.1.0.jar 要求 lucene/solr 4.8.x
mmseg4j-solr-2.2.0.jar 要求 lucene/solr [4.9, 4.10.x]
mmseg4j-solr-2.3.0.jar 要求 lucene/solr [5.0, ]
2.拷贝jar
将mmseg4j-solr-2.2.0.jar、mmseg4j-core-1.10.0.jar拷贝到%TOMCAT_HOME%\webapps\solr\WEB-INF\lib目录下
3.准备自定义词库
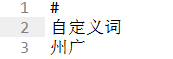
1.6版支持多个词库文件,定义的目录下读到"words"前缀且".dic"为后缀的文件,如:
F:\dic\words-mmseg4j.dic。添加自定义词条,一条一行(注意,必须UTF-8编码格式)。如下图所示:
4.配置schema.xml
<pre name="code" class="html"> <fieldtype name="text_mmseg4j_complex" class="solr.TextField" positionIncrementGap="100">
<analyzer>
<tokenizer class="com.chenlb.mmseg4j.solr.MMSegTokenizerFactory" mode="complex" dicPath="F:\dic"/>
</analyzer>
</fieldtype>
<fieldtype name="text_mmseg4j_MaxWord" class="solr.TextField" positionIncrementGap="100">
<analyzer>
<tokenizer class="com.chenlb.mmseg4j.solr.MMSegTokenizerFactory" mode="max-word" />
</analyzer>
</fieldtype>
<fieldtype name="text_mmseg4j_Simple" class="solr.TextField" positionIncrementGap="100">
<analyzer>
<tokenizer class="com.chenlb.mmseg4j.solr.MMSegTokenizerFactory" mode="simple" <span style="color:#ff6666;"><strong>dicPath="F:\dic" </strong></span>/>
</analyzer>
</fieldtype>
其中,dicPath为自定义词库路径,绝对路径测试通过。相对路径,说是相对于solr_home的,没有测试通过,有通过的请指点!
5.重启tomcat测试即可,如果是solrcloud,不需要重启,重新创建索引即可。如下图:
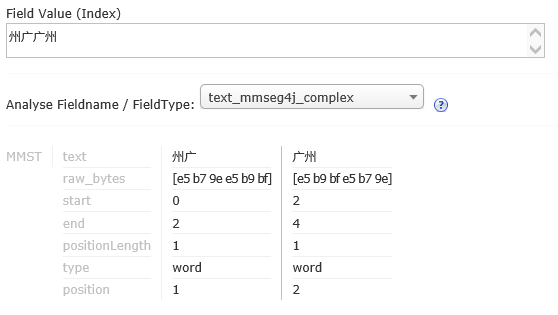
其中,州广为自定义词
https://github.com/chenlb/mmseg4j-solr
注意版本:
mmseg4j-solr-2.0.0.jar 要求 lucene/solr >= 4.3.0。在 lucene/solr [4.3.0, 4.7.1] 测试过兼容可用。
mmseg4j-solr-2.1.0.jar 要求 lucene/solr 4.8.x
mmseg4j-solr-2.2.0.jar 要求 lucene/solr [4.9, 4.10.x]
mmseg4j-solr-2.3.0.jar 要求 lucene/solr [5.0, ]
2.拷贝jar
将mmseg4j-solr-2.2.0.jar、mmseg4j-core-1.10.0.jar拷贝到%TOMCAT_HOME%\webapps\solr\WEB-INF\lib目录下
3.准备自定义词库
1.6版支持多个词库文件,定义的目录下读到"words"前缀且".dic"为后缀的文件,如:
F:\dic\words-mmseg4j.dic。添加自定义词条,一条一行(注意,必须UTF-8编码格式)。如下图所示:
4.配置schema.xml
<pre name="code" class="html"> <fieldtype name="text_mmseg4j_complex" class="solr.TextField" positionIncrementGap="100">
<analyzer>
<tokenizer class="com.chenlb.mmseg4j.solr.MMSegTokenizerFactory" mode="complex" dicPath="F:\dic"/>
</analyzer>
</fieldtype>
<fieldtype name="text_mmseg4j_MaxWord" class="solr.TextField" positionIncrementGap="100">
<analyzer>
<tokenizer class="com.chenlb.mmseg4j.solr.MMSegTokenizerFactory" mode="max-word" />
</analyzer>
</fieldtype>
<fieldtype name="text_mmseg4j_Simple" class="solr.TextField" positionIncrementGap="100">
<analyzer>
<tokenizer class="com.chenlb.mmseg4j.solr.MMSegTokenizerFactory" mode="simple" <span style="color:#ff6666;"><strong>dicPath="F:\dic" </strong></span>/>
</analyzer>
</fieldtype>
其中,dicPath为自定义词库路径,绝对路径测试通过。相对路径,说是相对于solr_home的,没有测试通过,有通过的请指点!
5.重启tomcat测试即可,如果是solrcloud,不需要重启,重新创建索引即可。如下图:
其中,州广为自定义词

相关文章推荐
- 在Eclipse中运行Solr 基础知识
- Solr基础--设置solr/home的三种方式
- Docker使用supervisor构建solr
- solr4.0安装和简单导入mysql数据
- Solr 4.0 基础教程
- 自译Solr in action中文版
- Solr In Action 中文版 第一章(一)
- Solr In Action 中文版 第一章 (二)
- Solr In Action 中文版 第一章(三)
- 基于solr实现hbase的二级索引
- 基于Nutch&Solr定向采集解析和索引搜索的整合技术指南文档
- 基于Nutch&Solr定向采集解析和索引搜索的整合技术指南文档
- Tomcat/Solr4.3.1 配置过程
- Solr Facet技术的应用与研究
- Apache Solr查询语法
- Solr客户端删除数据的方式
- Centos 安装 Solr
- solr空间查询
- lucene solr在tomcat中的配置
- nutch1.4 部署应用