pxe无人值守
2015-07-14 20:11
387 查看
一,所需服务:
dhcpd --- 为安装主机分配IP地址
tftp ---
syslinux
nfs
xinetd
二,安装服务软件:
首先,关闭selinux,iptables
vi /etc/sysconfig/selinux
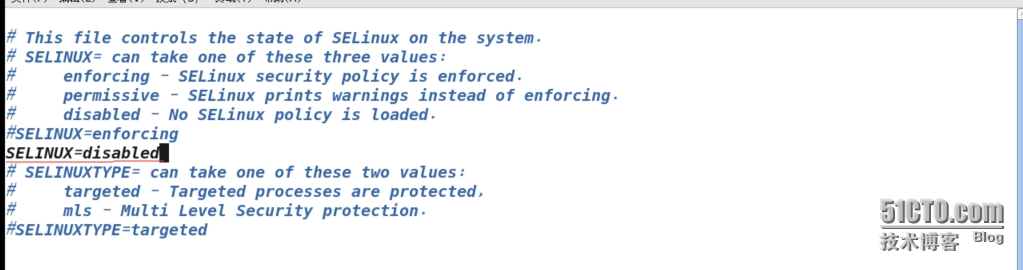
然后重启,否则不生效,重启命令,我比较喜欢 init 6
关闭防火墙:
service iptables stop 或者 直接清掉防火墙:iptables -L
三,安装软件:
yum -y install dhcp tftp tftp* syslinux nfs* nfs-utils xinetd

四,修改配置文件:
tftp: vi /etc/xinet.d/tftp

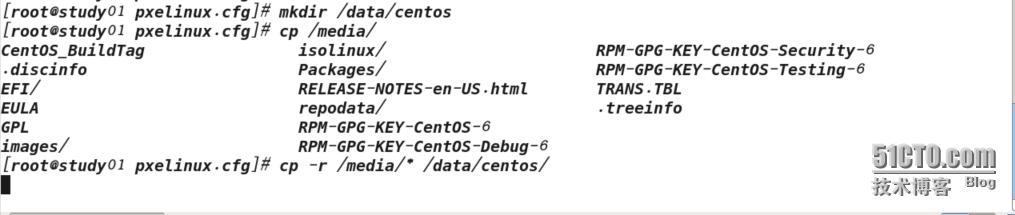
挂载光盘: mount /dev/cdrom /media
创建硬链接: ln -sv /var/lib/tftpboot /tftpboot
将文件pxelinux.0 , vmlinuz , initrd.img , vesamenu.c32 , splash.jpg复制到 /tftpboot 下

创建 pxelinux.cfg 文件夹,将系统的isolinux.cfg文件拷贝到此文件夹下,并改名为 default

添加权限: chmod 777 default
修改default文件: vi default
default centos6.5
timeout 600
display boot.msg
menu background splash.jpg
menu title Welcome to CentOS 6.5!:
menu color border 0 #ffffffff #00000000
menu color sel 7 #ffffffff #ff000000
menu color title 0 #ffffffff #00000000
menu color tabmsg 0 #ffffffff #00000000
menu color unsel 0 #ffffffff #00000000
menu color hotsel 0 #ff000000 #ffffffff
menu color hotkey 7 #ffffffff #ff000000
menu color scrollbar 0 #ffffffff #00000000
label centos6.5
kernel vmlinuz
append ks=nfs:192.168.11.185:/data/centos/ks.cfg ksdevice=eth0 initrd=initrd.img
创建centos目录,用来放置光盘文件
通过nfs服务器端设置共享和权限:echo "/data/centos *(rw,sync)" >> /etc/exports
#注:* 左边有空格,右边无空格
配置dhcpd 服务:
vi /etc/dhcp/dhcpd.conf
ddns-update-style interim;
ignore client-updates;
allow booting;
allow bootp;
subnet 192.168.11.0 netmask 255.255.255.0 {
option routers 192.168.11.254;
option subnet-mask 255.255.255.0;
option time-offset -18000;
range dynamic-bootp 192.168.11.100 192.168.11.120;
next-server 192.168.11.185; #本机IP
filename "pxelinux.0";
}
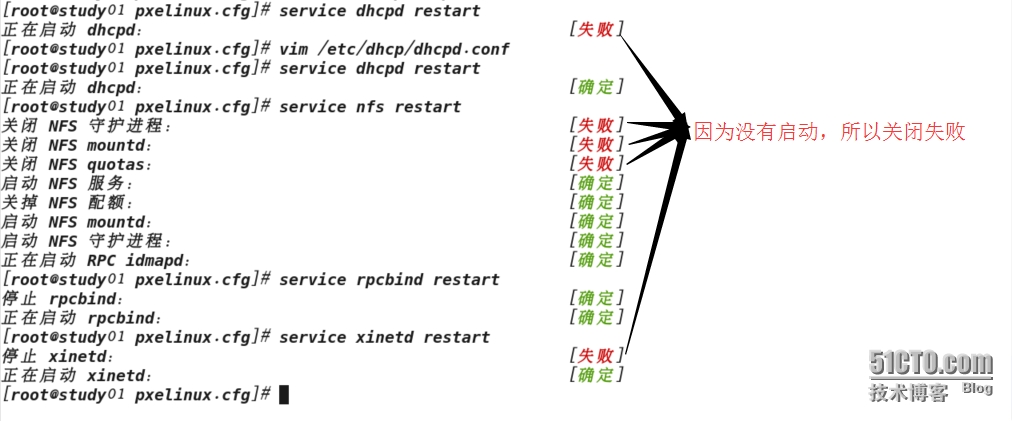
为了确保各服务启动正常,将所有服务全部重启一遍:
将ks文件放入光盘文件目录:
cp /root/anaconda-ks.cfg /data/centos/ks.cfg
对ks文件进行修改:
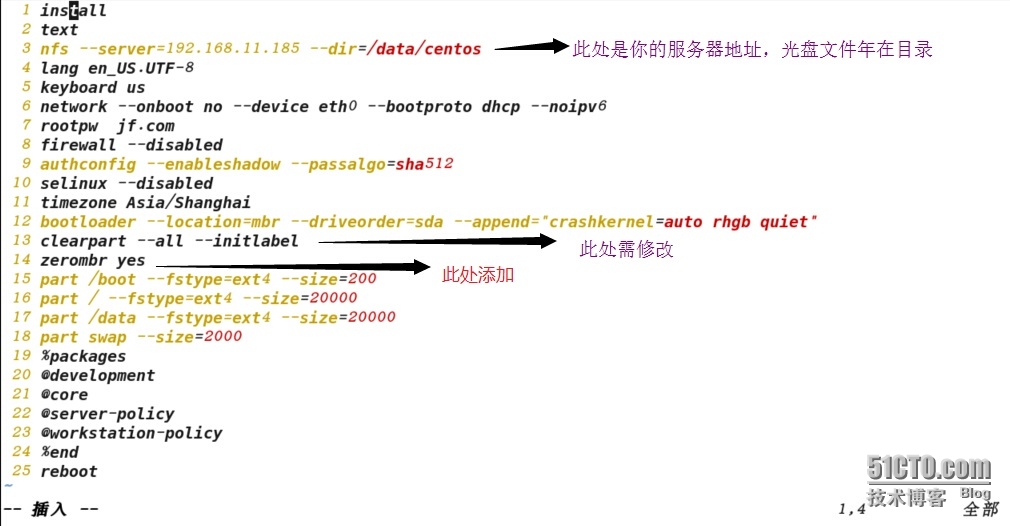
最后,为你的ks文件添加权限:chmod 777 /data/centos/ks.cfg
修改开机启动项第一项为网络启动

然后F10保存退出,重启


dhcpd --- 为安装主机分配IP地址
tftp ---
syslinux
nfs
xinetd
二,安装服务软件:
首先,关闭selinux,iptables
vi /etc/sysconfig/selinux
然后重启,否则不生效,重启命令,我比较喜欢 init 6
关闭防火墙:
service iptables stop 或者 直接清掉防火墙:iptables -L
三,安装软件:
yum -y install dhcp tftp tftp* syslinux nfs* nfs-utils xinetd
四,修改配置文件:
tftp: vi /etc/xinet.d/tftp
挂载光盘: mount /dev/cdrom /media
创建硬链接: ln -sv /var/lib/tftpboot /tftpboot
将文件pxelinux.0 , vmlinuz , initrd.img , vesamenu.c32 , splash.jpg复制到 /tftpboot 下
创建 pxelinux.cfg 文件夹,将系统的isolinux.cfg文件拷贝到此文件夹下,并改名为 default
添加权限: chmod 777 default
修改default文件: vi default
default centos6.5
timeout 600
display boot.msg
menu background splash.jpg
menu title Welcome to CentOS 6.5!:
menu color border 0 #ffffffff #00000000
menu color sel 7 #ffffffff #ff000000
menu color title 0 #ffffffff #00000000
menu color tabmsg 0 #ffffffff #00000000
menu color unsel 0 #ffffffff #00000000
menu color hotsel 0 #ff000000 #ffffffff
menu color hotkey 7 #ffffffff #ff000000
menu color scrollbar 0 #ffffffff #00000000
label centos6.5
kernel vmlinuz
append ks=nfs:192.168.11.185:/data/centos/ks.cfg ksdevice=eth0 initrd=initrd.img
创建centos目录,用来放置光盘文件
通过nfs服务器端设置共享和权限:echo "/data/centos *(rw,sync)" >> /etc/exports
#注:* 左边有空格,右边无空格
配置dhcpd 服务:
vi /etc/dhcp/dhcpd.conf
ddns-update-style interim;
ignore client-updates;
allow booting;
allow bootp;
subnet 192.168.11.0 netmask 255.255.255.0 {
option routers 192.168.11.254;
option subnet-mask 255.255.255.0;
option time-offset -18000;
range dynamic-bootp 192.168.11.100 192.168.11.120;
next-server 192.168.11.185; #本机IP
filename "pxelinux.0";
}
为了确保各服务启动正常,将所有服务全部重启一遍:
将ks文件放入光盘文件目录:
cp /root/anaconda-ks.cfg /data/centos/ks.cfg
对ks文件进行修改:
最后,为你的ks文件添加权限:chmod 777 /data/centos/ks.cfg
修改开机启动项第一项为网络启动
然后F10保存退出,重启

相关文章推荐
- 利用kickstart实现pxe的自动化安装
- 在项目中日志不规范,有可能会造成巨大麻烦
- BASH编程基础之变量、条件判断
- 自定义圆形的ProgressBar
- NSString 字符串
- Android APP内存优化之图片优化
- 读<<卓有成效的程序员>>之感
- oracle数据结构sql语句
- HDU-1862-EXCEL排序
- 迷茫和恐惧——我是谁
- 驱动,包括很多软件,并不是最新的就是最好的。
- Ubuntu 安装SVN服务器端
- Erlang--TCP学习(四)并行web server篇
- 实例变量和成员变量的区别以及类方法的用法
- 如何给数组添加字符串
- LeetCode题解——Letter Combinations of a Phone Number
- 杂谈之单元测试的必要性
- Android测试环境变量配置表
- Flyweight模式
- 关于json