Improving the Beginner’s PID
2015-06-28 18:38
405 查看
转自:http://brettbeauregard.com/blog/2011/04/improving-the-beginners-pid-introduction/
http://playground.arduino.cc/Code/PIDLibrary
Arduino PID Library I’ve decided to release this series of posts. The last library, while solid, didn’t really come with any code explanation. This time around the plan is to explain in great detail why the code is the way it is. I’m hoping this will be
of use to two groups of people:
People directly interested in what’s going on inside the Arduino PID library will get a detailed explanation.
Anyone writing their own PID algorithm can take a look at how I did things and borrow whatever they like.
It’s going to be a tough slog, but I think I found a not-too-painful way to explain my code. I’m going to start with what I call “The Beginner’s PID.” I’ll then improve it step-by-step until we’re left with an efficient, robust pid algorithm.

This leads pretty much everyone to write the following PID controller:
Compute() is called either regularly or irregularly, and it works pretty well. This series isn’t about “works pretty well” though. If we’re going to turn this code into something on par with industrial PID controllers, we’ll have to address a few things:
Sample Time - The PID algorithm functions best if it is evaluated
at a regular interval. If the algorithm is aware of this interval, we can also simplify some of the internal math.
Derivative Kick - Not the biggest deal, but easy to get
rid of, so we’re going to do just that.
On-The-Fly Tuning Changes - A good PID algorithm is one where
tuning parameters can be changed without jolting the internal workings.
Reset Windup Mitigation -We’ll go into what Reset Windup is,
and implement a solution with side benefits
On/Off (Auto/Manual) - In most applications, there is a desire to
sometimes turn off the PID controller and adjust the output by hand, without the controller interfering
Initialization - When the controller first turns on, we want
a “bumpless transfer.” That is, we don’t want the output to suddenly jerk to some new value
Controller Direction - This last one isn’t a change in the name of robustness
per se. it’s designed to ensure that the user enters tuning parameters with the correct sign.
Once we’ve addressed all these issues, we’ll have a solid PID algorithm. We’ll also, not coincidentally, have the code that’s being used in the lastest version of the Arduino PID Library. So whether you’re trying to write your own algorithm, or trying to
understand what’s going on inside the PID library, I hope this helps you out. Let’s get started.
You don’t get consistent behavior from the PID, since sometimes it’s called frequently and sometimes it’s not.
You need to do extra math computing the derivative and integral, since they’re both dependent on the change in time.
Once we know that the PID is being evaluated at a constant interval, the derivative and integral calculations can also be simplified. Bonus!
On lines 10&11, the algorithm now decides for itself if it’s time to calculate. Also, because we now KNOW that it’s going to be the same time between samples, we don’t need to constantly multiply by time change. We can merely adjust the Ki and Kd appropriately
(lines 31 & 32) and result is mathematically equivalent, but more efficient.
one little wrinkle with doing it this way though though. if the user decides to change the sample time during operation, the Ki and Kd will need to be re-tweaked to reflect this new change. that’s what lines 39-42 are all about.
Also Note that I convert the sample time to Seconds on line 29. Strictly speaking this isn’t necessary, but allows the user to enter Ki and Kd in units of 1/sec and s, rather than 1/mS and mS.
Regardless of how frequently Compute() is called, the PID algorithm will be evaluated at a regular interval [Line 11]
Because of the time subtraction [Line 10] there will be no issues when millis() wraps back to 0. That only happens every 55 days, but we’re going for bulletproof remember?
We don’t need to multiply and divide by the timechange anymore. Since it’s a constant we’re able to move it from the compute code [lines 15+16] and lump it in with the tuning constants [lines 31+32]. Mathematically it works out the same, but it saves a
multiplication and a division every time the PID is evaluated
you plan on doing this with your PID implentation, go for it! Keep reading this series though. You’ll hopefully still get some benefit from the modifications that follow.
There are three reasons I didn’t use interrupts
As far as this series is concerned, not everyone will be able to use interrupts.
Things would get tricky if you wanted it implement many PID controllers at the same time.
If I’m honest, it didn’t occur to me.
Jimmie Rodgers suggested it while proof-reading the series for me. I may decide to use interrupts in future versions of the PID library.

The image above illustrates the problem. Since error=Setpoint-Input, any change in Setpoint causes an instantaneous change in error. The derivative of this change is infinity (in practice, since dt isn’t 0 it just winds up being a really big number.) This
number gets fed into the pid equation, which results in an undesirable spike in the output. Luckily there is an easy way to get rid of this.

It turns out that the derivative of the Error is equal to negative derivative of Input, EXCEPT when the Setpoint is changing. This winds up being a perfect solution. Instead of adding (Kd * derivative of Error), we subtract (Kd * derivative of Input). This
is known as using “Derivative on Measurement”
The modifications here are pretty easy. We’re replacing +dError with -dInput. Instead of remembering the lastError, we now remember the lastInput

Here’s what those modifications get us. Notice that the input still looks about the same. So we get the same performance, but we don’t send out a huge Output spike every time the Setpoint changes.
This may or may not be a big deal. It all depends on how sensitive your application is to output spikes. The way I see it though, it doesn’t take any more work to do it without kicking so why not do things right?

The Beginner’s PID acts a little crazy if you try to change the tunings while it’s running. Let’s see why. Here is the state of the beginner’s PID before and after the parameter change above:

So we can immediately blame this bump on the Integral Term (or “I Term”). It’s the only thing that changes drastically when the parameters change. Why did this happen? It has to do with the beginner’s interpretation of the Integral:

This interpretation works fine until the Ki is changed. Then, all of a sudden, you multiply this new Ki times the entire error sum that you have accumulated. That’s not what we wanted! We only wanted to affect things moving forward!
something more elegant. (There’s no way I’m the first to have thought of this, but I did think of it on my own. That counts damnit!)
The solution requires a little basic algebra (or is it calculus?)

Instead of having the Ki live outside the integral, we bring it inside. It looks like we haven’t done anything, but we’ll see that in practice this makes a big difference.
Now, we take the error and multiply it by whatever the Ki is at that time. We then store the sum of THAT. When the Ki changes, there’s no bump because all the old Ki’s are already “in the bank” so to speak. We get a smooth transfer with no additional math
operations. It may make me a geek but I think that’s pretty sexy.
So we replaced the errSum variable with a composite ITerm variable [Line 4]. It sums Ki*error, rather than just error [Line 15]. Also, because Ki is now buried in ITerm, it’s removed from the main PID calculation [Line 19].


So how does this fix things. Before when ki was changed, it rescaled the entire sum of the error; every error value we had seen. With this code, the previous error remains untouched, and the new ki only affects things moving forward, which is exactly what
we want.

Reset windup is a trap that probably claims more beginners than any other. It occurs when the PID thinks it can do something that it can’t. For example, the PWM output on an Arduino accepts values from 0-255. By default the PID doesn’t know this. If it thinks
that 300-400-500 will work, it’s going to try those values expecting to get what it needs. Since in reality the value is clamped at 255 it’s just going to keep trying higher and higher numbers without getting anywhere.
The problem reveals itself in the form of weird lags. Above we can see that the output gets “wound up” WAY above the external limit. When the setpoint is dropped the output has to wind down before getting below that 255-line.

There are several ways that windup can be mitigated, but the one that I chose was as follows: tell the PID what the output limits are. In the code below you’ll see there’s now a SetOuputLimits function. Once either limit is reached, the pid stops summing (integrating.)
It knows there’s nothing to be done; Since the output doesn’t wind-up, we get an immediate response when the setpoint drops into a range where we can do something.
Term.
Even though the Integral Term has been safely clamped, P and D are still adding their two cents, yielding a result higher than the output limit. To my mind this is unacceptable. If the user calls a function called “SetOutputLimits” they’ve got to assume
that that means “the output will stay within these values.” So for Step 2, we make that a valid assumption. In addition to clamping the I-Term, we clamp the Output value so that it stays where we’d expect it.
(Note: You might ask why we need to clamp both. If we’re going to do the output anyway, why clamp the Integral separately? If all we did was clamp the output, the Integral term would go back to growing and growing. Though the output would look nice during
the step up, we’d see that telltale lag on the step down.)
A new function was added to allow the user to specify the output limits [lines 52-63]. And these limits are used to clamp both the I-Term [17-18] and the Output [23-24]

As we can see, windup is eliminated. in addition, the output stays where we want it to. this means there’s no need for external clamping of the output. if you want it to range from 23 to 167, you can set those as the Output Limits.

Let’s say at some point in your program you want to force the output to a certain value (0 for example) you could certainly do this in the calling routine:
void loop()
{
Compute();
Output=0;
}
This way, no matter what the PID says, you just overwrite its value. This is a terrible idea in practice however. The PID will become very confused: “I keep moving the output, and nothing’s happening! What gives?! Let me move it some more.” As a result,
when you stop over-writing the output and switch back to the PID, you will likely get a huge and immediate change in the output value.
A fairly simple solution. If you’re not in automatic mode, immediately leave the Compute function without adjusting the Output or any internal variables.

It’s true that you could achieve a similar effect by just not calling Compute from the calling routine, but this solution keeps the workings of the PID contained, which is kind of what we need. By keeping things internal we can keep track of which mode were
in, and more importantly it let’s us know when we change modes. That leads us to the next issue…

Yikes! The PID jumps back to the last Output value it sent, then starts adjusting from there. This results in an Input bump that we’d rather not have.
from jumping.
We modified SetMode(…) to detect the transition from manual to automatic, and we added our initialization function. It sets ITerm=Output to take care of the integral term, and lastInput = Input to keep the derivative from spiking. The proportional term doesn’t
rely on any information from the past, so it doesn’t need any initialization.

We see from the above graph that proper initialization results in a bumpless transfer from manual to automatic: exactly what we were after.
out to an input of 75.2. The user makes the Setpoint 75.2 and turns on the pid. What should happen?
I contend that after switching to automatic the output value should stay at 50. since the P and D terms will be zero, the only way this will happen is if ITerm is initialized to the value of Output.
If you are in a situation where you need the output to initialize to zero, there is no need alter the code above. Just set Output=0 in your calling routine before turning the PID from Manual to Automatic.
the opposite is true. In a refrigerator for example, an increase in cooling causes the temperature to go down. To make the beginner PID work with a reverse process, the signs of kp, ki, and kd all must be negative.
This isn’t a problem per se, but the user must choose the correct sign, and make sure that all the parameters have the same sign.
and hopefully makes things more intuitive.
of you writing your own PID, I hope you were able to glean a few ideas that save you some cycles down the road.
Two Final Notes:
If something in this series looks wrong please let me know. I may have missed something, or might just need to be clearer in my explanation. Either way I’d like to know.
This is just a basic PID. There are many other issues that I intentionally left out in the name of simplicity. Off the top of my head: feed forward, reset tiebacks, integer math, different pid forms, using velocity instead of position. If there’s interest
in having me explore these topics please let me know.
http://playground.arduino.cc/Code/PIDLibrary
Introduction
In conjunction with the release of the newArduino PID Library I’ve decided to release this series of posts. The last library, while solid, didn’t really come with any code explanation. This time around the plan is to explain in great detail why the code is the way it is. I’m hoping this will be
of use to two groups of people:
People directly interested in what’s going on inside the Arduino PID library will get a detailed explanation.
Anyone writing their own PID algorithm can take a look at how I did things and borrow whatever they like.
It’s going to be a tough slog, but I think I found a not-too-painful way to explain my code. I’m going to start with what I call “The Beginner’s PID.” I’ll then improve it step-by-step until we’re left with an efficient, robust pid algorithm.
The Beginner’s PID
Here’s the PID equation as everyone first learns it: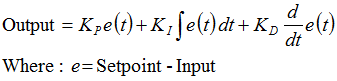
This leads pretty much everyone to write the following PID controller:
/*working variables*/
unsigned long lastTime;
double Input, Output, Setpoint;
double errSum, lastErr;
double kp, ki, kd;
void Compute()
{
/*How long since we last calculated*/
unsigned long now = millis();
double timeChange = (double)(now - lastTime);

/*Compute all the working error variables*/
double error = Setpoint - Input;
errSum += (error * timeChange);
double dErr = (error - lastErr) / timeChange;

/*Compute PID Output*/
Output = kp * error + ki * errSum + kd * dErr;

/*Remember some variables for next time*/
lastErr = error;
lastTime = now;
}

void SetTunings(double Kp, double Ki, double Kd)
{
kp = Kp;
ki = Ki;
kd = Kd;
}
Compute() is called either regularly or irregularly, and it works pretty well. This series isn’t about “works pretty well” though. If we’re going to turn this code into something on par with industrial PID controllers, we’ll have to address a few things:
Sample Time - The PID algorithm functions best if it is evaluated
at a regular interval. If the algorithm is aware of this interval, we can also simplify some of the internal math.
Derivative Kick - Not the biggest deal, but easy to get
rid of, so we’re going to do just that.
On-The-Fly Tuning Changes - A good PID algorithm is one where
tuning parameters can be changed without jolting the internal workings.
Reset Windup Mitigation -We’ll go into what Reset Windup is,
and implement a solution with side benefits
On/Off (Auto/Manual) - In most applications, there is a desire to
sometimes turn off the PID controller and adjust the output by hand, without the controller interfering
Initialization - When the controller first turns on, we want
a “bumpless transfer.” That is, we don’t want the output to suddenly jerk to some new value
Controller Direction - This last one isn’t a change in the name of robustness
per se. it’s designed to ensure that the user enters tuning parameters with the correct sign.
Once we’ve addressed all these issues, we’ll have a solid PID algorithm. We’ll also, not coincidentally, have the code that’s being used in the lastest version of the Arduino PID Library. So whether you’re trying to write your own algorithm, or trying to
understand what’s going on inside the PID library, I hope this helps you out. Let’s get started.
Sample Time
The Problem
The Beginner’s PID is designed to be called irregularly. This causes 2 issues:You don’t get consistent behavior from the PID, since sometimes it’s called frequently and sometimes it’s not.
You need to do extra math computing the derivative and integral, since they’re both dependent on the change in time.
The Solution
Ensure that the PID is called at a regular interval. The way I’ve decided to do this is to specify that the compute function get called every cycle. based on a pre-determined Sample Time, the PID decides if it should compute or return immediately.Once we know that the PID is being evaluated at a constant interval, the derivative and integral calculations can also be simplified. Bonus!
The Code
/*working variables*/
unsigned long lastTime;
double Input, Output, Setpoint;
double errSum, lastErr;
double kp, ki, kd;
int SampleTime = 1000; //1 sec
void Compute()
{
unsigned long now = millis();
int timeChange = (now - lastTime);
if(timeChange>=SampleTime)
{
/*Compute all the working error variables*/
double error = Setpoint - Input;
errSum += error;
double dErr = (error - lastErr);

/*Compute PID Output*/
Output = kp * error + ki * errSum + kd * dErr;

/*Remember some variables for next time*/
lastErr = error;
lastTime = now;
}
}

void SetTunings(double Kp, double Ki, double Kd)
{
double SampleTimeInSec = ((double)SampleTime)/1000;
kp = Kp;
ki = Ki * SampleTimeInSec;
kd = Kd / SampleTimeInSec;
}

void SetSampleTime(int NewSampleTime)
{
if (NewSampleTime > 0)
{
double ratio  = (double)NewSampleTime
/ (double)SampleTime;
ki *= ratio;
kd /= ratio;
SampleTime = (unsigned long)NewSampleTime;
}
}
On lines 10&11, the algorithm now decides for itself if it’s time to calculate. Also, because we now KNOW that it’s going to be the same time between samples, we don’t need to constantly multiply by time change. We can merely adjust the Ki and Kd appropriately
(lines 31 & 32) and result is mathematically equivalent, but more efficient.
one little wrinkle with doing it this way though though. if the user decides to change the sample time during operation, the Ki and Kd will need to be re-tweaked to reflect this new change. that’s what lines 39-42 are all about.
Also Note that I convert the sample time to Seconds on line 29. Strictly speaking this isn’t necessary, but allows the user to enter Ki and Kd in units of 1/sec and s, rather than 1/mS and mS.
The Results
the changes above do 3 things for usRegardless of how frequently Compute() is called, the PID algorithm will be evaluated at a regular interval [Line 11]
Because of the time subtraction [Line 10] there will be no issues when millis() wraps back to 0. That only happens every 55 days, but we’re going for bulletproof remember?
We don’t need to multiply and divide by the timechange anymore. Since it’s a constant we’re able to move it from the compute code [lines 15+16] and lump it in with the tuning constants [lines 31+32]. Mathematically it works out the same, but it saves a
multiplication and a division every time the PID is evaluated
Side note about interrupts
If this PID is going into a microcontroller, a very good argument can be made for using an interrupt. SetSampleTime sets the interrupt frequency, then Compute gets called when it’s time. There would be no need, in that case, for lines 9-12, 23, and 24. Ifyou plan on doing this with your PID implentation, go for it! Keep reading this series though. You’ll hopefully still get some benefit from the modifications that follow.
There are three reasons I didn’t use interrupts
As far as this series is concerned, not everyone will be able to use interrupts.
Things would get tricky if you wanted it implement many PID controllers at the same time.
If I’m honest, it didn’t occur to me.
Jimmie Rodgers suggested it while proof-reading the series for me. I may decide to use interrupts in future versions of the PID library.
Derivative Kick
The Problem
This modification is going to tweak the derivative term a bit. The goal is to eliminate a phenomenon known as “Derivative Kick”.The image above illustrates the problem. Since error=Setpoint-Input, any change in Setpoint causes an instantaneous change in error. The derivative of this change is infinity (in practice, since dt isn’t 0 it just winds up being a really big number.) This
number gets fed into the pid equation, which results in an undesirable spike in the output. Luckily there is an easy way to get rid of this.
The Solution
It turns out that the derivative of the Error is equal to negative derivative of Input, EXCEPT when the Setpoint is changing. This winds up being a perfect solution. Instead of adding (Kd * derivative of Error), we subtract (Kd * derivative of Input). This
is known as using “Derivative on Measurement”
The Code
/*working variables*/
unsigned long lastTime;
double Input, Output, Setpoint;
double errSum, lastInput;
double kp, ki, kd;
int SampleTime = 1000; //1 sec
void Compute()
{
unsigned long now = millis();
int timeChange = (now - lastTime);
if(timeChange>=SampleTime)
{
/*Compute all the working error variables*/
double error = Setpoint - Input;
errSum += error;
double dInput = (Input - lastInput);

/*Compute PID Output*/
Output = kp * error + ki * errSum - kd * dInput;

/*Remember some variables for next time*/
lastInput = Input;
lastTime = now;
}
}

void SetTunings(double Kp, double Ki, double Kd)
{
double SampleTimeInSec = ((double)SampleTime)/1000;
kp = Kp;
ki = Ki * SampleTimeInSec;
kd = Kd / SampleTimeInSec;
}

void SetSampleTime(int NewSampleTime)
{
if (NewSampleTime > 0)
{
double ratio  = (double)NewSampleTime
/ (double)SampleTime;
ki *= ratio;
kd /= ratio;
SampleTime = (unsigned long)NewSampleTime;
}
}
The modifications here are pretty easy. We’re replacing +dError with -dInput. Instead of remembering the lastError, we now remember the lastInput
The Result
Here’s what those modifications get us. Notice that the input still looks about the same. So we get the same performance, but we don’t send out a huge Output spike every time the Setpoint changes.
This may or may not be a big deal. It all depends on how sensitive your application is to output spikes. The way I see it though, it doesn’t take any more work to do it without kicking so why not do things right?
Tuning Changes
The Problem
The ability to change tuning parameters while the system is running is a must for any respectable PID algorithm.The Beginner’s PID acts a little crazy if you try to change the tunings while it’s running. Let’s see why. Here is the state of the beginner’s PID before and after the parameter change above:
So we can immediately blame this bump on the Integral Term (or “I Term”). It’s the only thing that changes drastically when the parameters change. Why did this happen? It has to do with the beginner’s interpretation of the Integral:
This interpretation works fine until the Ki is changed. Then, all of a sudden, you multiply this new Ki times the entire error sum that you have accumulated. That’s not what we wanted! We only wanted to affect things moving forward!
The Solution
There are a couple ways I know of to deal with this problem. The method I used in the last library was to rescale errSum. Ki doubled? Cut errSum in Half. That keeps the I Term from bumping, and it works. It’s kind of clunky though, and I’ve come up withsomething more elegant. (There’s no way I’m the first to have thought of this, but I did think of it on my own. That counts damnit!)
The solution requires a little basic algebra (or is it calculus?)
Instead of having the Ki live outside the integral, we bring it inside. It looks like we haven’t done anything, but we’ll see that in practice this makes a big difference.
Now, we take the error and multiply it by whatever the Ki is at that time. We then store the sum of THAT. When the Ki changes, there’s no bump because all the old Ki’s are already “in the bank” so to speak. We get a smooth transfer with no additional math
operations. It may make me a geek but I think that’s pretty sexy.
The Code
/*working variables*/
unsigned long lastTime;
double Input, Output, Setpoint;
double ITerm, lastInput;
double kp, ki, kd;
int SampleTime = 1000; //1 sec
void Compute()
{
unsigned long now = millis();
int timeChange = (now - lastTime);
if(timeChange>=SampleTime)
{
/*Compute all the working error variables*/
double error = Setpoint - Input;
ITerm += (ki * error);
double dInput = (Input - lastInput);

/*Compute PID Output*/
Output = kp * error + ITerm - kd * dInput;

/*Remember some variables for next time*/
lastInput = Input;
lastTime = now;
}
}

void SetTunings(double Kp, double Ki, double Kd)
{
double SampleTimeInSec = ((double)SampleTime)/1000;
kp = Kp;
ki = Ki * SampleTimeInSec;
kd = Kd / SampleTimeInSec;
}

void SetSampleTime(int NewSampleTime)
{
if (NewSampleTime > 0)
{
double ratio  = (double)NewSampleTime
/ (double)SampleTime;
ki *= ratio;
kd /= ratio;
SampleTime = (unsigned long)NewSampleTime;
}
}
So we replaced the errSum variable with a composite ITerm variable [Line 4]. It sums Ki*error, rather than just error [Line 15]. Also, because Ki is now buried in ITerm, it’s removed from the main PID calculation [Line 19].
The Result
So how does this fix things. Before when ki was changed, it rescaled the entire sum of the error; every error value we had seen. With this code, the previous error remains untouched, and the new ki only affects things moving forward, which is exactly what
we want.
Reset Windup
The Problem
Reset windup is a trap that probably claims more beginners than any other. It occurs when the PID thinks it can do something that it can’t. For example, the PWM output on an Arduino accepts values from 0-255. By default the PID doesn’t know this. If it thinks
that 300-400-500 will work, it’s going to try those values expecting to get what it needs. Since in reality the value is clamped at 255 it’s just going to keep trying higher and higher numbers without getting anywhere.
The problem reveals itself in the form of weird lags. Above we can see that the output gets “wound up” WAY above the external limit. When the setpoint is dropped the output has to wind down before getting below that 255-line.
The Solution – Step 1
There are several ways that windup can be mitigated, but the one that I chose was as follows: tell the PID what the output limits are. In the code below you’ll see there’s now a SetOuputLimits function. Once either limit is reached, the pid stops summing (integrating.)
It knows there’s nothing to be done; Since the output doesn’t wind-up, we get an immediate response when the setpoint drops into a range where we can do something.
The Solution – Step 2
Notice in the graph above though, that while we got rid that windup lag, we’re not all the way there. There’s still a difference between what the pid thinks it’s sending, and what’s being sent. Why? the Proportional Term and (to a lesser extent) the DerivativeTerm.
Even though the Integral Term has been safely clamped, P and D are still adding their two cents, yielding a result higher than the output limit. To my mind this is unacceptable. If the user calls a function called “SetOutputLimits” they’ve got to assume
that that means “the output will stay within these values.” So for Step 2, we make that a valid assumption. In addition to clamping the I-Term, we clamp the Output value so that it stays where we’d expect it.
(Note: You might ask why we need to clamp both. If we’re going to do the output anyway, why clamp the Integral separately? If all we did was clamp the output, the Integral term would go back to growing and growing. Though the output would look nice during
the step up, we’d see that telltale lag on the step down.)
The Code
/*working variables*/
unsigned long lastTime;
double Input, Output, Setpoint;
double ITerm, lastInput;
double kp, ki, kd;
int SampleTime = 1000; //1 sec
double outMin, outMax;
void Compute()
{
unsigned long now = millis();
int timeChange = (now - lastTime);
if(timeChange>=SampleTime)
{
/*Compute all the working error variables*/
double error = Setpoint - Input;
ITerm+= (ki * error);
if(ITerm> outMax) ITerm= outMax;
else if(ITerm< outMin) ITerm= outMin;
double dInput = (Input - lastInput);

/*Compute PID Output*/
Output = kp * error + ITerm- kd * dInput;
if(Output > outMax) Output = outMax;
else if(Output < outMin) Output = outMin;

/*Remember some variables for next time*/
lastInput = Input;
lastTime = now;
}
}

void SetTunings(double Kp, double Ki, double Kd)
{
double SampleTimeInSec = ((double)SampleTime)/1000;
kp = Kp;
ki = Ki * SampleTimeInSec;
kd = Kd / SampleTimeInSec;
}

void SetSampleTime(int NewSampleTime)
{
if (NewSampleTime > 0)
{
double ratio  = (double)NewSampleTime
/ (double)SampleTime;
ki *= ratio;
kd /= ratio;
SampleTime = (unsigned long)NewSampleTime;
}
}

void SetOutputLimits(double Min, double Max)
{
if(Min > Max) return;
outMin = Min;
outMax = Max;

if(Output > outMax) Output = outMax;
else if(Output < outMin) Output = outMin;

if(ITerm> outMax) ITerm= outMax;
else if(ITerm< outMin) ITerm= outMin;
}
A new function was added to allow the user to specify the output limits [lines 52-63]. And these limits are used to clamp both the I-Term [17-18] and the Output [23-24]
The Result
As we can see, windup is eliminated. in addition, the output stays where we want it to. this means there’s no need for external clamping of the output. if you want it to range from 23 to 167, you can set those as the Output Limits.
On/Off
The Problem
As nice as it is to have a PID controller, sometimes you don’t care what it has to say.Let’s say at some point in your program you want to force the output to a certain value (0 for example) you could certainly do this in the calling routine:
void loop()
{
Compute();
Output=0;
}
This way, no matter what the PID says, you just overwrite its value. This is a terrible idea in practice however. The PID will become very confused: “I keep moving the output, and nothing’s happening! What gives?! Let me move it some more.” As a result,
when you stop over-writing the output and switch back to the PID, you will likely get a huge and immediate change in the output value.
The Solution
The solution to this problem is to have a means to turn the PID off and on. The common terms for these states are “Manual” (I will adjust the value by hand) and “Automatic” (the PID will automatically adjust the output). Let’s see how this is done in code:The Code
/*working variables*/
unsigned long lastTime;
double Input, Output, Setpoint;
double ITerm, lastInput;
double kp, ki, kd;
int SampleTime = 1000; //1 sec
double outMin, outMax;
bool inAuto = false;

#define MANUAL 0
#define AUTOMATIC 1

void Compute()
{
if(!inAuto) return;
unsigned long now = millis();
int timeChange = (now - lastTime);
if(timeChange>=SampleTime)
{
/*Compute all the working error variables*/
double error = Setpoint - Input;
ITerm+= (ki * error);
if(ITerm> outMax) ITerm= outMax;
else if(ITerm< outMin) ITerm= outMin;
double dInput = (Input - lastInput);

/*Compute PID Output*/
Output = kp * error + ITerm- kd * dInput;
if(Output > outMax) Output = outMax;
else if(Output < outMin) Output = outMin;

/*Remember some variables for next time*/
lastInput = Input;
lastTime = now;
}
}

void SetTunings(double Kp, double Ki, double Kd)
{
double SampleTimeInSec = ((double)SampleTime)/1000;
kp = Kp;
ki = Ki * SampleTimeInSec;
kd = Kd / SampleTimeInSec;
}

void SetSampleTime(int NewSampleTime)
{
if (NewSampleTime > 0)
{
double ratio  = (double)NewSampleTime
/ (double)SampleTime;
ki *= ratio;
kd /= ratio;
SampleTime = (unsigned long)NewSampleTime;
}
}

void SetOutputLimits(double Min, double Max)
{
if(Min > Max) return;
outMin = Min;
outMax = Max;

if(Output > outMax) Output = outMax;
else if(Output < outMin) Output = outMin;

if(ITerm> outMax) ITerm= outMax;
else if(ITerm< outMin) ITerm= outMin;
}

void SetMode(int Mode)
{
inAuto = (Mode == AUTOMATIC);
}
A fairly simple solution. If you’re not in automatic mode, immediately leave the Compute function without adjusting the Output or any internal variables.
The Result
It’s true that you could achieve a similar effect by just not calling Compute from the calling routine, but this solution keeps the workings of the PID contained, which is kind of what we need. By keeping things internal we can keep track of which mode were
in, and more importantly it let’s us know when we change modes. That leads us to the next issue…
Initialization
The Problem
In the last section we implemented the ability to turn the PID off and on. We turned it off, but now let’s look at what happens when we turn it back on:Yikes! The PID jumps back to the last Output value it sent, then starts adjusting from there. This results in an Input bump that we’d rather not have.
The Solution
This one is pretty easy to fix. Since we now know when we’re turning on (going from Manual to Automatic,) we just have to initialize things for a smooth transition. That means massaging the 2 stored working variables (ITerm & lastInput) to keep the outputfrom jumping.
The Code
/*working variables*/
unsigned long lastTime;
double Input, Output, Setpoint;
double ITerm, lastInput;
double kp, ki, kd;
int SampleTime = 1000; //1 sec
double outMin, outMax;
bool inAuto = false;

#define MANUAL 0
#define AUTOMATIC 1

void Compute()
{
if(!inAuto) return;
unsigned long now = millis();
int timeChange = (now - lastTime);
if(timeChange>=SampleTime)
{
/*Compute all the working error variables*/
double error = Setpoint - Input;
ITerm+= (ki * error);
if(ITerm> outMax) ITerm= outMax;
else if(ITerm< outMin) ITerm= outMin;
double dInput = (Input - lastInput);

/*Compute PID Output*/
Output = kp * error + ITerm- kd * dInput;
if(Output> outMax) Output = outMax;
else if(Output < outMin) Output = outMin;

/*Remember some variables for next time*/
lastInput = Input;
lastTime = now;
}
}

void SetTunings(double Kp, double Ki, double Kd)
{
double SampleTimeInSec = ((double)SampleTime)/1000;
kp = Kp;
ki = Ki * SampleTimeInSec;
kd = Kd / SampleTimeInSec;
}

void SetSampleTime(int NewSampleTime)
{
if (NewSampleTime > 0)
{
double ratio  = (double)NewSampleTime
/ (double)SampleTime;
ki *= ratio;
kd /= ratio;
SampleTime = (unsigned long)NewSampleTime;
}
}

void SetOutputLimits(double Min, double Max)
{
if(Min > Max) return;
outMin = Min;
outMax = Max;

if(Output > outMax) Output = outMax;
else if(Output < outMin) Output = outMin;

if(ITerm> outMax) ITerm= outMax;
else if(ITerm< outMin) ITerm= outMin;
}

void SetMode(int Mode)
{
bool newAuto = (Mode == AUTOMATIC);
if(newAuto && !inAuto)
{  /*we just went from manual to auto*/
Initialize();
}
inAuto = newAuto;
}

void Initialize()
{
lastInput = Input;
ITerm = Output;
if(ITerm> outMax) ITerm= outMax;
else if(ITerm< outMin) ITerm= outMin;
}
We modified SetMode(…) to detect the transition from manual to automatic, and we added our initialization function. It sets ITerm=Output to take care of the integral term, and lastInput = Input to keep the derivative from spiking. The proportional term doesn’t
rely on any information from the past, so it doesn’t need any initialization.
The Result
We see from the above graph that proper initialization results in a bumpless transfer from manual to automatic: exactly what we were after.
Update: Why not ITerm=0?
I have been getting a lot of questions recently asking why I don’t set ITerm=0 upon intialization. As an answer, I’d ask you to consider the following scenario: The pid is in manual, and the user has set the output to 50. After a time, the process steadiesout to an input of 75.2. The user makes the Setpoint 75.2 and turns on the pid. What should happen?
I contend that after switching to automatic the output value should stay at 50. since the P and D terms will be zero, the only way this will happen is if ITerm is initialized to the value of Output.
If you are in a situation where you need the output to initialize to zero, there is no need alter the code above. Just set Output=0 in your calling routine before turning the PID from Manual to Automatic.
Direction
The Problem
The processes the PID will be connected to fall into two groups: direct acting and reverse acting. All the examples I’ve shown so far have been direct acting. That is, an increase in the output causes an increase in the input. For reverse acting processesthe opposite is true. In a refrigerator for example, an increase in cooling causes the temperature to go down. To make the beginner PID work with a reverse process, the signs of kp, ki, and kd all must be negative.
This isn’t a problem per se, but the user must choose the correct sign, and make sure that all the parameters have the same sign.
The Solution
To make the process a little simpler, I require that kp, ki, and kd all be >=0. If the user is connected to a reverse process, they specify that separately using the SetControllerDirection function. this ensures that the parameters all have the same sign,and hopefully makes things more intuitive.
The Code
/*working variables*/
unsigned long lastTime;
double Input, Output, Setpoint;
double ITerm, lastInput;
double kp, ki, kd;
int SampleTime = 1000; //1 sec
double outMin, outMax;
bool inAuto = false;

#define MANUAL 0
#define AUTOMATIC 1

#define DIRECT 0
#define REVERSE 1
int controllerDirection = DIRECT;

void Compute()
{
if(!inAuto) return;
unsigned long now = millis();
int timeChange = (now - lastTime);
if(timeChange>=SampleTime)
{
/*Compute all the working error variables*/
double error = Setpoint - Input;
ITerm+= (ki * error);
if(ITerm > outMax) ITerm= outMax;
else if(ITerm < outMin) ITerm= outMin;
double dInput = (Input - lastInput);

/*Compute PID Output*/
Output = kp * error + ITerm- kd * dInput;
if(Output > outMax) Output = outMax;
else if(Output < outMin) Output = outMin;

/*Remember some variables for next time*/
lastInput = Input;
lastTime = now;
}
}

void SetTunings(double Kp, double Ki, double Kd)
{
if (Kp<0 || Ki<0|| Kd<0) return;

double SampleTimeInSec = ((double)SampleTime)/1000;
kp = Kp;
ki = Ki * SampleTimeInSec;
kd = Kd / SampleTimeInSec;

if(controllerDirection ==REVERSE)
{
kp = (0 - kp);
ki = (0 - ki);
kd = (0 - kd);
}
}

void SetSampleTime(int NewSampleTime)
{
if (NewSampleTime > 0)
{
double ratio  = (double)NewSampleTime
/ (double)SampleTime;
ki *= ratio;
kd /= ratio;
SampleTime = (unsigned long)NewSampleTime;
}
}

void SetOutputLimits(double Min, double Max)
{
if(Min > Max) return;
outMin = Min;
outMax = Max;

if(Output > outMax) Output = outMax;
else if(Output < outMin) Output = outMin;

if(ITerm > outMax) ITerm= outMax;
else if(ITerm < outMin) ITerm= outMin;
}

void SetMode(int Mode)
{
bool newAuto = (Mode == AUTOMATIC);
if(newAuto == !inAuto)
{  /*we just went from manual to auto*/
Initialize();
}
inAuto = newAuto;
}

void Initialize()
{
lastInput = Input;
ITerm = Output;
if(ITerm > outMax) ITerm= outMax;
else if(ITerm < outMin) ITerm= outMin;
}

void SetControllerDirection(int Direction)
{
controllerDirection = Direction;
}
PID COMPLETE
And that about wraps it up. We’ve turned “The Beginner’s PID” into the most robust controller I know how to make at this time. For those readers that were looking for a detailed explanation of the PID Library, I hope you got what you came for. For thoseof you writing your own PID, I hope you were able to glean a few ideas that save you some cycles down the road.
Two Final Notes:
If something in this series looks wrong please let me know. I may have missed something, or might just need to be clearer in my explanation. Either way I’d like to know.
This is just a basic PID. There are many other issues that I intentionally left out in the name of simplicity. Off the top of my head: feed forward, reset tiebacks, integer math, different pid forms, using velocity instead of position. If there’s interest
in having me explore these topics please let me know.

相关文章推荐
- 【20150628】周总结(mkdir,进程与线程)
- 转:RTC搭建android下三层应用程序访问服务器MsSql-服务器端
- Linux开放1521端口允许网络连接Oracle Listener
- 用NW.js开发下一代桌面应用程序
- IT人士应该知道的一个趋势-在线教育
- UITabBarController生命周期(使用storyoard搭建)
- 如何成为一名好的研究生
- Linux_5.3_线程同步
- 栈-顺序存储结构-c语言
- 不规则ROI
- 斑斓中国BlenderCN项目库
- struts2.1笔记04:struts2优点
- windows 3.2平台编译及其打包
- 递归练习
- const学习总结
- 随笔
- 我开通博客了
- Java编程题每日一练day1
- 转:Delphi各种Socket组件的模式和模型
- 常用排序算法之希尔排序法