Maven学习(十六)--Maven知识点记录 - profile
2015-06-13 12:54
344 查看
在实际开发过程中,开发环境,测试环境和最后部署上线的环境都是不一样的,像数据库连接,都是要变的。
如果不使用Maven的话,我想到的就是修改配置文件,手动的修改;
使用Maven的话,就简单的多了。
先来看一个pom文件:
[html] view
plaincopy
<project xmlns="http://maven.apache.org/POM/4.0.0" xmlns:xsi="http://www.w3.org/2001/XMLSchema-instance"
xsi:schemaLocation="http://maven.apache.org/POM/4.0.0 http://maven.apache.org/maven-v4_0_0.xsd">
<modelVersion>4.0.0</modelVersion>
<groupId>org.ygy</groupId>
<artifactId>maven</artifactId>
<packaging>war</packaging>
<version>0.0.1-SNAPSHOT</version>
<name>maven Maven Webapp</name>
<url>http://maven.apache.org</url>
<!-- 属性配置 -->
<properties>
<project.build.sourceEncoding>UTF-8</project.build.sourceEncoding>
</properties>
<profiles>
<profile>
<id>devlopment</id>
<properties>
<username>lufei</username>
<password>shishi</password>
</properties>
<build>
<resources>
<resource>
<directory>src/main/resources</directory>
<filtering>true</filtering>
</resource>
</resources>
</build>
<activation>
<activeByDefault>true</activeByDefault>
</activation>
</profile>
<profile>
<id>test</id>
<properties>
<jdbc.url>http://www.deppon.com</jdbc.url>
<jdbc.username>haha</jdbc.username>
<jdbc.password>can you</jdbc.password>
</properties>
<build>
<resources>
<resource>
<directory>src/main/resources</directory>
<filtering>true</filtering>
</resource>
</resources>
</build>
<activation>
<activeByDefault>false</activeByDefault>
</activation>
</profile>
</profiles>
<dependencies>
<dependency>
<groupId>junit</groupId>
<artifactId>junit</artifactId>
<version>4.10</version>
<scope>test</scope>
</dependency>
<!-- 添加Spring依赖 -->
<dependency>
<groupId>org.springframework</groupId>
<artifactId>spring-core</artifactId>
<version>3.1.1.RELEASE</version>
</dependency>
<dependency>
<groupId>org.springframework</groupId>
<artifactId>spring-beans</artifactId>
<version>3.1.1.RELEASE</version>
</dependency>
<dependency>
<groupId>org.springframework</groupId>
<artifactId>spring-context</artifactId>
<version>3.1.1.RELEASE</version>
</dependency>
<dependency>
<groupId>org.springframework</groupId>
<artifactId>spring-jdbc</artifactId>
<version>3.1.1.RELEASE</version>
</dependency>
</dependencies>
<build>
<finalName>maven</finalName>
</build>
</project>
其中,有些标签可能没有用过,就是<profiles>,<profile>
Profile 的作用是允许你在项目文件(pom.xml)里定义若干个 profile 段,然后在编译时选择其中的一个用于覆盖项目文件原先的定义。
[html] view
plaincopy
<profile>
<id>devlopment</id>
<properties>
<username>lufei</username>
<password>shishi</password>
</properties>
<build>
<resources>
<resource>
<directory>src/main/resources</directory>
<filtering>true</filtering>
</resource>
</resources>
</build>
<activation>
<activeByDefault>true</activeByDefault>
</activation>
</profile>
我们大体上可以看懂,下面简单介绍一下具体的用法:
1.activation 激活方式
1)根据环境自动激活:如可以根据JDK版本,OS,Maven属性来激活
[html] view
plaincopy
<profile>
<id>dev</id>
<activation>
<activeByDefault>false</activeByDefault>
<jdk>1.5</jdk>
<os>
<name>Windows XP</name>
<family>Windows</family>
<arch>x86</arch>
<version>5.1.2600</version>
</os>
<property>
<name>mavenVersion</name>
<value>2.0.5</value>
</property>
<file>
<exists>file2.properties</exists>
<missing>file1.properties</missing>
</file>
</activation>
...
</profile>
2)通过命令行激活
这是最直接和最简单的方式,比如你定义了一个名为 myProfile 的 profile,你只需要在命令行输入 mvn clean install -P myprofile 就能将其激活,
这种方式的好处很明显,但是有一个很大的弊端,当 profile 比较多的时候,在命令行输入这写 -P 参数会让人觉得厌烦,
所以,如果你一直用这种方式,觉得厌烦了,可以考虑使用其它自动激活的方式。
3)配置默认自动激活
[html] view
plaincopy
<profile>
<id>dev</id>
<activation>
<activeByDefault>true</activeByDefault>
</activation>
...
</profile>
4)配置 settings.xml 文件 profile 激活
settings.xml 文件可以在 ~/.m2 目录下,为某个用户的自定义行为服务,也可以在 M2_HOME/conf 目录下,为整台机器的所有用户服务。
而前者的配置会覆盖后者。同理,由 settings.xml 激活的 profile 意在为用户或者整个机器提供特定环境配置,
比如,你可以在某台机器上配置一个指向本地数据库 URL 的 profile,然后使用该机器的 settings.xml 激活它。激活方式如下:
[html] view
plaincopy
<settings>
...
<activeProfiles>
<activeProfile>local_db</activeProfile>
</activeProfiles>
</settings>
(注:参考博客 激活Maven
profile的几种方式)
2.filtering功能
这里的意思是,过滤src/main/resources下的文件
[html] view
plaincopy
<build>
<resources>
<resource>
<directory>src/main/resources</directory>
<filtering>true</filtering>
</resource>
</resources>
</build>
Filtering 是 Maven Resources Plugin 的一个功能,它会使用系统属性或者项目属性的值替换资源文件(*.properties,*.xml)当中 ${…} 符号的值。
比如你系统属性有一项 “user.name=foobar”,那么资源文件当中的 ${user.name} 符号会在 Maven 编译时自动被替换为 “foobar”。
(注:参考博客 Apache Maven 使用 profile 和 filtering 实现多种环境下的资源)
Maven官方Filter讲解:http://maven.apache.org/plugins/maven-resources-plugin/examples/filter.html
3.说了这么多,下面来实践一下
这是我们的Maven项目:
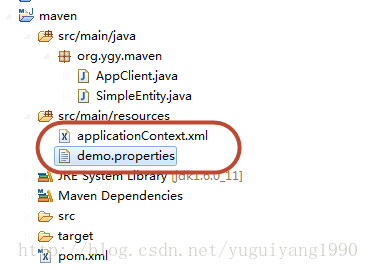
一个是配置文件,一个是Spring的配置文件
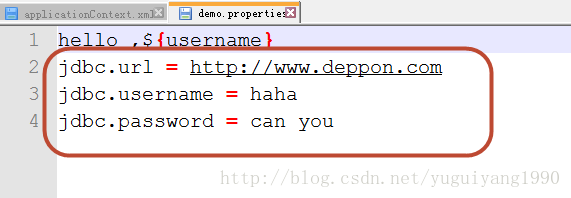
demo.properties
[java] view
plaincopy
hello ,${username}
jdbc.url = ${jdbc.url}
jdbc.username = ${jdbc.username}
jdbc.password = ${jdbc.password}
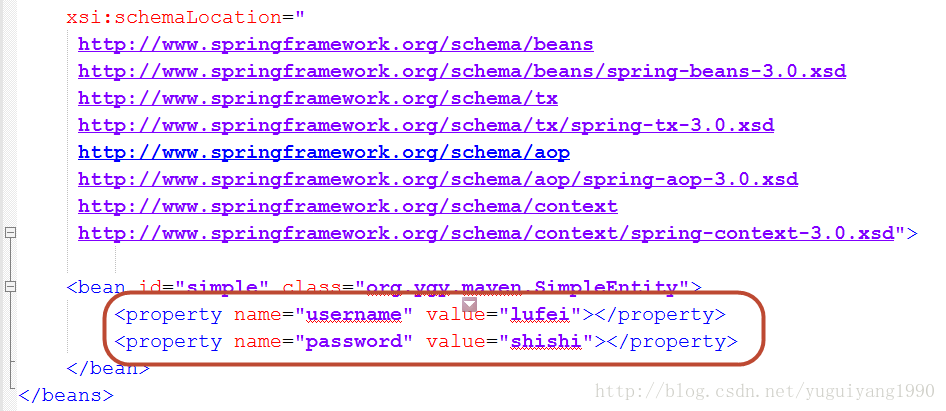
applicationContext.xml
[java] view
plaincopy
<?xml version="1.0" encoding="UTF-8"?>
<beans xmlns="http://www.springframework.org/schema/beans"
xmlns:xsi="http://www.w3.org/2001/XMLSchema-instance" xmlns:aop="http://www.springframework.org/schema/aop"
xmlns:tx="http://www.springframework.org/schema/tx" xmlns:context="http://www.springframework.org/schema/context"
xsi:schemaLocation="
http://www.springframework.org/schema/beans http://www.springframework.org/schema/beans/spring-beans-3.0.xsd http://www.springframework.org/schema/tx http://www.springframework.org/schema/tx/spring-tx-3.0.xsd http://www.springframework.org/schema/aop http://www.springframework.org/schema/aop/spring-aop-3.0.xsd http://www.springframework.org/schema/context http://www.springframework.org/schema/context/spring-context-3.0.xsd">
<bean id="simple" class="org.ygy.maven.SimpleEntity">
<property name="username" value="${username}"></property>
<property name="password" value="${password}"></property>
</bean>
</beans>
pom.xml就是最上面提到的:
[html] view
plaincopy
<project xmlns="http://maven.apache.org/POM/4.0.0" xmlns:xsi="http://www.w3.org/2001/XMLSchema-instance"
xsi:schemaLocation="http://maven.apache.org/POM/4.0.0 http://maven.apache.org/maven-v4_0_0.xsd">
<modelVersion>4.0.0</modelVersion>
<groupId>org.ygy</groupId>
<artifactId>maven</artifactId>
<packaging>war</packaging>
<version>0.0.1-SNAPSHOT</version>
<name>maven Maven Webapp</name>
<url>http://maven.apache.org</url>
<!-- 属性配置 -->
<properties>
<project.build.sourceEncoding>UTF-8</project.build.sourceEncoding>
</properties>
<profiles>
<profile>
<id>devlopment</id>
<properties>
<username>lufei</username>
<password>shishi</password>
</properties>
<build>
<resources>
<resource>
<directory>src/main/resources</directory>
<filtering>true</filtering>
</resource>
</resources>
</build>
<activation>
<activeByDefault>true</activeByDefault>
</activation>
</profile>
<profile>
<id>test</id>
<properties>
<jdbc.url>http://www.deppon.com</jdbc.url>
<jdbc.username>haha</jdbc.username>
<jdbc.password>can you</jdbc.password>
</properties>
<build>
<resources>
<resource>
<directory>src/main/resources</directory>
<filtering>true</filtering>
</resource>
</resources>
</build>
<activation>
<activeByDefault>false</activeByDefault>
</activation>
</profile>
</profiles>
<dependencies>
<dependency>
<groupId>junit</groupId>
<artifactId>junit</artifactId>
<version>4.10</version>
<scope>test</scope>
</dependency>
<!-- 添加Spring依赖 -->
<dependency>
<groupId>org.springframework</groupId>
<artifactId>spring-core</artifactId>
<version>3.1.1.RELEASE</version>
</dependency>
<dependency>
<groupId>org.springframework</groupId>
<artifactId>spring-beans</artifactId>
<version>3.1.1.RELEASE</version>
</dependency>
<dependency>
<groupId>org.springframework</groupId>
<artifactId>spring-context</artifactId>
<version>3.1.1.RELEASE</version>
</dependency>
<dependency>
<groupId>org.springframework</groupId>
<artifactId>spring-jdbc</artifactId>
<version>3.1.1.RELEASE</version>
</dependency>
</dependencies>
<build>
<finalName>maven</finalName>
</build>
</project>
这里有2个profile,一个是development,一个是test,默认自动激活development
注意
[java] view
plaincopy
<properties>
<username>lufei</username>
<password>shishi</password>
</properties>
[html] view
plaincopy
<properties>
<username>索隆</username>
<password>gogo</password>
<jdbc.url>http://www.deppon.com</jdbc.url>
<jdbc.username>haha</jdbc.username>
<jdbc.password>can you</jdbc.password>
</properties>
这里的<username>和<password>就是我们在配置文件中使用的会变化的配置,Maven会自动将 ${}替换成profile中配置的。
接下来,我们进入到该项目的根目录下,执行Maven命令
1.使用默认激活方式
[java] view
plaincopy
mvn clean compile
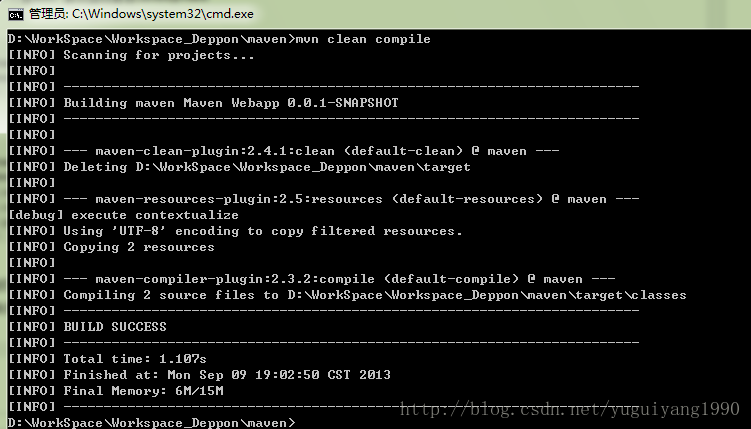
进入target/classes目录
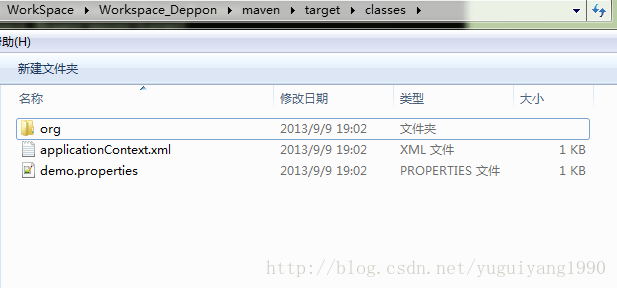
打开demo.properties和applicationContext.xml文件
会发现,在development中指定的属性都已经成功替换
而demo.properties中,jdbc相关的并没有配置,所以没有替换

2.使用命令更改激活方式
重新输入命令
[java] view
plaincopy
mvn clean compile -P test
我们启用了test环境的配置方式
再次进入target/classes文件夹下查看,会发现不同的替换

好了,到这里就可以简单使用了。
如果不使用Maven的话,我想到的就是修改配置文件,手动的修改;
使用Maven的话,就简单的多了。
先来看一个pom文件:
[html] view
plaincopy
<project xmlns="http://maven.apache.org/POM/4.0.0" xmlns:xsi="http://www.w3.org/2001/XMLSchema-instance"
xsi:schemaLocation="http://maven.apache.org/POM/4.0.0 http://maven.apache.org/maven-v4_0_0.xsd">
<modelVersion>4.0.0</modelVersion>
<groupId>org.ygy</groupId>
<artifactId>maven</artifactId>
<packaging>war</packaging>
<version>0.0.1-SNAPSHOT</version>
<name>maven Maven Webapp</name>
<url>http://maven.apache.org</url>
<!-- 属性配置 -->
<properties>
<project.build.sourceEncoding>UTF-8</project.build.sourceEncoding>
</properties>
<profiles>
<profile>
<id>devlopment</id>
<properties>
<username>lufei</username>
<password>shishi</password>
</properties>
<build>
<resources>
<resource>
<directory>src/main/resources</directory>
<filtering>true</filtering>
</resource>
</resources>
</build>
<activation>
<activeByDefault>true</activeByDefault>
</activation>
</profile>
<profile>
<id>test</id>
<properties>
<jdbc.url>http://www.deppon.com</jdbc.url>
<jdbc.username>haha</jdbc.username>
<jdbc.password>can you</jdbc.password>
</properties>
<build>
<resources>
<resource>
<directory>src/main/resources</directory>
<filtering>true</filtering>
</resource>
</resources>
</build>
<activation>
<activeByDefault>false</activeByDefault>
</activation>
</profile>
</profiles>
<dependencies>
<dependency>
<groupId>junit</groupId>
<artifactId>junit</artifactId>
<version>4.10</version>
<scope>test</scope>
</dependency>
<!-- 添加Spring依赖 -->
<dependency>
<groupId>org.springframework</groupId>
<artifactId>spring-core</artifactId>
<version>3.1.1.RELEASE</version>
</dependency>
<dependency>
<groupId>org.springframework</groupId>
<artifactId>spring-beans</artifactId>
<version>3.1.1.RELEASE</version>
</dependency>
<dependency>
<groupId>org.springframework</groupId>
<artifactId>spring-context</artifactId>
<version>3.1.1.RELEASE</version>
</dependency>
<dependency>
<groupId>org.springframework</groupId>
<artifactId>spring-jdbc</artifactId>
<version>3.1.1.RELEASE</version>
</dependency>
</dependencies>
<build>
<finalName>maven</finalName>
</build>
</project>
其中,有些标签可能没有用过,就是<profiles>,<profile>
Profile 的作用是允许你在项目文件(pom.xml)里定义若干个 profile 段,然后在编译时选择其中的一个用于覆盖项目文件原先的定义。
[html] view
plaincopy
<profile>
<id>devlopment</id>
<properties>
<username>lufei</username>
<password>shishi</password>
</properties>
<build>
<resources>
<resource>
<directory>src/main/resources</directory>
<filtering>true</filtering>
</resource>
</resources>
</build>
<activation>
<activeByDefault>true</activeByDefault>
</activation>
</profile>
我们大体上可以看懂,下面简单介绍一下具体的用法:
1.activation 激活方式
1)根据环境自动激活:如可以根据JDK版本,OS,Maven属性来激活
[html] view
plaincopy
<profile>
<id>dev</id>
<activation>
<activeByDefault>false</activeByDefault>
<jdk>1.5</jdk>
<os>
<name>Windows XP</name>
<family>Windows</family>
<arch>x86</arch>
<version>5.1.2600</version>
</os>
<property>
<name>mavenVersion</name>
<value>2.0.5</value>
</property>
<file>
<exists>file2.properties</exists>
<missing>file1.properties</missing>
</file>
</activation>
...
</profile>
2)通过命令行激活
这是最直接和最简单的方式,比如你定义了一个名为 myProfile 的 profile,你只需要在命令行输入 mvn clean install -P myprofile 就能将其激活,
这种方式的好处很明显,但是有一个很大的弊端,当 profile 比较多的时候,在命令行输入这写 -P 参数会让人觉得厌烦,
所以,如果你一直用这种方式,觉得厌烦了,可以考虑使用其它自动激活的方式。
3)配置默认自动激活
[html] view
plaincopy
<profile>
<id>dev</id>
<activation>
<activeByDefault>true</activeByDefault>
</activation>
...
</profile>
4)配置 settings.xml 文件 profile 激活
settings.xml 文件可以在 ~/.m2 目录下,为某个用户的自定义行为服务,也可以在 M2_HOME/conf 目录下,为整台机器的所有用户服务。
而前者的配置会覆盖后者。同理,由 settings.xml 激活的 profile 意在为用户或者整个机器提供特定环境配置,
比如,你可以在某台机器上配置一个指向本地数据库 URL 的 profile,然后使用该机器的 settings.xml 激活它。激活方式如下:
[html] view
plaincopy
<settings>
...
<activeProfiles>
<activeProfile>local_db</activeProfile>
</activeProfiles>
</settings>
(注:参考博客 激活Maven
profile的几种方式)
2.filtering功能
这里的意思是,过滤src/main/resources下的文件
[html] view
plaincopy
<build>
<resources>
<resource>
<directory>src/main/resources</directory>
<filtering>true</filtering>
</resource>
</resources>
</build>
Filtering 是 Maven Resources Plugin 的一个功能,它会使用系统属性或者项目属性的值替换资源文件(*.properties,*.xml)当中 ${…} 符号的值。
比如你系统属性有一项 “user.name=foobar”,那么资源文件当中的 ${user.name} 符号会在 Maven 编译时自动被替换为 “foobar”。
(注:参考博客 Apache Maven 使用 profile 和 filtering 实现多种环境下的资源)
Maven官方Filter讲解:http://maven.apache.org/plugins/maven-resources-plugin/examples/filter.html
3.说了这么多,下面来实践一下
这是我们的Maven项目:
一个是配置文件,一个是Spring的配置文件
demo.properties
[java] view
plaincopy
hello ,${username}
jdbc.url = ${jdbc.url}
jdbc.username = ${jdbc.username}
jdbc.password = ${jdbc.password}
applicationContext.xml
[java] view
plaincopy
<?xml version="1.0" encoding="UTF-8"?>
<beans xmlns="http://www.springframework.org/schema/beans"
xmlns:xsi="http://www.w3.org/2001/XMLSchema-instance" xmlns:aop="http://www.springframework.org/schema/aop"
xmlns:tx="http://www.springframework.org/schema/tx" xmlns:context="http://www.springframework.org/schema/context"
xsi:schemaLocation="
http://www.springframework.org/schema/beans http://www.springframework.org/schema/beans/spring-beans-3.0.xsd http://www.springframework.org/schema/tx http://www.springframework.org/schema/tx/spring-tx-3.0.xsd http://www.springframework.org/schema/aop http://www.springframework.org/schema/aop/spring-aop-3.0.xsd http://www.springframework.org/schema/context http://www.springframework.org/schema/context/spring-context-3.0.xsd">
<bean id="simple" class="org.ygy.maven.SimpleEntity">
<property name="username" value="${username}"></property>
<property name="password" value="${password}"></property>
</bean>
</beans>
pom.xml就是最上面提到的:
[html] view
plaincopy
<project xmlns="http://maven.apache.org/POM/4.0.0" xmlns:xsi="http://www.w3.org/2001/XMLSchema-instance"
xsi:schemaLocation="http://maven.apache.org/POM/4.0.0 http://maven.apache.org/maven-v4_0_0.xsd">
<modelVersion>4.0.0</modelVersion>
<groupId>org.ygy</groupId>
<artifactId>maven</artifactId>
<packaging>war</packaging>
<version>0.0.1-SNAPSHOT</version>
<name>maven Maven Webapp</name>
<url>http://maven.apache.org</url>
<!-- 属性配置 -->
<properties>
<project.build.sourceEncoding>UTF-8</project.build.sourceEncoding>
</properties>
<profiles>
<profile>
<id>devlopment</id>
<properties>
<username>lufei</username>
<password>shishi</password>
</properties>
<build>
<resources>
<resource>
<directory>src/main/resources</directory>
<filtering>true</filtering>
</resource>
</resources>
</build>
<activation>
<activeByDefault>true</activeByDefault>
</activation>
</profile>
<profile>
<id>test</id>
<properties>
<jdbc.url>http://www.deppon.com</jdbc.url>
<jdbc.username>haha</jdbc.username>
<jdbc.password>can you</jdbc.password>
</properties>
<build>
<resources>
<resource>
<directory>src/main/resources</directory>
<filtering>true</filtering>
</resource>
</resources>
</build>
<activation>
<activeByDefault>false</activeByDefault>
</activation>
</profile>
</profiles>
<dependencies>
<dependency>
<groupId>junit</groupId>
<artifactId>junit</artifactId>
<version>4.10</version>
<scope>test</scope>
</dependency>
<!-- 添加Spring依赖 -->
<dependency>
<groupId>org.springframework</groupId>
<artifactId>spring-core</artifactId>
<version>3.1.1.RELEASE</version>
</dependency>
<dependency>
<groupId>org.springframework</groupId>
<artifactId>spring-beans</artifactId>
<version>3.1.1.RELEASE</version>
</dependency>
<dependency>
<groupId>org.springframework</groupId>
<artifactId>spring-context</artifactId>
<version>3.1.1.RELEASE</version>
</dependency>
<dependency>
<groupId>org.springframework</groupId>
<artifactId>spring-jdbc</artifactId>
<version>3.1.1.RELEASE</version>
</dependency>
</dependencies>
<build>
<finalName>maven</finalName>
</build>
</project>
这里有2个profile,一个是development,一个是test,默认自动激活development
注意
[java] view
plaincopy
<properties>
<username>lufei</username>
<password>shishi</password>
</properties>
[html] view
plaincopy
<properties>
<username>索隆</username>
<password>gogo</password>
<jdbc.url>http://www.deppon.com</jdbc.url>
<jdbc.username>haha</jdbc.username>
<jdbc.password>can you</jdbc.password>
</properties>
这里的<username>和<password>就是我们在配置文件中使用的会变化的配置,Maven会自动将 ${}替换成profile中配置的。
接下来,我们进入到该项目的根目录下,执行Maven命令
1.使用默认激活方式
[java] view
plaincopy
mvn clean compile
进入target/classes目录
打开demo.properties和applicationContext.xml文件
会发现,在development中指定的属性都已经成功替换
而demo.properties中,jdbc相关的并没有配置,所以没有替换
2.使用命令更改激活方式
重新输入命令
[java] view
plaincopy
mvn clean compile -P test
我们启用了test环境的配置方式
再次进入target/classes文件夹下查看,会发现不同的替换
好了,到这里就可以简单使用了。

相关文章推荐
- Could not create the view: An unexpected exception was thrown.
- Maven学习(十五)--Maven创建的Web项目无法使用EL表达式
- unity开发:TCP socket网络连接
- 使用tinyxml生成xml
- 《浪潮之巅》读书笔记2
- Maven学习(十四)--Maven深入学习(四)- 知识总结
- 写给大一大二大三还在迷惘中的学生
- SQL生成拼音首码
- 回文数猜想
- Maven学习(十三)---Maven深入学习(三)- 聚合与继承
- jquery实现简单手风琴菜单效果实例
- 输入两颗二叉树A,B,判断B是不是A的子结构
- 电脑同时安装两个版本java jdk
- SQL生成拼音首码
- Maven学习(十二)---Maven深入学习(二)- 依赖
- CMake 入门
- minigui代码分析
- Xcode 6 下添加pch头文件
- 用于列出文件目录的java实用小程序,方便文件查找
- Maven学习(十一)----Maven深入学习(一)- 坐标