智能DNS服务器
2015-06-13 05:08
543 查看
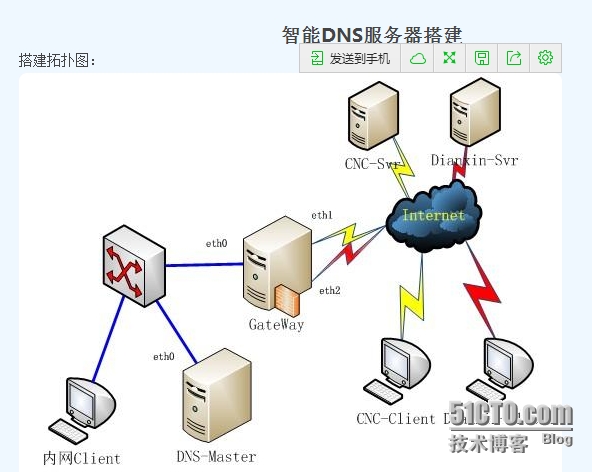
以下为本次试验配置步骤:
Setup-1:在DNS-Master上的配置如下
1.1 保证网络连通性
[root@localhost ~]# ifconfig eth0
eth0 Link encap:Ethernet HWaddr 00:0C:29:FE:39:09
inet addr:192.168.0.2 Bcast:192.168.0.255 Mask:255.255.255.0
inet6 addr: fe80::20c:29ff:fefe:3909/64 Scope:Link
UP BROADCAST RUNNING MULTICAST MTU:1500 Metric:1
RX packets:23137 errors:0 dropped:0 overruns:0 frame:0
TX packets:85 errors:0 dropped:0 overruns:0 carrier:0
collisions:0 txqueuelen:1000
RX bytes:26188328 (24.9 MiB) TX bytes:12189 (11.9 KiB)
Interrupt:59 Base address:0x2024
[root@localhost ~]# route -n
Kernel IP routing table
Destination Gateway Genmask Flags Metric Ref Use Iface
192.168.0.0 0.0.0.0 255.255.255.0 U 0 0 0 eth0
169.254.0.0 0.0.0.0 255.255.0.0 U 0 0 0 eth0
0.0.0.0 192.168.0.1 0.0.0.0 UG 0 0 0 eth0
1.2 安装DNS所需软件
[root@localhost ~]# mount /dev/cdrom /media/
[root@localhost ~]# cd /media/Server/
[root@localhost Server]# rpm -ivh bind-*.rpm caching-nameserver-9.3.6-4.P1.el5_4.2.i386.rpm --nodeps --force
1.3 根据需求进行配置
1.3.1:对/var/named/chroot/etc/named.conf的配置
[root@localhost ~]# cd /var/named/chroot/etc/
[root@localhost etc]# cp -p named.caching-nameserver.conf named.conf
[root@localhost etc]# ln -sf /var/named/chroot/etc/named.conf /etc/named.conf
[root@localhost etc]# vi named.conf
options {
listen-on port 53 { 192.168.0.2; };
directory "/var/named";
dump-file "/var/named/data/cache_dump.db";
statistics-file "/var/named/data/named_stats.txt";
memstatistics-file "/var/named/data/named_mem_stats.txt";
query-source port 53;
forwarders { 202.106.0.20; 202.106.148.1; };
};
logging {
channel default_debug {
file "data/named.run";
severity dynamic;
};
};
acl lan {
192.168.0.0/24;
192.168.1.0/24;
192.168.2.0/24;
};
acl cnc {
203.18.17.0/24;
};
acl dx {
78.19.25.0/24;
};
view "LAN" {
match-clients {
localhost;
lan;
};
recursion yes;
include "/etc/lan.zone";
};
view "CNC" {
match-clients { cnc; };
include "/etc/cnc.zone";
};
view "DX" {
match-clients { dx; };
include "/etc/dx.zone";
};
view "other" {
match-clients { any; };
include "/etc/other.zone";
};
[root@localhost ~]# cd /var/named/chroot/etc/
[root@localhost etc]# touch lan.zone
[root@localhost etc]# vi lan.zone
zone "benet.com" IN {
type master;
file "benet.com.zone.lan";
};
[root@localhost etc]# touch cnc.zone
[root@localhost etc]# vi cnc.zone
zone "benet.com" IN {
type master;
file "benet.com.zone.cnc";
};
[root@localhost etc]# touch dx.zone
[root@localhost etc]# vi dx.zone
zone "benet.com" IN {
type master;
file "benet.com.zone.dx";
};
[root@localhost etc]# touch other.zone
[root@localhost etc]# vi other.zone
zone "benet.com" IN {
type master;
file "benet.com.zone.dx";
};
1.3.2: 对正向数据文件及反向数据文件的配置
[root@localhost etc]# cd /var/named/chroot/var/named/
[root@localhost named]# touch benet.com.zone.lan benet.com.zone.cnc benet.com.zone.dx
[root@localhost named]# vi benet.com.zone.lan
[root@localhost named]# cat benet.com.zone.lan
$TTL 1D
@ IN SOA benet.com. admin.benet.com. (
2014062401
3H
15M
1W
1D )
@ IN NS ns1.benet.com.
ns1 IN A 192.168.0.2
www IN A 78.19.25.6
www IN A 203.18.17.6
[root@localhost named]# vi benet.com.zone.cnc
$TTL 1D
@ IN SOA benet.com. admin.benet.com. (
2014062401
3H
15M
1W
1D )
@ IN NS ns1.benet.com.
ns1 IN A 203.18.17.2
www IN A 203.18.17.6
[root@localhost named]# vi benet.com.zone.dx
$TTL 1D
@ IN SOA benet.com. admin.benet.com. (
2014062401
3H
15M
1W
1D )
@ IN NS ns1.benet.com.
ns1 IN A 78.19.25.2
www IN A 78.19.25.6
1.3.3: 解析测试
[root@localhost ~]# service named start
启动 named: [确定]
[root@localhost ~]# chkconfig named on
[root@localhost ~]# vi /etc/resolv.conf
nameserver 192.168.0.2
search localdomain
[root@localhost ~]# host www.benet.com
www.benet.com has address 203.18.17.6
www.benet.com has address 78.19.25.6
[root@localhost ~]# host www.benet.com
www.benet.com has address 78.19.25.6
www.benet.com has address 203.18.17.6
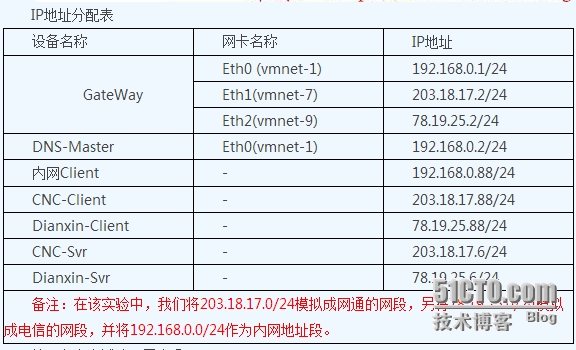
Setup-2:在GateWay上的配置如下
2.1 保证网络连通性
[root@localhost ~]# ip addr show
1: lo: mtu 16436 qdisc noqueue
link/loopback 00:00:00:00:00:00 brd 00:00:00:00:00:00
inet 127.0.0.1/8 scope host lo
inet6 ::1/128 scope host
valid_lft forever preferred_lft forever
2: eth0: mtu 1500 qdisc pfifo_fast qlen 1000
link/ether 00:0c:29:4e:07:88 brd ff:ff:ff:ff:ff:ff
inet 192.168.0.1/24 brd 192.168.0.255 scope global eth0
inet6 fe80::20c:29ff:fe4e:788/64 scope link
valid_lft forever preferred_lft forever
3: eth1: mtu 1500 qdisc pfifo_fast qlen 1000
link/ether 00:0c:29:4e:07:92 brd ff:ff:ff:ff:ff:ff
inet 203.18.17.2/24 brd 203.18.17.255 scope global eth1
inet6 fe80::20c:29ff:fe4e:792/64 scope link
valid_lft forever preferred_lft forever
4: eth2: mtu 1500 qdisc pfifo_fast qlen 1000
link/ether 00:0c:29:4e:07:9c brd ff:ff:ff:ff:ff:ff
inet 78.19.25.2/24 brd 78.19.25.255 scope global eth2
inet6 fe80::20c:29ff:fe4e:79c/64 scope link
valid_lft forever preferred_lft forever
5: sit0: mtu 1480 qdisc noop
link/sit 0.0.0.0 brd 0.0.0.0
[root@localhost ~]# route -n
Kernel IP routing table
Destination Gateway Genmask Flags Metric Ref Use Iface
192.168.0.0 0.0.0.0 255.255.255.0 U 0 0 0 eth0
78.19.25.0 0.0.0.0 255.255.255.0 U 0 0 0 eth2
203.18.17.0 0.0.0.0 255.255.255.0 U 0 0 0 eth1
169.254.0.0 0.0.0.0 255.255.0.0 U 0 0 0 eth2
0.0.0.0 78.19.25.1 0.0.0.0 UG 0 0 0 eth2
2.2 启动内核路由转发功能
[root@localhost ~]# vi /etc/sysctl.conf
[root@localhost ~]# sysctl -p
net.ipv4.ip_forward = 1
2.3 配置iptables防火墙
[root@localhost ~]# iptables -t nat -A POSTROUTING -o eth2 -s 192.168.0.0/24 -j SNAT --to-source 78.19.25.2
[root@localhost ~]# iptables -t nat -A PREROUTING -i eth1 -p udp -d 203.18.17.2 --dport 53 -j DNAT --to-destination 192.168.0.2
[root@localhost ~]# iptables -t nat -A PREROUTING -i eth2 -p udp -d 78.19.25.2 --dport 53 -j DNAT --to-destination 192.168.0.2
2.4 解析测试
省略
本文来源:http://www.benet.wang/%E6%9C%8D%E5%8A%A1%E6%90%AD%E5%BB%BA/47.html,multicast,up,lower_up>,multicast,up,lower_up>,multicast,up,lower_up>,up,lower_up>
本文出自 “江湖笑笑生” 博客,请务必保留此出处http://hashlinux.blog.51cto.com/9647696/1661476

相关文章推荐
- Search in Rotated Sorted Array
- kickstart是什么
- repodata创建本地YUM仓库(一)
- PXE+kicstart+Vsftpd/NFS/HTTP无人值守批量网络安装
- 量子计算与通讯的基本原理(量子纠缠)
- MySQL+DRBD+heartbeat+LVS+keepalived
- Java之线程状态
- awk调用外部变量
- awk 指令结构格式
- android 按手机返回键2次退出程序
- 解决Laravel 5上传大文件时出现TokenMismatchException的问题
- [.net 面向对象编程基础] (20) LINQ使用
- android 声音播放,我这里是给软件配的音效
- Codeforces Round #307 (Div. 2) E. GukiZ and GukiZiana 分块
- 查看jdk位数
- Codeforces Round #307 (Div. 2) C. GukiZ hates Boxes 贪心/二分
- android 读取手机硬件信息,我这里只读出SMEI码
- Codeforces Round #307 (Div. 2) B. ZgukistringZ 暴力
- android 我用过的一些权限,网络、SD卡、手机硬件信息、自动横屏、键盘自动弹出
- Codeforces Round #307 (Div. 2) A. GukiZ and Contest 水题