MySQL中Join算法实现原理分析
2015-06-08 17:38
603 查看
在MySQL 中,只有一种 Join 算法,就是大名鼎鼎的 Nested Loop Join,他没有其他很多数据库所提供的 Hash Join,也没有 Sort Merge Join。顾名思义,Nested Loop Join 实际上就是通过驱动表的结果集作为循环基础数据,然后一条一条的通过该结果集中的数据作为过滤条件到下一个表中查询数据,然后合并结果。如果还有第三个参与
Join,则再通过前两个表的 Join 结果集作为循环基础数据,再一次通过循环查询条件到第三个表中查询数据,如此往复。
还是通过示例和图解来说明吧,后面将通过我个人数据库测试环境中的一个 example(自行设计,非MySQL 自己提供) 数据库中的三个表的 Join 查询来进行示例。
注意:由于这里有些内容需要在MySQL 5.1.18之后的版本中才会体现出来,所以本测试的MySQL 版本为5.1.26
表结构:
1 sky@localhost : example
11:09:32>
show create
table user_group\G
2
3 ***************************
1. row
***************************
4
5 Table: user_group
6
7 Create
Table:
CREATE TABLE `user_group` (
8
9 `user_id`
int(11)
NOT
NULL,
10
11 `group_id`
int(11)
NOT
NULL,
12
13 `user_type`
int(11)
NOT
NULL,
14
15 `gmt_create`
datetime
NOT NULL,
16
17 `gmt_modified`
datetime
NOT NULL,
18
19 `status`
varchar(16)
NOT
NULL,
20
21 KEY `idx_user_group_uid` (`user_id`)
22
23 ) ENGINE=MyISAM
DEFAULT CHARSET=utf8
24
25 1 row
in set (0.00 sec)
26
27 sky@localhost : example
11:10:32>
show create
table group_message\G
28
29 ***************************
1. row
***************************
30
31 Table: group_message
32
33 Create
Table:
CREATE TABLE `group_message` (
34
35 `id`
int(11)
NOT
NULL AUTO_INCREMENT,
36
37 `gmt_create`
datetime
NOT NULL,
38
39 `gmt_modified`
datetime
NOT NULL,
40
41 `group_id`
int(11)
NOT
NULL,
42
43 `user_id`
int(11)
NOT
NULL,
44
45 `author`
varchar(32)
NOT
NULL,
46
47 `subject`
varchar(128)
NOT
NULL,
48
49 PRIMARY
KEY (`id`),
50
51 KEY `idx_group_message_author_subject` (`author`,`subject`(16)),
52
53 KEY `idx_group_message_author` (`author`),
54
55 KEY `idx_group_message_gid_uid` (`group_id`,`user_id`)
56
57 ) ENGINE=MyISAM AUTO_INCREMENT=97
DEFAULT CHARSET=utf8
58
59 1 row
in set (0.00 sec)
60
61 sky@localhost : example
11:10:43>
show create
table group_message_content\G
62
63 ***************************
1. row
***************************
64
65 Table: group_message_content
66
67 Create
Table:
CREATE TABLE `group_message_content` (
68
69 `group_msg_id`
int(11)
NOT
NULL,
70
71 `content`
text
NOT NULL,
72
73 KEY `group_message_content_msg_id` (`group_msg_id`)
74
75 ) ENGINE=MyISAM
DEFAULT CHARSET=utf8
76
77 1 row
in set (0.00 sec)
使用Query如下:
1 select m.subject msg_subject, c.content msg_content
2
3 from user_group g,group_message m,group_message_content c
4
5 where g.user_id
= 1
6
7 and m.group_id
= g.group_id
8
9 and c.group_msg_id
= m.id
看看我们的 Query 的执行计划:
1 sky@localhost : example
11:17:04>
explain select m.subject msg_subject, c.content msg_content
2
3 ->
from user_group g,group_message m,group_message_content c
4
5 ->
where g.user_id
= 1
6
7 ->
and m.group_id
= g.group_id
8
9 ->
and c.group_msg_id
= m.id\G
10
11 ***************************
1. row
***************************
12
13 id:
1
14
15 select_type: SIMPLE
16
17 table: g
18
19 type: ref
20
21 possible_keys: user_group_gid_ind,user_group_uid_ind,user_group_gid_uid_ind
22
23 key: user_group_uid_ind
24
25 key_len:
4
26
27 ref: const
28
29 rows:
2
30
31 Extra:
32
33 ***************************
2. row
***************************
34
35 id:
1
36
37 select_type: SIMPLE
38
39 table: m
40
41 type: ref
42
43 possible_keys:
PRIMARY,idx_group_message_gid_uid
44
45 key: idx_group_message_gid_uid
46
47 key_len:
4
48
49 ref: example.g.group_id
50
51 rows:
3
52
53 Extra:
54
55 ***************************
3. row
***************************
56
57 id:
1
58
59 select_type: SIMPLE
60
61 table: c
62
63 type: ref
64
65 possible_keys: idx_group_message_content_msg_id
66
67 key: idx_group_message_content_msg_id
68
69 key_len:
4
70
71 ref: example.m.id
72
73 rows:
2
74
75 Extra:
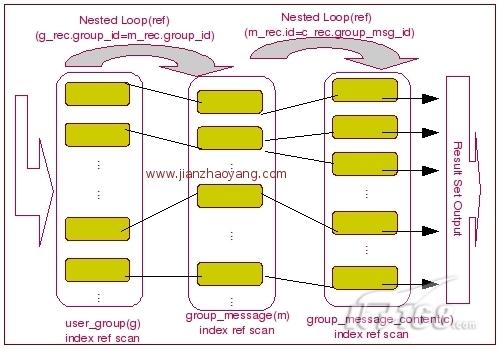
我们可以看出,MySQL Query Optimizer 选择了 user_group 作为驱动表,首先利用我们传入的条件 user_id 通过 该表上面的索引 user_group_uid_ind 来进行 const 条件的索引 ref 查找,然后以 user_group 表中过滤出来的结果集的 group_id 字段作为查询条件,对 group_message 循环查询,然后再通过 user_group 和 group_message 两个表的结果集中的 group_message 的 id 作为条件
与 group_message_content 的 group_msg_id 比较进行循环查询,才得到最终的结果。没啥特别的,后一个引用前一个的结果集作为条件,实现过程可以通过下图表示:
下面的我们调整一下 group_message_content 去掉上面的 idx_group_message_content_msg_id 这个索引,然后再看看会是什么效果:
1 sky@localhost : example
11:25:36>
drop
index idx_group_message_content_msg_id
on group_message_content;
2
3 Query OK,
96 rows affected (0.11 sec)
4
5 sky@localhost : example
10:21:06>
explain
6
7 ->
select m.subject msg_subject, c.content msg_content
8
9 ->
from user_group g,group_message m,group_message_content c
10
11 ->
where g.user_id
= 1
12
13 ->
and m.group_id
= g.group_id
14
15 ->
and c.group_msg_id
= m.id\G
16
17 ***************************
1. row
***************************
18
19 id:
1
20
21 select_type: SIMPLE
22
23 table: g
24
25 type: ref
26
27 possible_keys: idx_user_group_uid
28
29 key: idx_user_group_uid
30
31 key_len:
4
32
33 ref: const
34
35 rows:
2
36
37 Extra:
38
39 ***************************
2. row
***************************
40
41 id:
1
42
43 select_type: SIMPLE
44
45 table: m
46
47 type: ref
48
49 possible_keys:
PRIMARY,idx_group_message_gid_uid
50
51 key: idx_group_message_gid_uid
52
53 key_len:
4
54
55 ref: example.g.group_id
56
57 rows:
3
58
59 Extra:
60
61 ***************************
3. row
***************************
62
63 id:
1
64
65 select_type: SIMPLE
66
67 table: c
68
69 type:
ALL
70
71 possible_keys:
NULL
72
73 key:
NULL
74
75 key_len:
NULL
76
77 ref:
NULL
78
79 rows:
96
80
81 Extra: Using
where; Using
join buffer
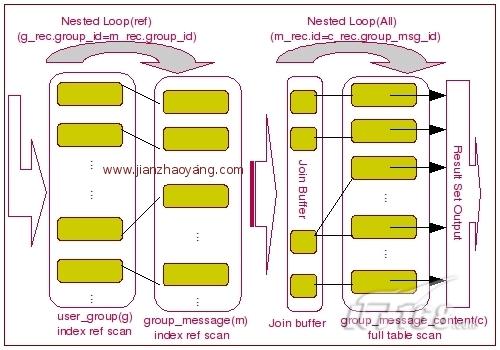
我们看到不仅仅 group_message_content 表的访问从 ref 变成了 ALL,此外,在最后一行的 Extra信息从没有任何内容变成为 Using where; Using join buffer,也就是说,对于从 ref 变成 ALL 很容易理解,没有可以使用的索引的索引了嘛,当然得进行全表扫描了,Using where 也是因为变成全表扫描之后,我们需要取得的 content 字段只能通过对表中的数据进行 where 过滤才能取得,但是后面出现的 Using join buffer
是一个啥呢?
我们知道,MySQL 中有一个供我们设置的参数 join_buffer_size ,这里实际上就是使用到了通过该参数所设置的 Buffer 区域。那为啥之前的执行计划中没有用到呢?
实际上,Join Buffer 只有当我们的 Join 类型为 ALL(如示例中),index,rang 或者是 index_merge 的时候 才能够使用,所以,在我们去掉 group_message_content 表的 group_msg_id 字段的索引之前,由于 Join 是 ref 类型的,所以我们的执行计划中并没有看到有使用 Join Buffer。
当我们使用了 Join Buffer 之后,我们可以通过下面的这张图片来表示 Join 完成过程:
Join,则再通过前两个表的 Join 结果集作为循环基础数据,再一次通过循环查询条件到第三个表中查询数据,如此往复。
还是通过示例和图解来说明吧,后面将通过我个人数据库测试环境中的一个 example(自行设计,非MySQL 自己提供) 数据库中的三个表的 Join 查询来进行示例。
注意:由于这里有些内容需要在MySQL 5.1.18之后的版本中才会体现出来,所以本测试的MySQL 版本为5.1.26
表结构:
1 sky@localhost : example
11:09:32>
show create
table user_group\G
2
3 ***************************
1. row
***************************
4
5 Table: user_group
6
7 Create
Table:
CREATE TABLE `user_group` (
8
9 `user_id`
int(11)
NOT
NULL,
10
11 `group_id`
int(11)
NOT
NULL,
12
13 `user_type`
int(11)
NOT
NULL,
14
15 `gmt_create`
datetime
NOT NULL,
16
17 `gmt_modified`
datetime
NOT NULL,
18
19 `status`
varchar(16)
NOT
NULL,
20
21 KEY `idx_user_group_uid` (`user_id`)
22
23 ) ENGINE=MyISAM
DEFAULT CHARSET=utf8
24
25 1 row
in set (0.00 sec)
26
27 sky@localhost : example
11:10:32>
show create
table group_message\G
28
29 ***************************
1. row
***************************
30
31 Table: group_message
32
33 Create
Table:
CREATE TABLE `group_message` (
34
35 `id`
int(11)
NOT
NULL AUTO_INCREMENT,
36
37 `gmt_create`
datetime
NOT NULL,
38
39 `gmt_modified`
datetime
NOT NULL,
40
41 `group_id`
int(11)
NOT
NULL,
42
43 `user_id`
int(11)
NOT
NULL,
44
45 `author`
varchar(32)
NOT
NULL,
46
47 `subject`
varchar(128)
NOT
NULL,
48
49 PRIMARY
KEY (`id`),
50
51 KEY `idx_group_message_author_subject` (`author`,`subject`(16)),
52
53 KEY `idx_group_message_author` (`author`),
54
55 KEY `idx_group_message_gid_uid` (`group_id`,`user_id`)
56
57 ) ENGINE=MyISAM AUTO_INCREMENT=97
DEFAULT CHARSET=utf8
58
59 1 row
in set (0.00 sec)
60
61 sky@localhost : example
11:10:43>
show create
table group_message_content\G
62
63 ***************************
1. row
***************************
64
65 Table: group_message_content
66
67 Create
Table:
CREATE TABLE `group_message_content` (
68
69 `group_msg_id`
int(11)
NOT
NULL,
70
71 `content`
text
NOT NULL,
72
73 KEY `group_message_content_msg_id` (`group_msg_id`)
74
75 ) ENGINE=MyISAM
DEFAULT CHARSET=utf8
76
77 1 row
in set (0.00 sec)
使用Query如下:
1 select m.subject msg_subject, c.content msg_content
2
3 from user_group g,group_message m,group_message_content c
4
5 where g.user_id
= 1
6
7 and m.group_id
= g.group_id
8
9 and c.group_msg_id
= m.id
看看我们的 Query 的执行计划:
1 sky@localhost : example
11:17:04>
explain select m.subject msg_subject, c.content msg_content
2
3 ->
from user_group g,group_message m,group_message_content c
4
5 ->
where g.user_id
= 1
6
7 ->
and m.group_id
= g.group_id
8
9 ->
and c.group_msg_id
= m.id\G
10
11 ***************************
1. row
***************************
12
13 id:
1
14
15 select_type: SIMPLE
16
17 table: g
18
19 type: ref
20
21 possible_keys: user_group_gid_ind,user_group_uid_ind,user_group_gid_uid_ind
22
23 key: user_group_uid_ind
24
25 key_len:
4
26
27 ref: const
28
29 rows:
2
30
31 Extra:
32
33 ***************************
2. row
***************************
34
35 id:
1
36
37 select_type: SIMPLE
38
39 table: m
40
41 type: ref
42
43 possible_keys:
PRIMARY,idx_group_message_gid_uid
44
45 key: idx_group_message_gid_uid
46
47 key_len:
4
48
49 ref: example.g.group_id
50
51 rows:
3
52
53 Extra:
54
55 ***************************
3. row
***************************
56
57 id:
1
58
59 select_type: SIMPLE
60
61 table: c
62
63 type: ref
64
65 possible_keys: idx_group_message_content_msg_id
66
67 key: idx_group_message_content_msg_id
68
69 key_len:
4
70
71 ref: example.m.id
72
73 rows:
2
74
75 Extra:
我们可以看出,MySQL Query Optimizer 选择了 user_group 作为驱动表,首先利用我们传入的条件 user_id 通过 该表上面的索引 user_group_uid_ind 来进行 const 条件的索引 ref 查找,然后以 user_group 表中过滤出来的结果集的 group_id 字段作为查询条件,对 group_message 循环查询,然后再通过 user_group 和 group_message 两个表的结果集中的 group_message 的 id 作为条件
与 group_message_content 的 group_msg_id 比较进行循环查询,才得到最终的结果。没啥特别的,后一个引用前一个的结果集作为条件,实现过程可以通过下图表示:
下面的我们调整一下 group_message_content 去掉上面的 idx_group_message_content_msg_id 这个索引,然后再看看会是什么效果:
1 sky@localhost : example
11:25:36>
drop
index idx_group_message_content_msg_id
on group_message_content;
2
3 Query OK,
96 rows affected (0.11 sec)
4
5 sky@localhost : example
10:21:06>
explain
6
7 ->
select m.subject msg_subject, c.content msg_content
8
9 ->
from user_group g,group_message m,group_message_content c
10
11 ->
where g.user_id
= 1
12
13 ->
and m.group_id
= g.group_id
14
15 ->
and c.group_msg_id
= m.id\G
16
17 ***************************
1. row
***************************
18
19 id:
1
20
21 select_type: SIMPLE
22
23 table: g
24
25 type: ref
26
27 possible_keys: idx_user_group_uid
28
29 key: idx_user_group_uid
30
31 key_len:
4
32
33 ref: const
34
35 rows:
2
36
37 Extra:
38
39 ***************************
2. row
***************************
40
41 id:
1
42
43 select_type: SIMPLE
44
45 table: m
46
47 type: ref
48
49 possible_keys:
PRIMARY,idx_group_message_gid_uid
50
51 key: idx_group_message_gid_uid
52
53 key_len:
4
54
55 ref: example.g.group_id
56
57 rows:
3
58
59 Extra:
60
61 ***************************
3. row
***************************
62
63 id:
1
64
65 select_type: SIMPLE
66
67 table: c
68
69 type:
ALL
70
71 possible_keys:
NULL
72
73 key:
NULL
74
75 key_len:
NULL
76
77 ref:
NULL
78
79 rows:
96
80
81 Extra: Using
where; Using
join buffer
我们看到不仅仅 group_message_content 表的访问从 ref 变成了 ALL,此外,在最后一行的 Extra信息从没有任何内容变成为 Using where; Using join buffer,也就是说,对于从 ref 变成 ALL 很容易理解,没有可以使用的索引的索引了嘛,当然得进行全表扫描了,Using where 也是因为变成全表扫描之后,我们需要取得的 content 字段只能通过对表中的数据进行 where 过滤才能取得,但是后面出现的 Using join buffer
是一个啥呢?
我们知道,MySQL 中有一个供我们设置的参数 join_buffer_size ,这里实际上就是使用到了通过该参数所设置的 Buffer 区域。那为啥之前的执行计划中没有用到呢?
实际上,Join Buffer 只有当我们的 Join 类型为 ALL(如示例中),index,rang 或者是 index_merge 的时候 才能够使用,所以,在我们去掉 group_message_content 表的 group_msg_id 字段的索引之前,由于 Join 是 ref 类型的,所以我们的执行计划中并没有看到有使用 Join Buffer。
当我们使用了 Join Buffer 之后,我们可以通过下面的这张图片来表示 Join 完成过程:

相关文章推荐
- MYSQLDUMP的小结
- mysql ORDER BY,GROUP BY 和DISTINCT原理
- mysql之字符集与校对集
- mysql启动和关闭外键约束的方法(FOREIGN_KEY_CHECKS)
- Mysql中Union用法
- mysql选取数据类型的标准(重要)
- mysql执行语句中的转义字符`
- Mysql relay_log 命名规则
- mysql 触发器
- mysql添加用户和用户权限
- Windows下搭建MySQL Master Slave
- Mysql导入,导出数据
- 安装 mysql
- 调试MySQL中遇到的问题
- MYSQL批量插入数据库实现语句性能分析
- MySQL5.6主从复制方案
- MySQL主从复制
- mysql workbench 保存model时,总是崩溃,解决方法
- MySQL日期时间函数大全
- 解决MySQL中文乱码问题