【Unity3D】Unity自带组件—完成第一人称人物控制
2015-05-31 14:38
417 查看
1.导入unity自带的Character Controllers包

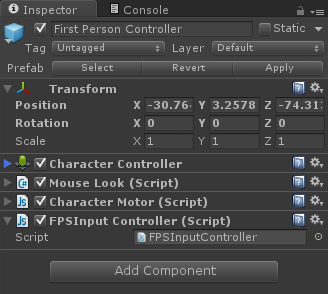
2.可以看到First Person Controller组件的构成

Mouse Look() : 随鼠标的移动而使所属物体发生旋转
FPSInput Controller() : 控制物体的移动
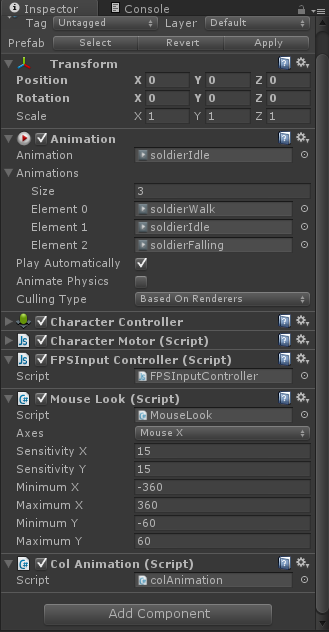
3.同样的,我们为自己的模型添加以上四个组件

其中Mouse Look() 中的Axes属性,是调整围绕的旋转轴
所谓第一人称就是,鼠标左右晃动则模型以X为轴进行旋转
鼠标上下晃动则模型的腰关节以Z轴进行旋转
4.找到模型的腰关节,同样添加Mouse Look(),Axes的值为Y,修改Mouse Look()
上面代码中,值得注意的是LateUpdate(),原始的为Update(),因为模型默认会有动画在不停播放,
那么播放动画的Update()也会调用模型全身的骨骼,那么就会产生冲突,也就使腰部无法上下旋转。
所以将Update()改为LateUpdate(),后于动画播放的调用,即可。
此时就可以将Main camera添加在模型腰部组件下
模型的左右旋转、观察上下的视野就完成了。

2.可以看到First Person Controller组件的构成

Mouse Look() : 随鼠标的移动而使所属物体发生旋转
FPSInput Controller() : 控制物体的移动
3.同样的,我们为自己的模型添加以上四个组件

其中Mouse Look() 中的Axes属性,是调整围绕的旋转轴
所谓第一人称就是,鼠标左右晃动则模型以X为轴进行旋转
鼠标上下晃动则模型的腰关节以Z轴进行旋转
4.找到模型的腰关节,同样添加Mouse Look(),Axes的值为Y,修改Mouse Look()
using UnityEngine;
using System.Collections;

/// MouseLook rotates the transform based on the mouse delta.
/// Minimum and Maximum values can be used to constrain the possible rotation

/// To make an FPS style character:
/// - Create a capsule.
/// - Add the MouseLook script to the capsule.
///   -> Set the mouse look to use LookX. (You want to only turn character but not tilt it)
/// - Add FPSInputController script to the capsule
///   -> A CharacterMotor and a CharacterController component will be automatically added.

/// - Create a camera. Make the camera a child of the capsule. Reset it's transform.
/// - Add a MouseLook script to the camera.
///   -> Set the mouse look to use LookY. (You want the camera to tilt up and down like a head. The character already turns.)
[AddComponentMenu("Camera-Control/Mouse Look")]
public class MouseLook : MonoBehaviour {

public enum RotationAxes { MouseXAndY = 0, MouseX = 1, MouseY = 2 }
public RotationAxes axes = RotationAxes.MouseXAndY;
public float sensitivityX = 15F;
public float sensitivityY = 15F;

public float minimumX = -360F;
public float maximumX = 360F;

public float minimumY = -60F;
public float maximumY = 60F;

private Vector3 eulerAngles;

float rotationY = 0F;

void LateUpdate ()
{
if (axes == RotationAxes.MouseXAndY)
{
float rotationX = transform.localEulerAngles.y + Input.GetAxis("Mouse X") * sensitivityX;

rotationY += Input.GetAxis("Mouse Y") * sensitivityY;
rotationY = Mathf.Clamp (rotationY, minimumY, maximumY);

transform.localEulerAngles = new Vector3(-rotationY, rotationX, 0);
}
else if (axes == RotationAxes.MouseX)
{
transform.Rotate(0, Input.GetAxis("Mouse X") * sensitivityX, 0);
}
else
{
rotationY += Input.GetAxis("Mouse Y") * sensitivityY;
rotationY = Mathf.Clamp (rotationY, minimumY, maximumY);
//----------********使Z轴旋转相应的鼠标偏移********----------//
transform.localEulerAngles = new Vector3(eulerAngles.x,eulerAngles.y,eulerAngles.z + rotationY);
}
}

void Start ()
{
// Make the rigid body not change rotation
if (GetComponent<Rigidbody>())
GetComponent<Rigidbody>().freezeRotation = true;
//----------********获得初始的旋转********----------//
eulerAngles = transform.localEulerAngles;
}
}
上面代码中,值得注意的是LateUpdate(),原始的为Update(),因为模型默认会有动画在不停播放,
那么播放动画的Update()也会调用模型全身的骨骼,那么就会产生冲突,也就使腰部无法上下旋转。
所以将Update()改为LateUpdate(),后于动画播放的调用,即可。
此时就可以将Main camera添加在模型腰部组件下
模型的左右旋转、观察上下的视野就完成了。
相关文章推荐
- unity3d 上传本地PC图片
- Unity3d在安卓平台下使用sqlite存储操作数据
- 使用Unity编写传统ARPG游戏的人物操作方式
- unity, 查看资源文件类型
- Unity3D占用内存太大的解决方法
- Unity 3D中的内存管理
- Unity跑酷游戏中的路点生成算法
- C# Unity游戏开发——Excel中的数据是如何到游戏中的 (二)
- [Unity基础]自带寻路Navmesh
- Unity 方向控制及鼠标滚轮代码控制
- unity3d优化总结篇
- 【整理】unity3d优化总结篇
- 全体听令!Unity3D崩溃分析援军已到,集中火力消灭所有手游崩溃!
- 【Unity技巧】四元数(Quaternion)和旋转
- Unity3D中uGUI事件系统简述及使用方法总结
- Unity3D面试题整合
- Unity3d制作一个简单的打开保存对话框-按钮2
- unity3d 在shader中创建及使用Texture3D
- unity3d 协程Coroutines
- Unity 编辑器下控制粒子播放跟随位移
