Android点击Button实现功能的几种方法总结
2015-05-29 15:21
696 查看
Android中Button控件应该算作是比较简单的控件,然而,它的使用频率却是非常的高,今天,我在这里总结了三种常用的点击Button实现其功能的方法。
1.很多时候,我们在用到Button控件时,往往都是“一次性”使用,这时,为了方便起见,我们一般采用的是匿名内部类的方法,形如这样:
复制代码代码如下:
button1.setOnClickListener(new OnClickListener() {
@Override
public void onClick(View v) {
// TODO Auto-generated method stub
System.out.println("您点击了Button1");
}
});
我们可以看到,这样的代码不仅简短,而且清晰易懂,不过,这样的方法一般只是适用于这个Button使用的次数不多或是“一次性”使用
2.当Button有多个或者Button的使用次数很多时,我们需要采用绑定监听器的做法,其实,绑定监听器也有几种方法,不过,我在这里就不一一列举了,毕竟那些方法在实际的应用中也不常见。
我们一般的方法是实现OnClickListener接口,并实现其中的方法,正如这样:
复制代码代码如下:
@Override
public void onClick(View v) {
// TODO Auto-generated method stub
switch (v.getId()) {
case R.id.button2:
System.out.println("您点击了Button2");
break;
default:
break;
}
}
注:onClick方法是OnClickListen接口中的方法,我们实现这个接口就必须实现它的方法。
3.这是一种最为简单的方法,我们需要做的就是添加一个方法并为Button添加一个属性:
复制代码代码如下:
<Button
android:id="@+id/button3"
android:layout_width="match_parent"
android:layout_height="wrap_content"
android:text="Button3 测试"
android:onClick="clickHandler"
/>
其中,我们比平时多添加了onClick属性。
那么,我们需要在代码中添加我们在属性中声明的方法:
复制代码代码如下:
public void clickHandler(View view) {
System.out.println("您点击了Button3");
}
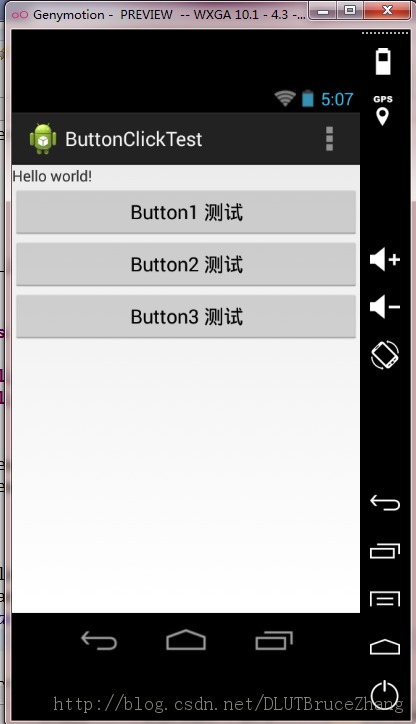
最后,贴出完整的源代码和实现效果截图:
1.布局文件
复制代码代码如下:
<LinearLayout xmlns:android="http://schemas.android.com/apk/res/android"
xmlns:tools="http://schemas.android.com/tools"
android:layout_width="match_parent"
android:layout_height="match_parent"
tools:context=".MainActivity"
android:orientation="vertical"
>
<TextView
android:layout_width="wrap_content"
android:layout_height="wrap_content"
android:text="@string/hello_world" />
<Button
android:id="@+id/button1"
android:layout_width="match_parent"
android:layout_height="wrap_content"
android:text="Button1 测试"
/>
<Button
android:id="@+id/button2"
android:layout_width="match_parent"
android:layout_height="wrap_content"
android:text="Button2 测试"
/>
<Button
android:id="@+id/button3"
android:layout_width="match_parent"
android:layout_height="wrap_content"
android:text="Button3 测试"
android:onClick="clickHandler"
/>
</LinearLayout>
效果形如:
2.测试源代码
复制代码代码如下:
package com.example.buttonclicktest;
import android.app.Activity;
import android.os.Bundle;
import android.view.Menu;
import android.view.View;
import android.view.View.OnClickListener;
import android.widget.Button;
public class MainActivity extends Activity implements OnClickListener{
private Button button1 = null;
private Button button2 = null;
public void findButton() {
button1 = (Button)findViewById(R.id.button1);
button2 = (Button)findViewById(R.id.button2);
}
@Override
protected void onCreate(Bundle savedInstanceState) {
super.onCreate(savedInstanceState);
setContentView(R.layout.activity_main);
findButton();
button2.setOnClickListener(this);
button1.setOnClickListener(new OnClickListener() {
@Override
public void onClick(View v) {
// TODO Auto-generated method stub
System.out.println("您点击了Button1");
}
});
}
@Override
public boolean onCreateOptionsMenu(Menu menu) {
// Inflate the menu; this adds items to the action bar if it is present.
getMenuInflater().inflate(R.menu.activity_main, menu);
return true;
}
@Override
public void onClick(View v) {
// TODO Auto-generated method stub
switch (v.getId()) {
case R.id.button2:
System.out.println("您点击了Button2");
break;
default:
break;
}
}
public void clickHandler(View view) {
System.out.println("您点击了Button3");
}
}
当我们点击按钮后,在Logcat中我们可以查看到结果如下所示:
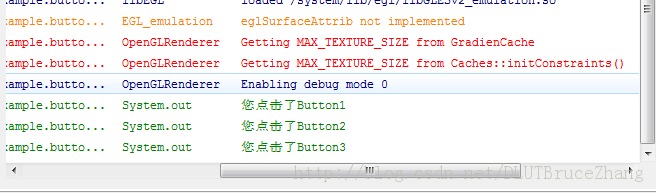
从结果中我们可以看出,三种方法都可以实现按钮点击的功能,我们可以根据情况的不同选择相应的方法。
1.很多时候,我们在用到Button控件时,往往都是“一次性”使用,这时,为了方便起见,我们一般采用的是匿名内部类的方法,形如这样:
复制代码代码如下:
button1.setOnClickListener(new OnClickListener() {
@Override
public void onClick(View v) {
// TODO Auto-generated method stub
System.out.println("您点击了Button1");
}
});
我们可以看到,这样的代码不仅简短,而且清晰易懂,不过,这样的方法一般只是适用于这个Button使用的次数不多或是“一次性”使用
2.当Button有多个或者Button的使用次数很多时,我们需要采用绑定监听器的做法,其实,绑定监听器也有几种方法,不过,我在这里就不一一列举了,毕竟那些方法在实际的应用中也不常见。
我们一般的方法是实现OnClickListener接口,并实现其中的方法,正如这样:
复制代码代码如下:
@Override
public void onClick(View v) {
// TODO Auto-generated method stub
switch (v.getId()) {
case R.id.button2:
System.out.println("您点击了Button2");
break;
default:
break;
}
}
注:onClick方法是OnClickListen接口中的方法,我们实现这个接口就必须实现它的方法。
3.这是一种最为简单的方法,我们需要做的就是添加一个方法并为Button添加一个属性:
复制代码代码如下:
<Button
android:id="@+id/button3"
android:layout_width="match_parent"
android:layout_height="wrap_content"
android:text="Button3 测试"
android:onClick="clickHandler"
/>
其中,我们比平时多添加了onClick属性。
那么,我们需要在代码中添加我们在属性中声明的方法:
复制代码代码如下:
public void clickHandler(View view) {
System.out.println("您点击了Button3");
}
最后,贴出完整的源代码和实现效果截图:
1.布局文件
复制代码代码如下:
<LinearLayout xmlns:android="http://schemas.android.com/apk/res/android"
xmlns:tools="http://schemas.android.com/tools"
android:layout_width="match_parent"
android:layout_height="match_parent"
tools:context=".MainActivity"
android:orientation="vertical"
>
<TextView
android:layout_width="wrap_content"
android:layout_height="wrap_content"
android:text="@string/hello_world" />
<Button
android:id="@+id/button1"
android:layout_width="match_parent"
android:layout_height="wrap_content"
android:text="Button1 测试"
/>
<Button
android:id="@+id/button2"
android:layout_width="match_parent"
android:layout_height="wrap_content"
android:text="Button2 测试"
/>
<Button
android:id="@+id/button3"
android:layout_width="match_parent"
android:layout_height="wrap_content"
android:text="Button3 测试"
android:onClick="clickHandler"
/>
</LinearLayout>
效果形如:
2.测试源代码
复制代码代码如下:
package com.example.buttonclicktest;
import android.app.Activity;
import android.os.Bundle;
import android.view.Menu;
import android.view.View;
import android.view.View.OnClickListener;
import android.widget.Button;
public class MainActivity extends Activity implements OnClickListener{
private Button button1 = null;
private Button button2 = null;
public void findButton() {
button1 = (Button)findViewById(R.id.button1);
button2 = (Button)findViewById(R.id.button2);
}
@Override
protected void onCreate(Bundle savedInstanceState) {
super.onCreate(savedInstanceState);
setContentView(R.layout.activity_main);
findButton();
button2.setOnClickListener(this);
button1.setOnClickListener(new OnClickListener() {
@Override
public void onClick(View v) {
// TODO Auto-generated method stub
System.out.println("您点击了Button1");
}
});
}
@Override
public boolean onCreateOptionsMenu(Menu menu) {
// Inflate the menu; this adds items to the action bar if it is present.
getMenuInflater().inflate(R.menu.activity_main, menu);
return true;
}
@Override
public void onClick(View v) {
// TODO Auto-generated method stub
switch (v.getId()) {
case R.id.button2:
System.out.println("您点击了Button2");
break;
default:
break;
}
}
public void clickHandler(View view) {
System.out.println("您点击了Button3");
}
}
当我们点击按钮后,在Logcat中我们可以查看到结果如下所示:
从结果中我们可以看出,三种方法都可以实现按钮点击的功能,我们可以根据情况的不同选择相应的方法。

相关文章推荐
- Android Studio集成Genymotion
- Android Metrics
- Android实用代码大全
- Android jni库加载错误:java.lang.UnsatisfiedLinkError
- android访问NFC的SE
- Android Scroller、VelocityTracker
- Android动态加载包含so文件的jar的自定义view控件
- Android JNI开发生成.h头文件问题(转)
- android开发常用方法
- Android Studio Gradle基础
- dialog的弹出动画(最关键的是坐标系)
- 这么多年被第三方接入坑的那些事。。。关于md5签名和sha1证书的坑
- android Toast问题
- android关于onActivityResult提前调用的问题
- 生拉硬套设计模式(一),关于装饰者模式在Android项目中的运用。
- ViewDragHelper详解
- Android读取Manifest文件下Application等节点下的metadata自定义数据
- AndroidStudio快捷键
- Android scrollview嵌套listview时自动滑动问题
- Android运行时异常“Binary XML file line # : Error inflating class”