IOS开发学习笔记028-UITableView单组数据显示代码优化
2015-05-18 23:04
330 查看
1、如果表格中又几百条数据的话,系统会自动加载显示在界面上得数据,逐一加载
添加100个数据到UITableView中for (int i = 0 ; i < 100 ; i ++)
{
NSString *icon = [NSString stringWithFormat:@"00%d.png",arc4random_uniform(8) + 1];
NSString *name = [NSString stringWithFormat:@"第%d",i];
NSString *desc = [NSString stringWithFormat:@"第%d行的描述",i];
Shop *tmp = [Shop shopWithIcon:icon andName:name andDesc:desc];
[_shops addObject:tmp];
}在滑动屏幕进行显示的时候,只会加载当前屏幕中显示的数据。
// 设置行内容
// 每当有一个cell进入视野范围内就会调用
- (UITableViewCell *)tableView:(UITableView *)tableView cellForRowAtIndexPath:(NSIndexPath *)indexPath
{
UITableViewCell * cell = [[UITableViewCell alloc] initWithStyle:UITableViewCellStyleSubtitle reuseIdentifier:@"c1"];
cell.textLabel.text = [NSString stringWithFormat:@"第%ld行",indexPath.row];
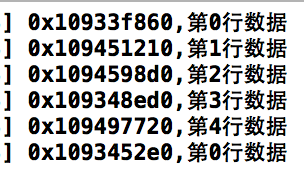
NSLog(@"%p,第%ld行数据",cell,indexPath.row);
return cell;
}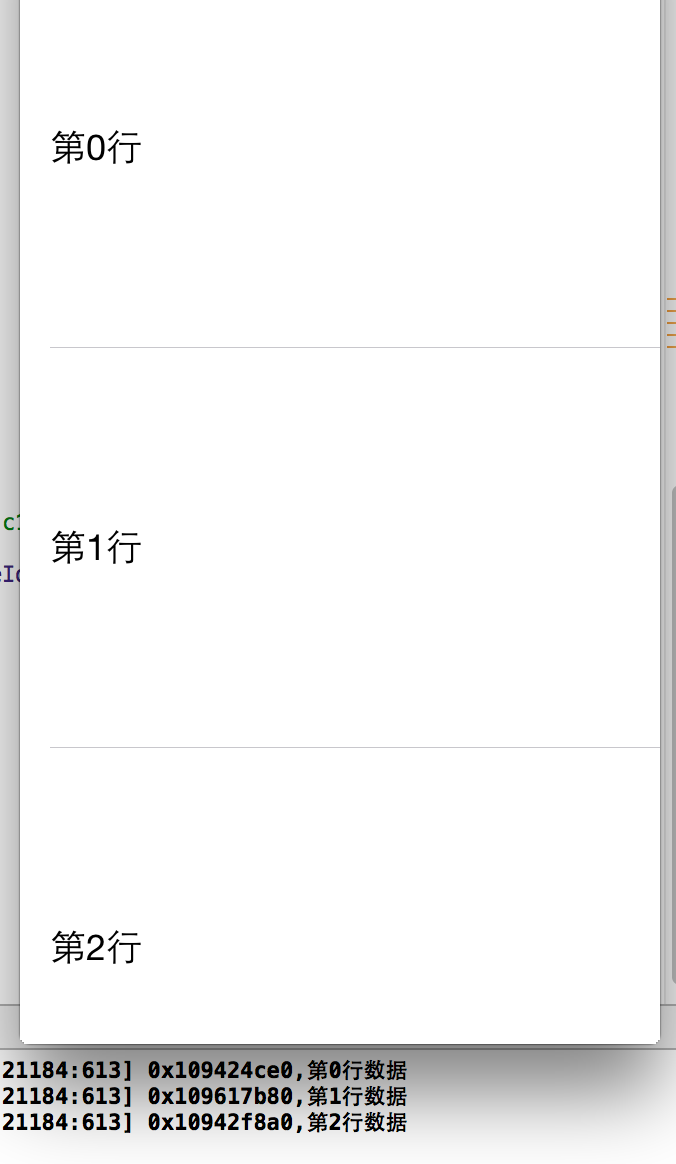
界面中只显示了三个cell,如下图,向下滑动,每次超过三个时就加载新的cell,向上滑动会重新加载cell,而且每次都会重新申请内存.
如果想避免这种情况可以使用缓存池,这是UITableViewCell 自带的方法 dequeueReusableCellWithIdentifier
// 设置行内容
// 每当有一个cell进入视野范围内就会调用
- (UITableViewCell *)tableView:(UITableView *)tableView cellForRowAtIndexPath:(NSIndexPath *)indexPath
{
// 从缓存池中选择可循环利用的cell,指定标识c1,这样就会找到结构一样的cell
UITableViewCell *cell = [tableView dequeueReusableCellWithIdentifier:@"c1"];
// 如果缓存池中没有
if (cell == nil)
{
cell = [[UITableViewCell alloc] initWithStyle:UITableViewCellStyleSubtitle reuseIdentifier:@"c1"]; // 设定标识C1
}
// UITableViewCell * cell = [[UITableViewCell alloc] initWithStyle:UITableViewCellStyleSubtitle reuseIdentifier:@"c1"];
cell.textLabel.text = [NSString stringWithFormat:@"第%ld行",indexPath.row];
NSLog(@"%p,第%ld行数据",cell,indexPath.row);

return cell;
}
看运行结果
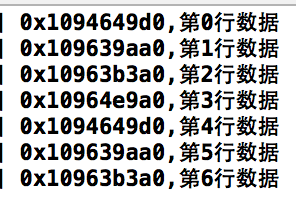
界面开始显示三个cell,向下滑动时会有一个过渡这回新建一个cell,但是接着往下就会使用已经存在的cell,从第四行开始使用第0行创建的cell
源代码:http://pan.baidu.com/s/1i3qyAjj
2、如何实现选中某行,改变这个cell最右侧显示的对号按钮
选中某行和取消选中某行2.1、选中某行执行方法
// 选中某行执行
- (void)tableView:(UITableView *)tableView didSelectRowAtIndexPath:(NSIndexPath *)indexPath
{
NSLog(@"selected");
//选中后颜色变深
// 在最右侧显示一个对号图标
// 1、获得选中行
Shop *s = _shops[indexPath.row];
// 2、修改选中行的数据,将选中的cell添加到待删除数组中
if ([_deleteShops containsObject:s]) // 如果已经存在,再次点击就取消选中按钮
{
[_deleteShops removeObject:s];
}
else    // 否则就添加待删除数组
{
[_deleteShops addObject:s];
}
// 3、更新数据,更新数据也就是重新设置某一行的内容
[tableView reloadRowsAtIndexPaths:@[indexPath] withRowAnimation:UITableViewRowAnimationFade];

}
2. 2、取消选中某行
// 取消选中某行执行
- (void)tableView:(UITableView *)tableView didDeselectRowAtIndexPath:(NSIndexPath *)indexPath
{
NSLog(@"Deselected");
}
2.3、重新设置选中行的内容
// 设置行内容
// 每当有一个cell进入视野范围内就会调用
- (UITableViewCell *)tableView:(UITableView *)tableView cellForRowAtIndexPath:(NSIndexPath *)indexPath
{
static NSString *ID = @"C1";
// 从缓存池中选择可循环利用的cell,指定标识c1,这样就会找到结构一样的cell
UITableViewCell *cell = [tableView dequeueReusableCellWithIdentifier:ID];
// 如果缓存池中没有
if (cell == nil)
{
cell = [[UITableViewCell alloc] initWithStyle:UITableViewCellStyleSubtitle reuseIdentifier:ID]; // 设定标识C1
}
// UITableViewCell * cell = [[UITableViewCell alloc] initWithStyle:UITableViewCellStyleSubtitle reuseIdentifier:@"c1"];
// 更新数据到界面
Shop *s = _shops[indexPath.row];
cell.textLabel.text = s.name;
cell.imageView.image = [UIImage imageNamed:s.icon];;
cell.detailTextLabel.text = s.desc;
// 显示最右侧的按钮
if ([_deleteShops containsObject:s]) // 判断是否已经选中的cell,是得话设置图标
{
cell.accessoryType = UITableViewCellAccessoryCheckmark;
}
else    // 否则就什么都不显示
{
cell.accessoryType = UITableViewCellAccessoryNone;
}

// NSLog(@"%p,第%ld行数据",cell,indexPath.row);

return cell;
}
代码中使用一个新的数组来保存选中的行_deleteShops,并在更新数据事进行判断。
2.4、加载图片和文字使用一个plist文件
- (void)viewDidLoad
{
[super viewDidLoad];
// Do any additional setup after loading the view, typically from a nib.

// 读取*.plist文件
// 1.获取全路径
NSString *path = [[NSBundle mainBundle] pathForResource:@"shops" ofType:@"plist"];
// 2.读取数据到数组
NSArray *array = [NSArray arrayWithContentsOfFile:path];
// 初始化数组
_shops  = [NSMutableArray array];
_deleteShops = [NSMutableArray array];
//NSLog(@"%d",array.count);
// 添加数据到界面
for (NSDictionary *arr in array)
{
// 1.创建shop
Shop *s = [Shop shopWithDict:arr];
// 2.添加到数组
[_shops addObject:s];
}

}
2.5、shop模型进行了其他一些修改,增减一个类方法和一个对象方法用于返回Shop对象
- (id)initWithDict:(NSDictionary *)dict
{
Shop *shop = [[Shop alloc] init];
shop.icon = dict[@"icon"];
shop.name = dict[@"name"];
shop.desc = dict[@"desc"];
return shop;
}
+ (id)shopWithDict:(NSDictionary *)dict
{
return [[self alloc] initWithDict:dict];
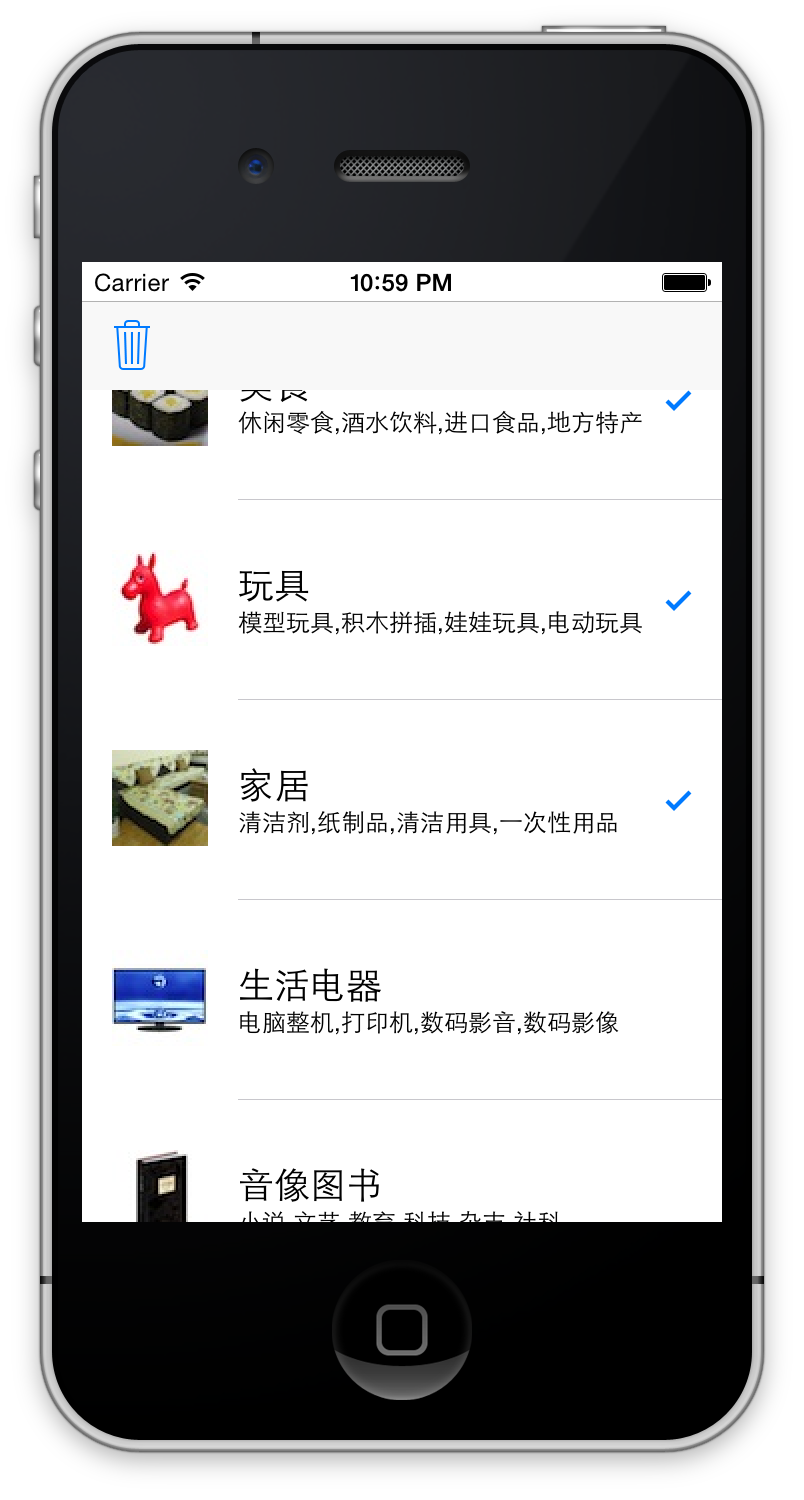
}效果如图:
源代码: http://pan.baidu.com/s/1mgxKgMO

相关文章推荐
- IOS学习笔记(10)UITableView展示数据 cell删除 构建页眉页脚
- IOS学习笔记45--UITableView性能优化
- iOS开发>>>UITableview实现更多数据显示方法
- ios开发笔记(三)—— UITableView的性能优化
- IOS学习笔记(十二)之IOS开发之表视图(UITableView)的讲解与使用(二)
- IOS学习笔记(十一)之IOS开发之表视图(UITableView)的基本介绍(一)
- iOS笔记:查询结果为空,显示无数据的方法(UITableView Display No Data)
- IOS学习笔记(十一)之IOS开发之表视图(UITableView)的基本介绍(一)
- IOS学习笔记(十一)之IOS开发之表视图(UITableView)的基本介绍(一) 推荐
- IOS学习笔记(十二)之IOS开发之表视图(UITableView)的相关类,属性与表视图实现学习(二)
- IOS学习笔记45--UITableView性能优化
- iOS开发学习笔记二:UITableView(1)
- IOS开发学习笔记026-UITableView的使用
- IOS开发学习笔记027-UITableView 使用模型对象
- IOS开发学习笔记032-UITableView 的编辑模式
- ios学习笔记之-UITableView的分组显示
- IOS学习笔记(十一)之IOS开发之表视图(UITableView)的基本介绍(一)
- IOS学习笔记(十二)之IOS开发之表视图(UITableView)的相关类,属性与表视图实现学习(二)
- IOS开发- UITableView 无数据时,显示“暂无数据”背景的实现
- IOS第七天(4:UiTableView 数据的显示优化重复实例和tableFooterView和tableHeaderView)