Aspectj快速上手代码示例之Before,After,Around
2015-04-27 20:50
501 查看
本文不打算解释AOP的相关专业名词和概念,仅通过几个代码示例来展示Aspectj(对AOP实现的)的基本使用,并且使用的Aspectj是目前最新版本。
1.搭建环境
本文使用Maven来构建工程,通过aspectj-maven-plugin插件来编译*.aj文件至.class。
Maven的具体配置:
配置aspectj运行时环境依赖jar
2.创建一个普通的Java类(Simple.java),为接下来使用Aspectj来植入相应功能做准备
3.创建一个针对Simple类的静态代码块初始化,构造方法执行,方法调用进行植入功能的方面类(SimpleAspect.aj)。
上面显示的声明了两个切入点(Pointcut)分别是:staticInit()(该切入点的连接点是Simple类的静态代码块), welcomeMethod(name)(该切入点的连接点是Simple对象的welcomeMethod方法);隐式的在前置通知和后置通知中声明了相同的切入点,该切入点的连接是Simple的构造方法。
上面使用到了Aspectj内置的5中通知类型的四种:before(连接点执行前通知)after returning(连接点正常完成后通知),after throwing(连接点执行中发生异常后通知),after(连接点完成后通知,无论正常还是异常)。另外一种是around(环绕通知,在连接点执行前,执行完成后都通知)。
使用aspectj-maven-pugin来编译SimpleAspect.aj文件,执行命令:mvn aspectj:compile 即可。
4.测试效果
如果没有Aspject的植入的话,上面输入的结果应该是Simple中的输入内容加上"welcome Jack",现在执行的结果如下图所示:

after throwing通知没有执行,去掉Simple类中welcome方法中的异常抛出注释,并且注释掉返回值,执行测试,将可以看到after throwing在连接点welcome执行发送异常后执行通知。

5.添加around通知在SimpleAspect.aj方面类中,另外需要注释掉其中welcomeMethod切入点表达式上的after和before通知,因为同时指定before,after,around将无发确定其执行的顺序,而且指定around通知后没必要存在before,after通知,around通知是可以实现这两种通知的效果的。
执行测试后可以看到下图,around通知在连接点welcome方法出执行,其在连接点执行前打印输出内容,在连接点执行完成后获取到返回值,并加以修改后返回。around通知在五中通知类型中最为强大,实际应用中则根据要植入的功能情况加以选择即可。
至此示例到此为止,关于Aspjectj更多信息参见官网:http://www.eclipse.org/aspectj/docs.php
本文出自 “野马红尘” 博客,请务必保留此出处http://aiilive.blog.51cto.com/1925756/1639440
1.搭建环境
本文使用Maven来构建工程,通过aspectj-maven-plugin插件来编译*.aj文件至.class。
Maven的具体配置:
<plugin>
<groupId>org.codehaus.mojo</groupId>
<artifactId>aspectj-maven-plugin</artifactId>
<version>1.7</version>
<configuration>
<complianceLevel>1.6</complianceLevel>
</configuration>
</plugin>
在上面的configuration节点下可以配置
<aspectDirectory></aspectDirectory>默认是src/main/aspect , 可以根据需要进行设置。
配置aspectj运行时环境依赖jar
<dependency>
<groupId>org.aspectj</groupId>
<artifactId>aspectjrt</artifactId>
<version>1.8.2</version>
</dependency>
2.创建一个普通的Java类(Simple.java),为接下来使用Aspectj来植入相应功能做准备
package com.rft.fdsi.server.aop;

public class Simple {

static {
System.out.println("[src] static init");
}

public Simple() {
System.out.println("[src] construct");
}

public String welcome(String name) {
System.out.println("[src]===========start===========");
System.out.println("[src] welcome method execute");
System.out.println("[src] welcome method execute");
System.out.println("[src]===========end===========");
// throw new RuntimeException("runtime exception");
return "welcome " + name;
}

public static void main(String[] args) {
Simple simple = new Simple();
String greeting = simple.welcome("Jack");
System.out.println(greeting);
}
}
3.创建一个针对Simple类的静态代码块初始化,构造方法执行,方法调用进行植入功能的方面类(SimpleAspect.aj)。
package com.rft.fdsi.server.aop;

public aspect SimpleAspect {

public pointcut staticInit() : staticinitialization(com.rft.fdsi.server.aop.Simple);

before() : staticInit() {
System.out.println("[before]"
+ thisJoinPointStaticPart.getSignature().getName());
}

after() returning() : staticInit() {
System.out.println("[after returning]"
+ thisJoinPointStaticPart.getSignature().getName());
}

before() : call(public com.rft.fdsi.server.aop.*.new()) {
System.out.println("[before]" + thisJoinPoint.getSignature().getName());
}

after() : call(public com.rft.fdsi.server.aop.*.new()) {
System.out.println("[after]" + thisJoinPoint.getSignature().getName());
}

public pointcut welcomeMethod(String name) : call(public String com.rft.fdsi.server..*.welcome(String)) && args(name);

before(String name): welcomeMethod(name){
System.out
.println("[before]"
+ thisJoinPoint.getTarget().getClass()
.getCanonicalName() + "."
+ thisJoinPoint.getSignature().getName()
+ " args_name=" + name);
}

after(String name) returning(String retval) : welcomeMethod(name) {
System.out.println("[after returning]"
+ thisJoinPoint.getTarget().getClass().getCanonicalName() + "."
+ thisJoinPoint.getSignature().getName() + " args_name=" + name
+ " return_value =" + retval);

}

after(String name) : welcomeMethod(name){
System.out
.println("[after]"
+ thisJoinPoint.getTarget().getClass()
.getCanonicalName() + "."
+ thisJoinPoint.getSignature().getName()
+ " args_name=" + name);
}

after(String name) throwing(java.lang.Exception e) : welcomeMethod(name)
{
System.out.println("[after throwing]"
+ thisJoinPoint.getTarget().getClass().getCanonicalName() + "."
+ thisJoinPoint.getSignature().getName() + " throwing="
+ e.getMessage());
}
}
上面显示的声明了两个切入点(Pointcut)分别是:staticInit()(该切入点的连接点是Simple类的静态代码块), welcomeMethod(name)(该切入点的连接点是Simple对象的welcomeMethod方法);隐式的在前置通知和后置通知中声明了相同的切入点,该切入点的连接是Simple的构造方法。
上面使用到了Aspectj内置的5中通知类型的四种:before(连接点执行前通知)after returning(连接点正常完成后通知),after throwing(连接点执行中发生异常后通知),after(连接点完成后通知,无论正常还是异常)。另外一种是around(环绕通知,在连接点执行前,执行完成后都通知)。
使用aspectj-maven-pugin来编译SimpleAspect.aj文件,执行命令:mvn aspectj:compile 即可。
4.测试效果
public static void main(String[] args) {
Simple simple = new Simple();
String greeting = simple.welcome("Jack");
System.out.println(greeting);
}
如果没有Aspject的植入的话,上面输入的结果应该是Simple中的输入内容加上"welcome Jack",现在执行的结果如下图所示:
after throwing通知没有执行,去掉Simple类中welcome方法中的异常抛出注释,并且注释掉返回值,执行测试,将可以看到after throwing在连接点welcome执行发送异常后执行通知。
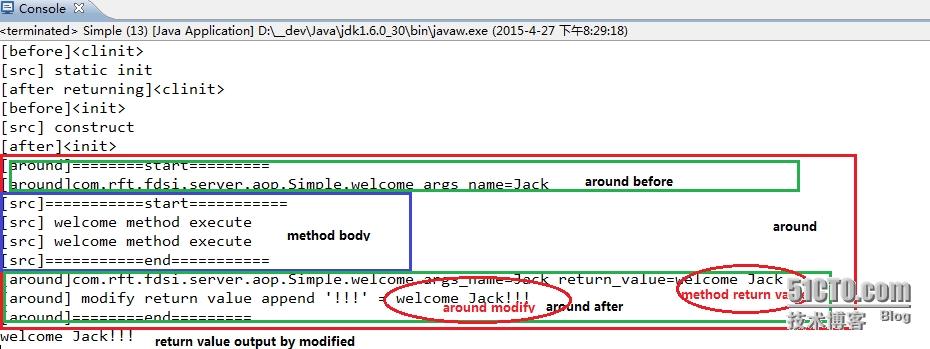
5.添加around通知在SimpleAspect.aj方面类中,另外需要注释掉其中welcomeMethod切入点表达式上的after和before通知,因为同时指定before,after,around将无发确定其执行的顺序,而且指定around通知后没必要存在before,after通知,around通知是可以实现这两种通知的效果的。
String around(String name) : welcomeMethod(name){
System.out.println("[around]========start=========");
System.out
.println("[around]"
+ thisJoinPoint.getTarget().getClass()
.getCanonicalName() + "."
+ thisJoinPoint.getSignature().getName()
+ " args_name=" + name);
String retval = proceed(name);
System.out.println("[around]"
+ thisJoinPoint.getTarget().getClass().getCanonicalName() + "."
+ thisJoinPoint.getSignature().getName() + " args_name=" + name
+ " return_value=" + retval);
System.out.println("[around] modify return value append '!!!' = "
+ (retval = retval + "!!!"));
System.out.println("[around]========end=========");
return retval;
}
执行测试后可以看到下图,around通知在连接点welcome方法出执行,其在连接点执行前打印输出内容,在连接点执行完成后获取到返回值,并加以修改后返回。around通知在五中通知类型中最为强大,实际应用中则根据要植入的功能情况加以选择即可。
至此示例到此为止,关于Aspjectj更多信息参见官网:http://www.eclipse.org/aspectj/docs.php
本文出自 “野马红尘” 博客,请务必保留此出处http://aiilive.blog.51cto.com/1925756/1639440

相关文章推荐
- AspectJ 切面注解中五种通知注解:@Before、@After、@AfterRunning、@AfterThrowing、@Around
- 用js实现before和after伪类的样式修改的示例代码
- AspectJ 切面注解中五种通知注解:@Before、@After、@AfterRunning、@AfterThrowing、@Around
- 常用的Python库和示例代码(快速上手)
- Spring AOP @Before @Around @After 等 advice 的执行顺序
- 【iOS7开发快速入门】代码示例3-10
- spring AOP @Around @Before @After 区别
- 排序【快速排序代码示例】
- JUnit--BeforeClass、AfterClass、Before、After示例
- 【iOS7开发快速入门】代码示例3-4
- 快速多人游戏(5) - 示例代码和Demo
- Spring AOP 全部通知, 四种通知方式,Around, Before, After, Throws
- spring AOP @Around @Before @After 区别
- 使用ElasticSearch6.0快速实现全文搜索功能的示例代码
- python快速排序代码示例!
- 【iOS7开发快速入门】代码示例3-5
- spring aop的@Before,@Around,@After,@AfterReturn,@AfterThrowing执行顺序
- python3 爬虫 零基础快速上手(爬虫示例)
- NodeJS学习系列课程笔记(NodeJs 快速上手+用法示例)
- Spring AOP @Before @Around @After 等 advice 的执行顺序